This guide describes NetVisualyzer™ Release 2.0. NetVisualyzer is a set of network management tools that visually monitor your network and display its activities. NetVisualyzer graphically shows network traffic so you can easily see network configuration and traffic patterns and identify network problems.
This chapter provides information on:
this guide's audience
how to use this guide
hardware and software requirements for using NetVisualyzer
documentation conventions
user interface terminology
common user interface operations
references
product support
This guide is written for network administrators and for developers of distributed applications that use a client/server model. It assumes that the network is already up and running.
To use this guide, you should be familiar with IRIX™ networking concepts and utilities and basic IRIX window system concepts. If you are not familiar with IRIX networking utilities and the Internet Protocol or need to set up a network, see the IRIX Advanced Site and Server Administration Guide. If you are using NetVisualyzer with another supported network product, you can consult the relevant documentation for that product. For instance, if you are using NFS™, see the NFS Administration Guide.
For information on the IRIX window system and WorkSpace™, see the IRIS Essentials.
This guide is organized as follows:
This Introduction provides general information about the hardware and software requirements for using NetVisualyzer, a list of the conventions used in this guide, descriptions of user interface terms and operations, information about the tutorial and examples provided with NetVisualyzer, and product support information.
Chapter 1, “Getting Started with NetVisualyzer,” gives an overview of NetVisualyzer; describes how NetVisualyzer snoops on networks to collect the data presented by the tools; explains how to do the setup tasks that enable you to run NetVisualyzer tools; and describes how to use the netvis(1M) command to start NetVisualyzer tools, view the NetVisualyzer online tutorial, and view the NetVisualyzer manual pages.
Chapter 2 through Chapter 9 explain the NetVisualyzer tools.
Chapter 10, “Creating and Using Filters,” and Chapter 11, “Using NetVisualyzer in a DECnet Environment,” explain general tasks that apply to many of the tools.
Appendix A through Appendix D provide reference information on error messages, tool authorization requirements, supported protocols, and configuration file formats.
Appendix E, “Introduction to MIBs,” explains Management Information Bases (MIBs) to users who are unfamiliar with this concept and the terminology associated with them.
Appendix F contains manual pages for all of the NetVisualyzer tools and the daemons that provide information to the tools.
Most users should begin using this guide by reading Chapter 1. It explains how snooping and SNMP agents are used to collect data for NetVisualyzer tools and how to perform setup tasks that are required for running NetVisualyzer tools.
Chapter 2 through Chapter 9 present one or more NetVisualyzer tools. Chapter 2, “NetFilters,” should be examined first to introduce you briefly to filters and the repository of filters provided for use with many NetVisualyzer tools. The remaining tools can be investigated in any order.
The remainder of this guide, Chapter 10 through Appendix F, contains specialized task information—creating filters, and running NetVisualyzer in a DECnet environment—and reference information—error messages, authorization information, supported protocols, configuration file formats, MIB terminology, and manual pages—that is available if you need it.
This guide assumes that all NetVisualyzer tools are available on the workstation that you are using. In cases where only NetVisualyzer Data Station™ software is installed (see the next section for more information), the only NetVisualyzer tools that are available are NetCollect, NetPack, and NetSnoop.
Whether you are a new or an experienced NetVisualyzer user, be sure to read the NetVisualyzer Release Notes for additional installation information and information about new features and changes in this release.
NetVisualyzer is available for all Silicon Graphics® IRIS® workstations running IRIX Release 4.0.5 or later.
The NetVisualyzer software is two separate software options:
NetVisualyzer Data Station Software
NetVisualyzer Display Station Software
The Data Station software, which allows Data Stations to capture information from their respective networks, can be used on Silicon Graphics or Sun® Microsystems SPARCstation™ workstations. Silicon Graphics and Sun Microsystems workstations used as Data Stations do not require graphics monitors.
The Display Station software, which provides centralized graphical monitoring of the information collected by the Data Stations, requires an IRIS graphics workstation. An IRIS graphics workstation can serve as both a Display Station and a Data Station when both types of software are installed.
The Data Station software for Sun Microsystems workstation is supported on SPARCstation 1+, SPARCstation 2, SPARCstation IPC, SPARCstation IPX, and SPARCstation ELC. Contact the Silicon Graphics Technical Assistance Center for the current list of supported Sun workstations.
Display Stations and Data Stations should have at least 16Mb of memory and 400Mb of disk space. Additional disk space may be required on Data Stations that use NetCollect to collect network traffic data. NetCollect traffic data for one hour is about 120K.
If your workstation has a CMC ENP-10 Ethernet® board, the firmware version of the board must be Silicon Graphics Version 4 or later (give the command hinv to see the firmware version of the CMC board).
Software prerequisites for NetVisualyzer are described in the NetVisualyzer Release Notes and also in “Installing NetVisualyzer Software” in Chapter 1 and “Enabling SNMP Agents” in Chapter 1 of this guide.
As you read this guide, you will notice that special fonts are used for certain words.
| typewriter font |
| |
| typewriter bold |
| |
| bold | Designates literal options to commands. | |
| italics | Indicates file names, command names, and manual page names. Lowercase italic words also represent variables—text strings that you must specify. References to other documents, button names, inst(1M) subsystem names, user IDs, and group names are also in italics. |
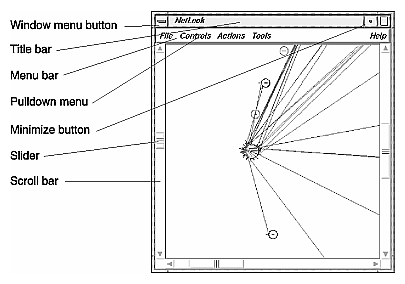
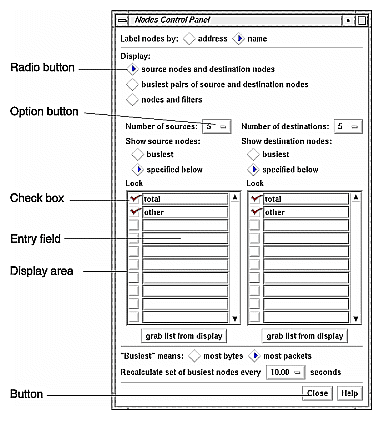
Figures I-1 and I-2 show examples of NetVisualyzer windows, with the window terms used in this guide noted.
The mouse buttons have these functions:
| left | Perform most basic tasks: click buttons, select an entry field to type into, select menu choices, select items in a display, select text to modify, and so on. | |
| middle | Reposition the viewing area in NetLook and re-position the graph in NetTop. | |
| right | Access pop-up menus. Pop-up menus appear when you press the right mouse button in certain locations on the screen. |
This guide uses the following terms to describe the use of the mouse:
| press | Hold down a mouse button. | |
| drag | Move the mouse while a mouse button is pressed. | |
| click | Press a mouse button and immediately release it without moving the mouse. | |
| double-click | Press and release a button twice in quick succession without moving the mouse. | |
| triple-click | Press and release a button three times in quick succession without moving the mouse. | |
| select | The term “select” is used in the following ways:
| |
| deselect | Click on a highlighted item to turn off the highlighting. |
The graphical NetVisualyzer tools have a common look-and-feel for consistent operation and easy switching between tools. This guide assumes that you are familiar with using the mouse, working with windows, and using pulldown and rollover menus. These operations are described in the IRIS Essentials.
The sections below explain how to use additional components of the user interface that are common to several of the tools.
You can use scroll bars (see Figure In-3) to change the area and scale of a viewing area and to display different lines or portions of lines in a display area. The size of the slider is proportional to the amount of the total that you are viewing. You operate scroll bars by pressing the left or middle mouse button when the cursor is in the scroll bar. There are several ways to operate the scroll bar:
Press the left mouse button on the slider, drag the cursor to a new slider position, and release the button.
Move the slider incrementally by clicking the triangles at each end of the scroll bar.
Move the slider up or down by positioning the cursor in the trough above or below the slider and clicking the left mouse button.
Move the slider to a specific position by positioning the cursor at that position and clicking the middle mouse button.

Editing text in the entry fields (see Figure In-4) is the same as editing text in the entry fields of other applications:
Position the text insertion point by moving the mouse to the entry field and clicking the left mouse button.
Select (highlight) text by pressing the left mouse button at one end of the text that you want to select and dragging to the other end.
Select a word including a space or punctuation-delimited characters by moving the cursor to the word and double-clicking the left mouse button.
Select the entire contents of an entry field by moving the cursor over the entry field and triple-clicking the left mouse button.
Delete selected (highlighted) text by pressing the <Backspace> key.
Delete the character to the left of the insertion point by pressing the <Backspace> key.

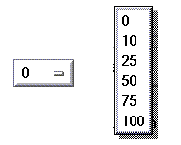
Option buttons (on the left in Figure In-5) let you select a numeric value from among a predefined set of choices. To use an option button, first press the option button with the left mouse button. A menu pops up (on the right in Figure In-5). Move the cursor to your selection and release the mouse button.
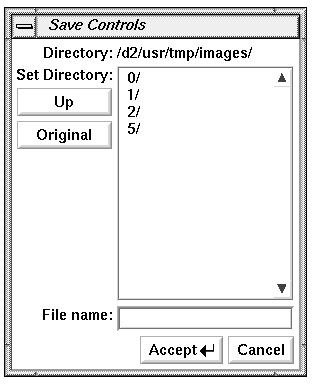
File prompter windows (like the one in Figure In-6) are used to specify file names. You can choose a file name by double-clicking a name in the display area. You can also type the name into the File name entry field and press <Enter> or click the Accept button to complete your file name selection. You can change directories to the parent of the current directory by clicking the Up button, or return to the directory where you started the tool by clicking the Original button.
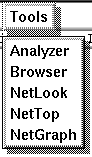
The menu bar of the main window of each graphical NetVisualyzer tool contains the Tools menu shown in Figure In-7. It contains the names of all of the graphical NetVisualyzer tools. You can use this menu to easily invoke other NetVisualyzer tools. When you select a choice from this menu, a Launch window appears. It contains an entry field with a command line for the tool you selected from the Tools menu. The command line includes the interface you are currently snooping on and the filter you are using, if applicable. Modify the command line if you need to and press the Accept button or press <Enter> to start the tool.
NetVisualyzer provides many online help files to help you as you learn to use the tools. You access these files from the Help menu in the menu bar of many NetVisualyzer windows (shown in Figure In-8 on top) and from the Help button that appears in some NetVisualyzer windows (on the bottom in Figure In-8).
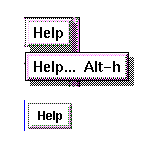
When you choose “Help...” from a menu or click a Help button, a Showcase window appears and displays the first help card.
Some help files contain several cards. Page through these cards using the <Page Up> and <Page Down> keys in the cluster of six keys just to the right of the <Backspace> key or click the left mouse button on the arrows at the bottom of the pages. Make sure the cursor is in the Help window when you press these keys.
When you're finished reading a help file, you can close the Help window just as you close any other window, for instance, by double-clicking the Window menu button in the upper left corner of the window or by selecting “Quit” from the Window menu.
If you are using Analyzer, Browser, or NetFilters from an X terminal, the help cards are displayed as ASCII text rather than as Showcase files.
Keyboard accelerators (shortcuts) are available for many menu items and buttons in NetVisualyzer tools. The keyboard sequences are consistent across all of the tools so that once you learn the accelerator for Quit, you can use it with every tool. For example, <Ctrl-s> is the accelerator for Save Controls (user interface configuration) to the default file. Each tool that saves its user interface configuration understands this accelerator. In cases where a tool uses a button rather than a menu choice for a function that has a keyboard accelerator, you can still use the keyboard accelerator.
The lists below contains general reference material that you may find useful as you use NetVisualyzer. A list of references for the protocols supported by NetVisualyzer is provided in “Protocol References” in Appendix C.
4DDN Network Management Guide and Man Pages
FDDIVisualyzer User's Guide and Man Pages
FDDIXPress Administration Guide
IRIS Software Installation Guide
IRIS Essentials
IRIX Advanced Site and Server Administration Guide
IRIX Network Programming Guide
NFS Administration Guide
NIS Administration Guide