This chapter explains how to use NetFilters to store and retrieve NetVisualyzer filters. NetFilters is a graphical tool that allows you to use the repository of filters provided with NetVisualyzer or create your own repository of useful filters. With NetFilters, you can easily extract a filter and use it in NetLook, Analyzer, NetGraph, or NetTop. The variable feature of NetFilters enables you to write “generic” filters and replace the variables with specific information such as host names when you use the filters. NetFilters can be used to manage several filter repositories.
This chapter explains how to:
start NetFilters
use the NetFilters main window to manage a repository of filters for use with NetVisualyzer tools
create general filters and customize them when used
copy filters from a NetFilters repository to other NetVisualyzer tools
In addition, a NetFilters example is provided. For complete information on NetFilters command line options and resources, see the netfilters(1M) manual page in Appendix F, “NetVisualyzer Manual Pages.” For information about filter syntax and constructing filters, see Chapter 10, “Creating and Using Filters.”

You can start NetFilters in several ways:
Start NetFilters from the netvis(1M) directory view by double-clicking the netfilters icon.
Give the NetFilters command from the shell by entering:
netfilters
Start NetFilters from other NetVisualyzer tools by using the NetFilters button provided near Filter entry fields. Put the insertion point in the entry field you want to fill in, and press the NetFilters button to start NetFilters.
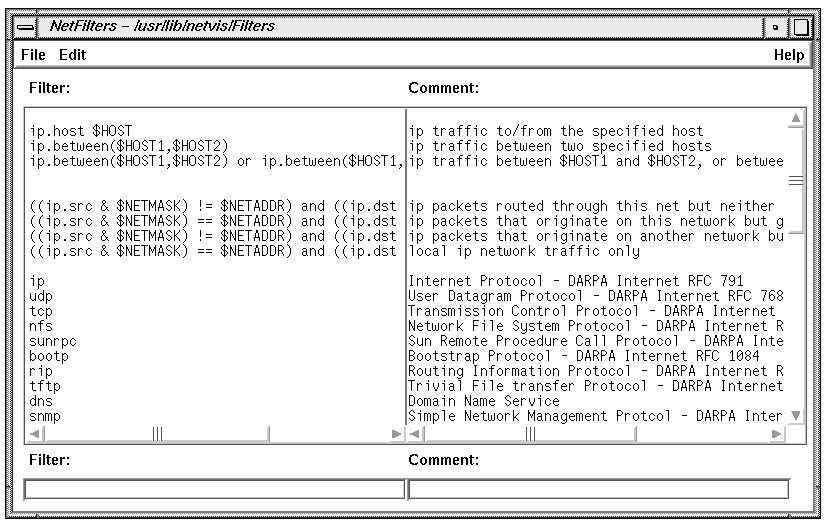
Once you start NetFilters, the NetFilters main window appears. The default main window is shown in Figure 2-1.
By default, NetFilters looks first for a filter repository file called Filters in your home directory, then in /usr/lib/netvis. You can override the default selection of a filter repository file by specifying the filter repository file as an argument to the –f command line option:
netfilters -f repository |
Or, using the netvis directory view, you can press the left mouse button on the icon for the repository, drag the icon to the NetFilters icon, and release the mouse button.
The main window contains a large Filter and Comment scrolling display area. The left side contains one line for each filter in the filter repository file. Next to each filter is a comment for the filter. Scroll bars on the right and beneath the filters and comments let you scroll to view additional filters, long filters, and long comments.
The Filter and Comment entry fields at the bottom of the window are used to enter and modify filter text and comments. In addition, you can perform these operations:
To copy a filter and its comment from the Filter and Comment display area to the Filter and Comment entry fields, select the filter by clicking on it.
To erase the contents of the entry fields when a filter in the display area is selected, click on the selected filter in the display area.
To select a word in an entry field, double-click the word.
To select an entire filter or comment in an entry field, triple-click on it.
To use the Filter Variables window to substitute values for variables in the Filter entry field, see “Using Variables in Filters” in this chapter.
To add a filter to the display area, remove it from the display area, or modify a filter in the display area, use “Add,” “Remove,” or “Replace” on the Edit menu:
| “Add” | Adds the text in the Filter and Comment entry fields to the list of filters in the display area. They are added at the end. | |
| “Remove” | Removes the currently selected filter and comment from the display area. | |
| “Replace” | Replaces the currently selected filter and comment with the filter text and comment in the entry fields. |
Filters in the display area can include variables. Variables enable you to store a “generic” filter in the display area and fill in specific values when you use the filter. An example is:
ip.between($HOST1,$HOST2) |
Variables are white-space or punctuation-delimited strings that begin with “$”.
You can create filters with variables and add them to the display area, just like any other filter (see “NetFilters Main Window” in this chapter).
To use a filter with one or more variables, edit the filter in the Filter entry field to substitute values for the variables, or follow these steps:
Put the generic version of the filter in the display area if it isn't already there.
Select the generic filter you want to use by clicking on it in the filter display area.
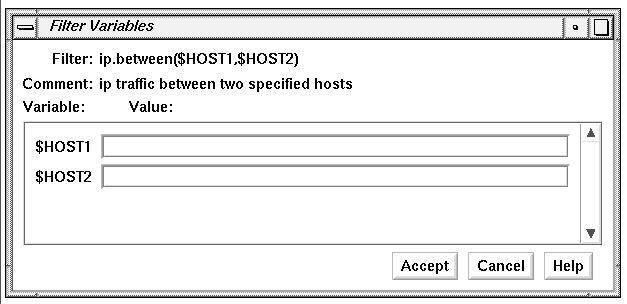
Select “Specify variables...” from the Edit menu. The Filter Variables window shown in Figure 2-2 appears. It contains an entry field for each of the variables that appear in the filter in the display area.
Enter the values of the variables in the entry fields in the Filter Variables window.
Click Accept. The Filter Variables window disappears. In the Filter entry field in the main window, the values you entered have been substituted.
You can now use the customized filter in another NetVisualyzer tool. See “Using NetFilters to Specify Filters for Other NetVisualyzer Tools” in this chapter for directions.
The File menu provides choices that manage NetFilters repository files and quit NetFilters:
| “New” | Use “New” to begin the development of a new set of filters in the Filter and Comment display area. It erases all filters and comments from the Filter and Comment display area entry fields. If you have not saved the current display area, you are prompted to save it to a repository file with a dialog box before it is erased. | |
| “Open” | Use “Open” to specify the name of the filter repository file you want to use. When you select “Open,” a file prompter window appears. See “Using a File Prompter” in the Introduction for information on using this window. | |
| “Save” | Clicking “Save” saves the current version of the Filter and Comment display area to the filter repository file whose name appears in the title of the NetFilters main window. | |
| “Save As...” | When you click “Save As...”, a file prompter window appears. Use this window to specify the name of the filter repository file where you want to save the current display area. See “Using a File Prompter” in the Introduction for information on using this window. | |
| “Quit” | To quit NetFilters, select “Quit.” If you have modified the filter and display area but not saved the changes to a filter repository file, a dialog box appears to prompt you to save it. |
You can easily copy a filter from the NetFilters display area or Filter entry field to an entry field in Analyzer, NetGraph, NetLook, or NetTop:
To copy a filter from the list of filters in the display area when the insertion point is in the entry field where you want the copy, just double-click the filter you want to copy.
To copy a filter from the list of filters in the display area when the insertion point is not in the entry field where you want the copy, click the filter in the display area to select it, move the cursor to the entry field where you want the copy, and click the middle mouse button.
To copy a filter from the Filter entry field in NetFilters, triple-click on the filter (or drag the mouse over the entire filter to highlight it), move the cursor to the entry field where you want the copy, and click the middle mouse button.
Suppose you are responsible for a network segment that is displaying much more traffic in NetLook than you would expect from the applications running on its nodes. You want to determine whether nodes on your network are responsible for the traffic you see.
First, eliminate common causes for this behavior such as arp storms using NetLook. To check for arp storms, first select “show the local hop” on the NetLook control panel, then put the insertion point in the Filter entry field in the Snoop control panel, and click the NetFilters button. When the NetFilters main window appears, double-click the filter arp in the display area. The filter is automatically copied to the Snoop control panel and NetLook automatically begins using that filter. If very little traffic is displayed after the filter takes effect, you've eliminated an arp storm as a possible cause of the problem.
Next, find the filter in the NetFilters display area that has the comment:
ip packets routed through this net but neither originate nor terminate on it |
Click this filter to copy it to the Filter and Comment entry fields of the NetFilters main window. Select “Specify variables...” from the NetFilters Edit menu. In the Filter Variables window that appears, specify the netmask your network is using in the first entry field and the IP address of your network segment in the second entry field. Click the Accept button. The filter, with the variables replaced by your netmask and network segment IP address, appears in the Filter entry field of the NetFilters main window.
In the NetFilters main window, select “Add” from the Edit menu. The filter is copied from the Filter and Comment entry fields to the end of the filter list in the display area.
Double-click on the new filter. It is automatically placed in the Filter field of NetLook's Snoop control panel, and NetLook automatically begins to use this filter. Now the only traffic you see on the network segment is traffic routed through the network segment.
Select “Analyzer” from the Tools menu of NetLook. The command line in the Tools Prompt dialog box that appears automatically contains the filter you are using in NetLook. Capture 200 packets with Analyzer. Inspect the sources and destinations of these packets in the Summary pane of Analyzer. This information tells you which nodes on which networks are routing traffic through your network. This information can help you detect routing problems, make a case for re-engineering your network to add segments and routers, and so on.
In NetFilters, use “Save As...” on the File menu to save the filters in the display area to a personal filter file for later use. Now you can pass the new filter you created to any NetVisualyzer tool to periodically look at the problem.