Browser enables you to select a node on your network and view and change the contents of one or more Management Information Bases (MIBs) for that node. Browser communicates with a node that you select using Simple Network Management Protocol (SNMP). The node can be a workstation, router, bridge, hub, or gateway—any device that has an IP address and implements the SNMP protocol and agent.
Browser enables you to walk the tree of information represented by the MIBs, the SNMP Containment Tree, and get the values of MIB variables. While you are using Browser, you can save the variable values that you receive to a file. You can set MIB variables if the SNMP and MIB implementations on the node you are browsing allow it and the community string you provide authorizes it.
Several MIB specifications are provided with Browser; you can easily supply additional specifications to Browser so that it can present MIB information for devices not supported by the supplied specifications. The supplied MIB specifications are:
mib-2
rmon
cisco
cabletron
Browser is designed to be used by network managers experienced in managing various devices on the network. This chapter assumes that you are familiar with SNMP management terminology and technology, especially the MIBs for different devices. If you are not familiar with this terminology, “SNMP Management Reference” in Appendix E defines the basic terms and should be read before this chapter.
This chapter explains how to:
start Browser
use the Browser main window to specify the node you want to browse and begin navigating the SNMP Containment Tree
navigate the SNMP Containment Tree to view subtrees, tables, and variables
get descriptions of variables
get and set the values of variables
use the Browser File menu
In addition, an example of using Browser is provided. For complete information on Browser command line options, see the browser(1M) manual page in Appendix F, “NetVisualyzer Manual Pages.” “Adding a MIB Specification” in Appendix E explains how to provide additional MIB specifications to Browser.
 | Note: To enable Browser to get and set MIB variables on a Silicon Graphics workstation, that workstation must be running the SNMP daemon snmpd(1M), and your Display Station must be authorized in the file /usr/etc/snmpd.auth on that workstation. See “Authorizing Browsing” in Chapter 1 and Appendix B, “Authorization Reference,” for details. |
 | Caution: With proper authorization, Browser lets you change some MIB variable values on devices you browse. Because MIB variable values can be critical to the operation of a device and your network, do not change values unless you understand the effects of your changes. |
To start Browser, double-click the browser icon in the netvis directory view or type:
browser |
The Browser main window appears. An example is shown in Figure 9-1.
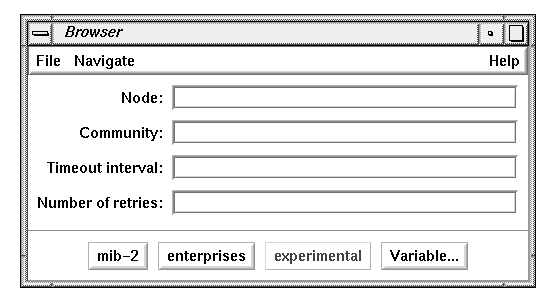
The entry fields in the Browser main window enable you to specify the node you wish to browse, a community string, a time-out value for accessing the SNMP agent on the node, and the number of retries to make when attempting to access a remote node.
When you invoke Browser, the entry field shown in Figure 9-2 contains the name of your workstation. You can replace it with the name or address of the node you want to browse. A blank entry field is the same as specifying the name of your workstation.

The Community entry field shown in Figure 9-3 contains the community string that is to be used in the SNMP packets sent to the node. The community string is an authorization password for the node you browse on. On Silicon Graphics workstations, valid community strings and other authorization information is specified in the file /usr/etc/snmpd.auth. The default community string on Silicon Graphics workstations is “public”. For other types of nodes, such as routers and bridges, the community string is specified for each device by a system administrator. A valid community string must be supplied in order to use Browser to view MIB information.

If Browser doesn't receive a reply from the SNMP agent on the specified node within the time-out value, it will try again. The default time-out value, shown in Figure 9-4, is 5 seconds.

The Number of retries entry field, shown in Figure 9-5, specifies the number of retries when there has been no reply from the node. The default is 3.

The mib-2, enterprises, and experimental buttons in the Browser main window, shown in Figure 9-6, provide quick ways to specify what you want to browse: the mib-2 MIB, or the enterprises or experimental nodes in the SNMP Containment Tree, respectively (see Figure E-1). When you click these buttons, a Subtree window appears. Subtree windows and a second type of window that displays MIB information, Table windows, are described in the next section. These buttons are grayed-out if no MIB specifications in that portion of the SNMP Containment Tree are available to Browser (see “Adding a MIB Specification” in Appendix E for more information).

When you click the Variable... button, shown in Figure 9-7, a Variable window appears. This window is used to get and set the values of specific MIB variables. It is explained in detail in “Getting and Setting Variable Values Using the Variable Window” in this chapter.
To display MIB information, Browser uses two types of windows, Subtree windows and Table windows. For every nonleaf node in the SNMP Containment Tree, Browser displays one of these types of windows:
a Subtree window showing the subtrees of that node
a Subtree window showing the variables and/or tables of that node
a Table window showing the array of table variables in that table
The remainder of this section discusses examples of these windows.
Figure 9-8 shows the Subtree window for mib-2. It is an example of a Subtree window for a subtree that contains other subtrees.
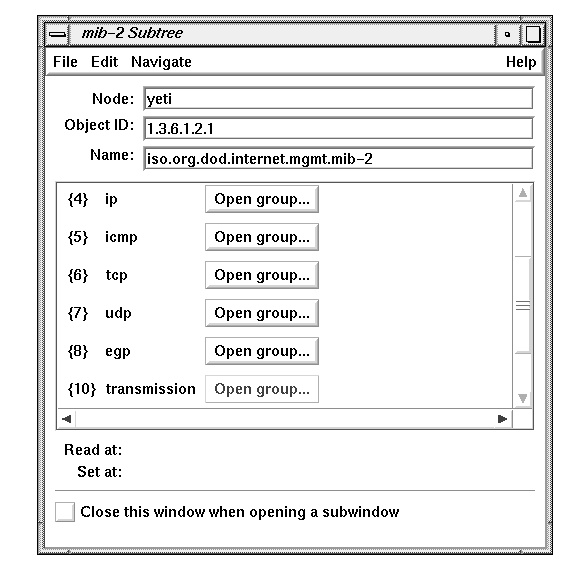
The Node entry field, shown in Figure 9-9, contains the node name or address you specified in the Browser main window.

The Object ID and Name entry fields, shown in Figure 9-10, contain two different representations of the name of the subtree displayed in the window. The Object ID entry field contains the numeric representation of the name (dot separated object numbers) and the Name entry field contains the text string representation (dot-separated object names).

The scrolling display area in the center of the window contains one line for each object in the subtree, such as the udp line shown in Figure 9-11. The line begins with the object's number in curly braces followed by its object name. Clicking the Open group... button brings up a Subtree window for the object on this line. Its use is described more fully in “Navigation Using Buttons in the Subtree and Table Windows” in this chapter. A grayed-out button means there are no variables under this object in the MIB.

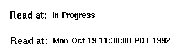
The Read At line provides status information during a “Get” operation (see “Getting, Setting, and Saving Variable Values” in this chapter), which is replaced by the current time after the operation is completed. Two examples are shown in Figure 9-12.
The current time is displayed on the Set At line after a “Set” operation (see “Getting, Setting, and Saving Variable Values” in this chapter). An example is shown in Figure 9-13.

Checking the “Close this window when opening a subwindow” check box, shown in Figure 9-14, specifies that you want this Subtree window to be closed when a new Subtree or Table window for a node in this subtree is opened. By default, each of the Subtree or Table windows you open for subtrees or tables within this subtree will have the same setting.

Figure 9-15 shows the Subtree window for mib-2.udp. It is an example of a Subtree window that shows the variables and/or tables of that subtree (in MIB terminology, this type of subtree is called a group).
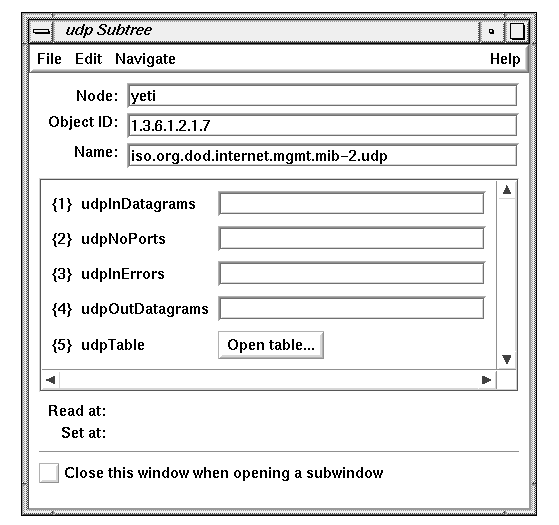
Most portions of this type of Subtree window are the same as the Subtree windows described in “Subtree Windows that Show Subtrees” in this chapter. However, the display area of this type of Subtree window contains entry fields and Open table... buttons rather than Open group... buttons.
Variables in the subtree are shown in the display area as an object number, an object name, and an entry field, as shown in Figure 9-16. When the object number (in braces) is appended to the object ID at the top of the window, it forms the complete object ID for the object. The entry field is gray for variables whose values are defined as read-only in the MIB and pink for variables that are defined as read-write or write-only in the MIB. If the entry field is pink, you can set the value of that variable (see “Getting and Setting Variable Values Using the Edit Menu of a Subtree Window” in this chapter).

Tables in the subtree have lines that include their object number, their name, and the Open table... button, as shown in Figure 9-17. When you click an Open table... button, a Table window, described in the next section, appears.

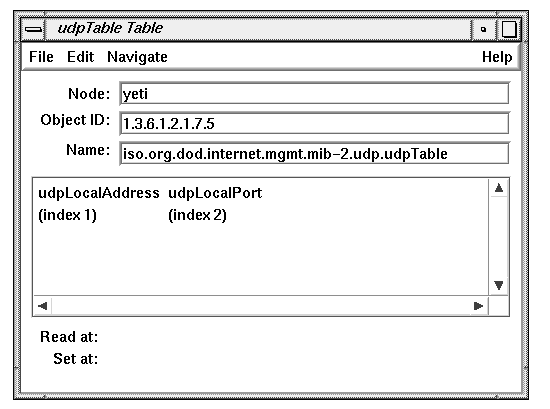
Figure 9-18 shows the default Table window for mib-2.udp.udpTable. When a Table window appears, the display area contains only the names of the table variables. Entry fields appear for the variables as you retrieve their values with “Get next row” in the Edit menu (see “Getting and Setting Variable Values Using the Edit Menu of a Table Window” in this chapter).
With Browser you can open a Subtree window for each subtree in a MIB you want to browse and a Table window for each table in a MIB you want to browse. Browser buttons and menus enable you to specify the subtree or table you want to view. When you use these buttons and menus, you are “navigating” the MIB Tree. The three navigation methods are described in the following sections.
The mib-2, enterprises, and experimental buttons in the Browser main window provide three starting points for browsing the SNMP Containment Tree. Clicking the mib-2 button brings up a Subtree window for the MIB-II MIB. Clicking the enterprises and experimental buttons brings up Subtree windows for the Enterprises and Experimental subtrees respectively.
To use the Navigate menu from any window, follow these steps:
Press the left mouse button on Navigate in the menu bar.
In the menu that appears, each choice except the last is the name of a subtree or table that is an object in the subtree in the window. Choices are highlighted as you move the cursor on them; if they have a rollover menu, it appears automatically. Figure 9-19 shows an example of the Navigate menu at the mib-2 subtree with the cursor on udp.
To view one of the subtrees of the subtree in the window, select one of the choices on the Navigate menu (not on a rollover menu).
If you make the subtree selection shown in Figure 9-19, the window shown in Figure 9-15 appears.
To view subtrees or tables farther down in the hierarchy, move the cursor to a choice on a rollover menu and release the mouse button. In this way you can traverse the entire breadth and depth of the subtree in the window.
To view the parent of the current subtree, select the last choice on the Navigate menu. It is the name of the parent of the subtree in the window.
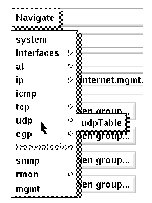
Figure 9-8 shows an example of Open group... buttons in the display area of the mib-2 Subtree window. When you click one of these buttons, a new Subtree window appears for this object. It is equivalent to choosing this subtree from the Navigate menu.
In Figure 9-15, udpTable is a table and has an Open table... button. Clicking an Open table... button is equivalent to choosing the table from the Navigate menu. Figure 9-18 shows the Table window for udpTable that appears when you click this button.
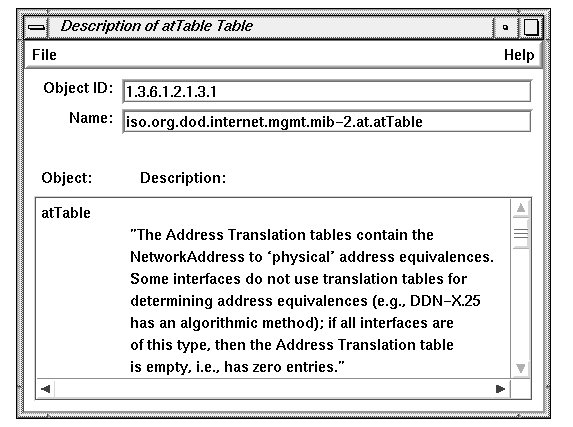
To get a description of each of the objects in a subtree or each of the variables in a table, select “Description” from the Help menu of the Subtree or Table window. A Description window appears. Figure 9-20 shows an example.
Browser enables you to get the values of MIB variables and set them if you have write access. (Write access is determined by the type of the variable and by your community. See “Authorizing Browsing” in Chapter 1 and “SNMP Management Reference” in Appendix E) Three types of Browser windows can be used to get and set variables:
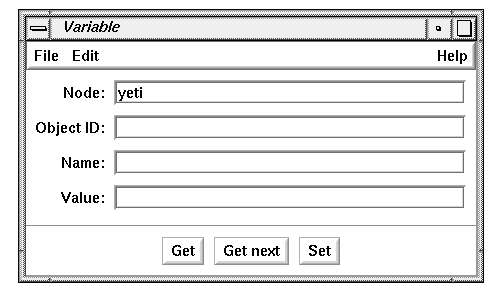
The Variable window enables you to get and set individual variables. The Variable window is described in “Getting and Setting Variable Values Using the Variable Window” in this chapter.
Subtree windows enable you to get and set variables that aren't part of tables. “Getting and Setting Variable Values Using the Edit Menu of a Subtree Window” in this chapter describes how to do this.
Table windows enable you to get and set variables that are part of tables. “Getting and Setting Variable Values Using the Edit Menu of a Table Window” in this chapter describes how to do this.
Follow the steps below to use the Variable window to get and set variable values.
Click the Variable... button in the Browser main window. The window shown in Figure 9-21 appears.
If you want to specify a variable by object identifier, fill in the Object ID entry field with the object identifier and append .0 (dot zero). .0 specifies that you want the value of the object; if you forget to use .0, Browser adds it automatically. For example, to specify mib-2.ip.ipForwarding (1.3.6.1.2.1.4.1), the Object ID entry field should look like the one shown in Figure 9-22.
To specify a variable in a table, enter its object identifier in the Object ID entry field. To construct its object identifier, you can use the object identifier of the table and append “.1.x.y”. x is the column number (beginning with 1), and y is the value of index for the row you want. For example, the object identifier for the ifDescr variable (column 2) in the first row (index value of 1) of the mib-2.interfaces.ifTable (1.3.6.1.2.1.2.2) table is 1.3.6.1.2.1.2.2.1.2.1. If the table you are using has more than one index column, create y by specifying each index value in order and separating them with periods. For example, if the value of index1 is 127.1.9 and the value of index2 is 7, y is 127.1.9.7.
If you want to specify the variable by name, fill in the name in the Name entry field. You need not type in the complete hierarchical name, just the last component of the name. Adding .0 to the name is optional. If the Object ID and the name you fill in don't match, the Object ID is used.
To get the value of the variable, click the Get button. The value of the variable appears in the Value entry field. The Name entry field is automatically modified so that it contains the complete hierarchical name.
To set the value of a variable, enter the value in the Value entry field and click the Set button.
To get the value of the next variable, click the Get next button. Depth-first search is used to determine the next variable, so the right-most component of the object identifier varies fastest as the tree is traversed with Get next.
Continue getting and setting variables as necessary by modifying the Object ID, Name, and/or Value entry fields and using the Get, Get next, and Set buttons.

You can get and set the values of variables from a Subtree window using the Edit menu:
Bring up the Subtree window that contains the variable whose value you want to get or set (see “Navigating the SNMP Containment Tree” in this chapter).
Select “Get” from the Edit menu to get the values of all of the variables. The current time is displayed on the Read At line.
Make changes in the entry fields for any variables whose values you want to change. Only variables whose entry fields are pink may be changed.
Select “Set” from the Edit menu to change variable values. The current time is displayed on the Set At line.
You can get and set the values of variables in a table from its Table window using the Edit menu:
Bring up the Table window for the table you are interested in (see “Navigation Using the Navigate Menu” in this chapter).
To get the first row of variables in the table, select “Get next row” from the Edit menu. The current time is displayed on the Read At line.
To get other rows for the table, select “Get next row” from the Edit menu as many times as necessary.
Make changes in the entry fields for any variables whose values you want to change.
Select “Set” from the Edit menu to change variable values. The current time is displayed on the Set At line.
The File menu in each window gives you one or more of the window management and quitting choices listed below.
| “Save MIB Values” |
| |
| “Save MIB Values As...” |
| |
| “Pop Main Window” |
| |
| “Close Lower Level Windows” |
| |
| “Close” | Close this window. | |
| “Quit” | Quit Browser (available only from the File menu in the Browser main window). |
This section contains an example Browser session on a network that contains a Cisco router with IP address 192.26.51.27.
To begin this session, invoke Browser with this command:
browser |
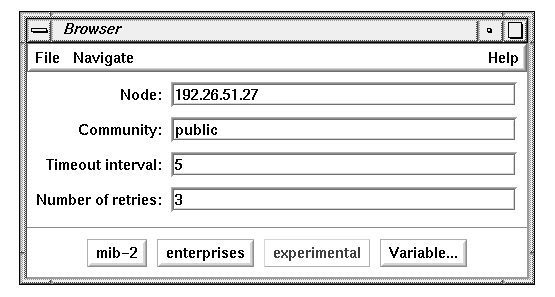
The Browser main window is placed on the screen. To browse the MIB for the Cisco router, first fill in the entry fields in the Browser main window:
| Node | Enter the Cisco router's IP address, 192.26.51.27. | |
| Community | Enter the community string your workstation is authorized to use. In this example, the string public is used. | |
| Time-out interval |
| |
| Number of retries |
|
Figure 9-23 shows the Browser main window after you've filled in the entry fields.
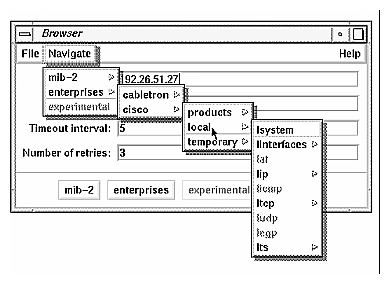
Suppose you want to get the values for the lsystem group in the Cisco MIB. To display the variables in this group, use the Navigate rollover menus to navigate through the MIB hierarchy to lsystem, as shown in Figure 9-24.
When you release the mouse button, the Subtree window shown in Figure 9-25 appears.
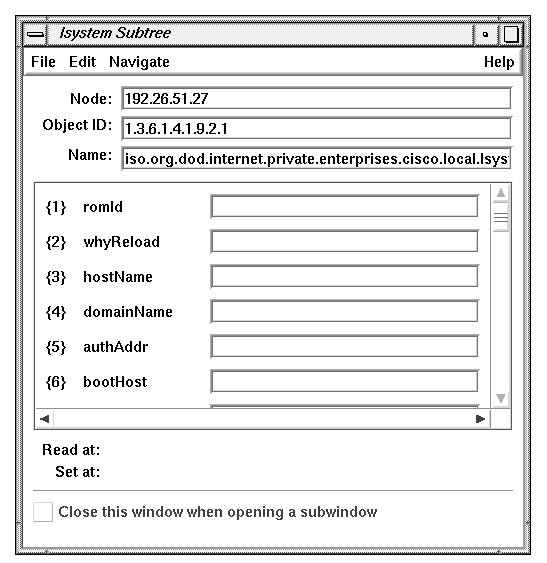
To get the values for these variables, select “Get” from the Edit menu. The entry fields for the variables are filled in with their current values, and the current time is indicated at the bottom of the window. Figure 9-26 shows an example.
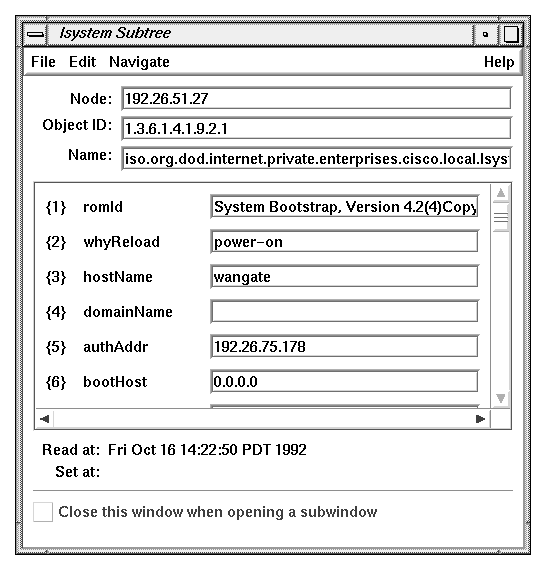
Use the right scroll bar to adjust the display area so that you can examine the values of the variables that don't fit in the default-size display area.