This chapter describes filter expressions, explains how to build them and use them with NetVisualyzer tools, and gives examples of various types of filters.
Filters enable you to focus the NetVisualyzer tools; they allow you to “zoom and pan” around your network dynamically. You can shift your attention to specific nodes or connections between a pair of nodes. You can zoom your view from all packets of all protocols to a specific protocol, and then to certain packet types of that protocol.
A filter screens out certain types of data and allows only the data you specify to be captured. Instead of capturing all network packets, you capture only selected packets. For example, you can use a filter expression to capture only the packets between two nodes or to capture only NFS packets.
When you specify a filter, captured packets are compared to the filter; if the packet matches the filter, the packet is stored. If the packet does not match the filter, it is not stored.
As your understanding of the problem being analyzed increases, you can modify the filters to gather an increasingly refined view of the network. Filters thus enable a highly interactive and iterative approach to planning or troubleshooting your network. The filter selects the subset of the network and its traffic that you want to view, graph, or capture.
This chapter explains:
what a filter is
the syntax of filters
how to find protocol-specific information that can be used in filters
how to use filters with NetVisualyzer tools
In addition, many example filters are described in this chapter. Additional information on the components of filter expressions is available in the netsnoop(1M) manual page in Appendix F, “NetVisualyzer Manual Pages.”. The filter file supplied with NetVisualyzer contains many additional examples of filters. Use NetFilters to view this file.
This chapter assumes that you are familiar with the network protocols that NetVisualyzer supports; if not, refer to Appendix C, “Protocols.” A basic understanding of the C programming language is also helpful. For details on the C programming language, refer to The C Programming Language by Brian Kernighan and Dennis Ritchie.
A filter is an expression formed from protocol packet fields, network device names, and logical operators. The filter expression determines which subset of all network traffic is to be captured and processed by the tools. Some examples of filters and their semantics are:
| ether | Select all packets on the Ethernet. | |
| ip | Select only IP packets. | |
| ip.dst = squaw |
|
All of the protocol header fields for the protocols decoded by NetVisualyzer can be used as operands in the filter.
Operands can also be constants or macros. A set of predefined constants are provided for ease of use. Some examples of constants and their values are:
BROADCAST 0xffffffff Ethernet broadcast address
ACK 0x10 TCP acknowledge
Macros are defined for the supported protocols to allow more convenient reference to commonly requested protocol strings or relations. For example:
nfs |
is a macro for
ip.udp.sunrpc.nfs |
In this example, the macro nfs is a shorthand for the complete protocol description for the NFS layer, ip.udp.sunrpc.nfs. The complete protocol description, except for the physical layer, is required for NetVisualyzer to correctly determine the scope of operands. The nfs macro can be used alone as a filter to select only NFS traffic, or it can be used as a component in a larger expression.
An example of a macro that takes one parameter is:
host |
This macro is a shorthand for
src == $1 || dst == $1 |
and is defined for several protocols. To use this macro, you must preface it with the protocol you are interested in and give an argument ($1). For example,
ip.host(yosemite) |
All IP packets whose source or destination is the node yosemite match this filter.
The operators supported are a subset of the C programming language relational operators. Arbitrarily complex expressions can be constructed and passed to the tools. The syntax of filter expressions is explained in the next section.
A filter is a logical expression (sometimes referred to as a Boolean expression). The expression consists of operands joined by operators.
Operands are subexpressions, path expressions, C integer constants, or protocol-specific strings. NetVisualyzer has many one-word macros and protocol-specific strings that you can use as simple filters. You can also, if necessary, define your own macros. The subsections that follow give brief descriptions of each type of operand you can use.
A subexpression is an expression such as ip.src == yeti that is joined to another expression with an operator. An example is:
ip.src == yeti and ip.dst == squaw |
For each protocol, macros are defined to provide names for magic numbers, shorthands for common lengthy expressions, and nicknames for long protocol path expressions. For example, the Ethernet protocol defines BROADCAST as the Ethernet broadcast address ff:ff:ff:ff:ff:ff, and IP defines nfs as a nickname for ip.udp.sunrpc.nfs. Macros can have arguments. They follow the macro name, either separated by white space or in a parenthesized, comma-separated list containing arbitrary white space.
A path expression is a period-separated sequence of components, for example, ip.udp.sunrpc.nfs. All but the last component must be legally-formed C identifiers. Each identifier except the last must name a protocol encapsulated by the preceding component's protocol or a structured field in the last protocol. The first identifier in a path names a field in the network interface's data link protocol or a network protocol encapsulated by the data link protocol. Supported data link protocols include Ethernet, FDDI, Serial Line IP, Token Ring, and the Loopback pseudo-protocol. The last identifier can name a protocol macro or be a protocol-specific string such as the name of a well-known port.
Integers, such as port numbers, can be used as operands in filters. Hex and octal integers (0xnnn and 0nnn, respectively) can be used as well as decimal integers.
Protocol-specific strings are described in “Finding Protocol-specific Operands” in this chapter.
Macros can be defined for NetSnoop only. Macros are defined in NetSnoop configuration (.netsnooprc) files. To define a macro, use this format:
define(name, def) |
Strings of the form $n within def represent formal arguments to name. Each such formal argument is replaced by the nth actual argument supplied when name is called. The number of formal and actual arguments must agree.
An operator specifies an operation to be performed, such as addition or subtraction. All C operators except the assignment operators and ?: are supported. In addition, these simplifications are provided:
You can use the keywords and and or in place of && and ||, respectively.
You can use a single = in place of ==.
In some instances, you can omit == (=) and and (&&) operators from filter expressions. For example:
nfs ip.dst alpine
is equivalent to:
nfs and ip.dst == alpine
Other characteristics of filter syntax are:
You must precede the subtraction operator (–) with white space; otherwise, it will be taken as part of a protocol-specific string, for example, an IP node name such as gate-firefly.
If you use a special character in a filter expression that has meaning to the shell (such as !, >, or &), enclose the expression in quotation marks when you use it in a command line.
The maximum length of filters used in the Filter entry fields of NetLook, NetGraph, Analyzer, NetFilters, NetTop, and in files read by these programs is 255 characters.
When you use a filter expression on the command line (for example, with netsnoop), the length is restricted only by command line limitations.
Table 10-1 gives the list of operators you can use in filters. They are listed in order of highest to lowest precedence. Unless otherwise noted in the table, operators have left-to-right associativity. Parentheses can be used to specify precedence.
Operator | Definition | Comments |
|---|---|---|
[ ] | array element | Must occur as a pair of brackets separated by an expression |
! | logical not | Right-to-left associativity |
~ | one's complement | Right-to-left associativity |
– | minus | Right-to-left associativity |
++ | increment | Right-to-left associativity |
– – | decrement | Right-to-left associativity |
* | multiply |
|
/ | divide |
|
% | remainder |
|
+ | add |
|
– | subtract | Must be preceded by white space |
<< | left shift |
|
>> | right shift |
|
< | less than |
|
<= | less than or equal |
|
> | greater than |
|
=> | greater than or equal |
|
==, = | equal | Can be replaced by a space in some expressions |
!= | not equal |
|
& | bitwise and |
|
^ | bitwise exclusive or |
|
| | bitwise or |
|
&&, and | logical and | Can be replaced by a space in some expressions |
||, or | logical or |
|
Several NetVisualyzer tools print a “corrected” version of your filter. This corrected version contains parentheses and operators that were implied in the original version. These corrected versions are printed so that you can verify the filter; they don't imply that there was an error. If a filter contains a syntax error, an error message is given.
This section explains how to find protocol-specific information to use as operands in filters. For purposes of illustration, examples in this section use the Internet Protocol (IP).
There are two steps to finding protocol-specific information:
Understand the protocol layering so that you can determine which protocols you want to capture. This is discussed in “Understanding Protocol Layer Relationships” in this chapter.
Use protocol information from NetSnoop or Analyzer to construct filters to capture specific data. Using NetSnoop output is discussed in “Using NetSnoop to Find Filter Operands” in this chapter and using Analyzer output is discussed in “Detail Pane” in Chapter 5.
First, take a look at the IP diagram shown in Figure 10-1. (Diagrams for all protocols are in Appendix C, “Protocols.”) The diagram illustrates the IP relationship to other network layers when the physical layer is Ethernet.
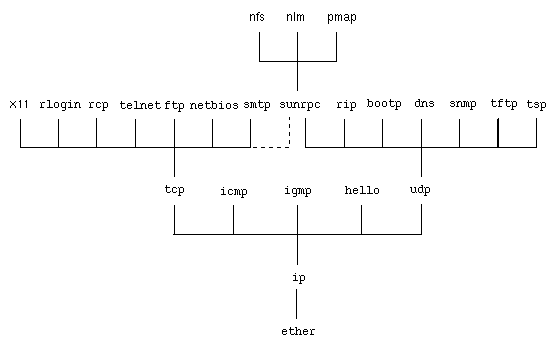
Suppose you want to capture packets using the IP protocol. In this case, you can use a simple filter, ip. As another example, suppose that you want to capture packets using the TCP protocol. The filter for this protocol is ip.tcp. This filter is ip.tcp because each layer above the physical layer must be qualified with the protocol it is defined in. The physical layer, such as ether or fddi, is implied by the type of the interface you are snooping on. You could also use tcp as the filter because the ether protocol defines tcp as a macro whose definition is ip.tcp.
Figure 10-1 shows some of the protocols that an IP packet can contain. Assuming that the packet comes over an Ethernet interface, each packet is of the protocol ether and ip. Many of these packets will also contain other protocols above IP such as UDP or TCP.
To capture NFS packets, refer to Figure 10-1 to see which protocols are used by the NFS packet: ether, ip, udp, sunrpc, and nfs. You would therefore use ip.udp.sunrpc.nfs as the filter. You can also use the filter nfs because nfs is a predefined macro that expands to ip.udp.sunrpc.nfs.
This section explains how you can use NetSnoop to find NetVisualyzer protocol-specific strings, macros, and so forth. To see these, use netsnoop with the –L option. The syntax is:
netsnoop -L [ all | protocol ...] |
With the –L option, NetSnoop lists information about the options and symbols defined by the protocol(s). all lists information for all protocols, and protocol is a protocol name, such as ip. You need not be superuser or have authorization to use NetSnoop when you use the –L option.
For example, to list IP information, type:
netsnoop -L ip |
The screen displays lists of fields, protocols, functions, macros, constants, and so forth. An example of the IP information looks similar to this output:.
ip (Internet Protocol):

  o Field               type                level     title
    v                   u_int:4             -vv       Version
    hl                  u_int:4             -vv       Header Length
    tos                 u_char              -vv       Type of Service
    len                 u_short             -v        Total Length
    id                  u_short             -v        Identification
    off                 u_short             -v        Fragment Offset
    ttl                 u_char              -vv       Time to Live
    p                   u_char              -vv       Protocol
    sum                 u_short             -vv       Header Checksum
    src                 u_long              -         Source Address
    dst                 u_long              -         Destination Address
    opt                 u_char              -v        Option Type
    optlen              u_char              -vv       Option Length
    rtoff               u_char              -vv       Route Offset
    rthop               u_long              -         Route Address
    tsptr               u_char              -vv       Timestamp Pointer
    tsoflw              u_int:4             -vv       Timestamp Overflow
    tsflg               u_int:4             -vv       Timestamp Flag
    tstime              u_long              -v        Timestamp Time
    tsaddr              u_long              -         Timestamp Address

  o Protocol            typecode  (decimal)
    hello               0x003f    63
    icmp                0x0001    1
    igmp                0x0002    2
    tcp                 0x0006    6
    udp                 0x0011    17

  o Function            description
    badsum              Match packet if header checksum is incorrect

  o Macro               definition
    HELLO               hello
    ICMP                icmp
    IGMP                igmp
    NFS                 udp.sunrpc.nfs
    TCP                 tcp
    UDP                 udp
    between             src == $1 && dst == $2 || dst == $1 && src == $2
    host                src == $1 || dst == $1
    nfs                 udp.sunrpc.nfs

  o Constant            value     (hexadecimal)
    BROADCAST           -1        ffffffff
    DF                  16384     4000
    EOL                 0         0
    LSRR                131       83
    MAXPRIVPORT         1023      3ff
    MF                  8192      2000
    MINHL               20        14
    MINUSERPORT         5001      1389
    MSS                 576       240
    NOP                 1         1
    RR                  7         7
    SATID               136       88
    SECURITY            130       82
    SSRR                137       89
    TS                  68        44

  o Option              description
    etherupdate         Update Ethernet hostname/address cache
    hostbyname          Decode IP addresses into hostnames
    hostresorder        Hostname resolution order; see resolver(4)
|
The first column of each section of the output consists of words that you can use in filter expressions. For example, you can create the filter:
ip.dst = BROADCAST |
where ip is the protocol name, dst is from the Field section, and BROADCAST is a Constant.
This output contains Field, Protocol, Function, Macro, Constant sections that are described briefly in Table 10-2. The next subsections explain each section of the output in detail and how you can use the information in them.
Table 10-2. NetSnoop Protocol Output
Section | Description |
|---|---|
Lists all the fields of the protocol from top to bottom in an abbreviated form. | |
type | Shows the type of variable; for example, v (version) is u_int:4, which is an unsigned integer four bits in length. |
level | Lists the level of verbosity (–v) you must use with the NetSnoop command for this field to be decoded. |
title | Lists the expanded description of the short form of the field. When entering a field as part of a filter, use the abbreviated name; Analyzer prints both the name and the title. |
Shows all protocols at the level above the current protocol. | |
typecode | A value used to identify upper layer protocol types within this protocol. |
(decimal) | Shows the decimal equivalent of the typecode. |
description | Describes each function. |
definition | Shows the definition of each macro. |
Defines common addresses such as the broadcast address. For example, dst=BROADCAST. | |
Lists constant values defined for the protocol. For example, MAXPRIVPORT is 1023, a port number defined by IP. Only the superuser can access a port less than or equal to port 1023 (see the example in the “Constants” section below). | |
value | Shows the value of the constant as a decimal number. |
(hexadecimal) | Shows the value of the constant as a hexadecimal number. |
Defines any options you can specify for the protocol. Manipulate protocol options by using the –p option to NetSnoop. See the netsnoop(1M) man page for its use. Options cannot be used in a filter. | |
description | Describes the option. |
The Field section lists the abbreviated names of the fields of the protocol. Fields are listed in the order they are decoded by the Analyzer. In the ip example, the field listing starts with v (for Version) at the top of the listing and ends with tsaddr (Timestamp Address) at the bottom.
Other columns list the type of variable of the field, the level of verbosity that you must use with NetSnoop to produce output for the field, and the title (full name) of the field. Table 10-3 lists types of variables and their sizes.
Type | Size (in bytes) |
|---|---|
void | 0 |
char | 1 |
u_char | 1 |
short | 2 |
u_short | 2 |
int | 4 |
u_int | 4 |
long | 4 |
u_long | 4 |
float | 4 |
double | 8 |
address | 8 |
To capture packets for a particular field, precede the field with the protocol name. For example, to capture IP packets destined for a node, use the format:
ip.dst=nodename |
where dst (an abbreviation for destination address) is a field defined for IP, and nodename is the name of the node. For example, to capture packets destined for a node named indiana, use the filter:
ip.dst=indiana |
To capture IP packets whose source is a node named gary, use the filter:
ip.src=gary |
You can also substitute IP addresses in place of the node names (for example, 192.26.75.10 as found in the /etc/hosts file):
ip.src=192.26.75.10 |
Note that different protocols use different names for similar fields. For example, if you want to capture the same type of data from TCP, use the destination port and source port specified as dport and sport, respectively. Give the command netsnoop -L tcp to see the differences in field names specified for TCP.
The Protocols section lists the protocols that NetVisualyzer decodes above the current protocol. For example, for IP higher-level protocols include the hello, icmp, igmp, tcp, and udp protocols. The protocol diagrams in “Protocol Layers” in Appendix C give you this same information in diagram form.
Some protocols define functions that perform some analysis of the packet and return a Boolean value. An example is ip.badsum, which matches IP packets with bad checksums.
A macro is a shorthand form of a longer expression. Each NetVisualyzer protocol has predefined macros. You can also define your own macros (see “Macro Definitions” in this chapter and netsnoop(1M) in Appendix F). Table 10-4 lists macros defined for IP.
Macro | Definition |
|---|---|
HELLO | hello |
ICMP | icmp |
IGMP | igmp |
NFS | udp.sunrpc.nfs |
TCP | tcp |
UDP | udp |
between | src == $1 && dst == $2 || dst == $1 && src == $2 |
host | src == $1 || dst == $1 |
nfs | udp.sunrpc.nfs |
Various protocols can have various definitions for the same macro; for example, the between macro captures packets between nodes. As you can see, this macro is defined for ip; it is also defined for ether, tcp, and udp. You must precede the macro name with the protocol name for all protocols except the physical layer protocols such as ether and fddi. For example, to capture IP packets between nodes, use ip.between, and then specify the source and destination as IP addresses or node names. If you use this macro with ether, the protocol is understood, but you must supply the Ethernet addresses as the arguments. You can use names if they can be mapped to the Ethernet address using /etc/ethers (or NIS or BIND).
The Macro section has a column that defines how the macro is expanded on execution. For example, the IP HELLO macro (see Table 10-4) is expanded to hello, the NetVisualyzer name for the HELLO protocol. In this example, a macro enables you to capitalize the protocol name instead of using the all-lowercase format for protocol names used by NetVisualyzer tools.
The IP NFS macro is an example of a macro that simplifies specifying protocol layers; it expands to upd.sunrpc.nfs. A filter that captures NFS packets using this macro is:
ip.NFS
rather than the longer form:
ip.udp.sunrpc.nfs
For another type of example, look at the definition of the host macro:
host src = host1 or dst = host1 |
The host, host1, is either the source (src) or destination (dst). To capture all IP packets going to or coming from a host named gary, you can use the host macro by entering:
ip.host gary
You wouldn't use ip.host=gary because host is a one-argument macro. Another way to write the filter is ip.host(gary).
If you did not use the host macro, you would have to enter:
ip.src=gary or ip.dst=gary
You can combine components from different sections, such as a component from the Macro section and a component from the Protocol section. For example, to capture only TCP packets to and from gary, use the filter:
tcp and ip.host gary
where tcp is a protocol and host is a macro.
Next, suppose you want to capture packets between two nodes. To do this, use the filter:
ip.src=gary and ip.dst=indiana
However, an easier way to do this is to use the between macro that captures packets between two nodes. For example:
ip.between gary indiana
captures only packets between gary and indiana. Do not use the operator and (&&) with the between macro. If you are familiar with the C programming language, you may want to use an alternative way of entering this filter:
ip.between(gary,indiana)
To see most of the macros understood by NetVisualyzer tools, give this NetSnoop command:
netsnoop -L ether fddi ip llc |
Addresses are multibyte strings up to 8 bytes in length. The ether protocol uses 6-byte (48-bit) addresses and defines a constant address called BROADCAST for the broadcast address ff:ff:ff:ff:ff:ff.
You can capture packets by using constants in filter expressions. A constant is a string that translates to a predefined value; the constant is often easier to remember than the value. For example, BROADCAST is a constant defined for IP. To capture all IP broadcast packets, you can use either the constant or its value. For example, you can enter:
ip.dst = BROADCAST
or
ip.dst = -1
Another constant is MAXPRIVPORT, which defines ports 1023 and below as restricted to superuser access. To show the nodes that have logged in to any of the ports restricted to the superuser, use the filter:
udp.sport <= ip.MAXPRIVPORT
or you can use the value of MAXPRIVPORT, and enter:
udp.sport <= 1023
You can use some constants such as SECURITY and RR with the opt (option type) field. For example, to show using the IP record route option, use the constant RR:
netsnoop -i gary: ip.opt=ip.RR
You can specify filters when you use NetVisualyzer tools in these ways:
Enter them in Filter entry fields in NetLook, NetGraph, Analyzer, and NetTop to capture only packets of interest to you.
Use them on the command line of Analyzer, NetCollect, NetGraph, NetLook, NetTop, and NetSnoop to capture only packets of interest.
Put them in configuration files so that they are read automatically when you use the tools that read these files. See Appendix D, “Configuration File Formats,” for information about configuration files.
Create a collection of filters with NetFilters so that you have a library of filters for your site.
NetLook, NetGraph, NetTop, and Analyzer each allow the dynamic creation and use of a filter. Each of these tools has one or more Filter entry fields where you can enter a filter. Alternatively, you can call up the NetFilters tool and retrieve one of the filters that has been stored in a filter archive. NetVisualyzer comes with a large set of standard, generally useful filters in the archive. You can adapt the filters in the archive to your local needs and create new ones. NetFilters allows you to easily share the same filter between different tools or to use different, complementary filters in multiple tools.
This section starts with a simple one-word filter. Other examples in this section describe more complex filters.
Suppose that you want to capture only packets using the IP protocol. The filter expression looks like this:
ip
This simple filter captures every packet that has the IP layer embedded in it. When you use this filter with Analyzer, the Summary window displays:
Seq Time Len Source Port Destination Port Type 4 09:17:01.61 60 rachel.wpd.sgi.com 1017 eno.wpd.sgi.com 1016 tcp |
Notice that the Type column, which tells the type of packet captured, shows that a tcp packet was captured, not an ip packet. This is because the tcp packet has ip embedded in it. Next, output in the Detail window looks like this:
ether          Ethernet
          src        Source Address                        2:cf:1f:11:1:51/CMC
          dst        Destination Address                   8:00:69:1:9:7e/SGI
          type       Packet Type                           ip
ip             Internet Protocol
          v          Version                               4
          hl         Header Length                         5
          tos        Type of Service                       0
          len        Total Length                          552
          id         Identification                        61487
          off        Fragment Offset                       0
          ttl        Time to Live                          29
          p          Protocol                              tcp
          sum        Header Checksum                       0xaef3
          src        Source address                        gary.wpd.sgi.com
          dst        Destination Address                   192.26.56.11
tcp            Transmission Control Protocol
          sport      Source Port                           514 (shell)
          dport      Destination Port                      1023
          seq        Sequence Number                       966,794,335
          ack        Acknowledgement Number                28,226,517
          off        Data Offset                           5
          flags      Flags                                 ACK
          win        Window                                24,576
          sum        Checksum                              0xc004
          urp        Urgent Pointer                        0
|
Notice how the output of this window displays the Field section information for each protocol that was captured. This display also uses the full name description (taken from the “title” column of netsnoop -L output).
To create a filter that captures only TCP or UDP data, use protocol filters. Protocol filters are found in the Protocol section of the output of netsnoop -L. For TCP and UDP, which are higher level protocols of IP, the netsnoop command is netsnoop -L ip. The output includes the protocols tcp and udp. To create the filter, enter:
ip.tcp or ip.udp
The output of Analyzer with this filter shows ether and ip information (shown in the previous example) and udp and dns information:
...
udp            User Datagram Protocol
          sport      Source Port                           53 (dns)
          dport      Destination Port                      53 (dns)
          len        Length                                52
          sum        Checksum                              0z686e
dns            Domain Name System Protocol
          id         Identifier                            43212
          qr         Query/Response Flag                   0 (query)
          opcode     Operation Code                        QUERY
          aa         Authoritative Answer                  0
          tc         Truncation                            0
...
|
Suppose you want to constrict the filter to see TCP or UDP packets coming to or from an IP host named gary. Use the protocols tcp and udp and the host macro defined for IP to construct a filter like this:
(tcp or udp) and ip.host gary
or you can use a longer filter:
(tcp or udp) and (ip.src=gary or ip.dst=gary)
You must include parentheses to ensure the correct order of evaluation. This time the filter isolated data to and from gary. In addition to ether and ip information, the Detail window lists the udp information that was captured:
...
udp            User Datagram Protocol
          sport      Source Port                           525 (timed)
          dport      Destination Port                      525 (timed)
          len        Length                                84
          sum        Checksum                              0xe28b
|
Perhaps you want to capture only TCP or UDP packets between nodes named gary and indiana. This filter uses the between macro defined for IP:
(tcp or udp) and ip.between gary indiana
You can achieve the same result by using a longer filter:
(tcp or udp) and (ip.src=gary and ip.dst=indiana or ip.dst=gary and ip.src=indiana)
A header field is prepended by IRIX when packets delivered to the snoop socket are received. This header consists of the following data:
title
sequence number of the packet
state flags (including error flags)
packet length
reception time
To see a list of header fields and errors you can capture, type:
netsnoop -L snoop
You can use the words in the Field and Constant sections of the output in filter expressions. For example, to capture packets with a length less than 100 bytes, use the filter:
snoop.len < 100
Perhaps you want to capture errors on the network. As described in the previous subsection, a list of errors to capture appears in the Field column that you see when you type:
netsnoop -L snoop
Types of errors include “frame,” “checksum,” “toobig,” “toosmall,” and “nobufs.” You can use these error types in a filter expression. For example, to capture framing errors, use the filter:
snoop.frame
To capture all errors, enter the filter:
snoop.error
For a description of flags and errors, see “Capture Options” in Chapter 5.
Suppose your workstation, with a physical (Ethernet) address of 8:0:69:2:9:2f, serves as a router on the network. To capture all Ethernet packets to and from this router, use the host macro:
host 8:0:69:2:9:2f
You do not need to precede this macro with the protocol name. If you use a macro to capture ether packets, the protocol (ether) is understood and you must supply the physical address and not the symbolic name unless the name is in /etc/ethers.
To capture remote logins (rlogin(1)) between two nodes named buffalo and newyork, use the filter:
ip.between buffalo newyork and rlogin
Use string in a filter expression to obtain a string from a protocol. For example, you want to capture the string “hello” and you know it begins at byte 38 in the packet. To do so, use the filter:
string(5,38) == "hello"
where (5,38) specifies the size to capture (5 bytes) and where to begin the capture. 38 is the offset (offsets begin at 0), which specifies the place to start capturing (position 39 in the packet). You can use \x01 and \001 to represent hex and octal.
An easy way to determine the offset is to use Analyzer. Highlight the field you wish to see in the Detail pane. The Hex Dump panes hexadecimal characters that correspond to the field also become highlighted. Thus you can determine the offset of a field by counting (from left to right) the number of bytes.
Use fetch in a filter expression to obtain information from a protocol that is not currently supported or to obtain information that is in the data content portion of the packet.
For example, suppose your site runs a proprietary protocol over UDP. The first byte of your proprietary protocol represents a count of users logged in on the sending system. The UDP header consists of 8 bytes, so the eighth byte from the start of UDP is your count. To capture packets only from systems that your proprietary protocol reports one user is on, enter:
udp.fetch(1,8) == 1
where (1,8) specifies the size to capture (1 byte) and the offset 8 (where to begin the capture), and 1 specifies one user.