This chapter explains how to use NetVisualyzer tools in a DECnet environment. It describes:
setting up NetVisualyzer Data and Display Stations
using 4DDN™ to resolve DECnet addresses and names
resolving DECnet addresses and names without 4DDN
dividing a DECnet network
suppressing the DECnet HELLO message
You can use NetVisualyzer tools (such as NetLook and Analyzer) with DECnet as well as LAT™ protocols.
Your Display Station and Data Stations use Transmission Control Protocol/Internet Protocol (TCP/IP) as the standard networking software. If you have not already done so, set up the network for your Display Stations and Data Stations as an IP network. For information, see the IRIX Advanced Site and Server Administration Guide. For example, some of the tasks you will need to do include obtaining an IP network number for each Display and Data Station and setting up network files such as /etc/ethers and /etc/hosts.
For NetVisualyzer tools to resolve (map) node addresses to names, you can:
use 4DDN to resolve addresses/names
enter each node's address/name manually in the /etc/ethers file
4DDN is a Silicon Graphics software option that connects IRIS workstations and servers to a DECnet network. It provides DECnet connection and data transfer service. For more information on 4DDN and the setup requirements, see the 4DDN Network Management Guide.
Use 4DDN to download a remote DECnet node database to the Display Station or Data Station. NetVisualyzer tools access this database to automatically resolve addresses to the DECnet node names. By using 4DDN, you eliminate the time-consuming process of entering the DECnet addresses and names into the /etc/ethers database file. For example, with 4DDN installed, type:
netsnoop -vv decnet |
where -vv produces verbose output. For example, output looks like this:
0000:   len   60   time 16:06:57.311
   ether:  src aa:0:4:0:a8:4      dst aa:0:4:0:28:4
           type decnet
   decnet: size 34   pad 0     flags 0x26=(I-E:1,RTS:0,RQR:0,LFDP:LONG_FORMAT)
           d_area 0            d_subarea 0         d_id 1.40 (SIERRA)
           s_area 0            s_subarea 0         s_id 1.232 (CHEESE)
           nl2 0     visit 0   s_class 0           pt nsp
   nsp:    msgflag LINK_SERVICE          dstaddr 8212         srcaddr 857
           acknum ACK 1        ackdat ACK 1599     segnum 149
           lsflags 0 =(FCVAL-INT:data req cnt, FC MOD: no change)
           fcval 0

0001:  len    60   time 15:58:05.869
   ether:  src aa:0:4:0:28:4 dst ab:0:0:3:0:0/DECnet
           type decnet
   decnet: size 34   pad 0      flags 0xd=(RES:0,TYPE:ENDNODE_HELLO)    ver 2
           eco 0     user_eco 0            id 1.40 (SIERRA)
           iinfo 0x3            blksize 1498         e_area 0
           seed 00:00:00:00:00:00:00:00   neighbor aa:0:4:0:0:0
           e_timer 15          e_mpd 0
|
The output shows the DECnet source and destination node names, sierra and cheese, in parentheses after the DECnet addresses:
d_area 0 d_subarea 0 d_id 1.40 (SIERRA) s_area 0 s_subarea 0 s_id 1.232 (CHEESE) |
These names are displayed by NetVisualyzer tools; for example, the names appear on the perimeter of the network circle when you use NetLook.
Without 4DDN installed, the output looks like this:
0000:    len   60   time 16:06:57.311
    ether:  src aa:0:4:0:e8:4/DEC       dst aa:0:4:0:28:4/DEC
            type decnet
    decnet: size 34   pad 0     flags 0x26=(I-E:1,RTS:0,RQR:0,LFDP:LONG_FORMAT)
            d_area 0            d_subarea 0        d_id 1.40 (1.40)
            s_area 0            s_subarea 0        s_id 1.232 (1.232)
            nl2 0     visit 0   s_class 0          pt nsp
    nsp:    msgflag LINK_SERVICE          dstaddr 8212       srcaddr 857
            acknum ACK 1        ackdat ACK 1599    segnum 149
            lsflags 0 =(FCVAL-INT:data req cnt, FC MOD: no change)
            fcval 0

0001:   len   60   time 15:58:05.869
    ether:  src aa:0:4:0:28:4/DEC       dst ab:0:0:3:0:0/DECnet
            type decnet
    decnet: size 34  pad 0      flags 0xd=(RES:0,TYPE:ENDNODE_HELLO)   ver 2
            eco 0    user_eco 0          id 1.40 (1.40)
            iinfo 0x3           blksize 1498       e_area 0
            seed 00:00:00:00:00:00:00:00 neighbor aa:0:4:0:0:0
            e_timer 15          e_mpd 0
|
The packets captured without 4DDN show the source and destination nodes as physical (Ethernet) and DECnet addresses, for example:
ether:  src aa:0:4:0:e8:4/DEC       dst aa:0:4:0:28:4/DEC
...
        d_area 0            d_subarea 0        d_id 1.40 (1.40)
        s_area 0            s_subarea 0        s_id 1.232 (1.232)
|
If you don't have 4DDN, you can still resolve DECnet node names by using NetSnoop and editing the /etc/ethers file to contain the DECnet addresses and node names. First, obtain DECnet output by typing:
netsnoop -vv decnet |
which displays a node's physical as well as DECnet address. For example, partial output looks like this:
ether:  src aa:0:4:0:e8:4/DEC       dst aa:0:4:0:28:4/DEC
        type decnet
decnet: size 34   pad 0     flags 0x26=(I-E:1,RTS:0,RQR:0,LFDP:LONG_FORMAT)
        d_area 0            d_subarea 0        d_id 1.40 (1.40)
        s_area 0            s_subarea 0        s_id 1.232 (1.232)
|
where aa:0:4:0:e8:4 is the physical address of the source node named cheese and aa:0:4:0:28:4 is the physical address of the destination node named sierra.
Next, edit the /etc/ethers file. Enter one address/name pair per line by using the format:
x:x:x:x:x:x node_name |
where x:x:x:x:x:x is the physical address and node_name is the node name. The DECnet network administrator will be able to supply this name.
For example, an entry in the /etc/ethers file for a node named cheese with physical address aa:0:4:0:e8:4 and a DECnet address 1.232 (shown in the previous example) looks like this:
aa:0:4:0:e8:4 cheese |
You do not need to include the DECnet address. To add a node named sierra with physical address aa:0:4:0:28:4, edit the /etc/ethers file to contain:
aa:0:4:0:28:4 sierra |
You may wonder how a physical address is translated to a DECnet address. Figure 11-1 shows how cheese's physical address (aa:0:4:0:e8:4) is translated to its DECnet address (1.232).
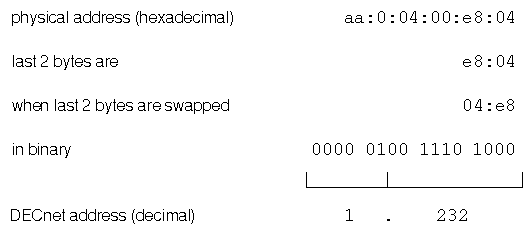
The last 2 bytes of the physical address is the DECnet address swapped byte for byte. Note that the first 4 bytes of a DECnet address consist of the standard DECnet addressing scheme.
NetLook typically displays a bridged DECnet network as a large circle, making it difficult to differentiate nodes. To make a DECnet network easier to visualize and monitor, divide it so that each new network circle contains nodes that are grouped by physical segmentation or other criteria. You can do so by editing the NetLook configuration file network.data. See “NetLook Network Data File” in Appendix D for more information.