This chapter discusses the CXFS Manager graphical user interface (GUI). It contains detailed information about CXFS tasks and an overview of XVM tasks. (For details about XVM tasks, see the XVM Volume Manager Administrator's Guide.)
This chapter contains the following sections:
| Note: CXFS requires a license key to be installed on each server-capable administration node. If you install the software without properly installing the license key, you will get an error and will not be able to use the CXFS Manager GUI. For more information about licensing, see Chapter 5, “CXFS License Keys”. |
The GUI lets you set up and administer CXFS filesystems and XVM logical volumes. It also provides icons representing status and structure.
This section provides an overview of the GUI:
| Note: CXFS is incompatible with the Red Hat cluster manager available in the Red Hat Advanced Server product. |
To start the GUI on a server-capable administration node where the CXFS GUI-client software (sgi-sysadm_cxfs-client) is installed, do the following:
Obtain and install the J2SE 1.4.2 (latest patch) software available from http://java.sun.com
Enter the following command line:
linux# /usr/sbin/cxfsmgr
If you want to use a web-based version of the GUI on Linux, do the following:
Ensure that the following software products are installed on the server-capable administration nodes that you will connect to (by means of a Java-enabled web browser) for performing administrative operations:
sgi-sysadm_xvm-web
sgi-sysadm_cxfs-web
These software products are part of the software normally installed with CXFS.
Ensure that an apache Web server is installed and running on the server-capable administration node.
Create the file /etc/apache2/conf.d/cxfs.conf with the following contents for the CXFS GUI:
Alias "/CXFSManager" "/var/www/html/CXFSManager"

<Directory "/var/www/html/CXFSManager/">
        Options +ExecCGI +Includes +FollowSymLinks
        Order allow,deny
        Allow from all
        DirectoryIndex index.shtml
        AddType text/html .shtml
        AddOutputFilter INCLUDES .shtml
</Directory>
Create the file /etc/apache2/conf.d/xvm.conf with the following contents for the XVM GUI:
Alias "/XVMManager" "/var/www/html/XVMManager"

<Directory "/var/www/html/XVMManager">
        Options +ExecCGI +Includes +FollowSymlinks
        Order allow,deny
        Allow from all
        DirectoryIndex index.shtml
        AddType text/html .shtml
        AddOutputFilter INCLUDES .shtml
</Directory>
Enable apache2 on boot, if necessary:
linux# chkconfig apache2 on
Restart the apache2 server:
linux# /etc/init.d/apache2 restart
Close all browser windows and restart the browser.
Enter the URL http:// server/CXFSManager/ where server is the name of a server-capable administration node in the pool
At the resulting webpage, click the CXFS Manager icon.
Table 10-1 describes the platforms where the GUI may be started, connected to, and displayed.
GUI Mode | Where You Start the GUI | Where You Connect the GUI | Where the GUI Displays |
|---|---|---|---|
cxfsmgr | A server-capable administration node system with sgi-sysadm_cxfs-client installed | The server-capable administration node in the pool that you want to use for cluster administration | The system where the GUI was invoked |
Web | Any system with a web browser and Java2 1.4.1 or 1.4.2 plug-in installed and enabled | The server-capable administration node in the pool that you want to use for cluster administration | The same system with the web browser |
To ensure that the required GUI privileges are available for performing all of the tasks, you should log in to the GUI as root. However, some or all privileges can be granted to any other user using the GUI privilege tasks; see “Privileges Tasks with the GUI”.
A dialog box will appear prompting you to log in to a CXFS host. You can choose one of the following connection types:
Local runs the server-side process on the local host instead of going over the network
Direct creates a direct socket connection using the tcpmux TCP protocol ( tcpmux must be enabled)
Remote Shell connects to the server via a user-specified command shell, such as rsh or ssh. For example:
ssh -l root servername

Note: For secure connection, choose Remote Shell and type a secure connection command using a utility such as ssh. Otherwise, the GUI will not encrypt communication and transferred passwords will be visible to users of the network.
Proxy connects to the server through a firewall via a proxy server
Do not make configuration changes on two different server-capable administration nodes in the pool simultaneously, or use the CXFS GUI, cxfs_admin, and xvm commands simultaneously to make changes. You should run one instance of the cxfs_admin command or the CXFS GUI on a single server-capable administration node in the pool when making changes at any given time. However, you can use any node in the pool when requesting status or configuration information. Multiple CXFS Manager windows accessed via the File menu are all part of the same application process; you can make changes from any of these windows.
The server-capable administration node to which you connect the GUI affects your view of the cluster. You should wait for a change to appear in the view area before making another change; the change is not guaranteed to be propagated across the cluster until it appears in the view area. (To see the location of the view area, see Figure 10-1.) The entire cluster status information is sent to every server-capable administration node each time a change is made to the cluster database.
Figure 10-1 shows the CXFS Manager window displaying information for a specific component in the details area. For information about using the view area to monitor status and an explanation of the icons and colors, see “Cluster, Node, and CXFS Filesystem Status” in Chapter 14.

Figure 10-2 shows an example of the pop-up menu of applicable tasks that appears when you click the right mouse button on a selected item; in this example, clicking on the node name trinity displays a list of applicable tasks.

The CXFS Manager GUI allows you to administer the entire CXFS cluster from a single point. It provides access to the tools that help you set up and administer your CXFS cluster:
Tasks let you set up and monitor individual components of a CXFS cluster, including XVM volumes. For details about XVM tasks, see XVM Volume Manager Administrator's Guide.
Guided configuration tasks consist of a group of tasks collected together to accomplish a larger goal. For example, Set Up a New Cluster steps you through the process for creating a new cluster and allows you to launch the necessary individual tasks by clicking their titles.
This section discusses the following:
By default, the window is divided into two sections: the view area and the details area (see Figure 10-1). The details area shows generic overview text if no item is selected in the view area. You can use the arrows in the middle of the window to shift the display.
The File menu lets you display the following:
Multiple windows for this instance of the GUI
System log file:/var/log/messages
System administration log file: /var/lib/sysadm/salog
The salog file shows the commands run directly by this instance of the GUI or some other instance of the GUI running commands on the system. (Changes should not be made simultaneously by multiple instances of the GUI or the GUI and cxfs_admin.)
The File menu also lets you close the current window and exit the GUI completely.
The Edit menu lets you expand and collapse the contents of the view area. You can choose to automatically expand the display to reflect new nodes added to the pool or cluster. You can also use this menu to select all items in the view menu or clear the current selections.
The Tasks menu contains the following:
Guided Configuration, which contains the tasks to set up your cluster, define filesystems, create volumes, check status, and modify an existing cluster
Nodes, which contains tasks to define and manage the nodes
Cluster, which contains tasks to define and manage the cluster
Cluster Services, which allows you to start and stop CXFS services, set the CXFS tiebreaker node, set the log configuration, and revoke or allow CXFS kernel membership of the local node
Switches and I/O Fencing, which contains tasks to configure switch definitions and manage I/O fencing
Disks, which contains XVM disk administration tasks
Volume Elements, which contains tasks to create, delete, modify, and administer XVM volume elements
Filesystems, which contains tasks to define and manage filesystems and relocate a metadata server
Privileges, which lets you grant or revoke access to a specific task for one or more users
Find Tasks, which lets you use keywords to search for a specific task
The Help menu provides an overview of the GUI and a key to the icons. You can also get help for certain items in blue text by clicking on them.
The command buttons along the top of the GUI window provide a method of performing tasks quickly. When you click a button, the corresponding task executes using default values, usually without displaying a task window. To override the defaults, launch the task from the Tasks menu. Table 10-2 summarizes the shortcuts available; for details about these tasks, see the XVM Volume Manager Administrator's Guide.
Choose what you want to view from the View menu:
Nodes and cluster
Filesystems
Cluster volume elements
Local volume elements
Disks
Switches
Users
Task privileges
You can use the following methods to select items:
Click to select one item at a time
Shift+click to select a block of items
Ctrl+click to toggle the selection of any one item
Another way to select one or more items is to type a name into the Find text field and then press Enter or click the Find button.
To view the details on any component, click its name in the view area; see “Selecting Items to View or Modify”.
The configuration and status details for the component will appear in the details area to the right. At the bottom of the details area will be the Applicable Tasks list, which displays tasks you may wish to launch after evaluating the component's configuration details. To launch a task, click the task name; based on the component selected, default values will appear in the task window.
To see more information about an item in the details area, select its name (which will appear in blue); details will appear in a new window. Terms with glossary definitions also appear in blue.
To perform an individual task, do the following:
Select the task name from the Task menu or click the right mouse button within the view area. For example:
Task -> Guided Configuration -> Set Up a New Cluster
The task window appears.
As a shortcut, you can right-click an item in the view area to bring up a list of tasks applicable to that item; information will also be displayed in the details area.
Note: You can click any blue text to get more information about that concept or input field. Enter information in the appropriate fields and click OK to complete the task. (Some tasks consist of more than one page; in these cases, click Next to go to the next page, complete the information there, and then click OK.)
Note: In every task, the cluster configuration will not update until you click OK. A dialog box appears confirming the successful completion of the task.
Continue launching tasks as needed.
The GUI lets you use drag-and-drop to do the following:
Move nodes between the pool and the cluster
Structure volume topologies
Administer XVM disks
| Caution: Always exercise care when restructuring volume elements with drag-and-drop because data that resides on the volume element can be lost. The GUI attempts to warn the user when it can predict that there is a high likelihood of data loss. However, when a volume is not associated with a mounted filesystem, neither the xvm command nor the GUI can determine whether that volume holds important data. |
To select multiple GUI icons, select the first icon by clicking the left mouse button, then press the Ctrl button while clicking on the additional icons. To select consecutive icons, select the first icon and press shift while selecting the last icon.
You cannot drag and drop between two GUI windows. You cannot drag and drop items onto shortcut command buttons.
See the XVM Volume Manager Administrator's Guide for more information about using drag-and-drop to structure volume topologies and configure disks.
To reconfigure a logical volume, do the following:
Select the view you want:
View -> Cluster Volume Elements
or
View -> Local Volume Elements
Select a volume element icon
Drag the icon and drop it on another volume element icon
Icons turn blue as you drag to indicate when it is valid to drop upon them. When you drag, if the mouse cursor reaches the top or the bottom of the view area, the display will scroll automatically.
You can use drag-and-drop to operate on multiple volume elements of different types. For example, you can detach several types of volume elements by selecting items and dragging them to any Unattached heading, even if no selected item belongs to that category. You can select multiple items of different types and attach them to a parent. For example, you can select two concats and a stripe and use drag-and-drop to attach them to a parent concat.
You can rename volume elements by clicking a selected (highlighted) volume element and typing a new name into the text field.
To label or unlabel disks using drag-and-drop, select the following:
View -> Disks
Select an unlabeled disk then drag and drop it on the Labeled Disks heading, or select a labeled disk then drag and drop it on the Unlabeled Disks heading.
You can give away a disk using the task menu or drag-and-drop. In the Disks view, select a disk and then drag and drop it on the Cluster Disks heading.
| Note: Giving away a disk presents less risk of data loss than stealing a disk. |
You can label a disk by clicking a selected (highlighted) disk and typing a name into the resulting name text field.
For more information, see the XVM Volume Manager Administrator's Guide.
The GUI shows the static and dynamic state of the cluster. For example, suppose the database contains the static information that a filesystem is enabled for mount; the GUI will display the dynamic information showing one of the following:
A blue icon indicating that the filesystem is mounted (the static and dynamic states match).
A grey icon indicating that the filesystem is configured to be mounted but the procedure cannot complete because CXFS services have not been started (the static and dynamic states do not match, but this is expected under the current circumstances). See “CXFS Services” in Chapter 1.
An error (red) icon indicating that the filesystem is supposed to be mounted (CXFS services have been started), but it is not (the static and dynamic states do not match, and there is a problem).
Click blue text to launch tasks or display one of the following:
When volume elements other than volumes are created or detached, the system automatically creates a volume and a subvolume that are associated with the volume element. You can explicitly name this generated volume, in which case the volume name is stored in label space and persists across machine reboots.
The GUI does not display volumes and subvolumes that were not named explicitly. The GUI displays the children of these volumes and subvolumes as available for use or as unattached. In contrast, the xvm command shows all volumes and subvolumes.
The GUI displays filesystems that are on volumes that were not named explicitly, but lists the volumes as None. Volumes and subvolumes that the system generated automatically with temporary names are mentioned in the full paths of unattached volume elements (for example, /vol96/datav), but the GUI ignores them otherwise.
To reduce the risk of data loss, SGI recommends that you name volumes explicitly when using the GUI. If you have created volumes using the xvm command that you did not name explicitly, you can use the xvm tool to assign these volumes permanent names before proceeding. This can reduce the risk of data loss.
The following tables show keys to the icons and states used in the CXFS Manager GUI.
Icon | Entity | |
|---|---|---|
IRIX node | ||
64-bit Linux systems | ||
Client-only nodes other than IRIX and 64-bit Linux | ||
Cluster | ||
Expanded tree in view area | ||
Collapsed tree in view area | ||
Switch | ||
XVM disk | ||
Unlabeled disk | ||
Foreign disk | ||
Slice | ||
Volume | ||
Subvolume | ||
Concat | ||
Mirror | ||
Stripe | ||
Slot | ||
Local filesystem | ||
CXFS filesystem | ||
Copy on write | ||
Repository | ||
Snapshot | ||
User account | ||
GUI task for which execution privilege may be granted or revoked | ||
Privileged command executed by a given GUI task |
Icon | State | |
|---|---|---|
(grey icon) Inactive, unknown, offline -- CXFS services may not be active | ||
(blue icon) Enabled for mount -- CXFS services may not be active | ||
(blue icon) Online, ready for use, up, or mounted without error | ||
(green swatch) Open, in use | ||
(blinking orange arrow) Mirror reviving | ||
(red icon) Error detected, down or mounted with error |
This section discusses the following guided configuration tasks:
Also see “Set Up a New Cluster with the GUI” in Chapter 9, “Set Up a New CXFS Filesystem with the GUI” in Chapter 9, and “CXFS GUI and Status” in Chapter 14. For information about XVM guided configuration tasks, see the XVM Volume Manager Administrator's Guide.
This task lists different ways to edit an existing cluster. You can make changes while the CXFS services are active, such as changing the way the cluster administrator is notified of events; however, your must first stop CXFS services before testing connectivity. You must unmount a filesystem before making changes to it.
See the following:
This task leads you through the steps required to remove a server-capable administration node from a cluster. It covers the following steps:
Perform the necessary maintenance on the node. Only if required, see “Reset a Node with the GUI ”.
Monitor the state of the cluster components in the view area. See “CXFS GUI and Status” in Chapter 14.
When shutting down, resetting, or restarting a CXFS client-only node, do not stop CXFS services on the node. (Stopping CXFS services is more intrusive on other nodes in the cluster because it updates the cluster database. Stopping CXFS services is appropriate only for a server-capable administration node.) Rather, let the CXFS shutdown scripts on the node stop CXFS when the client-only node is shut down or restarted.
This section discusses the following:
| Note: The Set Up a New Cluster guided configuration task leads you through the tasks required to set up the cluster and nodes. See “Set Up a New Cluster with the GUI” in Chapter 9. |
| Note: Within the CXFS tasks, you can click any blue text to get more information about that concept or input field. In every task, the cluster configuration will not update until you click OK. |
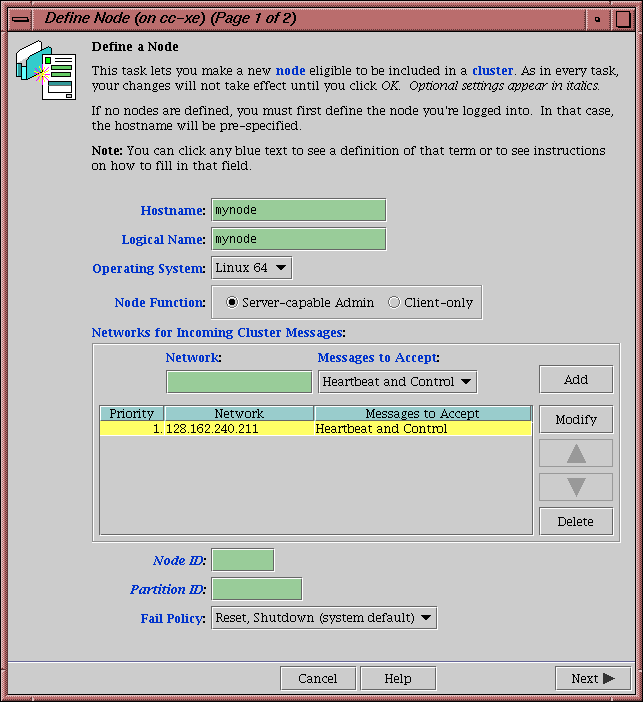
To define a node, do the following:
Hostname: Enter the hostname of the node you are defining. You can use a simple hostname, such as lilly, if it can be resolved by the name server or /etc/hosts on all nodes in the cluster; otherwise, use a fully qualified domain name such as lilly.example.com. Use the ping command to display the fully qualified hostname. Do not enter an IP address.
If you attempt to define a cluster or other object before the local node has been defined, you will get an error message that says:
No nodes are registered on servername. You cannot define a cluster
until you define the node to which the GUI is connected. To do so,
click "Continue" to launch the "Set Up a New Cluster" task.
Logical Name: Enter the simple hostname (such as lilly) or an entirely different name (such as nodeA). If you entered in the simple hostname for the Hostname field, the same name will be entered into the Logical Name field by default. Logical names cannot begin with an underscore (_) or include any whitespace characters, and can be at most 255 characters.
Note: To rename a node, you must delete it and then define a new node. Operating System: Choose the name of the operating system that is running on the node being defined. Choose Windows for Windows 2000, Windows 2003, or Windows XP. Choose Linux 64 when defining an x86_64 or ia64 architecture. (Use the uname -i command to determine the architecture type.)
An SGI Foundation Software node can be a server-capable administration node or a CXFS client-only node, depending upon the node function selected and the software installed. Other nodes are always CXFS client-only nodes.
If you select a fail policy that includes reset, you will be given an opportunity to provide reset information on a second page. Any potential metadata server should include reset in its fail policy hierarchy.
You cannot later modify the operating system for a defined node. To change the operating system, you would have to delete the node and then define a new node with the new name.
Node Function: Select one of the following:
Server-capable Admin is a node on which you will execute cluster administration commands and that you also want to be a CXFS metadata server. (You will use the Define a CXFS Filesystem task to define the specific filesystem for which this node can be a metadata servers.) Use this node function only if the node will be a metadata servers. You must install the cluster_admin product on this node.
Client-only is a node that shares CXFS filesystems but on which you will not execute cluster administration commands and that will not be a CXFS metadata server. Use this node function for all nodes other than those that will be metadata servers. You must install the product on this node. This node can run on any platform. (Nodes other than Linux are required to be client-only nodes.)
Networks for Incoming Cluster Messages: Do the following:
Network: Enter the IP address or hostname of the NIC. (The hostname must be resolved in the /etc/hosts file.) The priorities of the NICs must be the same for each node in the cluster. For information about why a private network is required, see “Private Network” in Chapter 1.
Messages to Accept: Select Heartbeat and Control.
You can use the None setting if you want to temporarily define a NIC but do not want it to accept messages.
Click Add to add the NIC to the list.
If you later want to modify the NIC, click the NIC in the list to select it, then click Modify.
To delete a NIC from the list, click the NIC in the list to select it, then click Delete.
By default, the priority 1 NICs are used as the private network; they must be on the same subnet. To allow one network to fail over to another, you must group the NICs into failover networks manually by using cxfs_admin. See Chapter 11, “cxfs_admin Command”.
Node ID: ( Optional for server-capable administration nodes) An integer in the range 1 through 32767 that is unique among the nodes in the pool. If you do not specify a number for a server-capable administration node, CXFS will calculate an ID for you.
For server-capable administration nodes, the default ID is a 5-digit number based on the machine's serial number and other machine-specific information; it is not sequential. For client-only nodes, you must supply the node ID.
You must not change the node ID number after the node has been defined. (There is no default CXFS tiebreaker.)
Partition ID: (Optional) Uniquely defines a partition in a partitioned Origin 3000 system, Altix 3000 series system, or Altix 4700 system. If your system is not partitioned, leave this field empty. Use the IRIX mkpart command or the Linux proc command to determine the partition ID value (see below).
Click Next to move to the next screen.
Fail Policy: Specify the set of actions that determines what happens to a failed node: the second action will be followed only if the first action fails; the third action will be followed only if the first and second fail.
The available actions depend upon the operating system value selected for the node:
Fence: disables access to the SAN from the problem node. Fencing provides faster recovery of the CXFS kernel membership than reset.
FenceReset: performs a fence and then, if the node is successfully fenced, also performs an asynchronous reset of the node via a system controller (according to the chosen reset method); recovery begins without waiting for reset acknowledgement.
Note: A server-capable administration node should also include Reset in its fail policy hierarchy (unless it is the only server-capable administration node in the cluster). Reset: performs a system reset via a system controller. A server-capable administration node should include Reset in its fail policy hierarchy.
Shutdown: tells the other nodes in the cluster to wait for a period of time (long enough for the node to shut itself down) before reforming the CXFS kernel membership. (However, there is no notification that the node's shutdown has actually taken place.) The default fail policy hierarchy for IRIX or Linux nodes is Reset, Shutdown. The default for other nodes is Shutdown.

Caution: There are issues when using Shutdown with server-capable administration nodes; for more information and for a list of valid fail policy sets, see “Data Integrity Protection” in Chapter 1. If you are using dynamic CXFS kernel heartbeat monitoring, you must not use the Shutdown setting on a client-only node. For information about heartbeat monitoring, see “Use the Appropriate CXFS Kernel Heartbeat Monitoring” in Chapter 2. To specify a fail policy without Shutdown you must define or modify the node with cxfs_admin. See Chapter 11, “cxfs_admin Command”.
Note: If the failure hierarchy contains Reset or FenceReset, the reset might be performed before the system kernel core-dump can complete, resulting in an incomplete core-dump. If you have chosen a failure hierarchy that includes Reset or FenceReset, provide the following information.
This node:
Port Type: select one of the following:
L1 (Origin/Onyx 300/350, Origin/Onyx 3200C)
L2 (Any Altix with an L2, Prism, Origin/Onyx 3000 series, Origin 300/350 over a direct-connect serial line )
BMC (Altix XE systems
MSC (Origin 200, Onyx2 Deskside, SGI 2100/2200 deskside systems)
MMSC (Rackmount SGI 2400/2800, Onyx2).
Note: Altix XE systems use baseboard management controller (BMC) for reset. To configure reset via BMC or L2 over the network, use the cxfs_admin configuration tool. See “Create or Modify a Node with cxfs_admin” in Chapter 11. Reset Method: The type of reset to be performed:
Power Cycle shuts off power to the node and then restarts it
Reset simulates the pressing of the reset button on the front of the machine (recommended)
NMI (nonmaskable interrupt) performs a core-dump of the operating system kernel, which may be useful when debugging a faulty machine
Note: NMI depends upon kernel support, which may not be present on all SGI Altix ia64 systems; if the kernel support is not provided, the NMI setting will not work.
NMI is not available on systems containing a baseboard management controller (BMC), such as SGI Altix XE x86_64 systems.
Port Password: The password for the system controller port, not the node's root password or PROM password. On some nodes, the system administrator may not have set this password. If you wish to set or change the system controller port password, consult the hardware manual for your node.
Temporarily Disable Port: If you want to provide reset information now but do not want to allow the reset capability at this time, check this box. If this box is checked, CXFS cannot reset the node.
Owner (node that sends the reset command):
Logical Name: Name of the node that sends the reset command. If you use serial cables, they must physically connect the node being defined and the owner node through the system controller port. At run time, the node must be defined in the CXFS pool.
You can select a logical name from the pull-down list or enter the logical name of a node that is not yet defined. However, you must define the node in CXFS before you run the node connectivity diagnostics task or start CXFS services.
TTY Device: Name of the terminal port (TTY) on the owner node to which the system controller is connected (the node being reset). /dev/ttyd2 is the most commonly used port, except on Origin 300 and Origin 350 systems (where /dev/ttyd4 is commonly used) and Altix 350 systems (where /dev/ttyIOC0 is commonly used). The other end of the cable connects to this node's (the node being reset) system controller port, so the node can be controlled remotely by the owner node. Check the owner node's specific hardware configuration to verify which tty device to use.
Note: To specify reset method that uses Intelligent Platform Management Interface (IPMI) or L2 over the network, use the cxfs_admin configuration tool. See “Create or Modify a Node with cxfs_admin” in Chapter 11.
Click OK.
| Note: Do not add a second node until the first node icon appears in the view area. The entire cluster status information is sent to each server-capable administration node each time a change is made to the cluster database; therefore, the more server-capable administration nodes in a configuration, the longer it will take. |
You can find the partition ID by reading the proc file. For example:
linux# cat /proc/sgi_sn/partition_id 0 |
The 0 indicates that the system is not partitioned. If the system is partitioned, the number of partitions (such as 1, 2, etc.) is displayed.
For example (output truncated here for readability):
# mkpart -n Partition id = 1 irix# mkpart -l partition: 3 = brick: 003c10 003c13 003c16 003c21 ... partition: 1 = brick: 001c10 001c13 001c16 001c21 ... |
You could enter one of the following for the Partition ID field:
1 001.10 |
You can use the IRIX mkpart command to determine the partition ID:
The following figures show an example of defining a new node.

| Note: Before adding or removing a server-capable administration node, you must first unmount any filesystems for which the node will be a potential metadata server. |
After you have added nodes to the pool and defined the cluster, you can indicate which nodes to include in the cluster.
| Note: Do not add or remove nodes until the cluster icon appears in the view area; set the View selection to Nodes and Cluster. |
Do the following:
Add or remove the desired nodes:
To add a node, select its logical name from the Available Nodes pull-down menu and click Add. The node name will appear in the Nodes to Go into Cluster list. To select all of the available nodes, click Add All.
To delete a node, click its logical name in the Nodes to Go into Cluster screen. (The logical name will be highlighted.) Then click Remove .
Click OK.
You can use the GUI to reset IRIX or SGI Foundation Software nodes in a cluster. This sends a reset command to the system controller port on the specified node. When the node is reset, other nodes in the cluster will detect the change and remove the node from the active cluster. When the node reboots, it will rejoin the CXFS kernel membership.
To reset a node, do the following:
Node to Reset: Choose the node to be reset from the pull-down list.
Click OK.
To rename a node or change its operating system, you must delete it and then define a new node.
To modify other information about a node, do the following:
Logical Name: Choose the logical name of the node from the pull-down list. After you do this, information for this node will be filled into the various fields.
Networks for Incoming Cluster Messages: The priorities of the NICs must be the same for each node in the cluster.
Network: To add a NIC for incoming cluster messages, enter the IP address or hostname into the Network text field and click Add .
To modify a NIC that is already in the list, click the network in the list in order to select it. Then click Modify. This moves the NIC out of the list and into the text entry area. You can then change it. To add it back into the list, click Add.
To delete a NIC, click the NIC in the priority list in order to select it. Then click Delete.
To change the priority of a NIC, click the NIC in the priority list in order to select it. Then click the up and down arrows in order to move it to a different position in the list.
You can use the None setting if you want to temporarily define a NIC but do not want it to accept messages.
By default, the priority 1 NICs are used as the private network; they must be on the same subnet. To allow the one network to fail over to another, you must group the NICs into networks manually by using cxfs_admin. See Chapter 11, “cxfs_admin Command”.
Click Next to move to the next page.
Partition ID: (Optional) Uniquely defines a partition in a partitioned Origin 3000 system, Altix 3000 series system, or Altix 4700 system. If your system is not partitioned, leave this field empty. You can use the IRIX mkpart command or the Linux proc command to determine the partition ID value; see below.
Fail Policy: Specify the set of actions that determines what happens to a failed node: the second action will be followed only if the first action fails; the third action will be followed only if the first and second fail.
The available actions depend upon the operating system value selected for the node:
Fence: disables access to the SAN from the problem node. Fencing provides faster recovery of the CXFS kernel membership than reset.
FenceReset: performs a fence and then, if the node is successfully fenced, also performs an asynchronous reset of the node via a system controller (according to the chosen reset method); recovery begins without waiting for reset acknowledgement.
Note: A server-capable administration node should also include Reset in its fail policy hierarchy (unless it is the only server-capable administration node in the cluster). Reset: performs a system reset via a system controller. A server-capable administration node should include Reset in its fail policy hierarchy.
Shutdown: tells the other nodes in the cluster to wait for a period of time (long enough for the node to shut itself down) before reforming the CXFS kernel membership. (However, there is no notification that the node's shutdown has actually taken place.) The default fail policy hierarchy for IRIX or Linux nodes is Reset, Shutdown. The default for other nodes is Shutdown.
Caution: There are issues when using Shutdown with server-capable administration nodes; for more information and for a list of valid fail policy sets, see “Data Integrity Protection” in Chapter 1. If you are using dynamic CXFS kernel heartbeat monitoring, you must not use the Shutdown setting on a client-only node. For information about heartbeat monitoring, see “Use the Appropriate CXFS Kernel Heartbeat Monitoring” in Chapter 2. To specify a fail policy without Shutdown you must define or modify the node with cxfs_admin. See Chapter 11, “cxfs_admin Command”.
If you have chosen a failure hierarchy that includes Reset or FenceReset, provide the following information.
This node:
Port Type: select one of the following:
L1 (Origin/Onyx 300/350, Origin/Onyx 3200C)
L2 (Any Altix with an L2, Prism, Origin/Onyx 3000 series, Origin 300/350 over a direct-connect serial line)
BMC (Altix XE systems
MSC (Origin 200, Onyx2 Deskside, SGI 2100/2200 deskside systems)
MMSC (Rackmount SGI 2400/2800, Onyx2).
Reset Method: The type of reset to be performed:
Power Cycle shuts off power to the node and then restarts it
Reset simulates the pressing of the reset button on the front of the machine (recommended)
NMI (nonmaskable interrupt) performs a core-dump of the operating system kernel, which may be useful when debugging a faulty machine
Note: NMI depends upon kernel support, which may not be present on all SGI Altix ia64 systems; if the kernel support is not provided, the NMI setting will not work.
NMI is not available on systems containing a baseboard management controller (BMC), such as SGI Altix XE x86_64 systems.
Port Password: The password for the system controller port, not the node's root password or PROM password. On some nodes, the system administrator may not have set this password. If you wish to set or change the system controller port password, consult the hardware manual for your node.
Temporarily Disable Port: If you want to provide reset information now but do not want to allow the reset capability at this time, check this box. If this box is checked, CXFS cannot reset the node.
Owner (node that sends the reset command):
Logical Name: Name of the node that sends the reset command. Serial cables must physically connect the node being defined and the owner node through the system controller port. At run time, the node must be defined in the CXFS pool.
You can select a logical name from the pull-down list or enter the logical name of a node that is not yet defined. However, you must define the node in CXFS before you run the node connectivity diagnostics task.
TTY Device: Name of the terminal port (TTY) on the owner node to which the system controller is connected. /dev/ttyd2 is the most commonly used port, except on Origin 300 and Origin 350 systems (where /dev/ttyd4 is commonly used) and Altix 350 systems (where /dev/ttyIOC0 is commonly used). The other end of the cable connects to this node's system controller port, so the node can be controlled remotely by the other node.
Note: To specify reset method that uses Intelligent Platform Management Interface (IPMI) or L2 over the network, use the cxfs_admin configuration tool. See “Create or Modify a Node with cxfs_admin” in Chapter 11.
Click OK.
On Linux, you can find the partition ID by reading the proc file. For example:
linux# cat /proc/sgi_sn/partition_id 0 |
The 0 indicates that the system is not partitioned. If the system is partitioned, the number of partitions (such as 1, 2, etc.) is displayed.
You could enter one of the following for the Partition ID field:
1 001.10 |
You can use the IRIX mkpart command to determine the partition ID value:
The -n option lists the partition ID (which is 0 if the system is not partitioned).
The -l option lists the bricks in the various partitions (use rack#.slot# format in the GUI).
For example (output truncated here for readability):
irix# mkpart -n Partition id = 1 irix# mkpart -l partition: 3 = brick: 003c10 003c13 003c16 003c21 ... partition: 1 = brick: 001c10 001c13 001c16 001c21 ... |
You must remove a node from a cluster before you can delete the node from the pool. For information, see “Modify a Cluster Definition with the GUI”.
To delete a node, do the following:
Node to Delete: Select the logical name of the node to be deleted from the pull-down list.
Click OK.
The Test Node Connectivity screen requires rsh access between hosts. The /.rhosts file must contain the hosts and local host between which you want to test connectivity.
To test connectivity, do the following from the CXFS Manager:
Choose whether to test by network or serial connectivity by clicking the appropriate radio button.
Choose a node to be tested from the pull-down list and add it to the test list by clicking Add.
To delete a node from the list of nodes to be tested, click the logical name to select it and then click Delete .
To start the tests, click Start Tests. To stop the tests, click Stop Tests.
To run another test, click Clear Output to clear the status screen and start over with step 3.
To exit from the window, click Close.
This section discusses the following:
| Note: The Set Up a New Cluster guided configuration task leads you through the tasks required to set up the cluster and nodes. See “Set Up a New Cluster with the GUI” in Chapter 9. |
A cluster is a collection of nodes coupled to each other by a private network. A cluster is identified by a simple name. A given node may be a member of only one cluster.
To define a cluster, do the following:
Enter the following information:
Cluster Name: The logical name of the cluster. Logical names cannot begin with an underscore (_) or include any whitespace characters, and can be at most 255 characters. Clusters must have unique names.
Cluster ID: A unique number within your network in the range 1 through 255. The cluster ID is used by the operating system kernel to make sure that it does not accept cluster information from any other cluster that may be on the network. The kernel does not use the database for communication, so it requires the cluster ID in order to verify cluster communications. This information in the kernel cannot be changed after it has been initialized; therefore, you must not change a cluster ID after the cluster has been defined. Clusters must have unique IDs.
Cluster Mode: Usually, you should set the cluster to the default Normal mode.
Setting the mode to Experimental turns off CXFS kernel heartbeat in the CXFS kernel membership code so that you can debug the cluster without causing node failures. For example, this can be useful if you just want to disconnect the network for a short time (provided that there is no other cluster networking activity, which will also detect a failure even if there is no heartbeat) or if you want to enter the kernel debugger (which stops heartbeat) on a CXFS node. You should only use Experimental mode when debugging with the approval of SGI support.
Notify Administrator (of cluster and node status changes):
By e-mail: This choice requires that you specify the e-mail program (/usr/sbin/Mail by default) and the e-mail addresses of those to be identified. To specify multiple addresses, separate them with commas. CXFS will send e-mail to the addresses whenever the status changes for a node or cluster. If you do not specify an address, notification will not be sent.
By other command: This choice requires that you specify the command to be run whenever the status changes for a node or cluster.
Never: This choice specifies that notification is not sent.
Click OK.
To change how the cluster administrator is notified of changes in the cluster's state, do the following:
Enter the following information:
Cluster Name: Choose from the pull-down list.
Cluster Mode: Usually, you should set the cluster to the default Normal mode. See “Define a Cluster with the GUI”, for information about Experimental mode.
Notify Administrator: Select the desired notification. For more information, see “Define a Cluster with the GUI”.
Click OK.
To modify the nodes that make up a cluster, see “Add or Remove Nodes in the Cluster with the GUI”.
| Note: If you want to rename a cluster, you must delete it and then
define a new cluster. If you have started CXFS services on the node, you
must either reboot it or reuse the cluster ID number when renaming the
cluster.
However, be aware that if you already have CXFS filesystems defined and then rename the cluster, CXFS will not be able to mount the filesystems. For more information, see “Cannot Mount Filesystems” in Chapter 15. |
You cannot delete a cluster that contains nodes; you must move those nodes out of the cluster first. For information, see “Add or Remove Nodes in the Cluster with the GUI”.
To delete a cluster, do the following:
Cluster to Delete: The name of the cluster is selected for you.
Click OK.
This section discusses the following:
To start CXFS services, and set the configuration to automatically restart CXFS services whenever the system is rebooted, do the following:
Node(s) to Activate: Select All Nodes or the individual node on which you want to start CXFS services.
Click OK.
When CXFS services are stopped on a node, filesystems are automatically unmounted from that node. You can stop CXFS on a specified node or for the cluster, and prevent CXFS services from being restarted by a reboot, by performing the following steps.
| Note: If you stop CXFS services using this method, they will not restart when the node is rebooted. To stop CXFS services temporarily (that is, allowing them to restart with a reboot if so configured), see “Manually Starting/Stopping CXFS” in Chapter 12 |
Enter the following information:
Force: If you want to forcibly stop CXFS services even if there are errors (which would normally prevent the stop operation), click the Force checkbox.
Node(s) to Deactivate: Select All Nodes or the individual node on which you want to stop CXFS services.
If you stop CXFS services on one node, that node will no longer have access to any filesystems. If that node was acting as the metadata server for a filesystem, another node in the list of potential metadata servers will be chosen. Clients of the filesystem will experience a delay during this process.
Click OK. It may take a few minutes to complete the process.
After you have stopped CXFS services on a node, the node is no longer an active member of the cluster. CXFS services will not be restarted when the system reboots.
| Caution: You should stop CXFS services before using the shutdown or reboot commands. If you execute shutdown or reboot when CXFS services are active, the remaining nodes in the cluster will view it as a node failure and be forced to run recovery against that node. |
A CXFS tiebreaker node determines whether a CXFS kernel membership quorum is maintained when exactly half of the server-capable administration nodes are up and can communicate with each other. There is no default CXFS tiebreaker.
| Caution: If one of the server-capable administration nodes is the
CXFS tiebreaker in a two server-capable cluster, failure of that node
or stopping the CXFS services on that node will result in a cluster-wide
forced shutdown. Therefore SGI recommends that you use client-only nodes
as tiebreakers so that either server could fail but the cluster would
remain operational via the other server.
To ensure data integrity, SGI recommends that you use system reset for all potential metadata servers and reset or or I/O fencing for all client-only nodes. |
The current CXFS tiebreaker node is shown in the detailed view of the cluster.
To set the CXFS tiebreaker node, do the following:
Tie-Breaker Node: Select the desired node from the list. If there currently is a CXFS tiebreaker, it is selected by default.
To unset the CXFS tiebreaker node, select None.
Click OK.
CXFS maintains logs for each of the CXFS daemons. CXFS logs both normal operations and critical errors to individual log files for each log group and the /var/log/messages system log file on server-capable administration nodes.
You can customize the logs according to the level of logging you wish to maintain.
| Caution: Do not change the names of the log files. If you change the names, errors can occur. |
When you define a log configuration, you specify the following information:
Log Group: A set of one or more CXFS processes that use the same log configuration. A log group usually corresponds to one CXFS daemon, such as crsd.
Log Level: A number controlling the amount of log messages that CXFS will write into an associated log group's log file.
Log File: The file in which to log messages.
See also “Status in Log Files” in Chapter 14.
To display log group definitions, do the following:
Log Group: Choose the log group to display from the menu.
The current log level and log file for that log group will be displayed in the task window, where you can change those settings if you desire.
Click OK.
To configure a log group, do the following in the Set Log Configuration task:
Enter the appropriate information:
Log Group: Select the log group from the pull-down list. A log group is a set of processes that log to the same log file according to the same logging configuration. Each CXFS daemon creates a log group. Settings apply to all nodes in the pool for the cli and crsd log groups, and to all nodes in the cluster for the clconfd and diags log groups.
Log Level: Select the log level, which specifies the amount of logging.
Caution: The Default log level is quite verbose; using it could cause space issues on your disk. You may wish to select a lower log level. Also see “Log File Management” in Chapter 12, “cad.options on Server-Capable Administration Nodes” in Chapter 8, and “fs2d.options on Server-Capable Administration Nodes” in Chapter 8. The values are as follows:
Off gives no logging
Minimal logs notifications of critical errors and normal operation (these messages are also logged to the /var/log/messages file)
Info logs Minimal notifications plus warnings
Default logs all Info messages plus additional notifications
Debug 0 through Debug 9 log increasingly more debug information, including data structures
Log File: Do not change this value.
Click OK.
You should revoke CXFS kernel membership of the local node only in the case of error, such as when you need to perform a forced CXFS shutdown (see “Shutdown of the Database and CXFS” in Chapter 12).
To revoke CXFS kernel membership for the local node, do the following:
Local Node: Verify the name of the local node, which will be displayed in the pop-up window.
Click OK to complete the task.
This result of this task will be considered as a node failure by the rest of the cluster. The rest of the cluster may then fail due to a loss of CXFS kernel membership quorum, or it may decide to reset the failed node. To avoid the reset, you can modify the node definition to disable the system controller status.
You must allow CXFS kernel membership for the local node (the node to which the GUI is connected) after fixing the problems that required a forced CXFS shutdown; doing so allows the node to reapply for CXFS kernel membership in the cluster. A forced CXFS shutdown can be performed manually or can be triggered by the kernel. For more information, see “Shutdown of the Database and CXFS” in Chapter 12.
You must actively allow CXFS kernel membership of the local node in the following situations:
After a manual revocation as in “Revoke Membership of the Local Node with the GUI”.
When instructed to by an error message on the console or the /var/log/messages system log file.
After a kernel-triggered revocation. This situation is indicated by the following message in the /var/log/messages system log file:
Membership lost - withdrawing from cluster
To allow CXFS kernel membership for the local node, do the following:
Local Node: Verify the name of the local node, which will be displayed in the pop-up window.
Click OK to complete the task.
This section discusses the following:
See the release notes for supported switches.
| Note: Nodes without system controllers require I/O fencing to protect data integrity. |
This task lets you define a new switch to support I/O fencing in a cluster.
Do the following:
Enter the following information:
Switch Name: Enter the hostname of the switch; this is used to determine the IP address of the switch.
Username: Enter the user name to use when sending a telnet message to the switch. By default, this value is admin.
Password: Enter the password for the specified Username field.
Mask: Enter one of the following:
A list of ports in the switch that will never be fenced. The list has the following form, beginning with the # symbol and separating each port number with a comma:
#port,port,port...
Each port is a decimal integer in the range 0 through 1023. Use a hyphen to specify an inclusive range. For example, the following indicates that port numbers 2, 4, 5, 6, 7, and 23 will never be fenced:
#2,4-7,23
Note: For the bladed Brocade 48000 switch (where the port number is not unique), the value you should use for Mask is the Index value that is displayed by the switchShow command. For example, the switchShow output below indicates that you would use a mask value of 16 for port 0 in slot 2: brocade48000:admin> switchShow Index Slot Port Address Media Speed State Proto =================================================== 0 1 0 010000 id N4 Online F-Port 10:00:00:00:c9:5f:9b:ea 1 1 1 010100 id N4 Online F-Port 10:00:00:00:c9:5f:ab:d9 .... 142 1 30 018e00 id N4 Online F-Port 50:06:0e:80:04:5c:0b:46 143 1 31 018f00 id N4 Online F-Port 50:06:0e:80:04:5c:0b:66 16 2 0 011000 id N4 Online F-Port 10:00:00:00:c9:5f:a1:f5 17 2 1 011100 id N4 Online F-Port 10:00:00:00:c9:5f:a1:72 ...
A hexadecimal string that represents the list of ports in the switch that will never be fenced.
Ports are numbered from zero. If a given bit has a binary value of 0, the port that corresponds to that bit is eligible for fencing operations; if 1, then the port that corresponds to that bit will always be excluded from any fencing operations. For example, Figure 10-5 shows that a mask of FF03 for a 16-port switch indicates that only ports 2-7 are eligible for fencing (because they have binary values of 0). Similarly, it shows that a mask of A4 for an 8-port switch allows fencing only on ports 0, 1, 3, 4, and 6 (the port numbers corresponding to binary 0) -- ports 2, 5, and 7 will never be fenced (the port numbers corresponding to the nonzero value).
Server-capable administration nodes automatically discover the available HBAs and, when fencing is triggered, will fence off all of the Fibre Channel HBAs when the Fence or FenceReset fail policy is selected. However, masked HBAs will not be fenced. Masking allows you to prevent the fencing of devices that are attached to the SAN but are not shared with the cluster, to ensure that they remain available regardless of CXFS status. You would want to mask HBAs used for access to tape storage, or HBAs that are only ever used to access local (nonclustered) devices.
Vendor: Select the name of the switch vendor or enter the vendor name manually if not found in the list.
Click OK to complete the task.

This task lets you modify an existing switch definition.
Enter the following information:
Switch Name: Select the hostname of the switch to be modified.
Username: Enter the user name to use when sending a telnet message to the switch. By default, this value is admin.
Password: Enter the password for the specified Username field.
Mask: Enter a list of port numbers or a hexadecimal string that represents the list of ports in the switch that will not be fenced. For more information, see “Define a Switch with the GUI”.
Click OK to complete the task.
| Note: You cannot modify the vendor name for a switch. To use a different vendor, delete the switch and redefine it. |
This task lets you update the mappings between the host bus adapters (HBAs) and switch ports. You should run this command if you reconfigure any switch or add ports. Click OK to complete the task.
This task lets you delete an existing switch definition. Do the following:
Switch Name: Select the hostname of the Fibre Channel switch to be deleted.
Click OK to complete the task.
This task lets you raise the I/O fence for a node. Raising an I/O fence isolates the node from the SAN; CXFS sends a messages via the telnet protocol to the switch and disables the port. After the node is isolated, it cannot corrupt data in the shared CXFS filesystem.
Do the following:
Raise Fence for Node: Select the name of the node you want to isolate. Only nodes that have been configured with a Fence or FenceReset fail policy can be selected.
Click OK to complete the task.
This task lets you lower the I/O fence for a given node by reenabling the port. Lowering an I/O fence allows the node to reconnect to the SAN and access the shared CXFS filesystem.
Do the following:
Lower Fence for Node: Select the node you want to reconnect. Only nodes that have been configured with a Fence or FenceReset fail policy can be selected.
Click OK to complete the task.
The following tasks let you configure CXFS filesystems as shared XVM volumes. These shared volumes can be directly accessed by all nodes in a CXFS cluster. Each volume is identified by its device name. Each volume must have the same mount point on every node in the cluster.
| Note: The Set Up a New CXFS Filesystem guided configuration task leads you through the steps required to set up a new CXFS filesystem. See “Set Up a New CXFS Filesystem with the GUI” in Chapter 9. |
This section discusses the following:
This task lets you create a filesystem on a volume that is online but not open. To create filesystems on multiple volume elements, use the Browse button.
| Caution: Clicking OK will erase all data that exists on the target volume. |
To make a filesystem, do the following:
Enter the following information:
Domain: Select the domain that will own the volume element to be created. Choose Local if the volume element or disk is defined for use only on the node to which the GUI is connected, or choose Cluster if it is defined for use on multiple nodes in the cluster.
Volume Element: Select the volumes on which to create the filesystem or select the volume elements whose parent volumes will be used for the filesystems. The menu lists only those volume elements that are available. (When volume elements other than volumes are created or detached, the system automatically creates a volume and a subvolume that are associated with the volume element. If you did not explicitly name an automatically generated volume, the GUI will display its children only.)
Specify Sizes: Check this box to modify the default options for the filesystem, including data region size, and log size.
By default, the filesystem will be created with the data region size equal to the size of the data subvolume. If the volume contains a log subvolume, the log size will be set to the size of the log subvolume.
If you checked the Specify Sizes box, click Next to move to page 2. On page 2, enter the following information. For more information about these fields, see the mkfs.xfs man page.
Block Size: Select the fundamental block size of the filesystem in bytes.
Directory Block Size: Select the size of the naming (directory) area of the filesystem in bytes.
Inode Size: Enter the number of blocks to be used for inode allocation, in bytes. The inode size cannot exceed one half of the Block Size value.
Maximum Inode Space: Enter the maximum percentage of space in the filesystem that can be allocated to inodes. The default is 25%. (Setting the value to 0 means that the entire filesystem can become inode blocks.)
Flag Unwritten Extents: Check this box to flag unwritten extents. If unwritten extents are flagged, filesystem write performance will be negatively affected for preallocated file extents because extra filesystem transactions are required to convert extent flags for the range of the file.
You should disable this feature (by unchecking the box) if the filesystem must be used on operating system versions that do not support the flagging capability.
Data Region Size: Enter the size of the data region of the filesystem as a number of 512-byte blocks. This number is usually equal to the size of the data subvolume. You should specify a size other than 0 only if the filesystem should occupy less space than the size of the data subvolume.
Use Log Subvolume for Log: Check this box to specify that the log section of the filesystem should be written to the log subvolume of the XVM logical volume. If the volume does not contain a log subvolume, the log section will be a piece of the data section on the data subvolume.
Log Size: Enter the size of the log section of the filesystem as a number of 512-byte blocks. You should specify a size other than 0 only if the log should occupy less space than the size of the log subvolume.
Note: XVM on SGI Foundation Software does not support real-time subvolumes.
Click OK.
This task lets you grow a mounted filesystem.
| Note: In order to grow a filesystem, you must first increase the size of the logical volume on which the filesystem is mounted. For information on modifying XVM volumes, see the XVM Volume Manager Administrator's Guide. |
To grow a filesystem, do the following:
Enter the following information:
Filesystem: Select the name of the filesystem you want to grow. The list of available filesystems is determined by looking for block devices containing XFS superblocks.
Specify Sizes: Check this option to modify the default options for the filesystem, including data region size and (if already present for the filesystem) log size.
By default, the filesystem will be created with the data region size equal to the size of the data subvolume. If the volume contains a log subvolume, the log size will be set to the size of the log subvolume.
If you checked the Specify Sizes box, click Next to move to page 2. For more information about these fields, see the mkfs.xfs man page.
Data Region Size: Enter the size of the data region of the filesystem as a number of 512-byte blocks. This number is usually equal to the size of the data subvolume. You should specify a size other than 0 only if the filesystem should occupy less space than the size of the data subvolume.
Log Size: Enter the size of the log section of the filesystem as a number of 512-byte blocks. You should specify a size other than 0 only if the log should occupy less space than the size of the log subvolume. This option only appears if the filesystem has a log subvolume.
Note: XVM on SGI Foundation Software does not support real-time subvolumes. Click OK.
This task lets you define one or more CXFS filesystems having the same ordered list of potential metadata servers and the same list of client nodes.
| Note: The list of potential metadata servers for a given filesystem is ordered, but because of network latencies and other unpredictable delays, it is impossible to predict which node will become the active metadata server for the initial mount of a filesystem. |
If you select multiple device names, the path you enter for the mount point will be used as a prefix to construct the actual mount point for each filesystem.
This task assumes that you have created volume headers on your disk drives, created the XVM logical volumes, and made the filesystems. “Initial Setup with the CXFS GUI” in Chapter 9.
To define filesystems, do the following:
Enter the following information:
Device Name: Select the device names of the XVM volumes on which the filesystems will reside.
Mount Point: The directory on which the specified filesystem will be mounted. This directory name must begin with a slash (/). The same mount point will be used on all the nodes in the cluster. For example, if you select the device name /dev/cxvm/cxfs1 and want to mount it at /mount/cxfs1, you would enter /mount/cxfs1 for the Mount Point value.
If you selected multiple device names in order to define multiple CXFS filesystems, the mount point path will be constructed using the mount point you enter as a prefix and the name of each device name (not including the /dev/cxvm portion) as the suffix. For example, if you select two volume device names ( /dev/cxvm/cxfs1 and /dev/cxvm/cxfs2) and enter a mount point of /mount/, then the CXFS filesystems will be mounted as /mount/cxfs1 and /mount/cxfs2 , respectively. If instead you had entered /mount for the mount point, the filesystems would be mounted as /mountcxfs1 and /mountcxfs2.
(Optional) Mount Options: These options are passed to the mount command and are used to control access to the specified XVM volume. Separate multiple options with a comma. For a list of the available options, see the fstab man page.
Force Unmount: Select the default behavior for the filesystem. This option controls what action CXFS takes if there are processes that have open files or current directories in the filesystems that is to be unmounted. If you select On, the processes will be killed and the unmount will occur. If you select Off, the processes will not be killed and the filesystem will not be unmounted. SGI recommends that you set Force Unmount to On in order to improve the stability of the CXFS cluster. This value can be overridden when you perform a manual unmount; see “Unmount CXFS Filesystems with the GUI”.
Metadata Servers: A list of server-capable administration nodes that are able to act as metadata servers.
To add a server-capable administration node to the list of servers, choose a name from the pull-down node list and click Add. To select all nodes listed, click Add All.
Note: Relocation is disabled by default. Recovery and relocation are supported only when using standby nodes. Therefore, you should only define multiple metadata servers for a given filesystem if you are using the standby node model. See “Relocation” in Chapter 1. To remove a node from the list of servers, click the name in the list to select it and then click Remove.
Note: The order of servers is significant. The first node listed is the preferred metadata server. Click a logical name to select it and then click the arrow buttons to arrange the servers in the order that they should be used.
However, it is impossible to predict which server will actually become the server during the boot-up cycle because of network latencies and other unpredictable delays. The first available node in the list will be used as the active metadata server.Enable Mount on: A choice of either all nodes in the cluster or a list of selected server-capable administration nodes that you specify on a second page. (The filesystem is always mounted on the current metadata server.)
If Nodes are Added to the Cluster Later: This option permits the filesystem to be mounted on all nodes that might be added to the cluster at some later date. This option is selected by default.
If you chose Only Selected Nodes above, click Next to move to the second page of the task.
Selected Nodes: You can select the desired nodes from the Node list. You can also click Add All to select all nodes, which is the same as selecting All Nodes Currently in Cluster.
Click OK.
After defining the filesystems, you can mount them on the specified client nodes in the cluster by running the Mount CXFS Filesystems task.
| Note: After a filesystem has been defined in CXFS, running mkfs on it (or using the “Make Filesystems with the GUI” task) will cause errors to appear in the system log file. To avoid these errors, run mkfs before defining the filesystem in CXFS, or delete the CXFS filesystem before running mkfs. See “Delete a CXFS Filesystem with the GUI”. |
| Note: You cannot modify a mounted filesystem. |
To modify an existing filesystem, do the following:
Enter the following information:
Filesystem to Modify: Choose a filesystem from the pull-down menu. This displays information for that filesystem in the various fields.
Mount Point and Mount Options: Change the information displayed for the selected filesystem as needed. To erase text, backspace over the text or select the text and type over it.
(Optional) Mount Options: These options are passed to the mount command and are used to control access to the specified XVM volume. For a list of the available options, see the fstab man page.
Metadata Servers:
To delete a node from the list of servers, click its name and then click Delete.
To add a new server-capable administration node to the list of servers, select it from the pull-down list and click Add. To select all server-capable administration nodes, select Add All. The list for a given filesystem must consist of nodes running the same operating system.
To rearrange the priority of a server, select it by clicking its name and then click the arrow buttons as needed.
Note: The list of potential metadata servers for a given filesystem is ordered, but because of network latencies and other unpredictable delays, it is impossible to predict which node will become the active metadata server for the initial mount of a filesystem.
Enable Mount on: A choice of either all nodes in the cluster or a list of selected nodes that you specify on a second page. (The filesystem is always mounted on the current metadata server.)
If Nodes are Added to the Cluster Later:This option permits the filesystem to be mounted on all nodes that might be added to the cluster at some later date. This option is selected by default.
If you chose Only Selected Nodes above, click Next to move to the second page of the task.
Selected Nodes: You can select the desired nodes from the Node list. You can also click Add All to select all nodes, which is the same as selecting All Nodes Currently in Cluster.
Click OK.
To mount existing filesystems on all of their client nodes, do the following:
Filesystem to Mount: Choose the filesystem to be mounted.
Click OK.
If CXFS services are not active, mounting a filesystem will not completely succeed. The filesystem will be marked as ready to be mounted and a warning message will be displayed in the Mount a Filesystem task. The filesystem will not actually be mounted until you have started CXFS services. For information, see “Start CXFS Services with the GUI”.
To unmount filesystems from all of their client nodes, do the following:
Enter the following information:
Filesystem to Unmount: Choose the filesystems to be unmounted.
Force Unmount : Click On to force an unmount for all selected filesystems (no matter how they have been defined) or Default to force an unmount for those filesystems that have the forced unmount option set in their definition.
This option controls what action CXFS takes if there are processes that have open files or current directories in the filesystems that are to be unmounted. If forced is used (by selecting On or by selecting Default if force is the default behavior), the processes will be killed and the unmount will occur. If you select Off, the processes will not be killed and the filesystem will not be unmounted. The option is set to Default by default.
Click OK.
This task lets you mount a filesystem only on the node to which the GUI is connected (the local node).
To mount a filesystem locally, do the following:
Enter the following information:
Filesystem to Mount: Select the filesystem you wish to mount. The list of available filesystems is determined by looking for block devices containing XFS superblocks.
Mount Point: Specify the directory on which the selected filesystem will be mounted.
(Optional) Mount Options: Specify the options that should be passed to the mount command. For more information about available options, see the fstab man page.
By default, the filesystem will remount every time the system starts. However, if you uncheck the box, the mount will take place only when you explicitly use this task.
Click OK.
For more information, see the mount man page.
To unmount a filesystem from the local node, do the following:
Enter the following information:
Filesystem to Unmount: Choose the filesystem to be unmounted.
Remove Mount Information: Click the check box to remove the mount point from the /etc/fstab file, which will ensure that the filesystem will remain unmounted after the next reboot. This item is available only if the mount point is currently saved in /etc/fstab.
Click OK.
You cannot delete a filesystem that is currently mounted. To unmount a filesystem, see “Unmount CXFS Filesystems with the GUI”.
To permanently delete an unmounted filesystem, do the following:
Filesystem to Delete: Choose the name of the filesystem from the pull-down list.
Click OK.
This task lets you delete a local filesystem's mount information in /etc/fstab.
| Note: The filesystem will still be present on the volume. |
Do the following:
Filesystem Name: Select the filesystem for which you want to remove mount information. The list of available filesystems is determined by looking for block devices containing XFS superblocks.
Click OK.
If relocation is explicitly enabled in the kernel with the cxfs_relocation_ok systune, you can relocate the metadata server for a filesystem to any other potential metadata server in the list (see “Relocation” in Chapter 1). The filesystem must be mounted on the system to which the GUI is connected.
Enter the following information:
Filesystem: Select the desired filesystem from the list.
Current Metadata Server: The current metadata server will be displayed for you.
New Metadata Server: Select the desired node from the list.
The selected server will assume responsibility for moderating access to the selected filesystem after you run the Start CXFS Services task; see “Start CXFS Services with the GUI”.
Click OK to complete the task.
CXFS kernel membership is not affected by relocation. However, users may experience a degradation in filesystem performance while the metadata server is relocating.
The privileges tasks let you grant specific users the ability to perform specific tasks and to revoke those privileges.
| Note: You cannot grant or revoke tasks for users with a user ID of 0. |
This section discusses the following:
You can grant access to a specific task to one or more users at a time.
| Note: Access to the task is only allowed on the node to which the GUI is connected; if you want to allow access on another node in the pool, you must connect the GUI to that node and grant access again. |
Do the following:
Select the user or users for whom you want to grant access. You can use the following methods to select users:
Click to select one user at a time
Shift+click to select a block of users
Ctrl+click to toggle the selection of any one user, which allows you to select multiple users that are not contiguous
Click Select All to select all users
Click Next to move to the next page.
Select the task or tasks to grant access to, using the above selection methods. Click Next to move to the next page.
Confirm your choices by clicking OK.
Note: If more tasks than you selected are shown, then the selected tasks run the same underlying privileged commands as other tasks, such that access to the tasks you specified cannot be granted without also granting access to these additional tasks.
To see which tasks a specific user can access, select View: Users. Select a specific user to see details about the tasks available to that user.
To see which users can access a specific task, select View: Task Privileges. Select a specific task to see details about the users who can access it and the privileged commands it requires.
Suppose you wanted to grant user diag permission to define, modify, and mount CXFS filesystems. You would do the following:
Select diag and click Next to move to the next page.
Select the tasks you want diag to be able to execute:
Ctrl+click Define CXFS Filesystem
Ctrl+click Modify CXFS Filesystem
Ctrl+click Mount CXFS Filesystem
Click Next to move to the next page.
Confirm your choices by clicking OK.
Figure 10-6 shows the tasks that diag can now execute. This screen is displayed when you select View: Users and click diag to display information in the details area of the GUI window. The privileged commands listed are the underlying commands executed by the GUI tasks.

Suppose you wanted to give user sys access to all tasks except changing the cluster contents (which also implies that sys cannot delete the nodes in the cluster, nor the cluster itself). The easiest way to do this is to select all of the tasks and then deselect the few you want to restrict. You would do the following:
Select sys and click Next to move to the next page.
Select the tasks you want sys to be able to execute:
Click Select All to highlight all tasks.
Deselect the task to which you want to restrict access. Ctrl+click Add/Remove Nodes in Cluster .
Click Next to move to the next page.
Confirm your choices by clicking OK.
You can revoke task access from one or more users at a time.
| Note: Access to the task is only revoked on the node to which the GUI is connected; if a user has access to the task on multiple nodes in the pool, you must connect the GUI to those other nodes and revoke access again. |
Do the following:
Select the user or users from whom you want to revoke task access. You can use the following methods to select users:
Click to select one user at a time
Shift+click to select a block of users
Ctrl+click to toggle the selection of any one user, which allows you to select multiple users that are not contiguous
Click Select All to select all users
Click Next to move to the next page.
Select the task or tasks to revoke access to, using the above selection methods. Click Next to move to the next page.
Confirm your choices by clicking OK.
Note: If more tasks than you selected are shown, then the selected tasks run the same underlying privileged commands as other tasks, such that access to the tasks you specified cannot be revoked without also revoking access to these additional tasks.
To see which tasks a specific user can access, select View: Users. Select a specific user to see details about the tasks available to that user.
To see which users can access a specific task, select View: Task Privileges. Select a specific task to see details about the users who can access it.