This chapter introduces you to the concepts of shaping data using MineSet Tools. These subjects are presented as preparation for the task of creating a classifier, which is covered in the next chapter. This chapter includes the following sections:
Confronted with an unfamiliar dataset, your first move might be to explore with the Record Viewer and Statistics Visualizer. (See Chapter 2, “Accessing Data with MineSet.”) In this chapter the process continues by shaping or transforming the raw data. For example, you may find you have too much information to make sense of. One the easiest ways of simplifying a visualization is by adding, removing, or combining columns. This manipulation does not change the underlying data, merely the session file on which you are currently working. The sequence of transformations that you apply will be referred to as the history for that Tool Manager session.
The Tool Manager is the graphical user interface (GUI) you use for most of your interactions with the MineSet components. With Tool Manager you can select an existing data source, transform or analyze that data, and visualize the results using any of the MineSet individual tools.
For detailed information on how to interact with MineSet visualizers, see the specific tool entry in the MineSet Enterprise Edition Reference Guide .
| Note: The Tool Manager may require some manual work to make data files not created by MineSet compatible; see the MineSet Enterprise Edition Interface Guide . |
The functions of the buttons shown in Figure 3-1 are indicated in Table 3-1. To transform data, select the column from the Current Columns pane, then click the appropriate button.
Start Mineset (refer to “Starting MineSet” in Chapter 2).
From the Tool Manager window select a dataset using the File > Open New Data File pulldown menu. Click on a file in the Open Data File dialog, and the dataset's column headings appear in the Current Columns window of the Data Transformations pane (Figure 3-1).
Table 3-1. Button Functions on Tool Manager's Data Transformations Pane
Button Title: | Action: |
|---|---|
Remove Column | Deletes all currently selected columns. |
Bin Columns | Assigns each record to a certain range (bin). |
Aggregate | Performs sum, average, min, max, or count aggregation of some columns, while grouping by others. It is also possible to array index the aggregated columns. |
Filter | Creates a subset of the data based on a boolean expression. Only records for which the expression evaluates to true are kept. |
Change Types | Changes a column's name as well as type, for example from float to int. (See Table 3-3 for an explanation.) |
Add Column | Adds a new column based on a mathematical expression, which may include other columns. |
Apply Model | Labels new records with an existing model or backfits data. |
Sample | Selects a random subset of the data in large datasets. |
Show Columns Sorted | Sorts the columns of the dataset alphabetically. |
To remove or add a column, do the following from the Tool Manager Data Transformations pane:
Remove Column—Select a column that is not relevant to your visualization or mining, then click the Remove Column button. Deleting extraneous columns may save computational time. To choose multiple non-contiguous columns for simultaneous removal, hold down the Ctrl key while selecting the additional columns. Use the Shift key for contiguous columns.
Add Column—Click the Add Column button to get a dialog box to specify a new column name and mathematical expression (Figure 3-2). For example, you could add a new column called “minor_age” based on the column “age,” using the expression: “if age is less than or equal to 18 then minor_age is true; else minor_age is false.” Such and expression is written “if (`age' <= 18) then (`minor_age' = 1) else (`minor_age' = 0).”

To accomplish this, when you click the Add Column button, a dialog box appears (Figure 3-2).
Enter the new column's name in the dialog box, and use the popup menu below it to specify the column type (integer, string, floating point, and so on). Column names should contain no spaces.
Fill in the definition of the expression in the large text entry area:
Use the scrolled lists in the lower left to quickly select from available columns and operators.
To insert a column name or operator into the expression, either double-click it in the scrolled list, or select it and click the arrow to the right of the list.
Click the Check Expression button to check that the expression syntax is correct. Click OK to dismiss the status box. Click OK again to dismiss the Add Column dialog box.
The Add Column dialog box checks for type compatibility: if you have assigned a numerical expression to a string column (or vice versa), a warning message appears, and the type of the new column is automatically changed to be correct.
To organize a model or visualization, records must often be grouped into bins, especially to create the sliders that are needed for an animation. You can change bin boundaries, and experiment with the number and range of columns to make a visualization less complex.
For example, if you wanted to break up a range of ages into: 0-18, 19-30, 31-50, 51-60, 61+. those ranges are expressed as (...18], (18 ... 30], (30 ... 50], (50 ...60], (60 ...]. The open parenthesis next to a number indicates it is not included in the range. A square bracket next to number indicates it is included. See also the glossary entry for Binning, and the “Binning” entry in the MineSet Enterprise Edition Reference Guide .
From the Tool Manager Data Transformations pane, click Bin Columns to get a dialog box to specify the binning options (Figure 3-3).
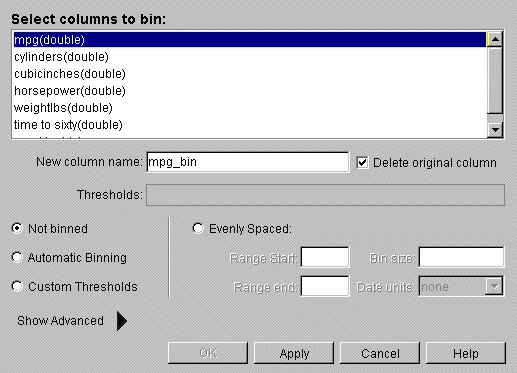
In the top pane of the dialog, click the column that is to be divided into bins. The default is “Not binned.” Choose a binning method and the name of the binned column appears in the “New column name” field, or you can type in a new name. If you select more than one column for binning, “New column name” stays inactive.
To delete the original column, ensure that the box labeled “Delete original column” is checked.
Choose Automatic Binning, Custom Thresholds, or Evenly Spaced (meaning evenly spaced bins).
Automatic Binning lets MineSet suggest the bin thresholds using machine learning.
Custom Thresholds allows you to specify bin thresholds in the Thresholds text field.
Evenly Spaced lets you specify the Range start and end, and the size of each bin.
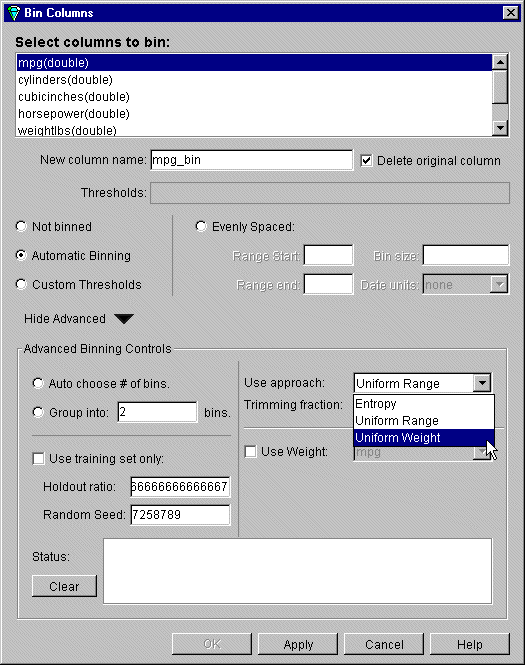
When you click the “Show Advanced” arrow, the Advanced Options Binning panel is displayed (Figure 3-4).
From the Advanced Binning Options panel you can make any of the following choices:
Table 3-2. Advanced Binning Options
Selection
Resulting Action
Auto choose # of bins
MineSet automatically decides the best number of bins.
Group into ___bins
The dataset is divided into the number of bins you specify.
Use Approach
This menu gives a choice of three approaches to creating bins.
Entropy
Picks bins so that the label values within each bin are similar, thus minimizing entropy or disorder among binning labels.
Uniform Range
Divides the dataset into bins evenly distributed across the range.
Uniform Weight
Divides the dataset into bins each with the same weight (or number of instances) of data per bin.
Trimming fraction
(Only available from Uniform Range and Uniform Weight). Lets you eliminate outliers from bin thresholds. Outliers are single instances that lie outside the bulk of the data.
Use training set
Divides the dataset into subsets and uses only the holdout ratio.
Holdout ratio
Specifies the percentage of the dataset to be used to create the binning.
Random Seed
Specifies where to start dividing the dataset. The random seed number changes with the time. If you want to get exactly the same data on your next run, you must specify the same random seed.
When you choose Custom Thresholds to set your own binning thresholds you can also enter:
Thresholds
In the text field, enter threshold ranges separated by commas, with a parenthesis next to the number that is not included in the range, and a square bracket next to the number that is included. For example, all ages above 18, not including 18 itself, up to and including 30 is expressed as (18 ... 30].
A date entry in the Use custom thresholds field requires double quotations around it. If you enter dates without quotation marks they are added automatically.
“1/1/99”, “2/1/99”, “3/1/99”, “4/1/99”, “5/1/99”, “6/1/99”
You can also use the mm/dd/yyyyy format (for example: “05/22/1999”).
Evenly spaced
When you click this button the text fields below it become active. Enter the start of the binning range, the end of the range, and the size of the bins into the appropriate fields.
Do not put quotation marks around dates used with Evenly spaced thresholds. You can use both date formats (1/1/96 or 01/01/1999) in this field.
Further details can be found in the “Binning” entry in the MineSet Enterprise Edition Reference Guide .
You can create new columns out of the contents of existing columns by aggregation. For example, using the churn dataset you can create a subset of the data in a column containing the average churn per state. You can also distribute the contents of the columns using various criteria. Because aggregation reshapes the data, it is important to refer to the MineSet Enterprise Edition Reference Guide for background on arrays and distribution for a fuller understanding of this feature. See the glossary definition for Aggregate.
The process of aggregation will reduce the overall number of rows in a dataset by grouping sets of rows in the original dataset into new aggregate rows.
To create aggregations, follow these steps:
From the Tool Manager Data Transformations pane, click Aggregate to get a dialog box to create simple aggregations, make arrays, or distribute columns (Figure 3-5). The columns of the current dataset initially appear in the central “Group By Columns” text field.
Select a column to aggregate, and click the left arrow button to move the column left. Leave the “Group By Columns” entries in the center (the columns by which you want to index), and move all the rest to the right column. (Hold down the Ctrl key while selecting to gather multiple columns.)
Columns to aggregate—move columns here to create an aggregate. Values in the aggregated columns are summed, averaged, given a minimum or maximum, or counted, depending on the boxes checked at the bottom of the panel.
Group-By columns—columns remaining here are unchanged throughout the operation. For each set of records with the same combination of values in the Group-By columns, only one record is output in the resulting table.

Note: If you have many columns or numeric columns in the group-by list, you may get more rows in the result than you expect. Typically, a few columns having few values each are used in the group-by list. Columns to remove—columns removed are not used in the aggregation.
Click the check boxes under the columns to specify how values are to be combined in the aggregation: summed, averaged, the minimum or maximum value, or counted. Minimum and maximum are rarely used.
For numeric columns choose any combination. For other types, only Count is permitted. Each option gives a separate result; selecting average and max gives you one column with average values, and another one with maximum values. The default column name identifies the process used to create it—count_state, avg_weightlbs and so on.
Use the popup menus in the lower right to specify indexes (if the result is to be an array) and a distribution column (if the result is to be distributed).
Arrays are useful for creating sliders, which are needed for the animations available in several of the visualizers. Columns to be indexed in an array must have been previously binned in order to show how one characteristic varies according to (indexed by) another. See the “Aggregate” entry in the MineSet Enterprise Edition Reference Guide for further explanation of arrays and distribution.
Click OK.
Make sure the Current Columns text box in the Data Transformations window shows the new column names that result from applying your criteria.

An example of using aggregation is detailed in the MineSet Enterprise Edition Tutorial , distinguishing the average churn by state.
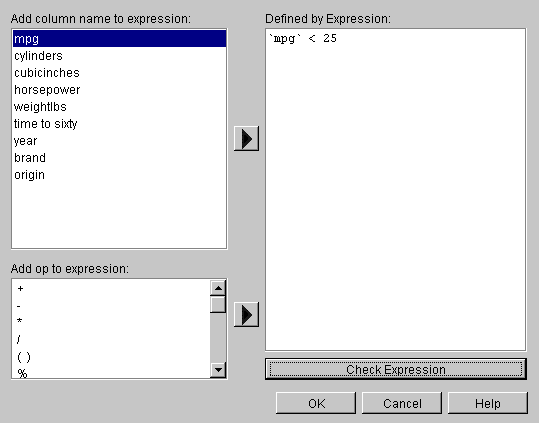
You can select a subset of the data based on an expression involving column values, for example, you can leave only those records in which the age is less than 20, or miles per gallon is less than 25. Once you have loaded a dataset using the Tool Manager, you can begin filtering by following these steps:
From the Tool Manager Data Transformations pane, click Filter to get a dialog box to filter data using a mathematical expression (Figure 3-6).
Select a column name and operators from the left side to build an expression on the right, or you can type it directly in the Defined by Expression text field. The resulting table includes only records for which the expression is true (or, if numerical, non-zero). See also the “Filter Panel” entry in the MineSet Enterprise Edition Reference Guide . For a complete description of the expression definition language, see the MineSet Enterprise Edition Interface Guide .
Some databases store numerical values as strings. Oracle databases store all numbers (both integers and real numbers) in a single format, which defaults to the data type double in the Tool Manager. Use the Change Types button to ensure that these values are processed correctly. Use the same button to change column names.
From the Tool Manager Data Transformations pane, click Change Names/Types. A dialog box appears showing column headings and their types (Figure 3-7).
Select a column that you can convert, and click the New type menu. The list shows possible column types (invalid types are shown in gray). Explanations of the choices are shown in Table 3-3.
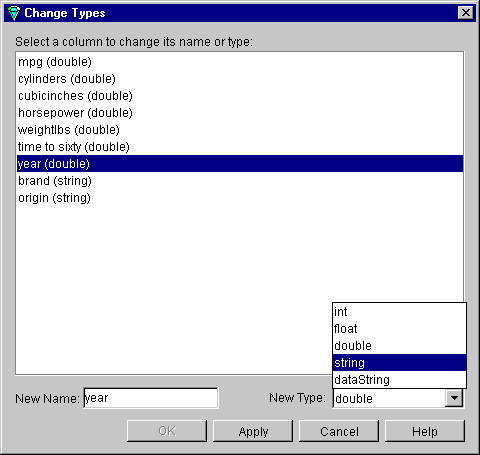
Table 3-3. Column Type Meanings
Type | Meaning |
|---|---|
int | A 32-bit signed integer. |
float | A single-precision floating-point number. The decimal point is optional. |
double | A double-precision floating-point number. The decimal point is optional. |
dataString | A dataString is a string whose value is not kept in a common string table, thus every data string value is stored independently, even when multiple values are identical. Seldom used. |
string | A string of characters that is stored in a common string table, which saves memory. If you are unsure whether to use a string or a dataString, use a string. |
date | Specified as the date type from the database. |
bin | A column created by a binning operation. |
After selecting a new type, click Apply to have the change take effect.
Click Close to exit the dialog box.
If you try to convert an inappropriate field (such as a name) to a number, the resulting values are all zeroes.
If you have previously created a model, you can use the Apply Model button to label new records in the current table, to estimate probabilities for a label value, to test the performance of the model on the current table, or to backfit the current table onto an existing model. See Chapter 7, “Understanding Predictive Modeling” for examples.
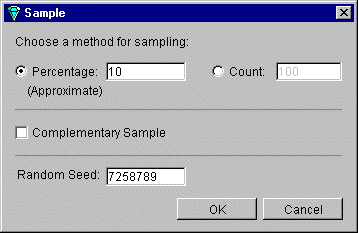
If your dataset is too large to work with efficiently, you may want to work with a randomly sampled subset. After you have loaded your data file, from the Tool Manager Data Transformation pane:
Click the Sample button to bring up the Sampling dialog box (Figure 3-8).
Choose one option:
Click the Percentage check box and type in the text field the percentage of the current dataset you want to be sampled. The percentage is approximate.
Click the Count check box and establish the number of records you want in the sample.
Click the Complementary Sample check box to get all records except those that fall in the random sample. For example if the Complementary Sample box is not checked when you request a 10% sample, when you check the box, you get the remaining 90% of the data. Click OK.
(optional) Enter a seed number in the Random Seed field on which to base the random sample. If no seed is specified, a number based on the current time is used as the seed. If you want a different random sample, specify a different random seed. Using the same seed for different mining explorations of a dataset allows you to work with the same random sample each time. Change the seed when you want to test how well a discovery holds up across the dataset. See also the glossary entry for Random Seed.
To see the history of previous operations, and go back if you change your mind or made a mistake, there are two Table History buttons at the bottom of the Data Transformations pane. Click the left arrow button to show the table at an earlier step. Click the right arrow button to return the table to its current state. See Table 3-4 for an explanation of the button meanings.
Table 3-4. Table History Meanings
Field | Meaning |
|---|---|
Current view is | Counts changes made and indicates which step you are viewing. |
Prev: and Next: | Notes the actions taken, helps you keep track. |
Edit Prev. Op | Brings up dialog box for editing the operation shown in the Prev: field. Be careful about deleting operations used in subsequent operations. |
Delete Ops. to End | Removes all operations after the current step. If you are not already at the end of the history, the Data Destination panel becomes active again after clicking the button. |
History of Operations View tab | Brings up a complete history of the Data Transformation table (Figure 3-9). |
Single Transformation and Data Destination View tab | Takes you to a single point in the history, presenting you with Tool Manager at that state of affairs. |

As with Edit Prev. Op, changing one operation usually affects (sometimes invalidates) subsequent operations in the history. You can select a specific operation to edit, add, or view. The History of Operations view warns you when changes affect the history, and shows you the new history as it occurs. Click on the diagram to return to a previous operation, or click on the table between operations to get to the table between states.
To return to your previous position in the Tool Manager, click the Single Transformation and Data Destination View tab.
Among other ways of transforming data, weighting records lets you make some records more important than others, or less important, if the need arises. As an example, a phone company stores all fraudulent phone calls in the dataset, while storing only a small fraction of non-fraudulent calls. By using record weighting, it is possible to give each record its true proportion of the total population of customers.
Some datasets are already aggregated, and the records have a natural “count” associated with them (for example, statistics about cities in the U.S. usually have an associated count of the population). This count attribute can be mapped to weight, which is equivalent to replicating each record by the number of counts.
The semantics of record weighting is that a record weight of 2 is equivalent to two records with a record weight of 1. Floating-point weights are allowed.
The weighting of records can be done using the Advanced Options dialog for all inducers (see the glossary definition for Inducer). After you have loaded your dataset, weight records by following these steps:
In the Tool Manager Data Destinations pane, choose Mining Tools, and click the Classify tab.
From the Mode popup menu, choose any inducer.
Click the Advanced Options button, and from the resulting dialog box, click the Use Weight check box. This means the records will be weighted by the selected attribute chosen in step 4.
Choose the column for the weight.
Click the “Weight is Attribute” check box if the attribute used in step 4 is also to appear as a normal attribute. If the box is unchecked, the weight attribute will have no influence over the induction process.
Click OK to accept these options, and Go to run your chosen inducer.
Column importance helps you discover which are the most important columns in predicting different values for a label column you choose. The difference between column importance and clustering (refer to Chapter 12, “Segmenting the Data with Clustering”) is that with column importance, you decide which label you will use to determine the importance of columns. In clustering, the data itself shows you which are the discriminating factors, but does not supply labels.
Use column importance for example, to find the best three columns for mapping to axes in the Scatter Visualizer. You simply select the label and run the tool, and a window appears with the three columns that are the best three discriminators. A measure called “purity” (a number from 0 to 100) informs you how well the columns discriminate the different labels. Adding more columns increases purity.
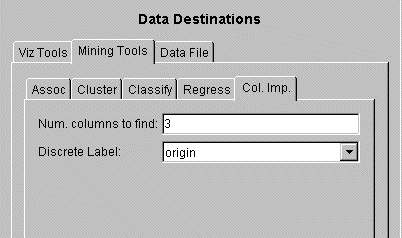
From the Tool Manager Data Destinations pane, choose the Mining Tools tab and click the Col. Imp. (Column Importance) tab shown in Figure 3-10.
To run in simple mode, choose a discrete label from the popup menu, specify a number in the “Num. columns to find” field, then click Go. The bottom status window gives the result.
To control the choice of columns, click the Advanced Mode button and the Column Importance dialog box appears, (see Figure 3-10).
In the dialog box, you may click the Use Weight check box and select a column from the “Importance with respect to column” popup menu. This helps decide whether the column behaves as a regular attribute for determining importance. See also “Weighting Records”. For details of tool operation see the “Column Importance” entry in the MineSet Enterprise Edition Reference Guide .
The dialog box contains two lists of column names: the left list contains the available attributes and the right list contains attributes chosen as important (either by you or the Column Importance algorithm). You move a selected column from left to right by clicking the right-pointing arrow.
In the middle section of the dialog box are two alternatives in advanced mode:
Find Several Important Attributes
Click the button at ...find [number] additional important columns. If you click Go with no further changes, the effect is the same as in simple mode. The specified number of important columns are found and moved to the right column and cumulative purity is given.
However, if you move column names from the left list to the right by clicking on the right-pointing arrow, you can specify columns to be included and let the system add more.
Click Go to see the cumulative purity of each column, together with the previous ones in the list. A purity of 100 means that using the given columns, you can perfectly discriminate the different label values in the dataset.
Rank Available Attributes
You can test the gain in purity that each column adds to those already in the list on the right. If you use the cars dataset, as shown in Figure 3-11, you can move the column cylinders to the list on the right, and then ask the system to compute any incremental improvement in purity that each column remaining in the left column yields. The cumulative purity is computed for columns on the right (already marked important). The output is displayed in the right column.
Click the button at ...compute improved purity for left columns, cumulative purity for right columns. This submode permits fine control over the process. If two columns are ranked very closely, you might prefer one over the other (for example, because it is cheaper to gather, more reliable, or easier to understand).
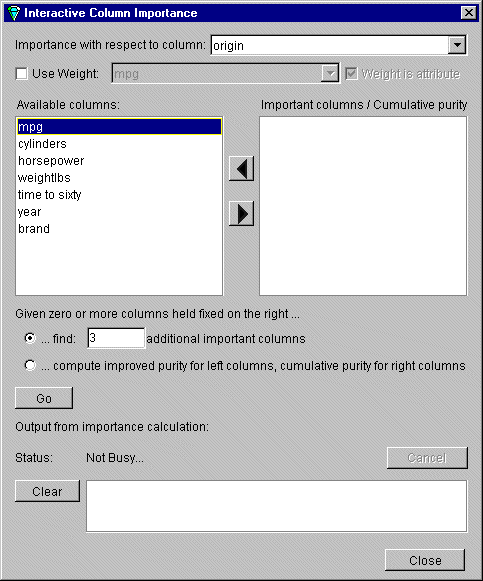
Column importance is useful for finding the best three axes for the Scatter and Splat Visualizers. It is also useful when using the Tree Visualizer, to find a good discriminatory hierarchy (hierarchy that separates different label values), when you select the label to be the key for the Tree Visualizer.
See the “Column Importance” entry in the MineSet Enterprise Edition Reference Guide for details on using a sample file with Column Importance.