Before configuring and administering XVM volumes, you should be familiar with the concepts that underlie the administration commands. This chapter describes the tasks that XVM performs on physical and logical disk resources. More complete descriptions of the xvm command-line interface (CLI) commands are provided in Chapter 5, “xvm Administration Commands ”. Also see Chapter 10, “XVM Manager GUI”.
This chapter discusses the following:
The following are XVM objects:
This section discusses the following:
A volume is the topmost XVM volume element. It is a collection of subvolumes (described in “Subvolume”) that are grouped together into a single volume name.
Each volume can be used as a single filesystem. Volume information used by the system is stored in logical-volume labels in the volume header of each disk used by the volume.
You can create volumes, delete volumes, and move volumes between systems.
A subvolume is the entry point for I/O. Each subvolume is a distinct address space. Subvolumes can be of the following types:
| Type | Description | ||
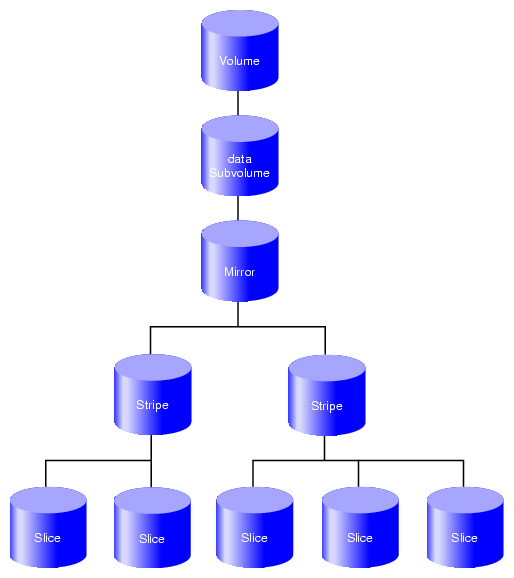
| data | System-defined type that contains most data, including user files. The name of a subvolume of type data is always data. There can be only one data subvolume within a given volume. | ||
| log | System-defined type that contains an external log of XFS filesystem metadata. This log can be used to expedite system recovery after a crash. The name of a subvolume of type log is always log. The log subvolume is optional for a volume; if one is not present, the filesystem log is kept within the data subvolume. There can be only one log subvolume within a given volume. | ||
| rt | System-defined type that contains data appropriate for a real-time filesystem. The name of a subvolume of type rt is always rt. An rt subvolume is generally used for data applications such as video, where guaranteed response time is more important than data integrity. An rt subvolume is optional. There can be only one rt subvolume within a given volume. Volume elements that are part of a real-time subvolume should not be on the same disk as volume elements used for data or log subvolumes.
| ||
| 16-255 | User-defined type that contains other user-defined information as configured by the site (the integers 0- 15 are reserved for system-defined types). You can specify any name for a subvolume with a user-defined type, other than the reserved words data, log, and rt. You can have multiple user-defined subvolumes under a volume if each has a unique type number. |
Subvolume types enforce separation of information. For example, user data in a data subvolume could not overwrite filesystem log data in a log subvolume or data in the user-defined type 16 and type 17 subvolumes.
Figure 2-1 shows a volume with system-defined subvolume types.
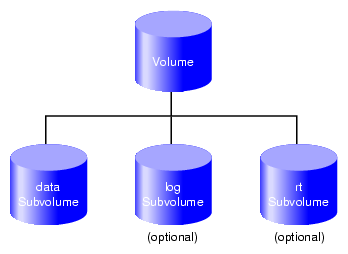
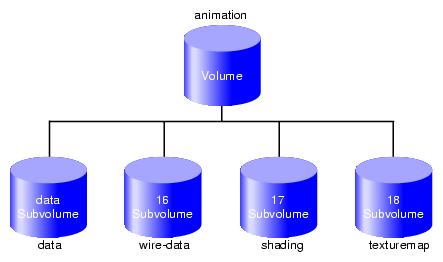
Figure 2-2 shows an XVM volume with user-defined subvolume types, which have been defined as types 16, 17, and 18. In this example, the volume is named animation and the subvolumes are named wire-data, shading, and texturemap . For information on XVM object names, see “Specifying Objects by Name” in Chapter 4.
Subvolumes let you meet goals for performance and reliability. For example, performance can be improved by putting subvolumes on different disk drives.
Each subvolume can be organized independently. For example, you could mirror the log subvolume for fault tolerance and stripe the rt subvolume across a large number of disks to give maximum throughput for video playback.
There can be only one volume element beneath a subvolume in an XVM topology. See “Children”.
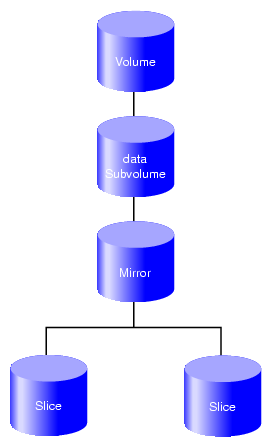
A slice is the lowest level in the topology tree for a volume. A slice defines physical storage; it maps address space of a physical disk onto a volume element.
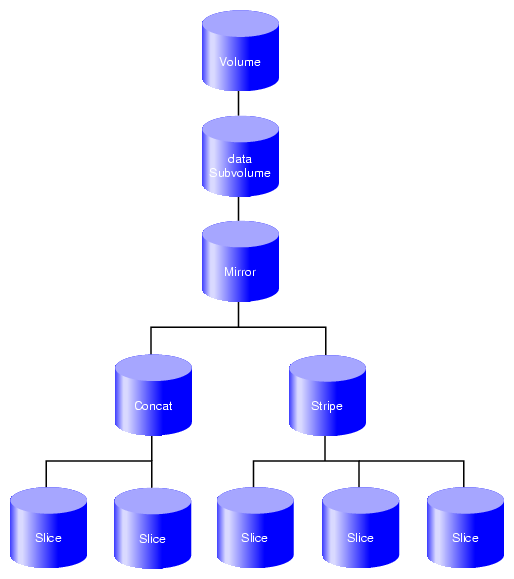
A concat combines other volume elements so that their storage is combined into one logical unit. For example, two slices can be combined into a single concat, as shown in Figure 2-3.

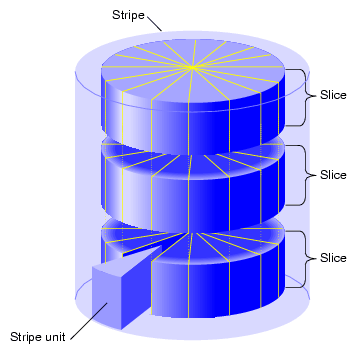
A stripe consists of two or more underlying volume elements. These elements are organized so that an amount of data called the stripe unit is written to and read in from each underlying volume element in a round-robin fashion. You can use striping to distribute data among multiple disks. This provides a performance advantage by allowing parallel I/O activity.
Figure 2-4 shows the concept of a three-way stripe.
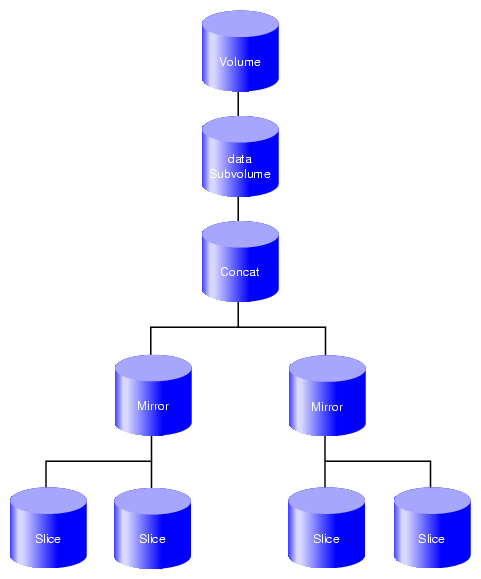
A mirror maintains identical data images on its underlying volume elements. This data redundancy increases system reliability. The components of a mirror do not have to be identical in size, but if they are not there will be unused space in the larger components.
The following figures show various types of mirror composition.
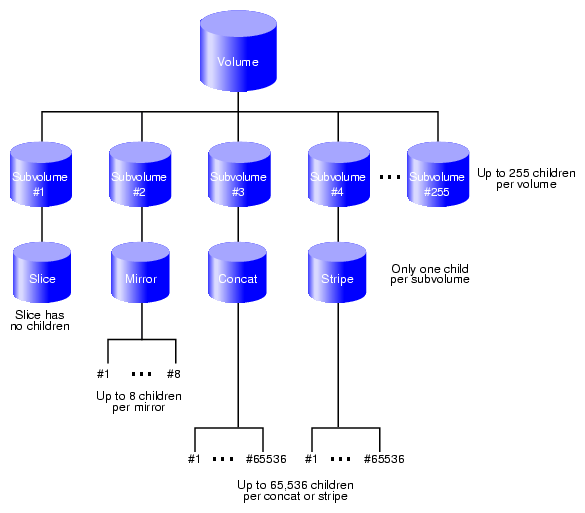
A volume element beneath another volume element in the hierarchy is known as a child of the higher-level volume element. Volumes are limited to 255 children, subvolumes are limited to 1 child, and mirrors are limited to 8 children. Other volume elements are limited to 65,536 children.
Figure 2-9 displays the maximum number of children for each volume element in the XVM topology tree.
This section discusses the following:
XVM has the following domains:
Only the owner of an XVM physvol can modify the configuration on that physvol. There may be an XVM physvol that is seen by a host but owned by another host or another cluster. XVM recognizes the disk and marks it as foreign. A disk without an XVM label is shown as unlabeled .
Cluster domain on a server-capable administration node requires that both the cxfs_cluster service and the cxfs service are started; on a client-only node, cluster domain requires that the cxfs_client services is started.
Figure 2-10 illustrates a physvol that is controlled by a local owner. In this example, the physvol lucy (reported by the xvm command as phys/lucy ) has a local domain of node ricky. The node ricky is part of the CXFS cluster neighbors that also includes the node fred and the node ethel, but neither fred nor ethel can control lucy.
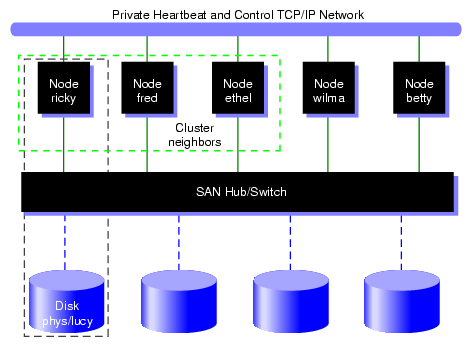
In the configuration illustrated in Figure 2-10, the node ricky can see and modify the configuration of physvol lucy. The nodes fred, ethel, wilma, and betty see lucy as a foreign disk, and display only the disk path and not the physvol name itself. (If necessary, you can execute the show command on a foreign disk to determine its physvol name, as described in “Displaying Physical Volumes with the show Command” in Chapter 5.)
Figure 2-11 illustrates a physvol that has a cluster domain. In this example, the physvol lucy has an owner of cluster neighbors, which consists of the nodes ricky, fred, and ethyl.
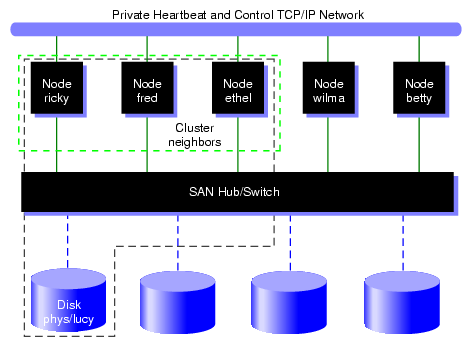
In the configuration illustrated in Figure 2-11, the nodes ricky, fred, and ethel can see and modify the configuration of the physvol lucy. The nodes wilma and betty cannot modify the configuration of lucy, even though they are connected to lucy through a SAN network; they see lucy as a foreign disk, and can display only the disk path.
A volume that spans physvols may not span domains on a running system. A volume that spans local and cluster domains is marked offline .
You can bring up the xvm CLI in either local or cluster domain to perform administrative tasks for the volumes in that domain:
If the required CXFS services have been started, xvm is brought up in cluster domain by default. The xvm:cluster> prompt. indicates that all XVM physvols you create are in the cluster domain. See “CXFS Service Requirements for Cluster Domain”
When the required services are not started, xvm is brought up in local mode (with no warning message about stopped services). The xvm:local> prompt indicates that all XVM physvols you create are in the local domain.

Note: If the required services have not been started, you cannot set the domain to cluster.
You can explicitly specify the domain by invoking xvm with the -domain option, as described in “Invoking the xvm CLI” in Chapter 4 or within an xvm session by using the set domain command, as described in “Changing the Current Domain with the set Command” in Chapter 5.
When you are running XVM in the cluster domain, by default you can see and modify only the XVM physvols that are also in that cluster domain, even if you are running from the node that is the owner of a local physvol. To see and modify local disks, you must either change your domain to local with the set domain command, or you use the local: prefix when specifying a physvol name. Similarly, when you are running XVM in the local domain, you must change your domain to cluster or specify a cluster: prefix when specifying the physvol that is owned by the cluster. For information on setting and specifying XVM domains, see “Invoking the xvm CLI” in Chapter 4.
You can change the owner of an existing physvol by using the give command to give that physvol to a different owner, whether that owner is a single node or a cluster. If the node or cluster that currently owns the physvol is unable to execute the give command, use the steal command to change the domain of an XVM physvol. For information on the give and steal commands, see:
The XVM Manager graphical user interface (GUI) also operates in either domain. See Chapter 10, “XVM Manager GUI”.
This section discusses the following:
See also “Gathering Statistics for Physical Disks and Logical Resources”.
This section discusses the following:
XVM is used with globally unique identifier (GUID) partition table (GPT) disks. The GPT label puts header data in sector 1 of a logical unit (LUN), leaving sector 0 for a master boot record. Partition information is stored in a variable number of sectors, starting at sector 2.
In order to use a GPT disk for XVM volumes, you must use the Linux parted(8) command to format the disk with one partition that must start before block 64. The partition is used for both the XVM metadata and the user's data and it typically includes all of the space on the disk that is not used by the GPT label.
Figure 2-12 shows a GPT disk that is formatted for XVM.

For more information, see “Making a GPT Label” in Chapter 7.
| Note: These instructions only apply to XVM in the local domain. For information on using XVM with CXFS, see CXFS 7 Administrator Guide for SGI InfiniteStorage and CXFS 7 Client-Only Guide for SGI InfiniteStorage. |
Procedure 2-1. Preparing to Configure XVM Volumes in the Local Domain
Do the following:
Install the SGI XVM Standalone pattern according to the instructions in the ISSP release note.
Confirm that the correct modules are loaded. You can use the lsmod command, as in the following example:
# lsmod | egrep 'xvm|pm'

   sgi_xvm               513174  0
   sgi_pm                 97247  19
   sgi_os_lib            128203  4 sgi_xvm,sgi_pm
Verify that a LUN chosen by XVM is not in use by another subsystem:
View all of the paths to disks and partitions on the system by executing the following:
# ls /dev/disk/by-path
XVM will select the LUNs that could potentially be used as XVM LUNs.
View the potential XVM LUNs by executing the following:
# xvm show -v unlabeled
For example:
# xvm show -v unlabeled
Unlabeled disk unlabeled/dev/pm/SGI-TP9700--lun6-600a0b8000269d1e0000c9b14d31a849
================================
using paths:

/dev/disk/by-path/pci-0000:08:03.0-fc-0x22000011c61dd97e-lun-0 <sdaa 65:160> affinity=none ws

/dev/disk/by-path/pci-0000:08:03.0-fc-0x21000011c61dd97e-lun-0 <sdab 65:176> affinity=none ws

/dev/disk/by-path/pci-0000:08:03.1-fc-0x21000011c61dd97e-lun-0 <sdbn 68:16> affinity=none ws

/dev/disk/by-path/pci-0000:08:03.1-fc-0x22000011c61dd97e-lun-0 <dbm 68:0> affinity=none ws

Unlabeled disk unlabeled/dev/pm/SGI-TP9700--lun7-600a0b8000269d1e0000c9b14d31a849
================================
using paths:

/dev/disk/by-path/pci-0000:08:03.0-fc-0x22000011c61dd850-lun-0 <sdao 66:128> affinity=none ws

/dev/disk/by-path/pci-0000:08:03.0-fc-0x21000011c61dd850-lun-0 <sdaq 66:160> affinity=none ws

/dev/disk/by-path/pci-0000:08:03.1-fc-0x22000011c61dd850-lun-0 <sdca 68:224> affinity=none ws

/dev/disk/by-path/pci-0000:08:03.1-fc-0x21000011c61dd850-lun-0 <sdcb 68:240> affinity=none ws

Unlabeled disk unlabeled/dev/pm/SGI-TP9700--lun8-600a0b8000269d1e0000c9b14d31a849
================================
using paths:

/dev/disk/by-path/pci-0000:08:03.0-fc-0x22000011c61e1a46-lun-0 <sdt 65:48> affinity=none ws

/dev/disk/by-path/pci-0000:08:03.1-fc-0x22000011c61e1a46-lun-0 <sday 67:32> affinity=none ws

/dev/disk/by-path/pci-0000:08:03.1-fc-0x21000011c61e1a46-lun-0 <sdbd 67:112> affinity=none ws

/dev/disk/by-path/pci-0000:08:03.0-fc-0x21000011c61e1a46-lun-0 <sdu 65:64> affinity=none ws
Note: This output groups together all the paths to a single LUN. Do not use a given disk device as an XVM volume if you are already using it to mount a filesystem outside of XVM. XVM cannot always detect that a LUN is already in use by some other subsystem, so verify that the LUN is not in use before proceeding.
Format each disk you will use for the XVM volume as a GPT disk. See “Partition Layout with GPT Disk Format”.
(Optional) Set up Command Tagged Queuing (CTQ) .
(Optional) Enable write-caching.
In order to create XVM logical volumes on a formatted physical disk, you must use the label command to write an XVM physvol label on the disk, which allows XVM to control layout of its data in the GPT partition. See “Assigning Disks to XVM with the label Command” in Chapter 5.
| Note: In a CXFS cluster, any XVM physvols that will be shared must be physically connected to all nodes in the cluster. |
When you label a new XVM disk, XVM automatically probes the disk as part of the label process. All disks are also probed when the system is booted to determine which disks are XVM disks.
| Note: However, if you add a previously labeled XVM physvol to a running system, you must explicitly use the probe command to probe the disk in order for the system to recognize the disk. See “Probing a Physical Volume with the probe Command ” in Chapter 5. |
You cannot label a disk as an XVM disk if the disk contains any partitions that are currently in use as mounted filesystems.
This section describes the following:
To display information about physvols, both labeled and unlabeled, use the show command. You can also use the show command to display information about disks that are foreign to the current node, as described in “Displaying Physical Volumes with the show Command” in Chapter 5.
To change the owner of an existing XVM physvol, giving that physvol to a different local or cluster owner, use the give command. If the node or cluster that currently owns the physvol is unable to execute the give command, use the steal command to change the domain of a physvol. See:
When the system boots, all disks connected to the system are probed to determine whether they are XVM disks. If you add an XVM disk to a system that is already running, you must manually probe the disk by using the probe command so that the kernel recognizes the disk as an XVM disk. See “Probing a Physical Volume with the probe Command ” in Chapter 5.
XVM lets you replace a disk on a running system without rebooting the system. When you do this, you must regenerate the XVM label on the replacement disk. To dump the commands to a file that you can use to regenerate a physvol label, use the dump command.
| Note: When you dump the commands to regenerate a physvol label, you must separately and explicitly dump the commands to regenerate the volume element tree that leads to the physvol, as described in “Reconstructing Volume Elements with the dump Command” in Chapter 5. |
You can rename a physvol with the name option of the change command. See “Modifying Volume Elements with the change Command ” in Chapter 5
To remove a physvol from the system, use the unlabel command to remove the physvol label from an XVM disk and restore the original partitioning scheme. The unlabel -force command deletes each slice that currently exists on the physvol unless the slice is part of an open subvolume (and therefore its deletion will cause the subvolume state to go offline). See “Removing Disks from XVM with the unlabel Command” in Chapter 5.
After you have created the physvols that you will use for your volume, you can create the elements that will make up the logical volumes.
This section discusses the following:
You can create an XVM topology tree starting from the top or the bottom. Only those trees that end in a slice will have labels written to disk and will therefore be persistent across boots.
While you are building the topology tree, you may find it useful to display the existing hierarchy by using the -topology option of the show command.
| Note: When you create stripes, mirrors, concats, subvolumes, and volumes, you have the option of not specifying which children will compose these volume elements. If you do not specify the child elements, an empty volume element is created and you can attach volume elements at a later time. |
When you create volume elements other than volumes, they must be associated with a volume. You can name and create the volume explicitly when you create the volume element, or you can specify that the volume be automatically generated with a temporary name. Unless you specify the subvolume type, a subvolume of type data is automatically generated for the volume. Automatic volume and subvolume generation ensures that when an object is constructed, it can be immediately used by an application such as mkfs to initialize a filesystem.
When you explicitly name a volume, the volume name is stored in the label space and remains persistent across machine reboots. When the system generates a volume name automatically, a different name might be generated when the system reboots. Slices, however, are a special case; when the system generates a volume name for a slice, that volume name is permanent and persistents across reboots.
You can make a temporary volume name persistent across reboots by using the change command to rename the volume; see “change” in Chapter 5.
Volume elements that compose an XVM volume are named as follows:
As described in “Automatic Creation of a Volume and Subvolume ”, volumes can be created and named when you create the elements within those volumes. You can also create an empty volume and give it a name explicitly.
You can name a subvolume explicitly only if it is of a user-defined type. See “Subvolume”.
You can name concats, mirrors, or stripes explicitly when you create them. In this case, the volume element name is stored in the label space and remains persistent across machine reboots. Information on setting the size of the label space is provided in “Assigning Disks to XVM with the label Command” in Chapter 5.
If you do not name concats, mirrors, or stripes explicitly, you must specify that a temporary name should be generated.
When XVM generates a temporary name, it uses the following format for most objects, where type is the type of object and N is a counter that increments with each object of that type created since the xvm module, usually at system boot time:
typeN
There is a separate counter for each object type.
Slices are named automatically when you create them.
Slice names remain persistent across machine reboots. This makes it convenient to reorganize and rebuild volumes using slices you have defined for each disk, even after you have rebooted the system.
You can make temporary volume element names persistent across reboots by using the change command to rename the volume element.
It is not necessary to use the name of a volume element when you manipulate it. You can use its relative position in the volume instead. These naming options as well as general information on the syntax of volume element names are described in “Object Names in XVM” in Chapter 4.
To explicitly attach a lower-level volume element to a higher-level volume element, use the attach command. You can also attach elements together by creating volume elements.
XVM enforces the following rules and restrictions:
You attach a lower-level item in the topology tree (the source of the attach) to a higher-level item (the target of the attach):
The source of an attach must be a subvolume, concat, mirror, stripe, or slice
A subvolumes can be attached only to a volume
A volume cannot be the source of an attach because it is the highest element in the hierarchy
Subvolumes can have only one child.
A volume cannot have more than one subvolume of a given type. See “Subvolume”.
A mirror cannot have more than eight legs.
If you specify a topology position (slot) when you create or attach a volume element to a target volume element, the target volume element must not already have a volume element in that position.
You can add a volume element only to the end (rightmost position) of a concat and you can add mirror legs; you cannot insert a volume element in the middle of a concat or change the size of a stripe.
When you attach a volume element to a mirror, this initiates a mirror synchronization known as a revive . A message is written to the system log when this process is complete. You cannot halt a mirror revive after it has begun except by detaching all but one of the legs of the mirror.
When you use the -safe option of an XVM command, you cannot attach volume elements that change the way the data is laid out in the target or any ancestor of the target even if the target does not belong to an open subvolume.
When you attach multiple source volume elements to a single target volume element, they are attached one at a time, in turn. If an attach in the list fails, XVM attempts to restore the volume elements to their previous parents. If a volume element cannot be restored, a warning message is generated and manual intervention is needed.
To detach a volume element from its parent, use the detach command. When you detach a volume element, a new volume will be created, just as a volume is created when you create a volume element. You can name the generated volume explicitly or you can specify that the volume be automatically generated with a temporary name. A data subvolume is also automatically generated for the volume element you are detaching unless the volume element you are detaching is itself a subvolume of a different type.
An element of an open subvolume can only be detached if its detachment will not cause the subvolume to go offline. The only element that can be detached from an open subvolume is a mirror leg that is not the last leg of that mirror. You cannot detach the last valid leg of an open mirror from that mirror, because this will cause the mirror to go offline.
| Note: If a subvolume is not open, you must use the -force option to detach the last leg of a mirror or a mirror leg that is being revived. The detach -safe command imposes this restriction even if the subvolume is not open. For more information, see “detach” in Chapter 5. |
To create a slice from a block range of an XVM physvol, use the slice command. You can specify the starting block of a slice and you can specify the length of a slice. In addition, you can specify the following methods of creating slices:
Create a slice out of all of the blocks of a physvol.
Divide a specified address range into equal parts, with each part a different slice.
Slice multiple physvols at once.
Specify that a slice must start on a sector that is an even multiple of some number, relative to the start of the logical unit (LUN). The slice length is rounded to an even multiple of that number. This is useful if the LUN is created as a stripe in a redundant array of independent disks (RAID).
Slices are named automatically and are persistent across machine reboots. You cannot rename slices.
The volume that is generated when you create a slice is persistent across machine reboots. You can specify the name of the volume that is created when you create a slice. By default, the volume name will be the same as the slice object name.
To create a volume element that concatenates all of its children into one address space (known as a concat), use the concat command.
During concat creation, XVM enforces the rules described in “Attaching Volume Elements”.
To create a volume element (known as a stripe) composed of multiple chunks that alternate across the address space, thereby allowing parallel I/O operations for higher performance, use the stripe command.
| Note: It is possible to create a stripe that is made up of volume elements of unequal size, but this will result in unused space on the larger volume elements. |
During stripe creation, XVM enforces the rules of attachment described in “Attaching Volume Elements”.
For information on configuring stripes that span two host bus adapters (HBAs), see “Volumes and Failover” in Chapter 1.
A mirror is a volume element that provides data redundancy in that each mirror leg (child) is an exact duplicate of every other mirror leg. If any leg fails, all data written to the mirror will still be available on all other legs, so that access to the mirror can continue without interruption. A mirror is useful when you require data redundancy and availability. To create a mirror, use the mirror command.
When you create a mirror that has more than one leg, a message indicating that the mirror is reviving (or beginning the process of mirroring the data) is written to the system log. Another message is written to the system log when this process is complete. Should the revive fail for any reason, a message will be written to the system console as well as to the system log.
You cannot halt a mirror revive after it has begun except by detaching all but one of the legs of the mirror. For more information, see “Mirror Revives” in Chapter 9.
During mirror creation, XVM enforces the rules of attachment described in “Attaching Volume Elements”.
When you create a mirror, you can optionally set the following characteristics:
The read policy for the mirror
The primary leg for the mirror
Whether the mirror will be revived at creation (the -clean option)
Whether the mirror will be revived when the system boots (the -norevive option)
For large mirror components, the revive process may take a long time. Therefore, you should consider using the -clean and -norevive options to limit revives as appropriate.
The following sections describe each of these options:
XVM lets you specify one of the following read policies for a mirror:
| Policy | Description | |
| rrobin | Balances the I/O load among the legs of the mirror, blindly reading in a round-robin fashion. | |
| sequential | Routes sequential I/O operations to the same leg of the mirror. |
Figure 2-13 illustrates how data is read from the legs of a mirror with an rrobin read policy. The wedges represent units of data that you are reading. The first operation reads from the first leg, the second operation reads from the second leg, the third operation reads from the third leg, and the fourth operation reads from the first leg again.
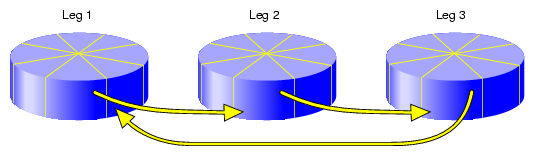
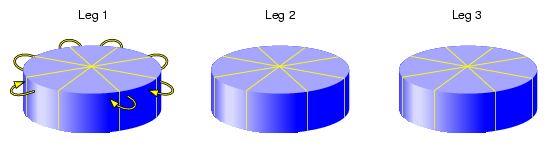
Figure 2-14 illustrates how data is read from the legs of a mirror with a sequential read policy, showing that the different mirror legs are not accessed for a single sequential I/O operation.
You can modify the read policy with the change command; see “change” in Chapter 5.
You can specify whether a particular leg of a mirror is to be preferred for reading by marking it as a primary leg. To redefine the primary leg, use the change command. See “change” in Chapter 5.
When you create a mirror, you can use the mirror -clean option to specify that the legs of the mirror do not need to be revived when they are created. This option is useful when the legs of the mirror are already in synchronization or when the mirror is new and all data will be written before being read. See “mirror” in Chapter 5.
When you create a mirror, you can use the mirror -norevive option to specify that the legs of the mirror do not need to be revived when the system boots. This option is useful when you are creating a mirror for a scratch filesystem such as /tmp..
If you are creating a mirror for a temporary filesystem that is in active use, you can specify -norevive (but not -clean). If you are creating a mirror for a temporary filesystem that is not in active use, then you can specify both -norevive and -clean because there is no valid data on either mirror leg. If you are creating a mirror for a filesystem that has not yet been used (and therefore contains no valid data on any leg) then specifying -clean by itself eliminates the initial revive. See “mirror” in Chapter 5.
To create a volume explicitly, use the volume command; see “volume” in Chapter 5. Volumes may also be created automatically when you create a volume element, as described in “Automatic Creation of a Volume and Subvolume ”.
When you create a volume with the volume command, you can specify subvolumes to attach to the volume after it is created. When subvolumes are attached to a volume, XVM enforces the rules described in “Attaching Volume Elements”.
To create a subvolume explicitly, use the subvolume command; see “subvolume” in Chapter 5. Subvolumes of type data may also be created automatically when you create a volume element, as described in “Automatic Creation of a Volume and Subvolume ”.
When you use the subvolume command, you can specify its child (a stripe, concat, mirror, or slice). If you do not specify a child, an empty subvolume is created.
For more information, see “Subvolume”.
As you create an XVM topology, you can use the attach and detach commands to reorganize its elements; see “attach” in Chapter 5, and “detach” in Chapter 5.
You can also reorganize the volume elements by using the remake command; see “remake” in Chapter 5. The remake command collapses holes in the topology and rearranges children under a given volume element. You can use a single remake command as a convenient alternative to executing a series of attach and detach commands.
This section discusses the following:
See also “Gathering Statistics for Physical Disks and Logical Resources”.
To display information about volume elements and physvols, use the show command.
A volume element or physvol can have one or more of the following states:
| State | Description | |||
| accessible | The underlying devices can be reached. | |||
| clean | The mirror leg has been created with -clean option of the mirror command to specify that the leg does not need to be revived on creation; it will be revived on subsequent boots.
| |||
| disabled | The volume element has been disabled with the change disable command. You must explicitly enable the volume element with change enable before it can be brought online. | |||
| incomplete | The volume element is missing one or more children. For all volume elements other than mirrors, the missing children must be attached or the volume element must be remade with the remake command before the volume element can be brought back online. | |||
| inconsistent | One or more children of the volume element may have changed since the last failure: a child may have been attached or detached, a missing child may have come back into place, or the state may have changed. See “Volume Element in inconsistent State” in Chapter 11. | |||
| mediaerr | The volume element has encountered at least one media error. | |||
| offline | Volume element: offline. No I/O can be done to the volume element. When a volume element is in this state, you must examine the volume element's topology and note the state each child. There should always be at least one other state displayed that can help determine why the volume element is offline. Physvol: the system does not know where the physvol resides. This can occur in a cluster where the system obtains information from another node but does not have access to the disk. | |||
| online | Volume element: online and properly configured. It is able to be opened, or it is already open. Physvol: the system has successfully discovered the disk. After the system has discovered the disk, it will not move back to an offline state. | |||
| open | ||||
| pieceoffline | The volume element has a child (piece) that is offline. For volume elements other than mirrors, the offline children must be brought back online before the volume element can be brought online. | |||
| reviving | The mirror leg is in the process of synchronizing. The data on this mirror leg is not valid until the revive completes. | |||
| reviving:queued | The mirror is targeted for a revive, but the revive has not started yet. | |||
| reviving:XX% | The system is in the process of synchronizing this mirror and is XX% complete. | |||
| tempname | The volume element has a name that may not be persistent across reboots. | |||
| valid |
To manually disable a volume element, use the change command. When you disable a volume element, no I/O can be done to that volume element until you explicitly enable the element, which you can also do with the change command. The object remains disabled until explicitly enabled, even across machine reboots.
The system kernel may disable a volume element and take that element offline. This could happen, for example, when a mirror member shows an I/O error. To bring the volume element back online, use the change command.
To insert a mirror or a concat above another volume element, use the insert command. You can use this command to grow a volume element or to add a mirror to a running system, because the volume element you are inserting can be part of an open subvolume and can have active I/O occurring.
To remove a layer from a tree, use the collapse command. Generally, you use a collapse command to reverse a previous insert operation. See “collapse” in Chapter 5.
To save a volume configuration, use the dump command to output the configuration commands to a file. You can then use this file to regenerate the XVM configuration.
When you dump and regenerate a device, you do not regenerate the data on the disk you are replacing, but rather you regenerate the XVM configuration on the new disk.
| Note: When you dump the commands to regenerate a volume topology tree, you must also separately and explicitly dump the commands to regenerate the physvols that the tree leads to, as described in “Reconstructing Volume Elements with the dump Command” in Chapter 5. |
For example, the following shell command line will dump all xvm volume elements and physvols to the file /var/xvm_config :
# xvm dump -topology -f /var/xvm_config phys/'*' vol/'*' |
This section discusses the following:
To delete a volume element, use the delete command. Parents of deleted volume elements remain and have open slots.
In general, if a volume element contains any attached children, it cannot be deleted. However, you can use the following options to override this restriction:
-all specifies that all of the children will be deleted
-nonslice specifies all of the children other than slices will be deleted (the slices are detached and a volume and data subvolume are automatically generated for the slices)
An element of an open subvolume can only be deleted if its deletion will not cause the subvolume to go offline. The only element that can be deleted without putting the subvolume offline is a mirror leg that is not the last leg of that mirror.
When an XVM disk becomes physically unavailable, you may not be able to execute standard XVM configuration commands on volumes that include that disk. To recover from this situation, use the reprobe command to remove previous configuration information from the kernel.
For information on using the reprobe command, see “Removing Configuration Information with the reprobe Command” in Chapter 5.
XVM can maintain statistics for physvols, subvolumes, stripes, concats, mirrors, and slices. To turn statistics on and off and to reset the statistics, use the stat option of the change command. For more, see Chapter 8, “Statistics”.
| Note: In a clustered environment, statistics are maintained for the local node only. |