This chapter discusses the following:
This section discusses the following:
The XVM Manager GUI and the CXFS Manager GUI contain the same tasks for configuring and administering XVM volumes. This guide documents only those tasks that pertain to XVM volume elements, disks, local filesystems, and privileges. For information about cluster functions and CXFS filesystems, see the CXFS 7 Administrator Guide for SGI InfiniteStorage.
To start the GUI using the command line, do the following:
Ensure that the following line is not commented out in the file /etc/ld.so.conf :
/usr/lib64/sysadm/lib
Enter the following command line:
# /usr/bin/xvmgr
| Note: If CXFS is installed, the xvmgr command will automatically invoke the CXFS Manager GUI, which provides access to the same set of XVM tasks as the XVM Manager GUI. |
If you want to use a web-based version of the GUI, do the following:
Ensure that the following software products are installed on the node that you will connect to (by means of a Java-enabled web browser) for performing administrative operations:
sgi-sysadm_xvm-web
sgi-sysadm_cxfs-web
These software products are part of the software normally installed with CXFS.
Ensure that an apache Web server is installed and running on the node.
Enable and restart the required web service:
RHEL:
rhel# chkconfig httpd on
rhel# service httpd restart
SLES:
sles# chkconfig apache2 on
sles# service apache2 restart
Close all browser windows and restart the browser.
Enter the URL http:// server/XVMManager/ where server is the name of the node on which XVM will run
At the resulting webpage, click the XVM Manager icon.
Table 10-1 describes the platforms where the GUI may be started, connected to, and displayed.
GUI Mode | Where You Start the GUI | Where You Connect the GUI | Where the GUI Displays |
|---|---|---|---|
xvmgr | A system with sgi-sysadm_xvm-web installed | The node that you want to use for XVM administration | The system where the GUI was invoked |
Web | Any system with a web browser and Java2 1.6 or 1.6 plug-in installed and enabled | The node that you want to use for XVM administration | The same system with the web browser |
To ensure that the required GUI privileges are available for performing all of the tasks, you should log in to the GUI as root. However, some or all privileges can be granted to any other user using the GUI privilege tasks; see “Privileges Tasks”.
A dialog box will prompt you to log in to an XVM host. You can choose one of the following connection types:
Local runs the server-side process on the local host instead of going over the network
Direct creates a direct socket connection using the tcpmux TCP protocol ( xinetd must be turned on via chkconfig and running)
Remote Shell connects to the server via a user-specified command shell, such as rsh or ssh. For example:
ssh -l root servername

Note: For secure connection, choose Remote Shell and type a secure connection command using a utility such as ssh. Otherwise, the GUI will not encrypt communication and transferred passwords will be visible to users of the network.
Proxy connects to the server through a firewall via a proxy server
The XVM Manager GUI provides access to the tools that help you configure and administer XVM:
Tasks let you set up and monitor individual XVM objects.
Guided configurations consist of a group of tasks collected together to accomplish a larger goal. For example, Set Up a New Volume steps you through the process for creating a new volume and allows you to launch the necessary individual tasks by clicking their titles.
This section discusses the following:
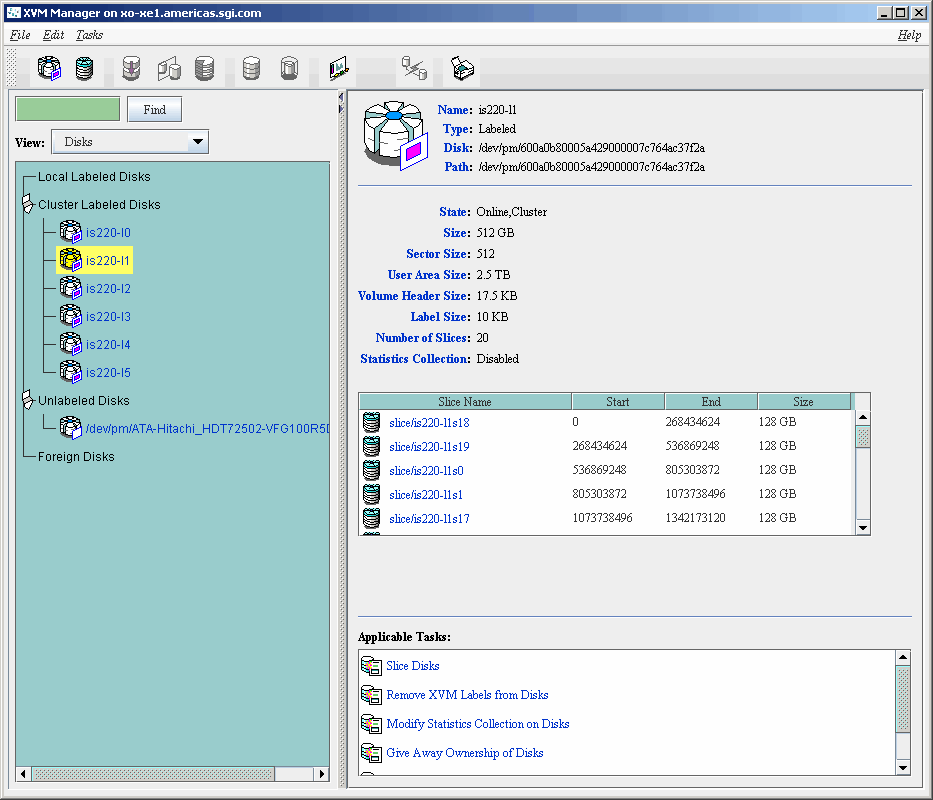
Figure 10-1 shows the XVM Manager window.

By default, the window is divided into two sections: the view area to the left and the details area to the right. The details area shows generic overview text if no item is selected in the view area. You can use the arrows in the middle of the window to shift the display.
The command buttons along the top of the window provide a method of performing tasks quickly. When you click a button, the corresponding task executes using default values, usually without displaying a task window. For more information on the command buttons, see “Shortcuts Using Command Buttons”.
Use the Find text field to view and select single or multiple items, as described in “Selecting Items to View or Modify”.
Choose what you want to appear in the view area from the View menu.
To view the details of any volume element, select it; see “Selecting Items to View or Modify”. The configuration and status details for the item will appear in the details area to the right, along with the Applicable Tasks list, which displays tasks you may wish to launch after evaluating the item's configuration details. Click a task to launch it; based on the item selected, default values will appear in the task window. For information on launching tasks, see “Performing Tasks”.
Figure 10-2 shows an XVM GUI window with a selected component and the details area showing the details for that component.
To see the configuration and status details about an item in the details area, select its name (which will appear in blue); details will appear in a new window.
In general, clicking on blue text yields a new window display, which could contain one of the following:
Item details
Term definitions
Input instructions
Task windows
When you are running XVM as a standalone product, the Domain is set to local by default in various tasks, indicating that the XVM objects that you create in this session are in the local domain. For more information about XVM domains, see “Local Domain and Cluster Domain” in Chapter 2.
Do not make configuration changes on two different nodes simultaneously, or use the XVM GUI and xvm(8) command simultaneously to make changes. You should run one instance of the xvm command or the XVM GUI on a single node when making changes at any given time. However, you can use any node when requesting status or configuration information. However, multiple XVM Manager windows accessed via the File menu are all part of the same application process; you can make changes from any of these windows.
You should wait for a change to appear in the view area before making another change.
The File menu lets you display the following:
Multiple windows for this instance of the GUI
System log file:/var/log/messages
System administration log file: /var/lib/sysadm/salog
The salog file shows the commands run directly by this instance of the GUI or some other instance of the GUI running commands on the system. (Changes should not be made simultaneously by multiple instances of the GUI or the GUI and xvm(8).)
The File menu also lets you close the current window and exit the GUI completely.
The Edit menu lets you expand and collapse the contents of the view area. You can choose to automatically expand the display to reflect new nodes added to the pool or cluster. You can also use this menu to select all items in the view menu or clear the current selections.
The Tasks menu contains the following:
Guided Configuration contains the tasks to configure various volume elements
Volume elements contains tasks to create and manage volumes, subvolumes, concats, mirrors, and stripes
Disks contains tasks to label and manage disks and slices
Filesystems contains tasks to define and manage local filesystems
Privileges lets you grant or revoke access to a specific task for one or more users
Find Tasks lets you use keywords to search for a specific task
The Help menu provides an overview of the GUI and a key to the icons. You can also get help for certain items in blue text by clicking on them.
The command buttons along the top of the GUI window provide a method of performing tasks quickly. When you click a button, the corresponding task executes using default values, usually without displaying a task window. To override the defaults, launch the task from the Tasks menu. Table 10-2 summarizes the shortcuts.
Table 10-2. XVM Manager GUI Command Buttons
Button | Task | |
|---|---|---|
| Labels selected disks (if the selected disks include foreign and/or labeled disks, the Label Disks task will be run) | |
| Brings up the Slice Disk task with the selected disks as default inputs | |
| Creates a concat with a temporary name | |
| Creates a mirror with a temporary name | |
| Creates a stripe with a temporary name | |
| Creates a data subvolume with a temporary name | |
| Creates a volume with a temporary name | |
| Starts the Performance Co-Pilot XVM I/O monitor pmgxvm on the server, displaying via X Windows to your local administration station (for information on using Performance Co-Pilot, see Performance Co-Pilot for Linux User's and Administrator's Guide)
| |
| Detaches the selected volume elements from their current parents | |
| Deletes the selected non-slice volume elements or unlabels the selected disks directly, or brings up the appropriate Delete task window for the selected component |
Choose the item that you want to view from the View menu.
You can use the following methods to select items:
Click to select one item at a time
Shift+click to select a block of items
Ctrl+click to toggle the selection of any one item
Another way to select one or more items is to type a name into the Find text field and then press Enter or click the Find button.
To view the details on any component, click its name in the view area; see “Selecting Items to View or Modify”.
The configuration and status details for the component will appear in the details area to the right. At the bottom of the details area will be the Applicable Tasks list, which displays tasks you may wish to launch after evaluating the component's configuration details. To launch a task, click the task name; based on the component selected, default values will appear in the task window.
To see more information about an item in the details area, select its name (which will appear in blue); details will appear in a new window. Terms with glossary definitions also appear in blue.
To perform an individual task, do the following:
Select the task name from the Task menu. For example:
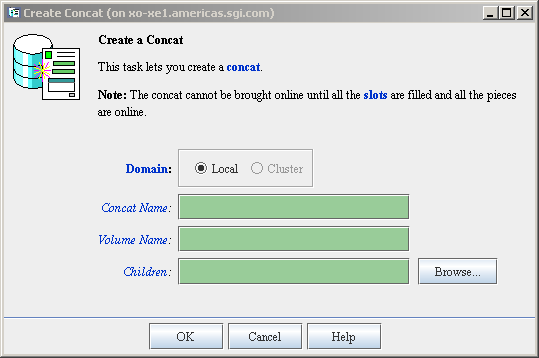
Task > Volume Elements > Create a Concat
The task window appears. Figure 10-3 shows the task window for the Create a Concat task.
As a shortcut, you can right-click an item in the view area to bring up a list of tasks applicable to that item; information will also be displayed in the details area.
Note: You can click any blue text to get more information about that concept or input field. Enter information in the appropriate fields and click OK to complete the task.
Some tasks consist of more than one page; in these cases, click Next to go to the next page, complete the information there, and then click OK.
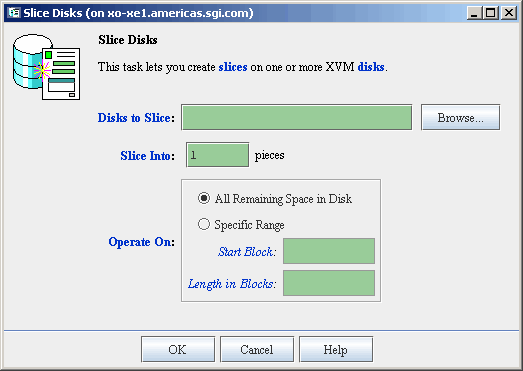
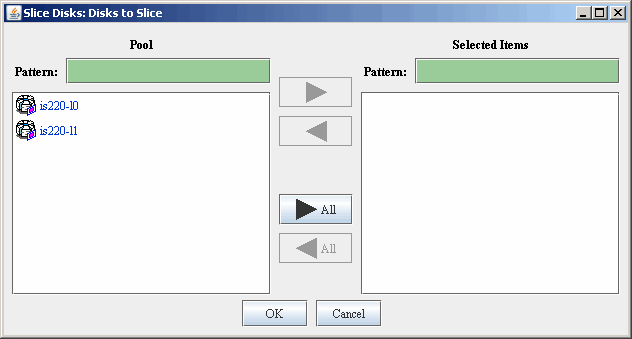
Some tasks include a Browse button, which you can click to view and choose task operands. For example, Figure 10-4 shows the task window for the Slice Disks task.
Clicking on the Browse button displays a list of available disks to label, as shown in Figure 10-5. In this window, you can enter a text pattern to match.
Note: In every task, changes do not take effect until you click OK. Continue launching tasks as needed.
The GUI lets you use drag-and-drop to do the following:
Structure volume topologies
Administer XVM disks
| Caution: Always exercise care when restructuring volume elements with drag-and-drop because data that resides on the volume element can be lost. The GUI attempts to warn the user when it can predict that there is a high likelihood of data loss. However, when a volume is not associated with a mounted filesystem, neither the xvm command nor the GUI can determine whether that volume holds important data. |
To select multiple GUI icons, select the first icon by clicking the left mouse button, then press the Ctrl button while clicking on the additional icons. To select consecutive icons, select the first icon and press shift while selecting the last icon.
You cannot use drag-and-drop between two GUI windows or with shortcut command buttons.
To reconfigure a volume, select an icon and then drag the icon and drop it on another icon. Icons turn blue as you drag to indicate when it is valid to drop upon them. When you drag, if the mouse cursor reaches the top or the bottom of the view area, the display will scroll automatically.
You can use drag-and-drop to operate on multiple volume elements of different types. For example, you can detach several types of volume elements by selecting items and dragging them to any Unattached heading, even if no selected item belongs to that category. You can select multiple items of different types and attach them to a parent. For example, you can select two concats and a stripe and use drag-and-drop to attach them to a parent concat.
You can rename volume elements by clicking a selected (highlighted) volume element and typing a new name into the text field.
To label or unlabel disks using drag-and-drop, select the following:
View -> Disks
Select an unlabeled disk then drag and drop it on the Labeled Disks heading, or select a labeled disk then drag and drop it on the Unlabeled Disks heading.
You can give away a disk using the task menu or drag-and-drop. In the Disks view, select a disk and then drag and drop it on the Cluster Disks heading.
| Note: Giving away a disk presents less risk of data loss than stealing a disk. |
You can label a disk by clicking a selected (highlighted) disk and typing a name into the resulting name text field.
The GUI shows static and dynamic state. For example, suppose the database contains the static information that a filesystem is enabled for mount; the GUI will display the dynamic information showing one of the following:
A blue icon indicating that the filesystem is mounted (the static and dynamic states match)
A grey icon indicating that the filesystem is configured to be mounted but the procedure cannot complete
An error (red) icon indicating that the filesystem is supposed to be mounted, but it is not (the static and dynamic states do not match, and there is a problem)
Use the following methods to select and deselect items in the View area:
Click to select one item at a time
Shift+click to select a block of items
Ctrl+click items to toggle the selection of any one item
Another way to select one or more items is to type a name into the Find text field and then press Enter or click the Find button.
When volume elements other than volumes are created or detached, the system automatically creates a volume and a data subvolume that are associated with the volume element. You can explicitly name this generated volume, in which case the volume name is stored in label space and persists across reboots.
The XVM Manager GUI does not display volumes and subvolumes that were not named explicitly. The GUI displays the children of these volumes and subvolumes as available for use or as Unattached. In contrast, the xvm command-line interface (CLI) shows all volumes and subvolumes.
The XVM GUI displays filesystems that are on volumes that were not named explicitly, but lists the volumes as None. Volumes and subvolumes that the system generated automatically with temporary names are mentioned in the full paths of Unattached volume elements (for example, /vol96/datav), but the GUI ignores them otherwise.
To reduce the risk of data loss, you should name volumes explicitly when using the GUI. If you have created volumes that you did not name explicitly, you can use the xvm CLI to assign these volumes permanent names before proceeding.
Table 10-3 shows keys to the icons used in the XVM Manager GUI.
Table 10-3. Key to XVM Manager GUI Icons
Icon | Entity | |
|---|---|---|
| XVM disk | |
| Unlabeled disk | |
| Foreign disk | |
| Slice | |
| Volume | |
| Subvolume | |
| Concat | |
| Mirror | |
| Stripe | |
| Slot | |
| Local filesystem | |
| Expanded tree | |
| Collapsed tree | |
| Copy on write
| |
| Repository
|
Table 10-4 shows keys to the states used in the XVM Manager GUI.
Table 10-4. Key to XVM Manager GUI States
Icon | State | |
|---|---|---|
| (Grey icon) Defined, offline, inactive or unknown | |
| Enabled for mount
| |
| (Blue icon) Online, ready for use, up, or mounted without error | |
| (Green swatch) Open, in use | |
| (Orange arrow) Mirror reviving | |
| Disabled
| |
| (Red icon) Error detected, down or mounted with error
|
This section tells you how to perform XVM administrative tasks on volume element.
| Note: When running the XVM Manager GUI as a standalone product, Domain is always set to local in these tasks. |
A concat is a volume element that concatenates all of its children into one address space.
When you create a concat, the system automatically creates a parent volume and data subvolume for the concat. If you explicitly name this generated volume, the volume name is stored in label space and persists across reboots.
| Note: To achieve good I/O performance, use the /etc/failover2.conf file. See Chapter 6, “XVM Path Failover”. |
To create a concat, do the following:
Domain: Select the domain that will own the concat.
Concat Name: ( Optional) Enter a name for the new concat. If you do not specify a name, a temporary name is generated. A temporary name is not guaranteed to be persistent across reboots.
Volume Name: ( Optional) Enter a name for the volume to create. If you do not specify a name, a temporary name is generated. A temporary name is not guaranteed to be persistent across reboots.
Children: ( Optional) Enter one or more children of the new concat, or click the Browse button to display a list and select from that list.
Click OK.
A mirror is a volume element that maintains identical data images on its underlying volume elements. A mirror cannot have more than eight legs. You can specify whether a particular leg of a mirror is to be preferred for reading by marking it as a primary leg.
| Note: The components of a mirror do not have to be identical in size, but if they are not there will be unused space in the larger components. |
When you create a mirror, the system automatically creates a parent volume and data subvolume for the mirror. If you explicitly name this generated volume, the name is stored in label space and persists across reboots.
| Note: To achieve good I/O performance, use the /etc/failover2.conf file. See Chapter 6, “XVM Path Failover”. |
To create a mirror, do the following:
Domain: Select the domain that will own the mirror.
Mirror Name: ( Optional) Enter a name for the new mirror. If you do not specify a name, a temporary name is generated. A temporary name is not guaranteed to be persistent across reboots.
Volume Name: ( Optional) Enter a name for the volume to create. If you do not specify a name, a temporary name is generated. A temporary name is not guaranteed to be persistent across reboots.
Read Policy: Select the read policy for the mirror
Round Robin Balances the I/O load among the legs of the mirror, blindly reading in a round-robin fashion.
Sequential Routes sequential I/O operations to the same leg
Revive Option: Select the revive option for the mirror.
By default, when you create a mirror that has more than one leg, the mirror begins the reviving process; this means that the system begins the process of synchronizing the data in each of the legs. For large mirror components, this revive process may take a long time. See “Avoid Unnecessary Revives ” in Chapter 3.
Note: You cannot halt a mirror revive once it has begun except by detaching all but one of the legs of the mirror. Children: ( Optional) Enter one or more children of the new mirror, or click the Browse button to display a list and select from that list.
Primary Leg: ( Optional) Select the volume element to be the primary leg of the mirror.
Click OK.
A stripe is a volume element that distributes a set of volume elements across an address space.
| Note: It is legal to create a stripe that consists of volume elements of unequal size, although this may leave some space unused. |
The actual size of the stripe depends on the stripe unit size and the size of the volume elements that make up the stripe. In the simplest case, the volume elements are all the same size and are an even multiple of the stripe unit size. For example, if the stripe unit is 128 512-byte blocks (the default) and you create a stripe consisting of two slices that are each 256,000 blocks, all of the space on each slice is used. The stripe size is the full 512,000 blocks of the two slices.
On the other hand, if two slices that make up a stripe are each 250,000 blocks and the stripe unit is 128 blocks, then only 249,984 of the blocks on each slice can be used for the stripe and the size of the stripe will be 499,968 blocks. This situation may arise when you create the slices on a disk by dividing the disk equally, or use the entire disk as a slice, and do not coordinate the resulting stripe size with the stripe unit size.
Even if one of the two slices that make up the two-slice stripe in the second example is 256,000 blocks (while the other is 250,000 blocks), the stripe size will be 499,968 blocks because the same amount of space in each volume element that makes up the slice is used.
Following is the general formula for determining the stripe size, where stripe_width is the number of volume elements that make up the stripe (using integer arithmetic):
stripe_size = (smallest_stripe_leg / stripe_unit) * stripe_unit * stripe_width
When you create a stripe, the system automatically creates a parent volume and data subvolume for the stripe. If you explicitly name this generated volume, the name is stored in label space and persists across reboots.
| Note: To achieve good I/O performance, use the /etc/failover2.conf file. See Chapter 6, “XVM Path Failover”. |
To create a stripe, do the following:
Domain: Select the domain that will own the stripe.
Stripe Name: ( Optional) Enter a name for the new stripe. If you do not specify a name, a temporary name is generated. A temporary name is not guaranteed to be persistent across reboots.
Volume Name: ( Optional) Enter a name for the volume to create. If you do not specify a name, a temporary name is generated. A temporary name is not guaranteed to be persistent across reboots.
Stripe Unit Size: Enter a stripe unit size for the stripe as a number of 512-byte blocks).
Children: ( Optional) Enter one or more children of the new stripe, or click the Browse button to display a list and select from that list.
Click OK.
When you delete a volume element, its parent remains and has an open slot in the XVM topology tree. An element of an open subvolume can only be deleted if its deletion will not cause the subvolume to go offline. The only element that can be deleted without putting the subvolume offline is a mirror leg that is not the last leg of that mirror.
If a volume element contains any attached children, it cannot be deleted unless you choose to delete all of its descendents, or all of its descendants except slices (detaching and keeping the slices).
To delete one or more volume elements, do the following:
Domain: Select the domain of the volume elements to delete; this selection determines what will appear when you click the Browse button.
Volume Elements to Delete: Enter the volume elements to delete or click the Browse button to display a list and select from that list.
Also Delete Descendants: Select whether to delete no children, the selected volume elements and all of their descendants except slices, or the selected volume elements and all of their descendents including slices.
Click OK.
You can rename a volume, subvolume, concat, stripe, or mirror. (You cannot change the name of a slice.) The name you give an object when you explicitly rename it remains persistent across reboots.
To rename a volume element, do the following:
Domain: Select the domain of the volume element to rename. This selection determines what will appear in the list of available volume elements to rename.
Volume Element to Rename: Enter the volume element to rename or choose an element from the pull-down menu.
New Name: Enter the new name for the volume element.
Click OK.
You can insert a mirror or a concat above another volume element other than a volume or a subvolume.
You can grow a volume element on a running system by inserting a concat and you can add mirroring on a running system by inserting a mirror. The volume element you are growing or mirroring can be part of an open subvolume and can have active I/O occurring.
To insert a new mirror/concat above an existing volume element, do the following:
Domain: Select the domain for the new volume element to be inserted.
Volume Elements to Insert Above: Enter the volume elements above which to insert the mirror/concat or click the Browse button to display a list and select from that list. A mirror or concat will be created for each volume element you select.
Insert: Choose to insert either mirrors or concats above the selected volume elements.
Click OK.
You can remove an unneeded mirror or concat from an XVM topology tree if the mirror or concat has only one child. This task links the child to the parent of the mirror or concat that you remove.
You can remove a mirror or concat in an open subvolume. Generally, you perform this task during configuration to reverse a previous insert operation.
To remove mirrors and concats with only one child, do the following:
Domain: Select the domain for the mirrors and concats to be removed. This selection determines what will appear when you click the Browse button.
Mirrors and Concats to Remove: Enter the mirrors and concats to remove or click the Browse button to display a list and select from that list.
Click OK.
When a volume element is disabled, no I/O will be issued to it until you explicitly enable it.
To enable one or more volume elements that have been disabled, do the following:
Domain: Select the domain for the volume elements to be enabled. This selection determines what will appear when you click the Browse button.
Volume Elements to Enable: Enter the volume elements to enable or click the Browse button to display a list and select from that list.
Click OK.
When a volume element is disabled, no I/O will be issued to it until you explicitly enable the volume element. An object remains disabled across reboots.
To disable one or more volume elements, do the following:
Domain: Select the domain for the volume elements to be disabled. This selection determines what will appear when you click the Browse button.
Volume Elements to Disable: Enter the volume elements to disable or click the Browse button to display a list and select from that list.
Click OK.
A volume element is online when it is properly configured. It is able to be opened, or it is already open.
The system kernel may disable a volume element and take that element offline. This could happen, for example, when a mirror leg shows an I/O error.
To bring a set of volume elements online, do the following:
Domain: Select the domain for the volume elements to be brought online. This selection determines what will appear when you click the Browse button.
Volume Elements to Bring Online: Enter the volume elements to bring online or click the Browse button to display a list and select from that list.
Click OK.
When you remake a volume element, you collapse holes in the XVM topology tree beneath volume element. The children remain in their current order.
To remake a volume element, do the following:
Domain: Select the domain. This selection determines what will appear in the list of available volume elements to remake.
Volume Element: Enter the volume element to collapse or select a volume element from the pull-down menu.
Click OK.
You can detach volume elements from their parents.
An element of an open subvolume can only be deleted if its deletion will not cause the subvolume to go offline. The only element that can be deleted without putting the subvolume offline is a mirror leg that is not the last leg of that mirror. You cannot detach the last valid leg of an open mirror from that mirror, because this will cause the mirror to go offline.
To detach volume elements, do the following:
Domain: Select the domain for the volume elements to be detached. This selection determines what will appear when you click the Browse button.
Volume Elements to Detach: Enter the volume elements to detach or click the Browse button to display a list and select from that list.
Click OK.
When you create a volume, you can specify subvolumes to attach to the volume.
A volume cannot have more than one subvolume of a given type. The system-defined subvolumes are data, log, and rt. See “Subvolume” in Chapter 2.
To create a volume, do the following:
Volume Name: ( Optional) Enter a name for the new volume. If you do not specify a name, a temporary name is generated. A temporary name is not guaranteed to be persistent across reboots. See “Explicitly Name Volume Elements” in Chapter 3.
Domain: Select the domain that will own the volume.
Volume Children: Select one of the following:
Add No children: Create a volume with no attached subvolumes.
Add Child Subvolume: Create a volume and attach an existing subvolume that you specify.
Add Child to a New Data Subvolume: Create a volume and attach an existing volume element to the new data subvolume that is created.
Click OK.
When you create a subvolume you can optionally attach a concat, mirror, stripe, or slice to the subvolume. The volume element attached to the subvolume cannot be a volume or another subvolume.
There cannot be more than one subvolume with the same type under a volume. For example, there can be only one data subvolume under a volume. A user-defined subvolume type is in the range 16 through 255. You can have multiple user-defined subvolumes under a volume if each has a unique type number. Subvolume types in the user-defined range are not interpreted in any way by the system. See “Subvolume” in Chapter 2.
When you create a subvolume, you specify the user ID of the subvolume owner (default 0), the group ID of the subvolume owner (default is 0), and the mode of the subvolume (default is 0644).
If you do not specify a child, an empty subvolume is created that can be attached to later.
When you create a subvolume, the system automatically creates a parent volume for it. If you explicitly name this generated volume, the name is stored in label space and persists across reboots.
To create a subvolume, do the following:
Domain: Select the domain that will own the subvolume.
Subvolume Type: Specify whether the subvolume is a data, log, rt (real-time), or user-defined volume type.
Click Next to move to the next page.
Attach to Volume: ( Optional) Select an existing volume as a parent for the new subvolume.
Child Volume Element: (Optional) Select an existing volume element to be the child of the subvolume.
User ID: Enter the ID of the user that owns the block and character special files corresponding to the subvolume.
Group ID: Enter the ID of the group that owns the block and character special files corresponding to the subvolume.
Mode: Enter the file permissions mode of the block and character special files corresponding to the subvolume. For more information, see the chmod(1) man page.
Click OK.
You can change user ID, group ID, and the permissions mode that apply to one or more subvolumes.
Do the following:
Domain: Select the domain. This selection determines what will appear in the list of available subvolumes.
Subvolumes to Modify: Select one or more subvolumes to modify.
User ID: Enter the new ID of the user that owns the block and character special files corresponding to the subvolume.
Group ID: Enter the new ID of the group that owns the block and character special files corresponding to the subvolume.
Mode: Enter the new file permissions mode of the block and character special files corresponding to the subvolume. For more information, see the chmod(1) man page.
Click OK.
Statistics collection for a subvolume, stripe, concat, mirror, or slice may be set to on or off and you can reset the current statistics to 0. Statistics are enabled/disabled only for the volume elements that you specify. Statistics for volume elements show the number of read and write operations as well as the number of 512-byte blocks read and written.
In a clustered environment, statistics are maintained for the local node only.
To modify statistics collection on one or more volume elements, do the following:
Domain: Select the domain, which determines what will appear when you click the Browse button.
Volume Elements to Modify: Select one or more volume elements to modify.
Statistics Collection: Turn statistics collection on or off, or reset the current statistics to 0.
Click OK.
This section discusses the following:
| Note: This section tells you how to perform XVM administrative tasks on disks using the CXFS Manager GUI or the XVM Manager GUI. When running the XVM Manager GUI as a standalone product, Domain is always set to local in these tasks. |
To create XVM logical volumes on a physical disk, you must label the disk as an XVM disk. Labeling a disk writes an XVM physical volume (physvol) label on a disk and allows XVM to control the partitioning on the disk. In a CXFS cluster, any physvols that will be shared must be physically connected to all nodes in the cluster.
You cannot label a disk as an XVM disk if the disk contains any partitions that are currently in use as mounted filesystems. On systems with many disks, these checks can be time-consuming. You can specify whether you want to override this restriction and not check for in-use partitions.
| Caution: Data corruption or system panics can result from labeling disks with partitions that are in use. |
When you label an XVM disk, you can specify how much space to assign to the volume header; the default value is the number of blocks currently in the volume header of the disk being labeled. You can also specify how much space to assign to the XVM label area in the volume header; the default is 1024 blocks (usually leaving 3072 blocks in the volume header that are not part of the XVM label area).
The default values for the volume header size and label area size support approximately 5000 XVM objects; this should be sufficient for most volume configurations. If you will have more than that many objects on the physvol that the label area must maintain, you may need to increase the XVM label area size. As a rule of thumb, one block is required for every seven objects.
| Note: A volume element and a name for a volume element count as two objects. |
If you add a new disk that has already been labeled as a physvol to a running system, you must manually probe the disk with XVM in order for the system to recognize the disk as an XVM disk. You do not have to do this when you are labeling a new XVM disk on your system, however, because XVM probes the disk as part of the label process. All disks are probed when the system is booted to determine which disks are XVM disks.
To label a disk as an XVM disk, do the following:
Disks to Label: Enter the disk or disks to label or click the Browse button to display a list of available disks. In the browse window, you can enter a text pattern to match.
Disk Name: Enter the new name for the disk or disk to label. When labeling multiple disks, the name you supply will act as a prefix for each disk name, and a unique numeric suffix will be added to make the final name for each disk.
Domain: Select whether the disk will be defined for use only on the system running the GUI ( Local) or for use on multiple nodes in a cluster ( Cluster).
Set Advanced Options: Selecting this allows you to set the following options:
Check for In-Use Partitions: Deselect this option if you want to label the disk, even if partitions are already present
Volume Header Size (blocks): Enter the size of the volume header in the disks's label area if you do not want to accept the default size
Label Area Size (blocks): Enter the size of the label area if you do not want to accept the default size
Click OK.
Slicing a disk creates a slice from a block range of a physvol. You can specify the starting block and the length of a slice. You can choose one of the following methods
Create a slice out of all of the blocks of a physvol
Divide a specified address range into equal parts, with each part a different slice
Slice multiple physvols at once
Slices are named automatically and are persistent across reboots. You cannot rename slices.
If you do not supply a slice length, the address range will be from the indicated start block to the end of the free area containing the start block.
When volume elements other than volumes are created, the system automatically creates a volume and a subvolume that are associated with the volume element. When you create a volume element, you can explicitly name this generated volume, in which case the volume name is stored in label space and persists across reboots.
To create slices on an XVM disk, do the following:
Disks to Slice: Enter the name of the XVM-labeled disk on which to define a slice. If you select multiple disks, each disk will be sliced according to the given parameters. Alternatively, you can click the Browse button to display a list of available disks to slice.
Slice Into: Fill in the number of equal-sized slices to create.
Operate On: Select whether you are creating slices from all of the remaining space on the XVM disk or from a specific block range on the disk. If you are slicing a portion of the available space on the disk, enter the following:
Start Block: (Optional ) The starting block (in 512-byte blocks) of the area of the disk you want to slice
Length in Blocks: ( Optional) The length in blocks of the area of the disk on which you are creating the slice or slices
Click OK.
You can rename a disk (physvol). The name you give is persistent across reboots. Do the following:
Disk to Rename: Choose a disk to rename from the pull-down list.
New Name: Enter the new name to give to the selected disk.
Click OK.
To remove a physvol from a system, you must remove the XVM label from the physvol. After unlabeling, the original partitioning information is restored from a file saved in the volume header directory under the name backvh.
In a clustered environment, you cannot unlabel a physvol that is not attached to the system you are working from.
You cannot unlabel physvols containing slices unless you also delete the slices on those physvols. When you indicate that you are deleting all slices on the disk, the slices are deleted even if the slice is part of an open subvolume and its deletion will cause the subvolume state to go offline. If any of the attempts to delete a slice fails when you are unlabeling a physvol, the unlabel will fail. If all deletes succeed, the physvol will be unlabeled.
To remove XVM labels from one or more physvols with the GUI, do the following:
Disks to Unlabel: Enter the physvol to unlabel or click the Browse button to display a list of labeled disks and select from that list.
Click OK.
Statistics for physvols show the number of read and write operations as well as the number of 512-byte blocks read and written. You can turn statistics collection for a physvol to on or off and you can reset the current statistics to 0.
In a clustered environment, statistics are maintained for the local node only.
To modify statistics collection on one or more disks with the GUI, do the following:
Disks to Modify: Enter the disks on which to modify statistics collection or click the Browse button to display a list of labeled disks and select from that list.
Statistics Collection: Turn statistics collection on or off, or reset the current statistics to 0.
Click OK.
| Note: This task is valid in a clustered environment only. |
You can gracefully change the ownership of a physvol by giving it to the local domain of another machine (by default) or to another cluster (if you select Another Cluster).
| Note: However, you cannot give away ownership of a physvol that has slices that are part of open subvolumes. For this reason, an attempt to give away a disk will fail during a mirror revive. In general, you must unmount filesystems on XVM volumes that contain the physvol and wait for mirror revives to complete before giving away a physvol. |
Giving a disk away will result in all slices on the disk (and any empty parents that result) being deleted. The configuration information will be retained on the disk. Subvolumes that span disks might go offline if giving a disk away will cause slices belonging to that physvol to be removed.
When you give a disk away, the new owning node or cluster must read the disk before the configuration is visible to the new owner. This happens either automatically on reboot or when the new owner probes the disk.
You can specify a physvol to give away by either the physvol name or the disk name.
To give ownership of one or more disks to another node or cluster, do the following:
Disks to Give Away: Enter the disks to give away or click the Browse button to display a list of disks and select from that list.
Give Disks To: Select the new owning host or cluster.
Click OK.
| Note: This task is valid in a clustered environment only. |
In some circumstances, the node or cluster that currently owns the physvol may be unable to give a disk away. In these cases, you can steal a disk to change the ownership of a physvol. Only physvols that are foreign to the current node or cluster can be the targets of a steal.
| Caution: Stealing a disk unconditionally resets the owner of a physvol to the current node or cluster. No attempt is made to inform the previous owner of the ownership change. If another host or cluster has the physvol instantiated, configuration corruption or data corruption could occur. You should forcibly steal a disk only when ownership cannot be changed by giving the disk away. In a situation where you must steal a disk, you can determine the ownship by using the xvm(8) command show -v foreign; see “Foreign Disks” in Chapter 5. |
You cannot steal a physvol that has slices that are part of open subvolumes. In general, you must unmount filesystems on XVM volumes that contain the physvol and wait for mirror revives to complete before stealing the physvol.
To take control of a foreign disk, do the following:
Foreign Disk to Steal: Enter the disk to steal or click the Browse button to display a list of foreign disks and select from that list.
Bring To: Select whether you are bringing the foreign disk to the local domain or to the cluster domain.
Click OK.
If you add to a running system a disk that was already labeled as a physvol, you must manually probe the disk in order for the system to recognize it as an XVM disk. (You do not have to do this when you label a new XVM disk because XVM automatically probes the disk as part of the label process.)
| Note: It is assumed that the disk to be probed is available in the hardware inventory (that is, the controller that it is connected to has been probed outside of XVM). |
To probe one or more disks for XVM label information with the GUI, do the following:
Disks to Probe: Enter the disk to probe or click the Browse button to display a list of disks and select from that list.
Click OK.
If the disk being probed has not been previously labeled by XVM, an error is returned.
You can dump configuration information for an individual volume element or all of its children. You can also use dump configuration commands for a physvol; you must explicitly dump the physvol topology tree separately from a volume element topology tree. Dumping configuration information allows you to replace a disk in a running system and to regenerate the XVM configuration on the new disk without rebooting the system.
When you dump and regenerate a device, you do not regenerate the data on the disk you are replacing, but rather you regenerate the XVM configuration on the new disk.
When you dump a volume element, a new UUID is generated for the object being dumped in order to avoid any possible name collision issues when the object is later re-created.
To dump the XVM configuration commands, do the following:
File Name: Enter the name of the file to which you want to dump the configuration commands for the XVM object.
Domain: Select the domain of the object to dump; this selection determines what will appear when you click the Browse button.
All disks and volume elements: Indicate whether you want to dump all disks and volume elements. If you deselect this option, you can specify the following:
Disks to Dump: Enter the name of the disks to dump, or click the Browse button to display a list of disks and select from that list.
Volume Elements to Dump: Enter the name of the volume elements to dump, or click the Browse button to display a list and select from that list.
If you dump selected volume elements, you can indicate whether to dump the children of the specified volume element as well.
Also Dump Descendants: If you specify only certain disks to dump, you can also choose to dump their descendants.
Click OK.
This section discusses the following:
This task lets you create a filesystem on a volume that is online but not open. To create filesystems on multiple volume elements, use the Browse button.
| Caution: Clicking OK will erase all data that exists on the target volume. |
To make a filesystem, do the following:
Enter the following information:
Domain: Select the domain that will own the volume element to be created. Choose Local if the volume element or disk is defined for use only on the node to which the GUI is connected, or choose Cluster if it is defined for use on multiple nodes in the cluster.
Volume Element: Select the volumes on which to create the filesystem or select the volume elements whose parent volumes will be used for the filesystems. The menu lists only those volume elements that are available. (When volume elements other than volumes are created or detached, the system automatically creates a volume and a subvolume that are associated with the volume element. If you did not explicitly name an automatically generated volume, the GUI will display its children only.)
Specify Sizes: Check this box to modify the default options for the filesystem, including data region size, log size, and real-time section size.
By default, the filesystem will be created with the data region size equal to the size of the data subvolume. If the volume contains a log subvolume, the log size will be set to the size of the log subvolume. If the volume contains an rt subvolume, the real-time section size will be set to the size of the rt subvolume.
If you checked the Specify Sizes box, click Next to move to page 2. On page 2, enter the following information. For more information about these fields, see the mkfs.xfs(8) man page.
Block Size: Select the fundamental block size of the filesystem in bytes.
Directory Block Size: Select the size of the naming (directory) area of the filesystem in bytes.
Inode Size: Enter the number of blocks to be used for inode allocation, in bytes. The inode size cannot exceed one half of the Block Size value.
Maximum Inode Space: Enter the maximum percentage of space in the filesystem that can be allocated to inodes. The default is 25%. (Setting the value to 0 means that the entire filesystem can become inode blocks.)
Flag Unwritten Extents: (Obsolete)
Data Region Size: Enter the size of the data region of the filesystem as a number of 512-byte blocks. This number is usually equal to the size of the data subvolume. You should specify a size other than 0 only if the filesystem should occupy less space than the size of the data subvolume.
Use Log Subvolume for Log: Check this box to specify that the log section of the filesystem should be written to the log subvolume. If the volume does not contain a log subvolume, the log section will be a portion of the data section on the data subvolume. This option only appears if the filesystem has a log subvolume.
Log Size: Enter the size of the log section of the filesystem as a number of 512-byte blocks. You should specify a size other than 0 only if the log should occupy less space than the size of the log subvolume. This option only appears if the filesystem has a log subvolume.
Real-Time Section Size: Enter the size of the real-time section of the filesystem as a number of 512-byte blocks. This value is usually equal to the size of the rt subvolume, if there is one. You should specify a size other than 0 only if the real-time section should occupy less space than the size of the rt subvolume. This option only appears if the filesystem has an rt subvolume.
Click OK.
This task lets you grow a mounted filesystem.
| Note: Before you can grow a filesystem, you must first increase the size of the volume on which the filesystem is mounted. You can launch the Insert Mirrors or Concats above Volume Elements task to add a concat, or you can use the drag-and-drop mechanism to attach a slice to an existing concat. You cannot add a slice to an existing volume element if this changes the way that the data is laid out in that volume element or in any of its ancestor. |
To grow a filesystem, do the following:
Enter the following information:
Filesystem: Select the name of the filesystem you want to grow. The list of available filesystems is determined by looking for block devices containing XFS superblocks.
Specify Sizes: Check this option to modify the default options for the filesystem, including data region size and (if already present for the filesystem) log size and real-time section size.
By default, the filesystem will be created with the data region size equal to the size of the data subvolume. If the volume contains a log subvolume, the log size will be set to the size of the log subvolume. If the volume contains an rt subvolume, the real-time section size will be set to the size of the rt subvolume.
If you checked the Specify Sizes box, click Next to move to page 2. For more information about these fields, see the mkfs.xfs(8) man page.
Data Region Size: Enter the size of the data region of the filesystem as a number of 512-byte blocks. This number is usually equal to the size of the data subvolume. You should specify a size other than 0 only if the filesystem should occupy less space than the size of the data subvolume.
Log Size: Enter the size of the log section of the filesystem as a number of 512-byte blocks. You should specify a size other than 0 only if the log should occupy less space than the size of the log subvolume. This option only appears if the filesystem has a log subvolume.
Real-Time Size: Enter the size of the real-time section of the filesystem as a number of 512-byte blocks. This value is usually equal to the size of the rt subvolume, if there is one. You should specify a size other than 0 only if the real-time section should occupy less space than the size of the rt subvolume. This option only appears if the filesystem has an rt subvolume.
Click OK.
This task lets you mount a filesystem only on the node to which the GUI is connected (the local node).
To mount a filesystem locally, do the following:
Filesystem to Mount: Select the filesystem you wish to mount. The list of available filesystems is determined by looking for block devices containing XFS superblocks.
Mount Point: Specify the directory on which the selected filesystem will be mounted.
(Optional) Mount Options: Specify the options that should be passed to the mount(8) command. For more information about available options, see the fstab(5) man page.
By default, the filesystem will remount every time the system starts. However, if you uncheck the box, the mount will take place only when you explicitly use this task.
Click OK.
For more information, see the mount(8) man page.
To unmount a filesystem from the local node, do the following:
Filesystem to Unmount: Choose the filesystem to be unmounted.
Remove Mount Information: Click the check box to remove the mount point from the /etc/fstab file, which will ensure that the filesystem will remain unmounted after the next reboot. This item is available only if the mount point is currently saved in /etc/fstab.
Click OK.
This task lets you delete a local filesystem's mount information in the /etc/fstab file.
| Note: The filesystem will still be present on the volume. |
Do the following:
Filesystem Name: Select the filesystem for which you want to remove mount information. The list of available filesystems is determined by looking for block devices containing XFS superblocks.
Click OK.
The privileges tasks let you grant specific users the ability to perform specific tasks, and to revoke those privileges:
| Note: You cannot grant or revoke tasks for users with a user ID of 0. |
You can grant access to a specific task to one or more users at a time.
Do the following:
Select the user or users for whom you want to grant access. You can use the following methods to select users:
Click to select one user at a time
Shift+click to select a block of users
Ctrl+click to toggle the selection of any one user, which allows you to select multiple users that are not contiguous
Click Select All to select all users
Click Next to move to the next page.
Select the tasks to grant access to, using the above selection methods. Click Next to move to the next page.
Confirm your choices by clicking OK.
Note: If more tasks than you selected are shown, then the selected tasks run the same underlying privileged commands as other tasks, such that access to the tasks you specified cannot be granted without also granting access to these additional tasks.
To see which tasks a specific user can access, select View: Users. Select a specific user to see details about the tasks available to that user.
To see which users can access a specific task, select View: Task Privileges. Select a specific task to see details about the users who can access it and the privileged commands it requires.
Suppose you wanted to grant user diag permission to make, mount, and unmount a filesystem. You would do the following:
Select diag and click Next to move to the next page.
Select the tasks you want diag to be able to execute:
Ctrl+click Make Filesystems
Ctrl+click Mount a Filesystem Locally
Ctrl+click Unmount a Locally Mounted Filesystem
Click Next to move to the next page.
Confirm your choices by clicking OK.
Suppose you wanted to give user sys access to all tasks except stealing a foreign disk. The easiest way to do this is to select all of the tasks and then deselect the task (or tasks) you want to restrict. You would do the following:
Select sys and click Next to move to the next page.
Select the tasks you want sys to be able to execute:
Click Select All to highlight all tasks.
Deselect the task to which you want to restrict access. Ctrl+click Steal a Foreign Disk.
Click Next to move to the next page.
Confirm your choices by clicking OK.
You can revoke task access from one or more users at a time.
Do the following:
Select the users from whom you want to revoke task access. You can use the following methods to select users:
Click to select one user at a time
Shift+click to select a block of users
Ctrl+click to toggle the selection of any one user, which allows you to select multiple users that are not contiguous
Click Select All to select all users
Click Next to move to the next page.
Select the task or tasks to revoke access to, using the above selection methods. Click Next to move to the next page.
Confirm your choices by clicking OK.
Note: If more tasks than you selected are shown, then the selected tasks run the same underlying privileged commands as other tasks, such that access to the tasks you specified cannot be revoked without also revoking access to these additional tasks.
To see which tasks a specific user can access, select View: Users. Select a specific user to see details about the tasks available to that user.
To see which users can access a specific task, select View: Task Privileges. Select a specific task to see details about the users who can access it.