This chapter provides an overview of the Request Tracking System (RTS). RTS provides a special graphical user interface (GUI) for accessing and submitting bugs and requests for enhancements, referred to collectively as requests.
RTS consists of four applications: rtsquery, the main application, which provides full functionality, and three supplementary applications for special purposes: rtssubmit, rtsrespond, and rtsapprove.
These topics are covered:
rtsquery user interface
RTS tracking process
To understand rtsquery, it's helpful to know a few of the terms that are used in Tracker systems. The term request refers to the type of data you are tracking in the system, typically bug reports or requests for enhancement (RFE). A request contains all the information associated with the request, such as submitter, owner, priorities, and dates.
The program that you run to access a request is an application. An application provides one or more views, which are windows for inspecting or changing requests. All applications have a main view that appears when you invoke the application. The main view is usually a general purpose window that contains most of the application's functionality. An application also has auxiliary views, which you can use for special data or for users requiring limited information or functionality. In addition to the main application, supplementary applications are available. Supplementary applications are similar to auxiliary views (they may even access the same data), but supplementary application users do not use the main view.
The standard version of rtsquery has one main view rtsquery, one auxiliary view rtsfiles, and these three supplementary applications:
rtssubmit, used to submit requests
rtsrespond, used by request owners and screeners to respond to requests
rtsapprove, used by request approvers to approve requests
The RTS application main view windows all have the same parts, although their menus and request form areas may differ. The main application for RTS is rtsquery, shown in Figure 1-1 with its main sections labeled.
The rtsquery window has four main areas:

The menu bar lets you access five menus (see Figure 1-2).

The menus are:
| File menu | lets you print a file and exit the window | |
| Edit menu | provides editing commands that you can apply to all fields as a group | |
| Query menu | lets you reuse query selection criteria. | |
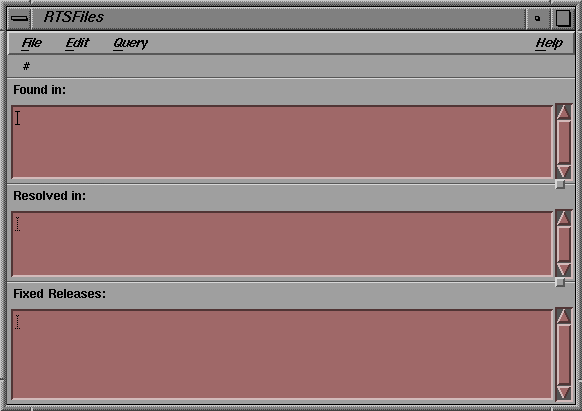
| Views menu | lets you display the auxiliary views associated with rtsquery. The standard version of rtsquery has one auxiliary view called rtsfiles, shown in Figure 1-3. The rtsfiles window lets you enter or access problem files in the Found in list, fixed files in the Resolved in list, and final files in the Fixed Releases list. | |
| Help menu | lets you get version information, summary information for the window, context information for components of the window, and an index of help topics for the system. The Help menu is standard for CASEVision tools. |
The control bar area of the rtsquery window is shown in Figure 1-4, with the Modes menu displayed.
The Modes menu displays the commands that you can perform on requests in the database. These commands are enabled or disabled, depending on your currently selected request (if any) and its state. For example, if no information is displayed, the system assumes you are either going to inspect requests or submit new ones; therefore, only the top four menu items are enabled.
When you select a command from the Modes menu, the information displayed in the rest of the window changes, as does the read/write permission on the fields. You can then cancel or apply the currently selected command by using the Cancel or <Apply command> buttons to the right of the Modes menu. In Figure 1-4, the current command is Query.
Commands have two categories: inspection commands that review requests and transition commands that can change the state of a request. The inspection commands, “Query” and “Display,” let you look up requests, in a list of summaries or individually in detail. The transition commands change either the status of the request or the fields in the report. Any field required for a specific transition is highlighted, indicating that an entry is necessary. If no entry is made, then the command is blocked from completion.
The list control buttons First, Next, Previous, and Last let you choose a request from the list for display in the request form area.

The rtsquery query results area is shown in Figure 1-5. The number of requests in the current query is displayed at the top of the list area. The list itself displays information that identifies requests in the list. If you use any of the list controls (buttons or menu items) to display a request in the form area, the list will scroll to the displayed request accordingly.
Two small icons that appear in the left margin of the query results area also help to track the status of a request:
The small rectangle indicates that the request has been displayed in the form area at least once since its submission.
The check mark indicates that the request has been edited at least once.
The query results area is divided into five columns, each with a title. The text in each column lines up under the title. Text fields are left-justified, and numerical fields are right-justified.

Next to each title is a radio button. When you click on one of these buttons, the button is highlighted and the list of requests will be sorted accordingly. For example, if you click on the ID# button, as in Figure 1-5, the list is sorted in ascending order according to ID#.

The request form area in RTS applications contains fields for entering and displaying data. A typical request form area appears in Figure 1-6.

Fields change colors and take on highlighting according to your current operation. If a field is the same color as the window background color, then it is in read-only state; when the field is in a contrasting color, it is writable.
Fields are highlighted if they are required for the current transition command. Fields are also highlighted if they are incorrectly entered. The highlighting color depends on your color scheme. In either case, a highlighted field blocks the transition.
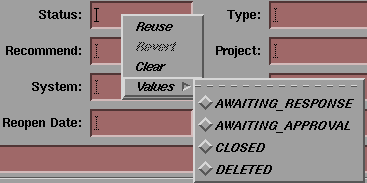
To display a popup menu, hold down the right mouse button while the cursor is over a field. At minimum, the menu contains the items “Reuse” (for using the last value displayed in this field), “Revert” (for returning to the saved value), and “Clear” (for blanking out the field). If predefined values are available for the field, they are displayed on the cascading menu attached to the “Values” item. The cascading menu features a “tear-off” perforation at the top. If you click on the perforation, the menu is displayed in its own window.
If the last item in the Values menu is an ellipsis (...), then you can enter a value other than the ones displayed. Figure 1-7 shows the values for the Status field.
The menu for fields that accept long text descriptions such as the Description and Resolution fields have an item called “Edit...” that lets you enter the text through your editor of choice. The editor default depends on the environment variable setting (see Chapter 3, “RTS Application Reference”) and defaults to vi if no variables are set.
The History of Changes field is automatically updated by Tracker each time an action is taken on a request. Figure 1-8 shows part of a typical request history.

There are probably as many ways of tracking requests as there are software organizations. The CASEVision/Tracker software has been designed with adaptability in mind. The tracking process implemented in the rtsquery application represents one particular process; your organization can use this process as is or with slight modifications. This section describes the rtsquery process in terms of the life cycle of a request in the system.
The data flow diagram in Figure 1-9 illustrates the request tracking process.

A request can go through many different states during its life cycle. A transition is an operation performed through a view that changes the request either in terms of status or data. Transitions are accessed from the Modes menu in the view's control bar.
Figure 1-10 shows how the transition commands change the states of a request. (The ovals represent the states of a request; the rectangles are the transition commands used to change the indicated states.)

The request tracking process has four major activities:
A submitter submits a bug or request for enhancement (RFE) into the request database. At this point the request is in the AWAITING_RESPONSE state.
The request is screened before the owner starts to work on it. rtsquery permits screening by these three parties:
screening committee
project manager
owner
Your tracking system administrator can tell you how screening is implemented for rtsquery in your organization. If okayed for work, the request is passed on to the owner. If no action is required, that is, it is rejected, deferred, or redundant (DUPLICATE), the request is returned to the database in the AWAITING_APPROVAL state for action by the approving authority.
Approved requests are then executed by the owner. If the approving authority calls for a redo, an owner will need to rework old requests. When the owner completes work on a screened request, it enters the AWAITING_APPROVAL state prior to approval.
The approving authority must then determine if the request has been adequately satisfied. If the approving authority finds problems, then the request is returned to the owner for correction (REDO); otherwise, the request is closed. If problems arise later, the request can be reopened and returned to the owner.