This chapter takes a task-oriented approach to describing the rtsquery request tracking system. The chapter covers the following tasks:
Getting started
Submitting a request
Browsing and displaying requests
Screening requests
Executing and reopening requests
Approving requests
Printing results
This section shows you how to use RTS applications. The first subsection discusses the differences between the applications. The next subsection presents a general discussion of performing Tracker operations.
To run RTS applications, type the full pathname of the application and press <return>. The RTS applications are usually stored in /usr/local/bin. The standard applications are:
rtsquery differs from the other applications in that it displays all of the fields in its main view and auxiliary view (see Figure 2-1). All operations can be performed from rtsquery, and all information in the database can be viewed from rtsquery. The other applications have fewer operations and only limited information for queries. They offer convenience as a trade-off.

For most Tracker operations you'll follow these steps:
Type the application name to display the desired window (if the application has not yet been started).
The window is displayed.
Select the desired command from the Modes menu in the control bar.
The window enters the selected mode for performing the command. Note that the command is not executed until you click the <apply command> button, which is to the right of the Cancel button in the control bar. Depending on the command selected, the window makes these changes:
Fields become writable or read-only.
The command name now displays on the Modes menu button and on the <apply command> button.
All fields required for the command are highlighted in red. This includes fields in views (such as rtsfiles) that may be hidden from view.
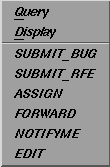
Fill in the request form fields with the appropriate information. Remember that holding down the right mouse button displays a menu with these items:
As the required fields are entered, the highlight disappears. If a field is entered incorrectly, according to the rules for that field, it is highlighted in yellow and must be corrected for the transition to take place. If you don't know the field's requirements, check on-line help.
Click the <apply command> button to perform the operation.
Note that the <apply command> button is sensitive only when all required fields are filled in. Clicking the button performs the operation and changes the window and database (if affected) accordingly. Any default fields are filled in automatically. The command mode may change as well; for example, after a query, the window switches to display mode.
In addition, email notifications are made to the owner, project manager, submitter, and any other parties indicated in the Notify field. The general format for a “SUBMIT_BUG” notification is:
Subject: BUG #ID modified, Transition SUBMIT_BUG

The following report fields have been modified:

Field czar set to: trackeradministrator.
Field owner set to: ownername.
Field ENTITY_ID set to: ID.
Field type set to: BUG.
Field STATE set to: AWAITING_RESPONSE.
Field summary set to: problemsummary.
Field bboard set to: approvingauthority.
Field due_date set to: submitdate plus 30 days.
Field submit_date set to: submitdate.
Field submitter set to: submittername.
Field notify_list changed from: () to: (interestedpartylist, ownername, submittername).

New value of description:
problemdescription
You can enter a new request through either rtsquery or rtssubmit. Both use the transition commands “SUBMIT_BUG” and “SUBMIT_RFE” to submit bug reports and requests for enhancement (RFEs) respectively.
The major difference between the applications is that rtsquery lets you perform the full range of transitions; it has a separate window for entering files. rtssubmit is a special purpose application best suited to submitting requests. It has fewer commands in its Modes menu (see Figure 2-2) and only those fields necessary for submitting requests (see Figure 2-3).
rtssubmit conveniently lets you enter problem files in its main window. Since rtssubmit has a limited number of fields, it is less suited to displaying details of individual requests.
To submit a request:
From either rtsquery or rtssubmit, select one of the submit transitions (“SUBMIT_BUG” or “SUBMIT_RFE”) in the Modes menu on the control bar.
The window makes these changes (see Figure 2-3):
The Report # and Status fields turn read-only, since these are set automatically by the system.
The Description field is highlighted in red, indicating that it is required.
The <apply command> field changes to the selected submit transition name, although it is not yet enabled.
Fill in the Description field, which is required, and any other fields needed to provide request information.
After you make an entry in the Description field and move the cursor out of it, the highlighting is removed. At this point, the <apply command> and Cancel buttons are enabled, since you have fulfilled the Description requirement.
These two facilities will help you enter data:
Use the Edit menu to make global edits in the window.
Hold down the right mouse button and select “Values” to select a standard value. Select “Reuse” to enter the value from the last request.
As a further convenience, these are the default entries:
Type—BUG or RFE
Submitter—current user
Date—current date
Owner—designated request czar (tracking system administrator)
Due date—30 days from submit date
Summary—first line of description
To complete the submit transition, click the <apply command> field now labeled either “SUBMIT_BUG” or “SUBMIT_RFE.”
After you click the <apply command> button, the following takes place:
The default entries are made, unless you have entered different information.
The new request is registered in the database.
The request enters the AWAITING_RESPONSE state.
The window displays all the request information and switches to display mode.
Email notifications are made to the owner, submitter, and anyone listed in the Notify field.
The data flow for the submittal process is summarized in Figure 2-4.


You can browse through requests from any of the RTS applications. However, rtsquery is best suited to browsing because it is the only application that contains all the available request fields. The other applications use queries to display requests prior to operating on them.
To browse requests in the database, perform the following steps:
Select “Query” from the Modes menu if it is not already selected. All fields in the window become writable.
Enter the desired selection criteria in the appropriate fields.
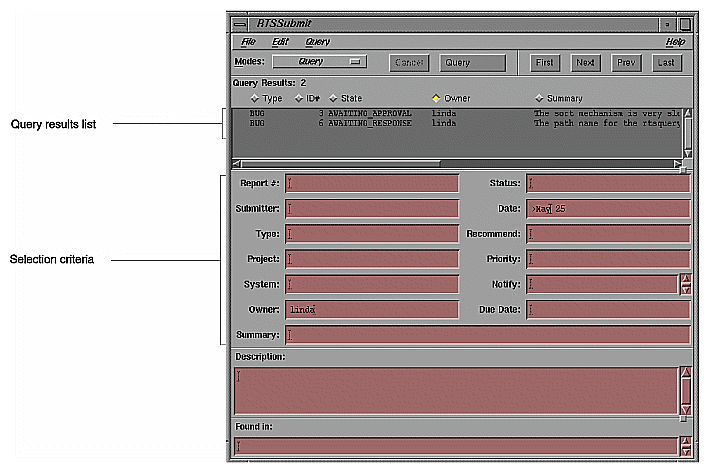
Leaving all fields blank brings all requests in the database into the list, with the first few displayed in the query results portion of the window. Entering one or more fields displays those requests with matching fields (with regard to case-sensitivity). Entering multiple fields has the effect of anding the fields. You can also use the operators in Table 2-1 to refine your queries. When you use these operators, you should enclose all values inside quotation marks (“”).
Operator
Description
=
equal to
<>
not equal to
<
less than[a]
<=
less than or equal to
>
greater than
>=
greater than or equal to
match
regular expression match
contains
contains specified value (list fields only)
contains any
contains any of the specified values (list fields only)
contains only
contains only the specified values (list fields only)
= null
unset or non-existent test
<> null
set or existing test
[startrange:endrange]
range entry
[a] The less-than (<) and greater-than (>) operators can be used with dates to mean be fore and after respectively. For example, >June 25 means after June 25.
Click the <apply command> button (which displays the command Query) to execute the query with your selection criteria.
All appropriate requests will appear in summary form in the query results area. Figure 2-5 is a typical example of entering selection criteria. It includes all requests in the database owned by Linda, submitted after May 25, 1993.
To display the detailed information for any request in the query results area, you can double-click the request directly, or you can click one of the list control buttons: First, Next, Prev, and Last.
The selected request displays in the request form area of the window. Figure 2-6 shows the rtsquery window in display mode.
When you display a request, a small rectangular icon appears to the left of the request line in the query results area. If you modify the request, a check mark will appear next to the request as well. If you make a subsequent query, the icons will be cleared.

All RTS applications let you save different sets of selection criteria and load them when you want to reuse them. For example, you might want to save different sets of criteria with some combination of yourself as owner and one or more of the following fields:
Project
Priority
Due Date
In addition, you can specify a default set of criteria to be loaded when you start up a specific application. For example, if you are doing approval work, you can specify a default of status equal to AWAITING_APPROVAL for running rtsapprove
Only authorized users can screen requests. You begin by browsing and displaying requests, and can then apply different transitions after the selected request displays.
Screening requests follows all the steps mentioned in the section “Browsing and Displaying Requests.” The difference is that you deal only with requests in the AWAITING_RESPONSE state.
The screener has three transition commands for turning down requests:
“DUPLICATE,” if a report on the same topic has been previously submitted.
“DEFER,” if work on the request is to be performed at a later date. This requires an entry in the Reopen Date field. Tracker automatically reopens the request on the specified date, switching its status from CLOSED to AWAITING_RESPONSE.
Each command changes the request status from AWAITING_RESPONSE to AWAITING_APPROVAL.
The “ASSIGN” transition command lets the screener specify the owner who will be executing the request. “ASSIGN” requires that the Owner field be changed. If the owner serves as screener, then the “ASSIGN” command is not appropriate.
The screening process is summarized in Figure 2-7.

After a request has been screened and okayed, it is turned over to the owner for implementation. (If the owner performed the screening, there is no turnover.) In addition to new requests from the screener, the owner may receive rejected resolutions (redo requests) from the approver.
The request execution process is summarized in Figure 2-8.

You can use either rtsquery or rtsrespond to execute a request. Figure 2-9 shows the rtsrespond main view and Modes menu.

To modify an existing request, you first have to bring it up, as discussed in the “Browsing and Displaying Requests” section. When the request is displayed, perform these steps:
Select “RESOLVE” from the Modes menu.
The Resolution field in the main view and the Resolved in field (in rtsfiles if you are using rtsquery) are highlighted.
Enter the explanation of the fix in the Resolution field and any files changed as a result of the request in the Resolved in field.
Click the <apply command> button, which now reads RESOLVE.
The status changes to AWAITING_APPROVAL.
Approving requests is similar to screening requests in that it requires authority. After the owner has executed the request, the approver must okay it before it can be closed. If the screener declines the request due to rejection, duplication, or deferral, the approver must approve this decision as well.
The first step is to perform a query to create a list of requests in the AWAITING_APPROVAL state. The “APPROVE” command requires entries in the Approver and Close date fields. The defaults for these fields are the current user and date respectively. When you approve a request, its state changes to CLOSED. If you reject a request, the state becomes AWAITING_RESPONSE.
The approval process is illustrated in Figure 2-10.

You can approve requests using either rtsquery or rtsapprove (see Figure 2-11).

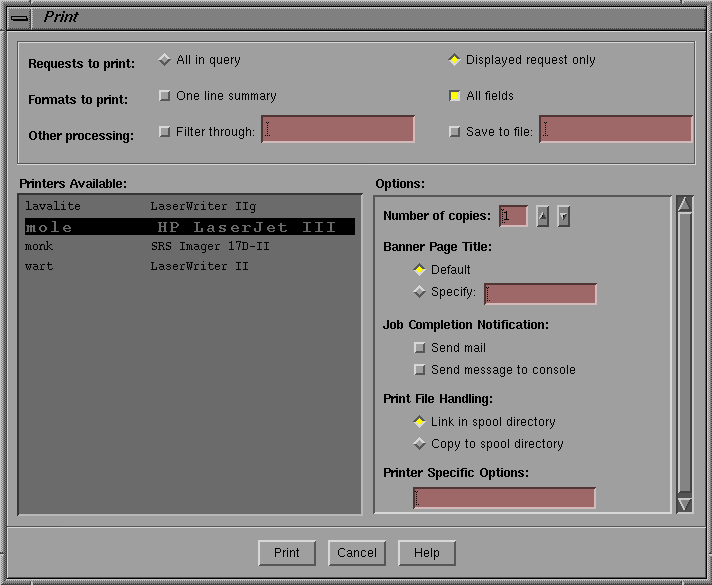
You can use the Print option on the File menu to print a request or group of requests in a report, or you can save the information in a file. The Print menu is shown in Figure 2-12.
The diamond buttons indicate a “one-of” choice; the square buttons mean you can select any or all of the options offered. When you select the Save to file option, the Print button at the bottom of the menu changes to Save.
The Filter through: option lets you use your own filter to create a suitable report format for the printed requests. Try the sample filter in NAME.