Chapter 3. RTS Application Reference

This chapter describes these features of rtsquery:

rtsquery Main View

The RTS application main view windows all have the same parts, although their menus and request form areas may differ.

The main view for rtsquery is shown in Figure 3-1, with its menus and parts labeled. It contains:

  • a menu bar with five menus: File, Edit, Query, Views, and Help

  • a control bar for browsing, displaying, and performing operations on requests

  • a query results area containing requests matching the criteria of the most recent query and indicating accessed and modified requests

  • a request form containing detailed information
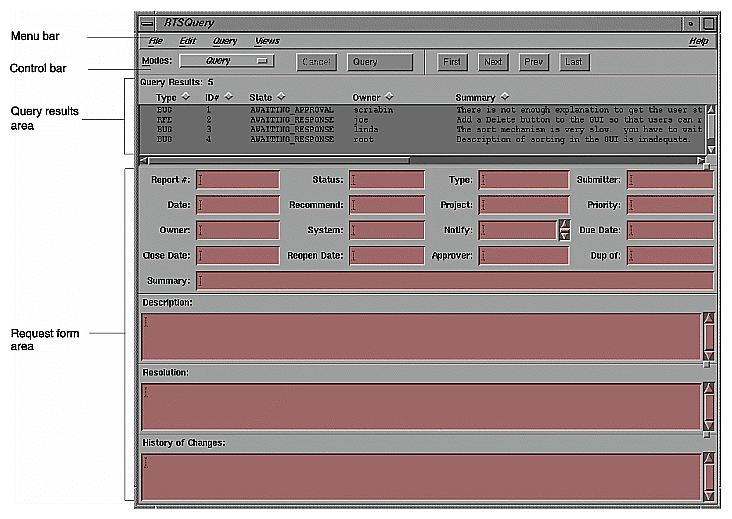
    Figure 3-1. rtsquery Window with Menus


Tracker Menus

Up to five menus are provided in Tracker application windows: File, Edit, Query, Views, and Help. If the application has no auxiliary views, there is no Views menu.

File Menu

The File menu (see Figure 3-2) provides these selections:

Figure 3-2. File Menu


“Print...” 

lets you print a request. It displays a dialog box for you to select printing specifications.

“Exit” 

quits the application

“Hide 

appears in auxiliary views only, in place of “Exit.” It closes the auxiliary view's window.

Edit Menu

The Edit menu (see Figure 3-3) provides these selections:

Figure 3-3. Edit Menu


“Reuse” 

fills all fields with data from the last request

“Revert” 

restores the values entered previously for the current request

“Clear” 

blanks out all fields

Query Menu

The Query menu (see Figure 3-4) lets you reuse query selection criteria rather than enter it in the request fields each time you want that combination. Its selections are:

Figure 3-4. Query Menu


“Save...”  

stores the current set of criteria

“Load...”  

enters a saved set of criteria into the appropriate fields

“Save as Default” 


saves your current criteria and reuses it as a default when you start up this RTS application.

“Case Sensitive Matches” 


toggles case sensitivity on or off when you are searching for a string match in a field

Views Menu

The Views menu (see Figure 3-5) lets you display auxiliary views. The standard version of rtsquery provides one selection “rtsfiles.” Your particular configuration may have additional views.

Figure 3-5. Views Menu


“rtsfiles” 

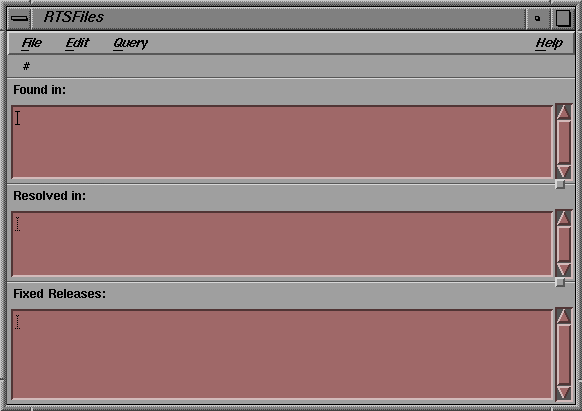
displays the rtsfiles window (see Figure 3-6), which has three fields for entering file names:

Found in: lets you enter or access problem files.

Resolved in: lets you enter changed files.

Fixed Releases: lets you enter final files.

Figure 3-6. rtsfiles Window


Help Menu

The Help menu (see Figure 3-7) is the same for all CASEVision tools from Silicon Graphics.
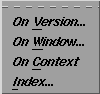
Figure 3-7. Help Menu


“On Version...” 

displays copyright and version number information

“On Window...” 

displays the Help Viewer with an overview of the current window's usage

“On Context” 

lets you select a feature with the cursor and display the Help Viewer describing that feature

“Index...” 

displays the Help Browser, which lets you browse a list of Help topics and make a request

Control Bar

The control bar lets you perform queries on the request database, access individual requests, and perform operations on them. The control bar for rtsquery is shown in Figure 3-8. It contains:

  • the Modes menu for resetting the window to accept an operation

  • a Cancel button for canceling an operation

  • an <apply command> button for completing an operation. It displays the command for the current operation.

  • list controls for displaying the detailed information for requests in the query results area (see the next section, “Query Results Area”).
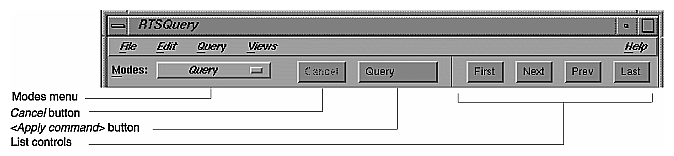
    Figure 3-8. Control Bar of rtsquery with Modes Menu


Modes Menu

The Modes menu displays the commands that can be performed on requests in the database. These commands are enabled or disabled, according to your currently selected request (if any) and its state. For example, if no detail information is displayed, the system assumes that you are either going to inspect requests or submit new ones so that only the top four menu items (“Query,” “Display,” “SUBMIT_BUG,” and SUBMIT_RFE”) are enabled.

When you select a command from the Modes menu, the rest of the window changes according to the information displayed and the read/write permission on the fields. The buttons, Cancel and <apply command>, let you cancel or apply the currently selected command. They are enabled only when appropriate; for example, <apply command> is enabled only after you enter data in all required fields and move the cursor out of the last field.

Performing Operations

In general, operations are performed in three steps:

  1. Select the operation from the Modes menu.

  2. Select or change the data necessary for the operation.

  3. Complete the operation by clicking the <apply command> button or stop it by clicking Cancel.

The Modes menu provides two types of commands inspection commands and transition commands. The inspection commands “Query” and “Display” let you look up requests, in a list of summaries or individually in detail. The transition commands change either the status of the request or the fields in the report. Any field required for a specific transition will be highlighted, indicating that an entry is necessary. If no entry is made, then the command will be blocked from completion.

List Control Buttons

The list control buttons are:

First  

displays the first request in the list.

Next  

displays the next request in the list.

Previous  

displays the prior request in the list.

Last  

displays the last request in the list.

Modes Menu Selections

The Modes menu selections, shown in Figure 3-8, are:

“Query” 

lets you define a list of requests to display in the query results area by entering field values to be matched. (“Query” is case-sensitive.) For a more detailed description, refer to the section “Browsing and Displaying Requests” in Chapter 2.

“Display”  

indicates display mode, that is, you can display the detailed information for individual requests in the list. Clicking “Display” while in Query mode displays the first request in the list. While in display mode, you can select requests by clicking them, or you can use the list control buttons: First, Next, Prev (short for previous), and Last.

“SUBMIT_BUG” 


lets you submit a request classified as a bug. It requires that you specify a description. “SUBMIT_BUG” fills in these fields by default unless you enter different information: Type (BUG), Submitter (current user), Date (current date), Owner (project leader if known or else approving authority), Due Date (30 days from current), Summary (first line of description).

“SUBMIT_RFE” 


lets you submit a request classified as an RFE (request for enhancement). “SUBMIT_RFE” fills in these fields by default unless you enter different information: Type (RFE), Submitter (current user), Date (current date), Owner (project leader if known or else approving authority), Due Date (30 days from current), Summary (first line of description).

“ASSIGN” 

lets you assign an owner and due date to a request. These two fields are required.

“FORWARD” 

lets you change the owner of the request. A different owner name is required.

“RESOLVE” 

indicates the request has been completed and is ready for approval. It requires an explanation of the fix in the Resolution field and the list of files changed in the Resolved in field (which is in rtsfiles view if you are using rtsquery). The Recommend field gets set to RESOLUTION.

“REJECT” 

lets you reject the request as invalid. Its state goes from AWAITING_RESPONSE to AWAITING_APPROVAL. An explanation must be made in the Resolution field. The Recommend field gets set to REJECTION.

“DEFER” 

lets you remove a request from AWAITING_RESPONSE state to AWAITING_APPROVAL state. You must provide an explanation in the Resolution field and set a new date in the Reopen Date field. The Recommend field gets set to DEFERRAL.

“DUPLICATE” 

lets you close out this request, because it is a duplicate of a prior one. You must enter an explanation in the Resolution field and enter the report number of the request duplicated by the current request in the Dup of field.

“NOTIFYME” 

lets you add yourself to the list of interested parties to be notified when changes occur to the current request.

“REDO” 

is for approvers only. It lets you return a request to its owner for further work. The state changes from AWAITING_APPROVAL back to AWAITING_RESPONSE.

“EDIT” 

lets you change fields in the request (other than Report # and Status).

“APPROVE” 

is for approvers only. It closes out the request and sets the value in the Close Date field to the current date, unless a different value has been entered.

“REOPEN” 

takes a request from the CLOSED state to AWAITING_RESPONSE and makes the usual notifications.

“DELETE” 

takes a request from the CLOSED state to DELETED, which means it will be removed from the request database.

Query Results Area

All query results areas in Tracker applications have the same general characteristics (see Figure 3-9).
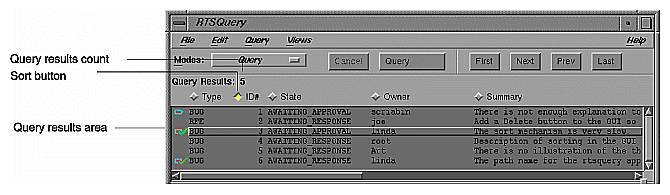
Figure 3-9. Query Results Area


The number of requests in the current query is displayed at the top of the list area. The list itself displays information for identifying requests in the list. The vertical scroll bar displays different portions of the list; the horizontal scroll bar lets you display portions of request descriptions that are obscured from view. If you use any of the list controls to display a request in the form area, the list will scroll to the displayed request accordingly.

You can use the sort buttons to sort the list of requests according to one of the characteristics displayed. The list is sorted in ascending order, alphabetically or numerically, according to the chosen category.


Note: You cannot alter the sort order from the GUI. Items are always sorted in ascending order from the sort buttons.

The standard version of rtsquery presents requests in the query results area in this format:

<request ID> <request state> <owner> <summary>

Request Form Area

The fields that appear in the request form area depend on which application you are using and if your configuration has been modified. In total, these fields represent all the potential user-accessible data belonging to a request.

Field Menus

All Tracker applications provide right-button menus to help edit the request fields. Holding down the right mouse button while the cursor is over a field displays a popup menu.

If there are no standard values for the field, the menu contains the items “Reuse” (for using the value from the last displayed request), “Clear” (for blanking out the field), and “Revert” (for returning to the saved value).

If predefined values are available for the field, they can be displayed from the cascading menu attached to the “Values” item. If the last item in the Values menu is an ellipsis (...), you can enter values other than the ones displayed. Fields with a large number of value options may display these options in the form of a scrolling list. Figure 3-10 shows a list of projects.
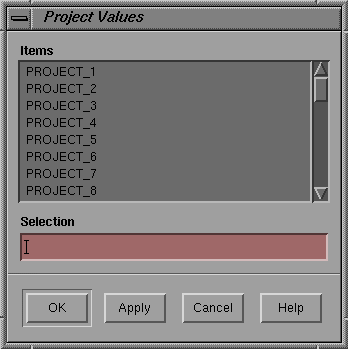
Figure 3-10. Scrolling List of Project Values


If the field allows lists, such as “Notify” in rtsquery, a menu like that in Figure 3-11 is displayed. “Format” has two options: “List,” a vertical presentation with a scroll bar, and “Text,” a linear presentation separated by commas. You can make entries only in text mode; the entries are made inside the parentheses, separated by commas. When in list mode, you can remove items from the list by choosing “Delete Selected.”
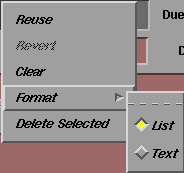
Figure 3-11. Format Menu Selections


If the field allows long text descriptions, a menu displays as shown in Figure 3-12. “Edit...” lets you bring up your editor of choice to edit the text. While the editor window is up, the RTS field is in read-only mode.
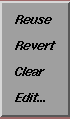
Figure 3-12. ”Edit...” Option


Use one of the following to set your default editor:

  • the environment variable $WINEDITOR (for editors like jot that bring up their own windows)

  • the environment variable $EDITOR (for editors like vi that do not supply their own windows)

  • the editorCommand setting in .Xdefaults

If none of these are set, the editor defaults to vi.

Date Entry

Tracker provides a wide variety of date input formats. Dates can be supplied with as little information as the year or month, or specified to the nearest second.

Special formats allow dates to be supplied as a base time point plus or minus a time interval, and also as relative to the current year, month, day, hour or second. Date field values represent a point in time to the nearest second. They do not represent a time interval such as in six seconds or two days.

Date values are ordered from this starting point, the lowest value, and increasing toward later dates. Therefore, a date that occurs after a specified date will have a higher value. This lets you use comparison operators such as < (before) and > (after).

When you use dates in transitions, you enter a specific point in time. When you are using dates in queries, you can enter a range or condition as well as a specific time.

Date Entry for Transitions

Tracker lets you enter dates in most of the standard formats available in UNIX. Table 3-1 provides examples of date value entries, along with the interpretation by Tracker. These examples assume a current date and time of Tue Jul 28 11:10:14 PDT 1992.

Table 3-1. Date Formats

Date Input

Tracker Interpretation

7/28/92

Tue Jul 28 00:00:00 PDT 1992

July 28, 1992

Tue Jul 28 00:00:00 PDT 1992

July 28 1992

Tue Jul 28 00:00:00 PDT 1992

28-July-92

Tue Jul 28 00:00:00 PDT 1992

July 28 10:00 1992

Tue Jul 28 10:00:00 PDT 1992

10:00 July 28 1992

Tue Jul 28 10:00:00 PDT 1992

July 28

Tue Jul 28 00:00:00 PDT 1992

July 28 10PM

Tue Jul 28 22:00:00 PDT 1992

July 28 10PM EDT

Tue Jul 28 19:00:00 PDT 1992

July 1992

Wed Jul 1 00:00:00 PDT 1992

July

Wed Jul 1 00:00:00 PDT 1992

1992

Wed Jan 1 00:00:00 PST 1992

10PM

Tue Jul 28 22:00:00 PDT 1992

10:30:59 PM

Tue Jul 28 22:30:59 PDT 1992

In addition to entering the specific date and time, you can also use these expressions:

this second 

represents the current date and time, up to the second. The expression now has the same effect

this minute 

represents the current date and time, up to the minute (stored as the first second in that minute)

this hour 

represents the current date and time, up to the hour (stored as the first second in that hour)

this day 

represents the current date with no time specified (stored as the first second in that day). The expression today has the same effect.

this month 

represents the current date and time, (stored as the first second in the first day of the month)

this year 

represents the current date and time, (stored as the first second in the first day of the year)

Table 3-2 lists some current expressions of the date (assuming the date used in the previous example, Tue Jul 28 11:10:14 PDT 1992).

Table 3-2. Current Date Expressions

Date Input

Tracker Interpretation

today

Tue Jul 28 00:00:00 PDT 1992—Beginning of current day. Equivalent to this day.

now

Tue Jul 28 11:10:14 PDT 1992—Current time to the nearest second.

this year

Wed Jan 1 00:00:00 PST 1992—Beginning of current year.

this month

Wed Jul 1 00:00:00 PDT 1992—Beginning of current month.

today + 30:00:00:00

Thu Aug 27 00:00:00 PDT 1992—30 days from today.

July 28 - 72:00:00

Sat Jul 25 00:00:00 PDT 1992—72 hours before July 28th of the current year.


Date Entry for Queries

When you are performing queries involving dates, you often need multiple dates rather than a specific date. These entries are useful in queries:

  • a date range in the form [startdate:enddate].

  • an expression with the operators <, <=, =, >=, >, and <> (> means after the date and < means before).

  • the current expressions mentioned above, such as this year or this month.

  • an implied interval such as a day, month, or year. Tracker performs the query according to the specificity of the date unit entered.

  • an expression with a base time plus or minus a time interval.

Field Definitions

This is a list of the standard fields in rtsquery, which is a superset of the other applications:

Report # 

is an integer used to identify requests, which is set by the application and cannot be modified. The field is read-only, except when you are performing queries.

Status 

refers to the state of the request, which can be AWAITING_RESPONSE, AWAITING_APPROVAL, CLOSED, and DELETED. Status cannot be edited directly; it is changed only by transitions.

Type 

represents the type of request: BUG or RFE. Your configuration may be set up to accept other types of requests. Check the “Values” selection in the right-button popup menu for other values.

Submitter 

identifies the original submitter of the request.

Date 

is the date and time when the request was submitted.

Recommend 

represents a response to a request. The permitted values are DEFERRAL, REJECTION, RESOLUTION, and DUPLICATION.


Note: Only transitions can change the state of a request. For example, using the “EDIT” command to change the Recommend field to RESOLUTION does not resolve the request; it only changes the value of this field.


Project 

identifies the software project. Initially, rtsquery has three placeholder project names: PROJECT_1, PROJECT_2, and PROJECT_3. To determine the projects on your system, hold down the right mouse button when the cursor is in this field and select “VALUES.”

Priority 

is the priority of the request on a scale of LOW, MEDIUM, and HIGH. Since your configuration may be different, hold down the right mouse button when the cursor is in the Priority field and select “VALUES” to see the valid priority values.

Owner 

identifies the person responsible for making the correction. For notification purposes, the name should be the same as that person's email address.

System 

identifies the system to which the request is applied. Initially, rtsquery has three placeholder project names: SYSTEM_1, SYSTEM_2, and SYSTEM_3.

Notify 

identifies parties to be informed whenever there is a change to a request. Notify is a field of list type.

Due date  

is the target date for resolution of the request. The standard versions of rtsquery and rtssubmit set the date to 30 days from the submittal date by default. Your configuration may be different.

Close date 

is the actual date on which the request is closed by the approving authority.

Reopen date 

is the new effective submittal date when a request is deferred. This is a required field for the DEFER transition.

Approver 

establishes the approving authority. Check the “VALUES” item in the right-button menu to see if your system has a special configuration.

Dup of 

displays the report number of a duplicated request if the current request has been discarded as a duplicate.

Summary 

is a one-line description of the request. It defaults to the first line from the Description field after a “SUBMIT_BUG” or “SUBMIT_RFE” transition if no other information has been entered. You can also edit the Summary field using the “EDIT” command.

Description 

is the detailed description of the request. It is displayed in a scrollable area and thus can take as many lines as necessary for the full description.

Resolution 

displays a detailed explanation for a transition of the request. It is required for these transitions: RESOLVE, REJECT, DEFER, and DUPLICATE. It is displayed in a scrollable area and thus can take as many lines as necessary.

Found in 

is a list of file names in which problems related to the request are found.

Resolved in 

is a list of files that have changed as a result of the request. One or more entries are required in this field for the RESOLVE transition.

Fixed releases 

is a list of files that represent the software releases containing the fix to the request.