This chapter describes how to manage your station's connection to the FDDI ring. Specifically, the following topics are covered:
If you are the FDDI ring's network administrator, you need to devise a way to keep track of the stations on your FDDI ring to ensure that they are operational and that the network traffic is flowing freely. How do you determine whether a particular station is on the ring or whether the ring has wrapped? How do you find out what, if anything, is wrong with a station? This chapter provides some of the information you need to answer these questions.
FDDIXPress provides station management (SMT) commands (listed in Table 3-1) for managing and monitoring both the FDDI ring and the FDDI connections at each station. You execute these commands from a shell window.
FDDIXPress includes a graphical tool for maintaining FDDI rings: FDDIVisualyzer. This application displays a color-coded graphical representation of the FDDI ring, thus allowing you to see the ring status and view all the station statuses. Unlike the SMT commands that work best for monitoring a single station, FDDIVisualyzer provides complete ring status at a single glance.
You can use the SMT commands to verify that a station is reachable on the ring, to list all the stations on the ring, to monitor the status of a particular station's FDDI connection, and so forth. Table 3-1 lists the SMT commands.
Something the SMT commands do not do for you is maintain a list of all the stations that are supposed to be on the ring. In general, SMT information is always current, so only the currently operating stations can be listed and contacted. However, at times, it is convenient to have a list of all the stations that should be functioning on a particular ring. This is a task the network administrator for the FDDI ring should do.
The SMT commands are specialized versions of the IRIX networking commands. For example, a few of the SMT commands that are similar to the networking commands include smtstat (like netstat), smtping (like ping), and smtconfig (like ifconfig). Be sure to use the SMT commands for the FDDI connections; use the standard network commands for the Ethernet connections. See Appendix D for the man pages for the SMT commands.
Table 3-1. FDDIXPress (SMT) Commands
Target | Utility | Description |
|---|---|---|
Ring | smtring | Lists all the functioning stations on the ring. |
Remote station or | smtinfo | Shows SMT information for one station on the ring. |
| smtping | Verifies that a particular station on the ring can be reached. Proves that the local station's FDDI connection is functional. |
Local station (only) | smtconfig | Configures or displays local station's FDDI interface parameters. Superuser access is required to (re)configure. |
| smtmaint | Sets FDDI PCM line states for debugging local station's FDDI connection. Intended for use by FDDI experts only. Superuser access required. |
| smtstat | Shows SMT statistics and information for local station; displays selected contents of MIB, organized into six different reports. |
To see if a station is on the FDDI ring:
% /usr/etc/smtping –I fddiinterface -c 2 host |
host is a name in the /etc/ethers file or a MAC address, and fddiinterface is the network interface (for example, ipg0, ipg1, and so on, or xpi0, xpi1, and so on).
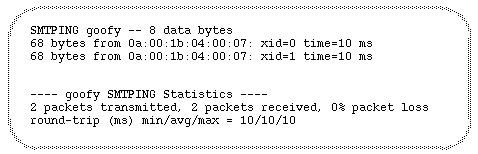
This command sends a request for a response (analogous to an RSVP). The previous request is sent twice (–c 2) to a host (either a MAC address or a name defined in /etc/ethers) on the specified FDDI network connection. As the host receives each request, it responds by sending some data. If host is not responding for any reason, smtping will time out, and the screen display indicates the problem with the message ... 0 packets received, 100% packet loss.
When a station is on the ring and responds, you see a display similar to Figure 3-1.
For additional information about smtping and its options, see smtping(1M).
To list all the functioning stations on the FDDI ring, use the smtring command:
% /usr/etc/smtring |
smtring broadcasts to all the stations and concentrators on the ring, waits 60 seconds to collect all responses, and then lists the responding stations in logical order. The local station is at the top of the list (unless a specific host has been specified in the command line). Each line shows three items of information, described from left to right:
the station ID for the station listed on the right (under the label MAC Address)
the station's upstream neighbor
the station's name (or, if the ethers database is not maintained, the MAC address in canonical order)
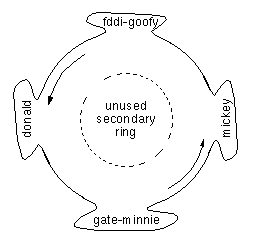
Figure 3-2 shows an example of responses. In this example, the smtring command has been invoked from a station named goofy whose MAC address is a:0:1b:4:0:7 and whose upstream neighbor is mickey. From this listing you can construct a ring, as shown in Figure 3-3.
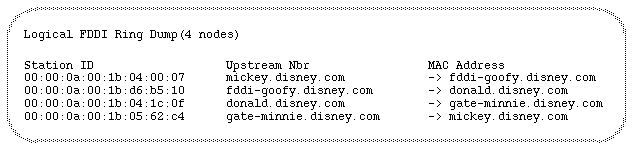
In Figure 3-2, goofy's station ID is the default one created by the FDDIXPress SMT daemon from the MAC address.
You can use the –I option to smtring if you have more than one FDDI controller board installed (for example, xpi0 and xpi1) and want to examine the state of the second board's ring. To do this, use:
% /usr/etc/smtring -I interfacename |
With the smtinfo command, you can see SMT information for a specified remote host, including station configuration and operation information and supported SMT versions.
To display the SMT version for a remote host (for example, 0a:00:1b:04:00:07 or goofy), use:
% /usr/etc/smtinfo host |
host is a name in the /etc/ethers file or a MAC address.
The output looks like the following line and shows the host goofy is currently using SMT version 2, and can communicate with stations using SMT versions 1 or 2.
goofy uses SMT version 2 (supported versions: 1-2) |
To see station configuration information for a remote host (for example, 0a:00:1b:04:00:07 or goofy), use:
% /usr/etc/smtinfo -c host |
host is a name in the /etc/ethers file or a MAC address.
An example of smtinfo -c output is shown in Figure 3-4 and the information is explained in Table 3-2.
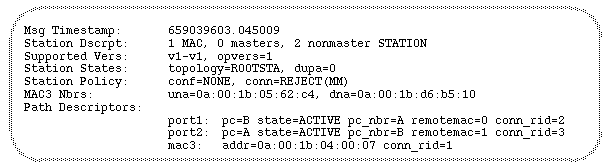
Table 3-2. Information Displayed by smtinfo -c
Item | Description |
|---|---|
Msg Timestamp | This information is not useable. |
Station Dscrpt | Description of the station |
Supported Vers | SMT versions supported and currently used |
Station States | Station's states. ROOTSTA indicates that the station is connected to a dual ring, not a concentrator. |
MAC3 Nbrs | Upstream (una) and downstream (dna) neighbor addresses. |
Path Descriptors | Descriptions of the port or ports and the interface's MAC address in canonical order. |
If the host has an additional FDDI board installed and you want to see configuration information about that interface (for example, ipg1), use:
% /usr/etc/smtinfo -c -I interfacename host |
For more information about smtinfo, see smtinfo(1).
The network administrator for an FDDI ring needs to monitor the ring and recognize faults when they occur. One type of fault, for example, occurs when a station on the network goes down. The SMT modules within the FDDI stations isolate the fault and wrap to the secondary ring. If an optical bypass switch is installed on the dysfunctional station, the switch causes the ring to bypass the station and no wraps occur. The network continues to function. Figure 3-5 shows an example of wrapped ring when one station goes down.
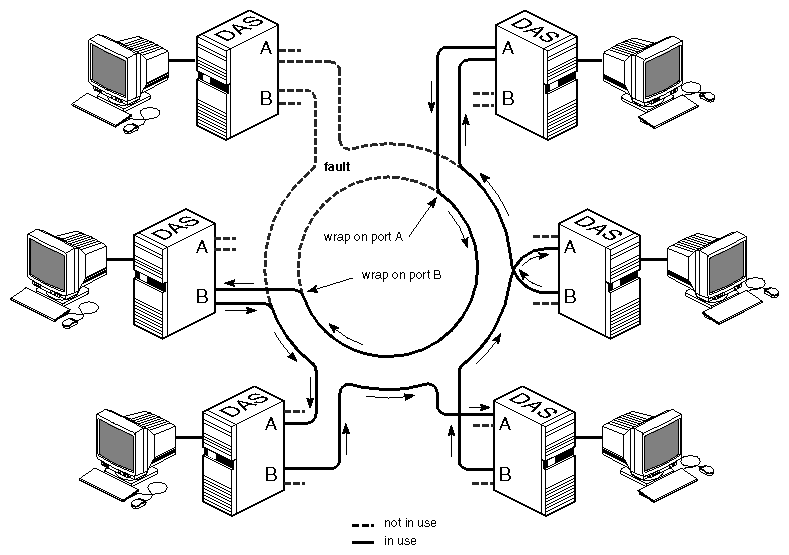
As you can see in Figure 3-5, when one station experiences an error, only that station is out of the loop. It is also possible for one port on one station to malfunction (as illustrated by fault 1 in Figure 3-6), in which case the ring wraps, but no station is out of the loop. Traffic on the network continues as usual. Notice that when a station fails (both ports are off the ring), the wraps do not occur on the faulty port, but on its two neighbor ports.
If two or more stations go down, the network may become fragmented into a number of smaller loops, and users may not be able to access stations that have become isolated onto a different loop. It is important to locate the faults and make the necessary repairs as quickly as possible. Figure 3-6 shows a fragmented network with two stations down.
How do you know there is a fault on the ring? One way is to use smtping at each station to verify that each one responds. Another way is to use smtring to create a complete list, then verify that all known stations appear on the list. The easiest method is to use the FDDIVisualyzer product, which graphically indicates faults on the ring. In all of these instances, an up-to-date, complete list of all stations that are physically attached to the ring is vital. The network administrator should maintain this list. In many cases, once a station fails, it is not possible to communicate with it remotely over the ring. Its failure is deduced from its absence or lack of response. To debug the faulty station, log on to that station through a second network connection or at the station.
You can log on to any station and use smtstat to display status information about that station's FDDI interfaces. This command does not access a station remotely; rather, it displays information about the local host, even when the host is not functioning on the ring. A step-by-step verification process is described in “Verifying the FDDI Connection”.
You can display and monitor the status of a station's FDDI connection by logging on to the station and entering the following command:
% /usr/etc/smtstat |
The smtstat report is shown in Figure 3-7 and a listing of its columns follows. Table 3-3 explains the entries for the columns in more detail.
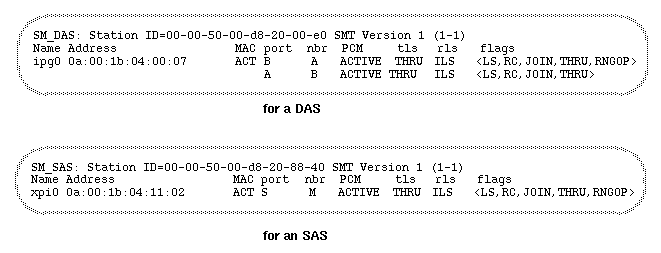
In the DAS display, the first line contains the following information:
the type of station (SM_DAS is a single MAC, dual-attachment station)
the SMT station ID
supported SMT versions
The second line contains column headings while subsequent lines display the information:
Name: names of FDDI interfaces (for example, ipg0, xpi0)
Address: MAC address (in canonical order) associated with each interface
MAC: status of the MAC (for example, ACT for active is normal)
port: ports present for each MAC
nbr: port on neighbor station to which each local port is connected (A-to-B, B-to-A, and S-to-M are normal)
PCM: status of each port's physical connection management (PCM) where ACTIVE is normal
tls: transmit line state for each port (THRU is normal)
rls: receive line state for each port (ILS is normal)
flags: flags for each port (RNGOP, LS, RC, JOIN, THRU, and OBS are normal)
By monitoring SMT status, you can see the connection state, transmitting and receiving line states, and the flags indicating the ring state. In the smtstat display shown in Figure 3-7, the primary ring is operating (RNGOP), its transmit line is working (THRU), its receive line is idle (ILS), and the secondary ring is functional (LS, RC, JOIN) but not operating. If the ring were wrapped at this station, you would see a WRAP indication.
Table 3-3. smtstat Report Fields
By using the –v (verbose) option with smtstat, you can display additional statistics, including the following:
Physical connection management (PCM) status.
A log showing line states for PHY0 (usually port B).
Kernel statistics, described in Table 3-4. These statistics are reset to zero each time the system is booted. Of the kernel statistics, only the following items normally have steadily increasing values: frame_ct, A-bit, C-bit, and tok_ct.
Table 3-4. smtstat -v Kernel Statistics
Field
Description
Left column
frame_ct
Frames seen
A-bit
Address-recognized bits seen
rngop
Times ring transitioned from nonoperational to operational
tkerr
Duplicate tokens seen
tvxexp
Times valid-transmission-timer (TVX) expired
myclm
Station's own claims seen
mybec
Station's own beacons seen
eovf
Elasticity buffer overflows experienced
tx_under
Transmit FIFO underflows experienced
flsh
Frames flushed
tot_junk
Frames discarded
error
Errors detected by MAC
rx_ovf
Receive FIFO overflows experienced
Middle column
tok_ct
Tokens seen
C-bit
Frame-copied bits seen
rngbroke
Times ring has become nonoperational.
clm
Claims seen
trtexp
Times token-rotation-timer (TRT) expired
loclm
Claims seen that were lower than this station's
otrbec
Other stations' beacons
noise
Noise events from PMD and PHY
err_ct
Frames seen with bad checksums (CRCs)
abort
Frames aborted
junk_void
Badly formatted void frames
shorterr
Frames seen that were too short
buf_ovf
Buffer overflows experienced
Right column
E-bit
Error-detected bits seen
multda
Frames seen with station's address and A bit already set
bec
Beacons seen
tkiss
Tokens issued
hiclm
Claims seen that were higher than mine
dup_mac
Times duplicate MAC addresses detected
xmtabt
Transmission aborts experienced
lost_ct
Badly formatted frames seen
miss
Frames seen but unable to copy
junk_bec
Badly formatted beacons seen
longerr
Frames seen that were too long
Using –vv (extra verbose) displays even more information, including SMT daemon (smtd) statistics. The report displays
additional station information
physical connection management (PCM) status
line state log for PHY0 (usually port B)
MAC statistics and configuration information (referred to as a MAC dump)
PHY1 (usually port A) configuration information
To monitor continually the FDDI activity of a configured interface on the local system, use:
% /usr/etc/smtstat –s -I fddiinterface |
fddiinterface is the interface (for example, ipg0, ipg1, xpi0, xpi3).
The output of this command produces the following six smtstat reports.
MAC status
port status
ring management status
configuration information
neighbor information
miscellaneous SMT information
This output requires a shell window or a terminal at least 80 columns wide by 24 lines high. When the window is too small, the display is not usable. Make your display area at least this size before invoking the command.
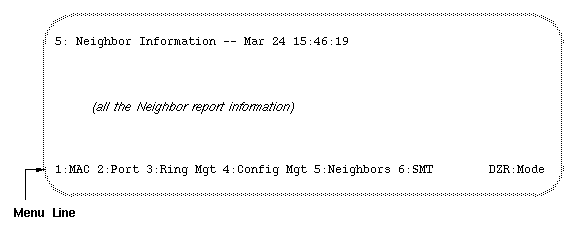
The reports are viewed one at a time. The top of each report displays the report name, date, and time. At the bottom of each report is a menu line listing all the available reports, as shown in Figure 3-8.
The following user interface allows you to manipulate the reports:
To display a different report, type the report's number. The numbers are displayed in the menu line on the bottom of the screen. For example, to view the SMT report, type 6.
To quit, type q or Ctrl+c.
To refresh the screen, type Ctrl+l.
To change the time interval for the report statistics display, press one of the these keys:
r Each second, shows totals accumulated since last reboot.
d Resets fields to zero every second, and each second shows totals accumulated within that last second.
z Resets fields to zero when z is pressed, and every second displays the accumulating totals.
For a description of all the fields in each report, see Appendix B, “smtstat Reports.” For a complete definition of each field, refer to the ANSI standard entitled ANSI FDDI Station Management (SMT). For information about command usage, refer to the smtstat(1M) man page.
As network administrator, you may need to display or temporarily alter a station's network interface parameters. The command smtconfig allows you to do this.
To display the current configuration of the FDDI interface, follow these steps:
Use smtstat to determine the name of the FDDI network interface(s) on your station. The FDDI interface name is listed under the column heading Name. Examples: ipg0, xpi0.
Use smtconfig with the name of the interface discovered in the first step:
% /usr/etc/smtconfig interfacename
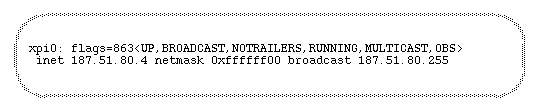
Sample output from smtconfig is shown in Figure 3-9. A description of the fields follows, starting with the first item on the left of the top line and moving right.
First line:
Second line:
The address family configured for this interface: inet is the default.
The address assigned to this network interface: The default is the IP address associated with the hostname in the /etc/hosts file.
The network mask (netmask) used for the IP subnetwork: The default is a value that, when applied, implements no mask.
The address used for broadcasting to all stations on the ring: The default is an IP address where the host portion is all ones.
As superuser, you can enable and disable the FDDI interface or (re)configure the FDDI interface parameters manually using the smtconfig(1M) command. Most of the time, it is not necessary to set interface parameters manually using smtconfig because FDDI is configured automatically with default settings (as described in Table 2-3) when the system is started or rebooted.
 | Note: Changes made with smtconfig are not saved; at reboot they return to their default settings (or the /etc/config/ifconfig-#.options and /etc/config/netif.options files). To change the configuration so the changes survive rebooting, follow the instructions in Chapter 2 or in IRIX Admin: Networking and Mail. |
To change the configuration of a network interface, perform the following steps:
Become superuser:
% /sbin/su
Password: thepassword
#
Use smtstat to determine the name of the FDDI network interface(s) on your station. The FDDI interface name is listed under the column heading Name. Examples of FDDI interfaces include ipg0, ipg1, xpi0, xpi3.
Use smtconfig with one of the following formats.
Superuser can use the smtconfig command to change the FDDI operational parameters listed below, in much the same manner as ifconfig. For information about the creation and purpose of these parameters, refer to IRIX Admin: Networking and Mail.
Enable or disable the interface:
# /usr/etc/smtconfig interfacename up
# /usr/etc/smtconfig interfacename down
Set a network mask value for an IP subnetwork:
# /usr/etc/smtconfig interfacename netmask value_or_name
Change the address used for broadcasting:
# /usr/etc/smtconfig interfacename broadcast address
Enable or disable driver debugging messages:
# /usr/etc/smtconfig interfacename debug
# /usr/etc/smtconfig interfacename -debug
Enable or disable Address Resolution Protocol. ARP is enabled when there is no flag about ARP:
# /usr/etc/smtconfig interfacename arp
# /usr/etc/smtconfig interfacename -arp
Set the routing metric used by the route daemon (routed):
# /usr/etc/smtconfig interfacename metric digit
Change the IP address for this interface:
# /usr/etc/smtconfig interfacename IPaddress
Select a different interface to be the primary network interface for this station:
# /usr/etc/smtconfig interfacename primary
This section describes some scenarios in which the different smtconfig command options can be used.
Before performing computer maintenance work that will require rebooting a station, disable the FDDI network interface, xpi0, with the command:
# /usr/etc/smtconfig xpi0 down
On a router with an FDDI interface named ipg0, you want to decrease the number of packets going through the station enroute to other networks. One way to do this is by advertising the route as less favorable. Use this command:
# /usr/etc/smtconfig ipg0 metric 5
For information about creating netmasks, route metrics, broadcast addresses, and IP addresses, or about altering network interface configurations, see “Changing Settings for the Operational Parameters” in Chapter 2, the smtconfig(1M) man page, or IRIX Admin: Networking and Mail.
The smtmaint command allows you, as superuser, to set the Physical Connection Management (PCM) line state for each PHY on a station's FDDI board. An SAS has one PHY (PHY0); a DAS has two PHYs (in most cases, PHY0 for port B and PHY1 for port A).
Use smtmaint judiciously and only if you are an FDDI expert. Setting a line state can make the ring nonfunctional.
You can set these six line states:
| QLS | PHY sends a continuous stream of Quiet symbols so the transceiver emits no signal. | |
| ILS | PHY sends a continuous stream of Idle symbols; this is a normal condition between transmissions. | |
| HLS | PHY sends a continuous stream of Halt symbols; this forces a break in the ring. | |
| MLS | PHY sends a continuous stream of alternating Halt and Quiet symbols; this is used to propagate a trace along the ring. | |
| ALS | PHY functions normally; it is Active and incorporated into the ring. | |
| -t | PHY enters PC_TRACE state (trace function) attempting to recover the ring from a stuck beacon condition. |
To change a line state, follow these steps:
Become superuser:
% /sbin/su
Password: thepassword
#
Use smtstat to discover the name of the FDDI network interface on your station. The FDDI interface name is listed under the column heading Name. Examples of FDDI interfaces include ipg0, ipg1, xpi0.
Use this command to change the line state:
# /usr/etc/smtmaint interfacename 0or1 linestate
0or1 identifies the PHY (port) and linestate is one of the line states listed above (for example, ALS, -t, or ILS).
When an FDDI station is removed from the ring, the SMT modules reconfigure the ring. If the removal is done in a way that makes it impossible for the optical signal to complete its loop around the ring, the ring wraps. Generally, it is best to avoid wrapped rings for long periods. The procedures described in this section describe how to avoid or minimize a wrapped ring when removing a station from the ring.
The situations listed below constitute taking an FDDI station off the ring; any of these has the potential to cause the FDDI ring to wrap (sometimes for a very short period of time).
Rebooting a system, which includes any of the following: invoking the reboot or init commands, pressing the station's reboot button, and crashing the station's system. A crash usually results in an automatic reboot.
Hanging the station's system (usually due to software failures).
Shutting down the station's system, which includes using any of the following commands: shutdown, reboot, halt, init 0.
Removing power from the station by pressing the power switch or disconnecting the power cable.
Disconnecting the station's FDDI cables.
Disabling the FDDI network interface, which includes invoking any of the following commands with the down or stop option: smtconfig, ifconfig, /etc/init.d/network.
Removing an optical bypass switch from a station.
The procedure for safely removing a station from the ring differs, depending on three factors:
whether the removal is temporary or permanent
whether the station is directly attached to the dual ring (DAS) or is attached to a concentrator (SAS or dual-homed DAS)
whether an optical bypass switch is present or not (applies only to a DAS attached directly to the dual ring)
To temporarily disable any FDDI interface for a short period of time, use the smtconfig command described in “Change the Configuration”.
If the station is a DAS, is not attached to a concentrator, and does not have an optical bypass switch, the ring will wrap when the FDDI network interface is disabled. However, this is usually not a problem for a short period of time.
Four types of devices can be attached to concentrators: single-attachment stations and concentrators (SAS and SAC) and dual-homed, dual-attachment devices (DAS and DAC). It is simple to remove any of these from the ring. Because the concentrator maintains the integrity of the ring, it is not important whether the station will be out of the ring for a long or short period of time. You need only decide whether the removal is temporary or permanent.
To temporarily remove a device attached to the ring through a concentrator, perform the following steps:
Become superuser and shut down the system. As soon as you do this, the station is out of the ring. The command lines below are one way of doing this:
% /sbin/su
Password: thepassword
# /etc/shutdown
You can now perform system maintenance or physically disconnect the station from ring (actually, from the concentrator). The concentrator will maintain the integrity of the ring. However, since the station's identity as an FDDI station remains in the system files, the station should be returned to the ring at some point. When reinserted into the ring, the station does not have to be reconnected at the same location.
To permanently remove a concentrator-attached device from the ring, do the following:
Become superuser and disable the FDDI interface using these commands:
% /sbin/su
Password: thepassword
# /usr/etc/smtconfig interfacename down
Edit the files described in “Complete and Complex Configuration Information” to remove or comment out the lines referring to this station. One or more of the following files may need to be edited: /etc/hosts, /etc/ethers, /etc/config/netif.options.
Shut down the system using the shutdown or halt command.
Power off the station by pressing its power switch.
Disconnect the FDDI cable(s).
At this point, you can move the workstation or server. If you ever decide to reinsert this station into this ring, you will need to reconfigure it.
Removing a DAS that has an optical bypass switch is simple. Because the optical bypass switch maintains the integrity of the ring, it is not important whether the station is out of the ring for a long or short period of time. You need only decide whether the removal is temporary or permanent.
As long as you leave the optical bypass switch in place and move only the station, the ring will not wrap.
To temporarily take a DAS with an optical bypass switch out of its ring follow these steps.
Become superuser and shut down the system. For example:
% /sbin/su
Password: thepassword
# /etc/shutdown
Disconnect the optical bypass switch's DC power cable from the FDDI board.
If you need to, power off the station by pressing the station's power switch, and disconnect the station's FDDI cable(s). Do not disconnect the connections between the ring and the optical bypass switch.
You can now perform system maintenance or physically disconnect the station from ring. The optical bypass switch maintains the integrity of the ring. However, since the station's identity as an FDDI station remains in the system files, the station should be returned to the ring at some point. When reinserted into the ring, the station does not have to be reconnected at the same location.
To permanently remove a DAS with an optical bypass switch from the ring, perform the steps below:
Become superuser and disable the FDDI interface with these commands:
% /sbin/su
Password: thepassword
# /usr/etc/smtconfig interfacename down
Edit the configuration files to remove or comment out the lines referring to this station. One or more of the following files may need to be edited: /etc/hosts, /etc/ethers, /etc/config/netif.options.
Shut down the system using the shutdown or halt command.
Power off the station by pressing its power switch.
Disconnect the optical bypass switch's DC power cable from the FDDI board.
Disconnect the FDDI board's cables from the optical bypass switch.
At this point, you can move the workstation or server. If you ever want to insert this station into this ring, you need to reconfigure the station. Another station can be attached to the optical bypass switch at any time.
Removing a DAS that does not have an optical bypass switch always disrupts the ring; removal of a station causes the ring to wrap in configurations where the secondary ring is a backup. There is no way to avoid this; hence, your primary concern is the length of time the ring will be disrupted. After you remove the station, you need to do one of the following as soon as possible to reestablish the integrity of the ring:
Insert the same or another station at the location.
Insert an optical bypass switch at the location.
Patch the ring (for example, by inserting a barrel connector or section of fiber optic cable at the location).
To temporarily remove a DAS without an optical bypass switch from its ring, follow the instructions below.
| Note: This procedure causes the ring to wrap. |
Become superuser and shut down the system. For example:
% /sbin/su
Password: thepassword
# /etc/shutdown
Power off the station by pressing the station's power switch, and disconnect the station's FDDI cable(s).
As soon as possible, do something to reestablish the ring's integrity. A list of possible actions is provided at the beginning of this section.
You can now perform system maintenance or physically move the station. Since the removed station's identity as an FDDI station remains in the system files, the station should be returned to the ring at some point. When reinserted into the ring, the station does not have to be reconnected at the same location.
To permanently remove a DAS station without an optical bypass switch from the ring, follow the instructions below.
| Note: The ring will wrap as soon as you disable the FDDI interface. |
Become superuser:
% /sbin/su
Password: thepassword
#
Edit the configuration files to remove or comment out the lines referring to this station. One or more of the following files may need to be edited: /etc/hosts, /etc/ethers, /etc/config/netif.options.
Disable the FDDI interface:
# /usr/etc/smtconfig interfacename down
Shut down the system using the shutdown or halt command.
Power off the station by pressing its power switch.
Disconnect the station's FDDI cable(s).
As soon as possible, do something to reestablish the ring's integrity. A list of possible actions is provided in the beginning of this section.
At this point, you can move the workstation or server. If you want to reinsert this station into this ring, you will need to reconfigure the station.
For more information, see the smtconfig(1M), halt(1M), and shutdown(1M) man pages or ”Change the Configuration” in this chapter.
To permanently remove an FDDIXPress board and software from a station, follow the steps below:
Use inst to remove the FDDIXPress software:
# /usr/sbin/inst
...
Inst> remove FDDIXPress
...
Inst> quit
Follow the set of instructions in “Removing a Station From the FDDI Ring” that is appropriate for your configuration.
Once the power is off, remove the board.
The board's installation guide or installation instructions provides hardware details that are useful for removing the board.
When the FDDI board has been removed, press the power switch to turn the system on.
Answer the questions on the terminal to restart the system.
Answer yes to the prompt to rebuild the operating system. This step removes the FDDI driver from the operating system (kernel).
Automatically reconfigure the operating system (y or n)? y
Reboot the system to start using the new operating system.