This chapter explains how to solve common system problems:
determining firmware failure
restarting the agent
reconfiguring the system as system type 9
reenabling command-tagged queuing
determining caching problems
reassigning LUN ownership
When you start the RAID system via serial connection, the software outputs the alphabet to the serial device (such as a laptop or ASCII terminal). If the output remains at letter W, the meaning is that the system cannot find valid firmware. That is, drive A0, B0, C0, and A3 are all missing or are all defective. The firmware in these disks is required for SP operation. Replace these disks with functional ones.
Turn on the Challenge RAID storage system. To see if the agent is active, type
/usr/raid5/getagent |
Note these error messages and their solutions:
-
The agent is unable to start. The Challenge RAID storage system might have been configured as system type 1, instead of system type 9. To remedy this situation, follow instructions in the next section.
-
The agent is not running and must be restarted. See "Starting the Agent" in Chapter 4 for instructions.
in syslog: Is the device configured correctly?
Check raid5-agent.config, particularly the device specification; make corrections as needed.
 | Note: Error messages from the agent are not reported to the console, but are stored in the syslog file. |
You can access the Challenge RAID storage system two ways: using the command-line interface in an IRIX shell or using dassmgr, Data General®'s software interface to the Challenge RAID storage system. The dassmgr program varies, depending on whether the storage system is running Sauna and Phoenix FLARE code.
The dassmgr program runs on an ASCII terminal attached to the serial port on the system. The program is also on diskette for use on your laptop; the diskette is available only in training classes for Challenge RAID.

To reconfigure the system as system type 9, use an ASCII terminal. Follow these steps:
Run raidcli getcache to determine if caching is enabled. If it is enabled, make sure both storage-control processors are powered on; check the status lights or run raidcli getcrus (see Appendix B for information).
If caching is enabled, disable it by entering
raidcli -d device setcache 0
Start dassmgr:
On a laptop: load dassmgr from the diskette.
On an ASCII terminal, dassmgr (actually the GridMgr screen of dassmgr) starts automatically when the ASCII terminal is powered on after being connected to the serial port on the Challenge RAID storage system.
If necessary, select the Grid Management option from the Disk Array Storage System Manager Main Menu.
When you select the Grid Management option the first time after powering up the storage system, the Presentation Utility screen appears. Otherwise, the screen that appears is the one displayed the last time someone exited dassmgr. If the Main Menu screen is not replaced by another screen, press the caret (^) key several times.
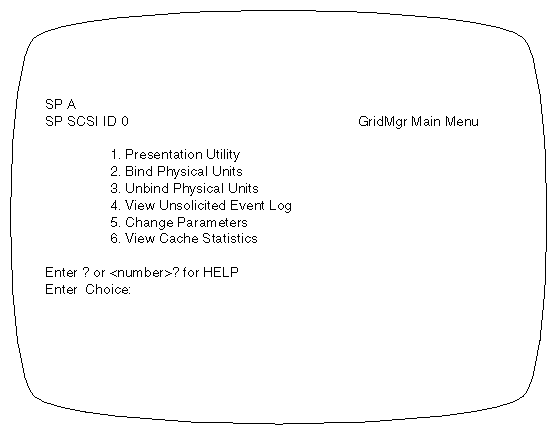
Display the GridMgr Main Menu. If necessary, type a caret (^) and press <Enter>, repeating this process until it the GridMgr screen appears, as shown in Figure C-1.
To get into engineering mode:
Press <Ctrl-p>. Be sure to use lowercase.
At the Enter choice: prompt, type ENG and press <Enter>. Be sure to use uppercase.
This input does not appear on-screen.
Press <Ctrl-j>. Be sure to use lowercase.
The letters ENG appear at the upper right corner of the GridMgr screen.
In the GridMgr screen, select 5, "Change Parameters."
In the Change Parameters Menu, select 2, "Change Storage System Parameters."
In the Change Storage System Parameters Menu, select "Select Storage System Options Package"; this choice is item 4 in the FLARE 7.xx (Sauna) version and item 5 in the FLARE 8.xx (both Sauna and Phoenix) version.
At the prompt
Enter the system type (1-9) or ^ to return to previous screen

Enter system type:
type 9 and press <Enter>.
At the prompt
Set system type and reboot controller(s) in system (Y/N)?
type y and press <Enter>. After the reboot process is finished, the Presentation Utility appears.
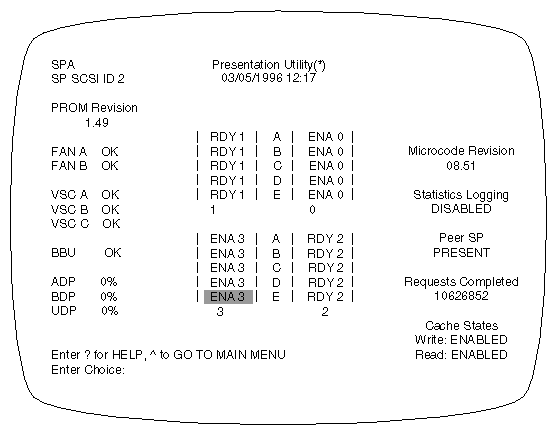
In the Presentation Utility, check that the code for disk modules in the system are shown as ENA (enabled). Figure C-2 shows an example with two RAID-5 groups.
The FLARE code checks all drives. The fault indicator lights on any drive modules that are not Silicon Graphics drives. The agent will not start if any LUN is incorrect, that is, contains a drive that is not a Silicon Graphics drive.
Because the fault indicator light also indicates a drive fault for genuine Silicon Graphics drives, use raid5 getdisk to verify the problem with the disk drive.
Exit dassmgr:
On a laptop: press <Esc> to return to the Disk Array Storage System Manager Main Menu; select "Exit dassmgr."
On an ASCII terminal: power off the terminal and disconnect it from the serial port on the Challenge RAID storage system.
In the case of extremely sluggish performance, the volume header on one or more disk modules might have been inadvertently destroyed. To recreate the volume header, follow the steps in Section 4.10, "Enabling Command-Tagged Queuing," in Chapter 4.
Disk modules in locations A0, B0, C0, D0, and E0 are vault drives. If a vault drive fails, caching is disabled until the failed module is replaced.
If an SP fails, caching is disabled until the failed SP is replaced.
When an SP or SCSI-2 interface fails in a dual-SP configuration, such as the dual-interface/dual-processor configuration, the LUN ownership of the failing or unavailable SP is assigned to the surviving SP.
However, when the original SP is replaced or turned back on (at the end of the replacement procedure), all LUNs continue to be owned by the other SP. Although this situation is viable, it is not optimal. Performance in a dual-SP system is significantly improved if accesses to the LUNs are balanced across the two SPs, instead of all being funneled through one SP.
To restore the original status, use the raidcli trespass command (RAID agent 1.55; for earlier versions, use /sbin/trespass) as follows. For example, if SP A was turned off and is now operational again, and SP A is connected to SCSI bus 6 with target (SCSI ID) 6, you would type:
/usr/raid5/raidcli trespass sc6d610 mine |
This command does not require the RAID agent to be stopped. However, for SPs with RAID agent earlier than 1.55, use /sbin/trespass as follows:
/etc/init.d/raid5 stop |
/sbin/trespass sc6d610 mine /etc/init.d/raid5 start |
For /sbin/trespass, the first command is required because the /sbin/trespass command cannot work while the agent is running; the last command restarts the RAID agent. The /sbin/trespass or raidcli trespass command tells SP A to take over the LUNs of which it is a default owner.
Follow this procedure whenever an SP (storage-control processor) of a dual-SP Challenge RAID storage system is turned off and then back on again.