After the hardware is set up, cabled, and tested, install the required software, following these procedures:
checking the Challenge server (OPS host) SCSI IDs
installing system software
installing the IRISconsole software and configuring the site
installing and configuring the Challenge RAID storage system software for OPS
enabling command-tagged queuing on the LUNs
partitioning log files and creating the XLV volumes
installing the Oracle database software
installing the OPS software
starting OPS
Each step is explained in a separate section in this chapter.
This section explains how to ensure that the two OPS hosts (Challenge servers or other SCSI devices on the same bus) do not have the same SCSI ID number. If you have just completed the hardware installation as explained in Chapter 2, particularly Section 2.6, "Setting the OPS Host SCSI IDs," skip to the next section; this information is provided for cases in which software installation does not immediately follow hardware installation.
Follow these steps:
Using your laptop or a customer ASCII terminal, log on to each OPS host.
For the first OPS host, enter the command nvram. The output should contain the line
scsihostid=
This output means that the SCSI host ID for this OPS host is 0.
For the second OPS host, repeat step 2 in the second window. The output should contain the line
scsihostid=2
This output means that the SCSI host ID for the second OPS host is 2.
If the host SCSI IDs are not 0 and 2, respectively, follow the instructions in Section 2.6, "Setting the OPS Host SCSI IDs," in Chapter 2 to set them.
The system software consists of patches for IRIX and the opsqd software package. For efficiency, you can install all the software described in this section on the first OPS host (OPS1) and copy the disk to OPS2 using the sashcp command.
The section explains
installing IRIX and the patches on the OPS hosts
converting to the XFS filesystem
installing the opscm software on the OPS hosts
installing the opsnc software and configuration file on the workstation
testing the serial connection to the OPS hosts
To install system software, follow these steps:
Check to see if IRIX 6.2 or IRIX 5.3 with XFS is installed on the first OPS host. If it is not, upgrade it to 6.2 from the CD shipped with the option (or 5.3 with XFS from a CD ordered separately).
Load eoe2.sw.xlvplex.
From the IRIX patch CD included in the OPS shipment, load the appropriate patches (IRIX 6.2 or 5.3 with XFS) using inst -f.
If necessary, change the root filesystem to an XFS filesystem.
Repeat steps 1 through 3 for the second OPS host and the workstation.
For complete information on installing an XFS filesystem, see
IRIX Admin: Disks and Filesystems volume, which covers XLV volumes for IRIX 6.2, as well as IRIX 5.3 patches (007-2825-001)
Getting Started with XFS Filesystems, which covers XLV volumes for IRIX 5.3 with XFS (007-2549-001)
To convert the filesystems on both hosts and the workstation to XFS, follow these steps:
see Chapter 2 of Getting Started with XFS Filesystems (007-2549-001) When you use the mkfs command to create the new XFS filesystem, use
mkfs -d name=partition -l internal,size=1000b |
Installing the opscm software on the first OPS host consists of these steps:
installing the opscm software
editing the configuration file
editing sidconf
To install the opscm software on the hosts, follow these steps:
Enter the following commands:
ops1 1# su - root
ops1 2# inst -f /CDROM/opscm_eoe
The Inst Main Menu appears.
Select item 2, "list."
At the Inst prompt, type go.
After the program completes the install process, type quit at the prompt.
The configuration file for opscm, /usr/opscm/conf/opsconf, lists information on
the cluster controller (workstation and IRISconsole software) managing the OPS hosts
each OPS instance and its peer, plus OPS instance/peer pairs running on other nodes
time parameters for the opscm and lock manager software
To edit the configuration file, follow these steps:
In your favorite editor, edit /usr/opscm/conf/opsconf to match the following.

Note: In this output, Indyconsole refers to the workstation acting as the node controller for OPS (using IRISconsole software). #ident "$Revision: 1.2 $" # #CLUSTER id name size console # CLUSTER 1 test 2 ops-indy #id any integer -- not used #name just a ascii string -- not used #size better be 2 -- not used #console hostname of IndyConsole #cons_port port number on IndyConsole where cluster_daemon listens # #NODE dom inst ndname ndaddress cmsvc apsvc wt # NODE 0 0 host1 150.166.42.37 opscm opsdlm 1 NODE 0 1 host2 150.166.42.38 opscm opsdlm 1 #dom domain nr, (LKDOM environment variable) #inst instance id (LKINST environment variable) #ndname hostname, same as in the /usr/opsnc/conf/ncconf file on IndyConsole #ndaddr ip address tied to the OPS private network interface #cmsvc from services(4):port nr on which the opscm listens for connections #apsvc from services(4):port nr on which the OPS dlm listens for connections #wt any integer - not used in this release # #TIME parameters (all units are seconds, except tick which is microsec)) #TIME init ping ack sync cnct sdwn tick hb hbto hold pwr rcfg # TIME 60 5 50 0 120 30 500000 2 10 20 30 5 #init CM waits init sec on startup to hear from peer #ping CM sends a ping message to DLM every ping sec #ack CM exits if it does not receives a ping ack from DLM for ack sec #sync CM aborts DLM sync op unless it completes in sync sec [0=inf] #cnct CM exits if DLM does not connect in cnct sec #sdwn CM exits if DLM does not detach sdwn sec after Stop is sent [0=inf] #tick CM looks for work every tick MICROsec #hb CM sends heartbeat message to peer every hb sec #hbto CM declares peer crashed if no HB received for hbto sec #hold CM tries to reconnect with peer hold sec after peer crashes #pwr assume power failed if both HB and remote sysctlr fail within pwr sec #rcfg DLM specific parameter
In the CLUSTER line, enter the machine name of the workstation being used for IRISconsole.
Define the DLM domain(s) and DLM instances, as explained in the Oracle Parallel Server Administrator's Guide. Check that the lines under
#NODE dom inst ndname ndaddress cmsvc apsvc wt
have accurate information on your OPS servers. For example:
NODE  0   0    host1  150.166.42.37  opscm   opsdlm  1
NODE  0   1    host2  150.166.42.38  opscm   opsdlm  1
Save and close /usr/opscm/conf/opsconf.
Edit the file /etc/services; add three services:
opscm newnumber1/tcp
opsdlm newnumber2/tcp
opsnc newnumber3/tcp
where newnumbern is a number not used elsewhere in this file. For example:
opscm 7018/tcp
opsdlm 7019/tcp
opsnc 7020/tcp
Save and exit the file.
Set the ownership, permissions, and timeouts in the config file according to the customer's wishes.
The sidconf file maps each Oracle instance (sid, or Oracle system ID) to a DLM domain-instance pair. For information on DLM domains and instances, see Chapter 1 of the Oracle Parallel Server Administrator's Guide.
To edit the sidconf configuration file, follow these steps:
Determine the DLM domain and DLM instance (sid) of the Oracle database for each instance.
In /usr/opscm/conf/sidconf, enter correct information for the two OPS servers in the lines
MAP sid0 domainnumber instancenumber
MAP sid1 domainnumber instancenumber
The variables sid0 and sid1 must contain no more than four characters. For example:
MAP fin1 0 0
MAP fin2 0 1
Save and close /usr/opscm/conf/sidconf.
If necessary, change permissions on this file so that it can be read by everyone.
When you have finished installing the system software on the first Challenge server, copy its disk to the second Challenge server; change the hostname.
To install the opsnc software on the workstation, follow these steps:
Enter the following commands:
ops1 1# su - root
ops1 2# inst -f /CDROM/opsnc_eoe
The Inst Main Menu appears.
At the Inst prompt, type go.
After the program completes the install process, type quit at the prompt. The following messages appear:
Building dynamic ELF inventory file for rqs(1) processing ..   100% Done.
Invoking rqs(1) on necessary dynamic ELF objects ..   100% Done.
If desired, list the installed software; type ls -1R /usr/opsnc. The following should appear:
total 0
drwxr-xr-x    2 root     sys           36 Apr 20 13:28 bin/
drwxr-xr-x    2 root     sys           24 Apr 20 13:28 conf/

./bin:
total 107
-r-xr-x---    1 root     sys        39792 Apr 20 13:28 opsnc*
-r-xr-x---    1 root     sys        14368 Apr 20 13:28 spng*

./conf:
total 1
-rw-rw-r--    1 root     sys          346 Apr 20 13:28 ncconf
Use your favorite editor to edit the configuration file /usr/opsnc/conf/ncconf. Enter information for each OPS server under
#nodename ttyname
For example:
ops1   /dev/ttyf031
ops2   /dev/ttyf033
The last digit in each tty entry should be the multiplexer port into which the Remote System Control for each server is cabled. The numbers 1 through 16 on the multiplexer correspond to 0 through f in the tty entries. In the example above, the Remote System Control ports are cabled to ports 2 and 4 on the multiplexer.
To test the connection to the multiplexer, become superuser at the shell prompt to determine if the system recognizes the multiplexer. As the superuser, enter the /sbin/cdscanbus command; the output should look like the following:
# /sbin/cdscanbus
-------------------------------------------------------------
SCSI ID: 1
Device type: 0x0
Vendor ID: 'SGI '
Product ID: 'SEAGATE ST31200N'
Firmware: '8640'
Vendor Unique:
30 30 32 33 34 31 34 34 00 00 00 00 00 00 00 00
00234144........
-------------------------------------------------------------
SCSI ID: 5
Device type: 0x9
Vendor ID: 'CenData '
Product ID: '<multiplexername>'
Firmware: 'V3.9'
Vendor Unique:
20 53 65 6e 64 20 4c 55 4e 20 00 00 00 00 00 00
.Send.LUN.......


Available SCSI ID numbers on bus 0: 2 3 4 6 7
If the multiplexer does not appear in the /sbin/cdscanbus listing, recheck all the following items:
SCSI cable connections
SCSI terminator and ID
multiplexer power connection
proper software installation
You must have the multiplexer software drivers installed, or the cdscanbus command will not work. See the section "Basic Troubleshooting" at the end of Chapter 2 of the IRISconsole Multiplexer Installation Guide.
To test the serial connection between the workstation and the OPS hosts, follow these steps:
Make sure the OPS hosts are powered on.
Enter
/usr/opsnc/bin/spng -i 10 -f /dev/ttyfn
where /dev/ttyfn is the name of the device on the workstation connected to the Remote System Control port on the OPS host. Output like the following should appear:
0: pinging machine...24:71:25:
1: pinging machine...24:71:25:
2: pinging machine...24:71:25:
3: pinging machine...24:71:25:
4: pinging machine...24:71:25:
5: pinging machine...24:71:25:
6: pinging machine...24:71:25:
7: pinging machine...24:71:25:
8: pinging machine...24:71:25:
If this type of output does not appear, check the following:
verify that the OPS host is powered on
verify the cable connections from the multiplexer to the Remote System Control port and from the workstation to the multiplexer
debug the IRIXconsole installation; see "Basic Troubleshooting" at the end of Chapter 2 in the IRISconsole Multiplexer Installation Guide
| Note: For more information on troubleshooting, see Chapter 4, "Maintaining and Upgrading the Oracle Parallel Server." |
To set up the workstation for OPS, follow these steps:
If the customer has purchased a new workstation for use with OPS, install its software and configure it.
From the distribution CDs included in the IRISconsole kit, load the IRISconsole software as explained in Chapter 2 of the IRISconsole Multiplexer Installation Guide.
Use the IRISconsole GUI to set up the customer's site, which is the IRISconsole grouping of the two OPS hosts for administration purposes: as root; type /usr/sbin/ic. The IRISconsole main window appears.
In the Edit menu, select "Add New Site." The Change IRISconsole Config dialog box appears.
In the dialog box, type a name for the site, such as OPS. Click the Apply button; select "Save IRISconsole Config" in the File menu and close the dialog box.
To add the systems to the site, double-click on the site icon in the main menu. The site window appears.
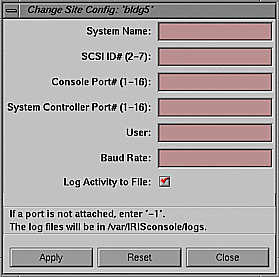
In the site window, select "Add New System..." in the Edit menu. The Change Site Config dialog box appears, as shown in Figure 3-1.
Enter information for the first OPS server. If necessary, check the multiplexer and the cables for the ports to enter. Ask the customer for the correct entry for the User: field. When the information for the first OPS server is correct, click the Apply button.
Click Reset to clear the fields and enter the information for the second OPS server. When the information for the second OPS server is correct, click Apply. Click Close to exit the dialog box.
Save the configuration by selecting "Save System Config" in the site window File menu. If the customer desires, save the configuration to a particular name (Save As). Exit the IRISconsole GUI.
| Note: For more detail on steps 3 through 10, see Chapter 2 of the IRISconsole Administrator's Guide. |
Load the Challenge RAID software from the CDs. The Challenge RAID software images are created in inst format; thus, they require that the Inst program be used. Installation software and instructions are included with the standard Silicon Graphics software products.
Configuring the Challenge RAID storage system for OPS consists of these processes:
creating the Challenge RAID config file for use with OPS
restarting the agent and checking the config file
configuring LUNs
creating SCSI device nodes
The Challenge RAID agent, which interprets commands from the command line interface for the Challenge RAID storage system, uses the configuration file /usr/raid5/raid5-agent.config. This file contains
description specification: list of objects that can be specified in the file
RAID specification: format for RAID devices
user specification: list of users allowed to perform write operations; root is the default
poll specification: a value that determines whether polling is performed and whether the agent stores a copy of the log in its memory
To create the Challenge RAID config file, follow these steps:
Open /usr/raid5/raid5-agent.config.proto in your favorite editor. This file is self-documenting and contains samples.
Save /usr/raid5/raid5-agent.config.proto as /usr/raid5/raid5-agent.config.
In the RAID specification section, add RAID devices, using the controller numbers displayed in the hinv output (see Section 3.1 earlier in this chapter). For example, to add SPs:
device sc6d6l0 sgi_clariion_SPA "SGI Agent Development System"
device sc6d5l0 sgi_clariion_SPB "SGI Agent Development System"
Note: In /usr/raid5/raid5-agent.config, only the SCSI device number for LUN 0 is required. Consulting with the customer, enter the userids of those who can perform write operations in the User Specification section.
Consulting with the customer, enter the poll specification in the Poll Specification section.
Save and exit. Restart the agent as explained in the next section.
Repeat steps 1 through 6 for the second OPS host.
To restart the Challenge RAID software after editing /usr/raid5/raid5-agent.config, follow these steps
-
/etc/init.d/raid5 stop
/etc/chkconfig -f raid5 on
/etc/init.d/raid5 start
If the agent is not active, the Challenge RAID storage system is not available to the server and an error message appears. For error conditions and solutions, see the CHALLENGE RAID Owner's Guide.
Note: Error messages from the agent are not reported to the console but are stored in the syslog file. Use the /usr/raid5/raidcli getagent command to display information on RAID devices. The output of this command covers all devices; because the disks have not been bound into LUNs, information for only the storage control processors (SPs) is shown; for example
Agent Rev: 1.55
Name: PHX-SPA-sc7d2
Desc: TOWER A
Node: sc7d2l0
Signature: 0x65a91c00
Peer Signature: 0xc3d81f00
Revision 9.3.0, Model: 7305
SCSI Id: 2
Prom Rev: 1.55.0
SP Memory: 32
Serial No: 96-2192-4

Agent Rev: 1.55
Name: PHX-SPB-sc5d5
Desc: TOWER A
Node: sc5d5l0
Signature: 0xc3d81f00
Peer Signature: 0x65a91c00
Revision 9.3.0, Model: 7305
SCSI Id: 5
Prom Rev: 1.55.0
SP Memory: 32
Serial No: 96-2192-4
The output lists the SCSI ID numbers and SCSI node numbers for each SP.
To create SCSI device nodes, follow these steps:
Become superuser on the first OPS host using your laptop or an ASCII terminal.
Note: If you use the IRISconsole, you can open a window for each OPS host. If you are creating more than the default number of partitions, enter this command in the /dev directory:
MAKEDEV dks scsi
The result of this command is that a device is created for each LUN:
for LUN 0: /dev/{r}dsk/dks<controller-#>d<drive-#>{s<partition-#>|vh|vol}; note that the device for LUN 0 is different from that for the other LUNs
for LUN 1 through 7: /dev/{r}dsk/dks<controller-#>d<drive-#>l<lun-#>{s<partition-#>|vh|vol}
Note: If the Challenge RAID storage system is not connected to a Challenge server during the software installation process, no device nodes are created. Open the release notes for patch1232 (for either IRIX 6.2 or 5.3 with XFS). This patch creates device nodes; follow instructions in the release notes.
Use ls -l in the /dev/scsi directory to display the SCSI device nodes. The following is a fragment of an example output for the first SP:
 crw-r--r--    1 root     sys      195,387 Mar  6 12:30 /dev/scsi/sc6d6l0
 crw-------    1 root     sys      195,403 Mar 21 15:40 /dev/scsi/sc6d6l1
 crw-------    1 root     sys      195,419 Mar 21 15:40 /dev/scsi/sc6d6l2
 crw-------    1 root     sys      195,435 Mar 21 15:40 /dev/scsi/sc6d6l3
 crw-------    1 root     sys      195,451 Mar 21 15:45 /dev/scsi/sc6d6l4
 crw-------    1 root     sys      195,467 Mar 21 15:45 /dev/scsi/sc6d6l5
 crw-------    1 root     sys      195,483 Mar 21 15:45 /dev/scsi/sc6d6l6
 crw-------    1 root     sys      195,499 Mar 21 15:45 /dev/scsi/sc3d3l7
In this example, the first line lists LUN 0 and the next seven lines show LUN 1-7. In this address
the digit after sc is the SCSI controller number
the digit after d is the number of the RAID disk module
the digit after l (the last character in the address) is the LUN number
If you are adding disk arrays to a storage system that has at least one LUN configured, the SPs must be made aware of the new disks. This section explains how to accomplish this without rebooting. Also, in a system with two SPs that are used for primary and secondary paths, both SPs must be made aware of the new disks. Also, the new disks must be bound into LUNs.
Follow these steps:
Change to the /dev directory:
cd /dev
Enter
./MAKE_VLUNS <controller-number> <target-number>
This command creates the device nodes for the new disks.
Bind the newly installed modules into one or more LUNs, as described in Section 3.4.4, "Configuring LUNs," later in this chapter.
Once the LUNs are bound, use fx to partition the LUNs as needed. The syntax of the fx program is as follows.
fx -x "controllertype(controller_number, drive_number, lun_number)" |
For more information on fx, consult its reference page.
Follow these steps:
Enter the fx command with appropriate parameters; for example:
fx -x dksc(6,6,2)
Output such as the following appears:
fx version 5.3, Jan 3, 1995
...opening dksc(6,6,2)
...controller test...OK
Scsi drive type == SGI RAID 5 0767
fx: Warning: bad sgilabel on disk

creating new sgilabel

----- please choose one (? for help, .. to quit this menu)-----
[exi]t             [d]ebug/           [l]abel/           [a]uto
[b]adblock/        [exe]rcise/        [r]epartition/     [f]ormat
Update parameters; at the fx> prompt, type the following:
fx> label/set/param
Output such as the following appears:
fx/label/set/parameters: Error correction = (enabled)
fx/label/set/parameters: Data transfer on error = (enabled)
fx/label/set/parameters: Report recovered errors = (enabled)
fx/label/set/parameters: Delay for error recovery = (enabled)
fx/label/set/parameters: Err retry count = (0)
fx/label/set/parameters: Transfer of bad data blocks = (enabled)
fx/label/set/parameters: Auto bad block reallocation (write) = (enabled)
fx/label/set/parameters: Auto bad block reallocation (read) = (enabled)
fx/label/set/parameters: Read ahead caching = (disabled)
At the Enable CTQ prompt, type enable:
fx/label/set/parameters: Enable CTQ = (disabled) enable
At the CTQ depth prompt, type 12:
fx/label/set/parameters: CTQ depth = (2) 12
Output such as the following appears.
fx/label/set/parameters: Read buffer ratio = (0/256)
fx/label/set/parameters: Write buffer ratio = (0/256)
 * * * * * W A R N I N G * * * * *
about to modify drive parameters on disk dksc(6,6,2)! ok?
At the prompt in the last line in step 4, type yes.
The following output appears:
----- please choose one (? for help, .. to quit this menu)-----
[exi]t             [d]ebug/           [l]abel/           [a]uto
[b]adblock/        [exe]rcise/        [r]epartition/     [f]ormat
To repartition the disk, type r.
Type exit to exit fx. The following message appears:
label info has changed for disk dksc(6,6,2). write out changes? (yes)
Type y to write the changes to disk.
When you specify the number of files in the process of creating the Oracle database, do not exceed the XLV limit of 52 volumes, which is 13 partitions (volumes) per RAID LUN. Partitions are numbered 0-7. 11-15; partitions 8, 9, and 10 cannot be used.
Follow these steps:
If there are more than ten volumes, you must edit master.d/xlv (see "Configuring the System for More Than Ten XLV Logical Volumes" in Chapter 7 of the IRIX Admin: Disks and Filesystems volume) and regenerate the kernel using autoconfig(1M).
Stop the RAID agent:
/etc/init.d/raid5 stop
Use fx to create partitions for the log files on the volumes.
Create an xlv_make file for the volumes in all partitions.
Run xlv_make to create the volumes.
Edit /etc/init.d/xlv to add lines that change the ownership of the Oracle volumes to "oracle." Look for these commented lines:
# change ownership of xlv volumes here:
# chown $USER.$GROUP /dev/dsk/xlv/<volname>
# chown $USER.$GROUP /dev/rdsk/xlv/<volname>
When the volumes are created, change the owner to oracle.
Note: On every reboot, xlv recreates the volumes; they will be owned by root.sys, and the names will be different on each node. Change the node name for all XLV volumes to be used by the OPS software so that the full XLV volume name is the same on both nodes.
When XLV creates volumes, it inserts a node name element in each volume name. For example, if volume finance1 is created on node ops1, XLV names the volume ops1.finance1. On node ops1, the device name for the volume appears as the matching volume /dev/dsk/xlv/finance1, but on node ops2, the full XLV volume name appears: /dev/dsk/xlv/ops1.finance1. The volume name has this form because XLV on ops2 sees that the volume finance1 was built on another server (ops1).
However, OPS requires that these shared volumes have exactly the same name. You must rename the volumes manually; do not use a node name. Give the shared volumes the same names on each node.Table 3-1 gives examples.
Table 3-1. Example Shared Volume Names
XLV Shared Volume Name
Renamed as OPS Shared Volume
ops1
ops2
ops1
ops2
ops1.finance1
ops2.finance1
OPS.finance1
OPS.finance1
ops1.finance2
ops2.finance2
OPS.finance2
OPS.finance2
ops1.finance3
ops2.finance3
OPS.finance3
OPS.finance3
Restart the RAID agent:
/etc/init.d/raid5 start
Installing the Oracle database software, which requires entering information in a series of menus, takes two to three hours. Follow instructions in the Oracle Parallel Server for SGI IRIX Installation & Configuration Guide. an Oracle document (A22258-x). Add the Oracle bin directory to PATH.
To install the OPS software, follow these steps:
Log in on each server as the Oracle software owner.
Set environment variables:
set ORACLE_HOME to the name of the directory where the Oracle server is installed on the Challenge server
set REMOTE_NODE to the name of the second Challenge server
set REMOTE_ORACLE_HOME to the name of the directory on REMOTE_NODE where you have created an ORACLE_HOME directory
Use systune -i to increase the number of semaphores in the kernel:
semaem = 16384 (0x4000)
semvmx = 32767 (0x7fff)
semume = 10 (0xa)
semopm = 200 (0xc8)
semmsl = 200 (0xc8)
semmnu = 100 (0x64)
semmns = 200 (0xc8)
semmni = 100 (0x64)
If necessary, adjust the shared memory segment size using systune.
Run the OPS install script as follows:
% cd $ORACLE_HOME/pso
% ./psoinst.sh
The psoinst.sh script does three things:
moves files needed by OPS, such as the Distributed Lock Manager executable file
installs the OPS and relinks the Oracle server with this option, using the following commands:
% cd $ORACLE_HOME rdbms/lib
% make -f oracle.mk parropt
% make -f oracle.mk ioracle
(To remove the OPS software, execute these commands substituting no_parropt for parropt in the second command.)
copies the locally installed Oracle server to the second Challenge server
During installation, the script outputs messages informing you of the installation status. When the installation has finished, the following message appears:
Finished installing Oracle Parallel Server
If the message shown above does not appear, correct any errors and enter
% ./copyoh.sh
The file osh is owned by root and is not copied automatically.
Note: If the message rcp: osh: Permission denied appears, ignore it. To put the file osh on the second Challenge server, log in as root and copy this file, as follows:
# rcp &ORACLE_HOME/bin/osh \
   $REMOTE_NODE:$REMOTE_ORACLE_HOME/bin
# rsh &REMOTE_NODE chmod 4711 $REMOTE_ORACLE_HOME/bin/osh
If you encounter errors, make sure that the user equivalence is set up for root, or execute the following steps as root:
# cd $ORACLE_HOME/bin
# ftp $REMOTE_NODEEnter the username root and the root user password.
ftp> cd $REMOTE_ORACLE_HOME/bin
ftp> bin
ftp> put osh
ftp> quit
# rlogin $REMOTE_NODE -l root
Password: password
# chmod 4711 $REMOTE_ORACLE_HOME/bin/osh
Install any optional software that the customer has purchased.
To start the OPS software for normal dual-host operation on both hosts and the workstation node controller, follow these steps:
As root on the workstation, start the OPS node controller software by entering
/usr/opsnc/bin/opsnc
Start IRISconsole by entering
/usr/sbin/ic
In the IRISconsole site window, click the GetConsole button for each OPS host.
Check for the presence of the CM lock file in /tmp. This filename has the format .nn, where each digit stands for DLM domain and instance, for example, .00. If this file exists, delete it.
Check if the CM is already running by entering
ps -ef | grep opscm
If it is running, type the following to kill it:
killall -TERM opscm
Check if the DLM is already running by entering
ps -ef | grep dlm
If the DLM is running, enter the following to kill its processes:
killall -TERM dlmmon
killall -TERM dlmd
Run ipcs to determine the shared memory and semaphores used on the host. The following is an example output:
IPC status from /dev/kmem as of Thu May 18 14:31:22 1995
T     ID     KEY        MODE       OWNER    GROUP
Message Queues:
Shared Memory:
m      0 0x53637444 --rw-r--r--     root      sys
m    301 0x000022bb --rw-rw----   oracle      dba
m   2202 0x0c33b7c9 --rw-r-----   oracle      dba|
Semaphores:
s   2200 0x00000000 --ra-r-----   oracle      dba
If Oracle or DLM is using any shared memory segments or semaphores, save them to another location if you need them for debugging a DLM or Oracle crash; otherwise, delete them with ipcrm. In the example in step 7, you would use
ipcrm -m 301 -m 2202 -s 2200
For each host, set environment variables in the /etc/init.d/opscmgr script:
ORACLE_HOME=/usr/people/oracle
ORACLE_SID=sidname
LKDOM=0
LKINST=0
USER=oracle
GROUP=dba

export ORACLE_HOME ORACLE_SID LKDOM LKINST

/usr/opscm/bin/opscm
$ORACLE_HOME/bin/lkmgrd -u $USER -g $GROUP
In each script, make sure that the values for LKDOM= and LKINST= are accurate for the domain and instance on that host. Theses values must match those in /usr/opscm/conf/sidconf, as explained in "Editing sidconf," earlier in this chapter.
Run the startup script on each host to bring up OPS.
In each host console window, start the Oracle database.
To check DLM operation, run dlmstat:
setenv ORACLE_SID sidname
$ORACLE_HOME/bin/dlmstat -i -q
No error messages should appear.