This chapter provides information about installing and removing components from your SGI system, as follows:
This section describes how to open the system node enclosures “sticks” for maintenance and upgrade, protect the components from static damage, and return the system to operation. The following topics are covered:
“Returning the System to Operation”

Warning: To avoid problems that could void your warranty, your SGI or other approved system support engineer (SSE) should perform all the setup, addition, or replacement of parts, cabling, and service of your SGI Prism XL system, with the exception of the following items that you can perform yourself: Using your system console or network access workstation to enter commands and perform system functions such as powering on and powering off, as described in this guide.
Removing or replacing the power supply in a Prism XL stick enclosure.
Installing, removing or replacing PCIe cards.
Depending on the size of your system and the number of sticks that you need to service or upgrade, you may want to power down the entire system - follow these steps:
| Note: Powering the system off is not a requirement when replacing a single component or stick. However, the affected stick should be taken off-line and the power disengaged at the source. |
If you are logged on to the system, log out. Follow standard procedures for gracefully halting the operating system.
Go to the section “Powering the System On and Off” in Chapter 1 if you are not familiar with power down procedures.
After the system is powered off, locate the power distribution unit(s) (PDUs) in the rack and turn off the circuit breaker switches on each PDU.
When you finish installing or removing components, return the system to operation as follows:
Turn each of the PDU circuit breaker switches to the “on” position.
Power up the system. If you are not familiar with the proper power down procedure, review the section “Powering the System On and Off” in Chapter 1.
Verify that the LEDs on the system power supplies turn on and illuminate green which indicates that the power-on procedure is progressing properly.
If your system does not boot correctly, see “ Troubleshooting Chart” in Chapter 6, for troubleshooting procedures.
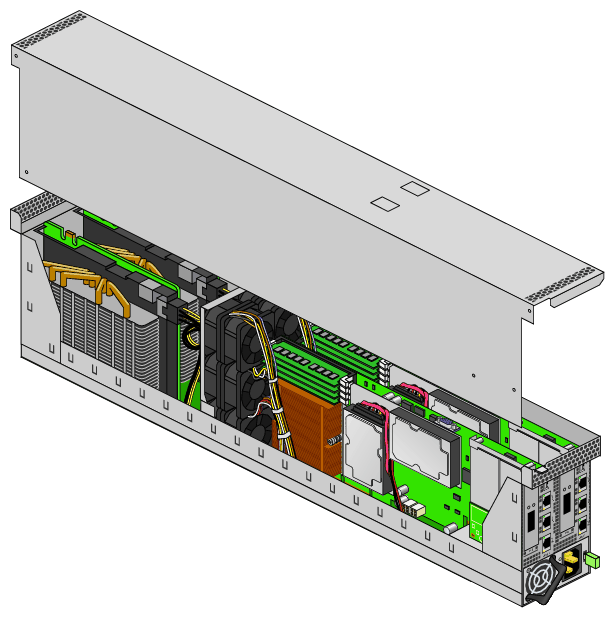
For most remove and replace procedures it will be necessary to remove the stick enclosure from the internal rack housing where the unit is installed. The rack housing is a kind of enclosed shelf that houses the sticks side-by-side. A standard 19-inch rack uses a housing three sticks wide.
The remove/replace procedures in the following subsections may require removal of the stick from the rack housing and some require taking the top cover off the unit (see “Removing the Top Cover From the Stick Enclosure”) to access the internal components.
| Note: No special tools are required to remove the stick from the rack housing. |
Access the front of the rack and shut down the power to the stick being removed by turning off the PDU supplying voltage to the unit.
Unplug the power cable from the stick and disconnect all I/O or data cables attached to the front of the enclosure. Be sure to label them for re-installation purposes.
Access the rear of the rack and disconnect any I/O or data cables connected to the PCIe boards on the stick you are removing. Label all connectors to ensure proper re-installation.
Grasp the flange and/or power supply handle at the end of the stick and pull the unit straight out until the half-moon safety lock engages the back of the internal rack housing.
The unit will lock when it is about 3/4 of the way out of the rack housing; depress the half moon lock to release the stick completely.
Support the stick from beneath and carefully remove it completely from the internal housing.
Set the stick on a level static-free work surface.
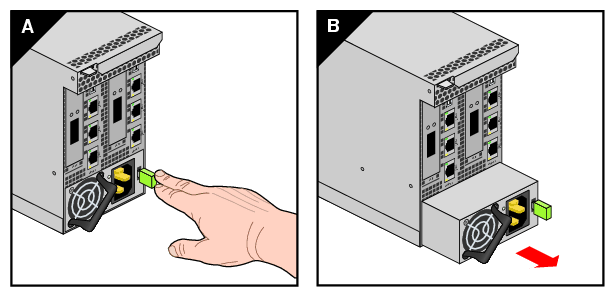
There is a single power supply (located at the front of the rack) used in each SGI Prism XL stick. The supply supports both slices (nodes) housed in the stick. Use the following steps and illustration to remove and replace a power supply if you have determined that the unit has failed or is malfunctioning:
Gracefully shut down the stick (or system), use the information in Chapter 1 as needed.
Open the system rack doors and turn off the PDU breaker switch that supports the stick being serviced, then unplug the power cord from the power supply in the stick.

Important: There is no On/Off switch on the power supply itself, power must be cut at the PDU. If needed, use the information in “Removing a Stick from the Rack Enclosure” to extract the stick from the rack enclosure.
Grasp the power supply handle (over the fan) and pull the power supply locking lever towards the fan to unlock the supply (see Figure 7-1).
Pull the supply straight out of the stick, using your other hand to support it from beneath if possible.
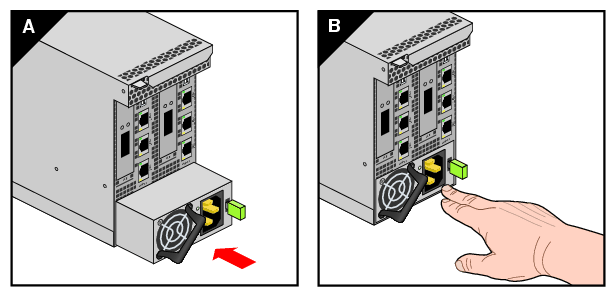
Position the new power supply in the same orientation as the one removed and slide it into the stick enclosure until it is fully seated.
Reverse the steps in “Removing a Stick from the Rack Enclosure” as needed to replace the stick in the rack.
Plug the power supply line back into the unit and turn on the PDU breaker switch that supplies power to the stick.
Use the SGI Management Center software to bring the slices (nodes) in the stick back online.
In order to perform many of the remove/replace procedures documented in the following subsections you must first remove the sheetmetal top cover from the stick.
| Note: You will need a Phillips (cross-head) screwdriver to remove the top cover from the stick. |
Using a Phillips head screwdriver, remove the 8 screws that hold the sheetmetal top cover of the stick in place. See Figure 7-3 for an example of the screw locations.
Place the screws in a cup or other container to make them easily available.
Lift the sheetmetal cover off the stick and set it aside (see Figure 7-4).
Go to the subsection covering the component(s) you wish to remove or replace.

| Warning: Before installing, operating, or servicing any part of this product, read the “Safety Information” in Appendix B. |
This section provides instructions for adding or replacing a PCIe card in your system compute stick. To maximize the operating efficiency of your cards, be sure to read all the introductory matter before beginning the installation.
| Caution: To protect the PCIe cards from ESD damage, SGI recommends that you use a grounding wrist strap while installing the card. |
This section provides a brief overview of the PCI Express (PCIe) technology available with your system. PCI Express has both compatibility and differences with older PCI/PCI-X technology. Check with your SGI sales or service representative for more detail on specific PCI Express board options available with your system. At time of publication there were no PCI-X options available with your SGI Prism XL system.
PCI Express is compatible with PCI/PCI-X in the following ways:
Compatible software layers
Compatible device driver models
Same basic board form factors
PCIe controlled devices appear the same as PCI/PCI-X devices to most software
PCI Express technology is different from PCI/PCI-X in the following ways:
PCI Express uses a point-to-point serial interface vs. a shared parallel bus interface used in older PCI/PCI-X technology
PCIe hardware connectors are not compatible with PCI/PCI-X, (see Figure 7-5)
Potential sustained throughput of x16 PCI Express is approximately four times that of the fastest PCI-X throughputs
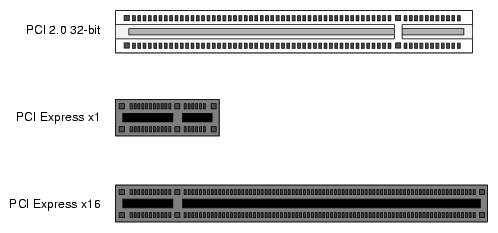
PCI Express technology uses two pairs of wires for each transmit and receive connection (4 wires total). These four wires are generally referred to as a lane or x1 connection - also called “by 1”. SGI Prism XL PCIe technology is available up to a x16 connector (64 wires) or “by 16” in PCI Express card slots. This technology will support PCIe boards that use connectors up to full-height double-wide size and x16 speeds. Table 7-1 shows this concept.
| Note: Two of the PCIe slots supported are limited to half-height PCIe cards at maximum x8 transfer rates. These slots are primarily used to support networking cards. |
Table 7-1. SGI Prism XL Stick PCIe Lane Support
SGI x16 PCIe Connectors | Support levels in stick chassis |
|---|---|
x1 PCIe cards | Supported in all slots |
x2 PCIe cards | Supported in all slots |
x4 PCIe cards | Supported in all slots |
x8 PCIe cards | Supported in all slots |
x16 PCIe cards | Supported in two slots |
x32 PCIe cards | Not supported |
The half-height x8 PCIe cards are located at the front of the enclosure directly adjacent to each of the node boards. Note that the PCIe slots located at the rear of the stick are full-height units intended primarily for accelerator cards. Remove and replace information for the full-height cards is listed in the following subsection “Remove and Replace Full-Height PCIe Cards”.
You can install or replace the half-height PCIe cards using the following steps and illustrations:
Power down the stick and disconnect the cord from the unit.
Remove all data cables attached to the stick and label them for reinstallation purposes.
Remove the stick from the rack enclosure using the information in “Removing a Stick from the Rack Enclosure”.
Remove the enclosure's top cover using the information in “Removing the Top Cover From the Stick Enclosure”.
Remove the retention screw at the front of the enclosure that holds the PCIe card in place.
Extract the half-height PCIe card from the slot and place on a static-safe surface.
Install the new/replacement PCIe card as applicable and secure with the retention screw removed in step 5.
Restore the stick to operational status by reversing the extraction procedures.


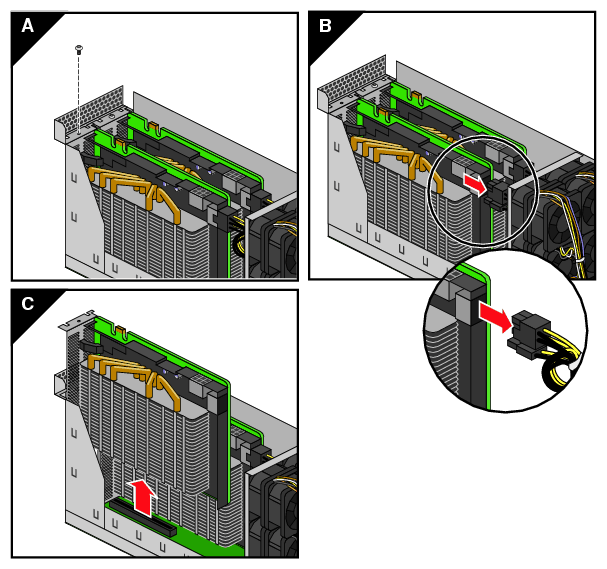
Removing or replacing the full-height PCIe/accelerator cards requires extraction of the stick from the rack. Use the following steps and illustrations to remove and/or replace a card:
Power down the stick and disconnect the cord from the unit.
Disconnect all data cables from the stick and label them for reinstallation purposes.
Remove the stick from the rack enclosure using the information in “Removing a Stick from the Rack Enclosure”.
Remove the enclosure's top cover using the information in “Removing the Top Cover From the Stick Enclosure”.
Locate and remove the retention screw at the end of the enclosure that holds the PCIe accelerator card.
Remove the power/data cables from the end of the accelerator card (nearest the fan assembly).
Grasp the card assembly ends with both hands and pull the PCIe/accelerator card straight up from the slot (see Figure 7-8) and place on a static-safe surface. Note that you may need to “rock” the accelerator card assembly slightly to pull it from the PCIe slot.
Install the new/replacement PCIe card (see Figure 7-9) and secure with the screw removed in step 5. Be sure to plug in the power/data cables at the end of the card.
Restore the stick to operational status by reversing the extraction procedures.