This chapter provides an overview to RapidApp and useful information for using RapidApp effectively. It contains:
“RapidApp Overview,” an overview of RapidApp
“Prerequisites for Installing RapidApp,” a list of products you must have installed on your system to use certain features of RapidApp
“Setting Up Your Working Environment for RapidApp,” a list of environment variables you might want to set for easier use of RapidApp
“Starting RapidApp,” instructions for running RapidApp
“The RapidApp Interface,” an overview of the RapidApp interface
RapidApp is an interactive tool for creating applications. It integrates with other Developer Magic tools, including cvd, cvstatic, cvbuild, and others, to provide an environment for developing object-oriented applications as quickly as possible. RapidApp generates C++ code, with interface classes based on the IRIS ViewKit toolkit. Its predefined interface components facilitate your use of other Developer Magic libraries such as OpenGL and Open Inventor.
You can use RapidApp for constructing typical desktop applications in which the user interface has a significant effect on the overall application architecture. The applications produced by RapidApp are automatically integrated into the Indigo Magic Desktop environment, making RapidApp the easiest way to take advantage of most of Silicon Graphics' interface and desktop technology.
When using RapidApp, you work with a combination of IRIS IM widgets and components based on IRIS ViewKit classes. This guide refers to widgets and components collectively as interface elements. You create, select, position, and manipulate interface elements using techniques similar to those supported by drawing editors such as IRIS Showcase™. You can move interface elements after creating them, and you can edit various attributes (known as resources) to change their appearance or behavior.
RapidApp provides a great deal of support for creating interactive applications, but it doesn't completely replace programmer expertise. Think of RapidApp as a sophisticated editor with domain-specific support for helping you create graphical user interfaces. Although RapidApp can greatly facilitate the task, you remain in control and must understand the tasks being performed.
To use RapidApp effectively, you should have a basic knowledge of IRIS IM, C++, IRIS ViewKit, and recommended Indigo Magic user interface guidelines. You don't have to be an IRIS IM expert, but a basic understanding of widget hierarchies, the behavior of IRIS IM manager widgets, resources, and callbacks is very helpful. Because RapidApp produces IRIS ViewKit programs, you should also understand the basic idea of user interface components, as well as be familiar with C++ classes and object-oriented concepts such as inheritance, polymorphism (virtual functions), and so on. Finally, knowledge of the Indigo Magic user interface guidelines helps you understand the type of application RapidApp helps you create. You can find references for all of these topics in “Suggested Reading”.
 | Note: RapidApp is a tool that provides an easy-to-use interface between you and the SGI development tools and libraries such as the Debugger, IRIS IM, and ViewKit. It allows you to build your interface in the SGI style without requiring a full knowledge of SGI's development environment (though basic knowledge is recommended). As such, RapidApp does not dictate the behavior of these tools and libraries. If you encounter unexpected behavior, first check RapidApp's guide, and then check the guide appropriate for the tool or library with which you're working. |
The RapidApp Release Notes contains complete instructions for installing RapidApp. To install and run RapidApp, your system must have the IRIS Development Option (IDO), which includes the C compiler and the X and IRIS IM development systems, and the C++ Development Option, which includes the IRIS ViewKit development system. To use the other ProDev WorkShop tools which include the Developer Magic tools, such as the Static Analyzer (cvstatic) and the Build Analyzer (cvbuild), you must install the ProDev WorkShop products. To use special interface components that take advantage of other Developer Magic libraries such as Open Inventor, you must also install those development options. Consult the RapidApp Release Notes for a complete list of products you must install on your system before you install and run RapidApp.
The following sections describe how to prepare your working environment for RapidApp.
SGI recommends that you set up a project directory for each application you build. When you build your application, RapidApp generates and saves a number of files automatically. Unless you specify a project directory, RapidApp saves these files in the current directory. To specify a project directory for RapidApp:
From the File menu, choose “Preferences.”
Go to the Project card.
In the Project Directory field, enter the path to your project directory.
If the directory doesn't exist, RapidApp asks if it should create the directory.
In the Application name field, enter the name of your application.
When you create an application with RapidApp, it generates a resource file in the project directory containing all the application's resources (for example, labelString, a resource used by labels and push buttons). RapidApp automatically loads these resources when it runs your application, but your application might not find them if your try to run it independently from the command line.
To ensure that your application finds the resource file, set the environment variable XUSERFILESEARCHPATH to “%N%S” to add the current directory to the application's resource search path. You might want to do this as part of your login setup.
You can use any window-based editor within RapidApp. To do so:
Set the WINEDITOR environment variable to the window-based editor you want to invoke. For example:
setenv WINEDITOR 'winterm -c vi'
In RapidApp, from the File menu, choose “Preferences.”
In the RapidApp card, set the “Use $WINEDITOR” option.
If you do not specify your own editor, RapidApp uses the Source View editor.
In a shell window, type:
% rapidapp
–or–
Use the RapidApp icon:
Go to the Toolchest, and from the Find menu, choose “An Icon.”
Search for “rapidapp.”
Drag the RapidApp icon to your desktop.
Start RapidApp by double-clicking on the icon.
When you launch RapidApp, it displays a startup screen as shown in Figure 2-1.
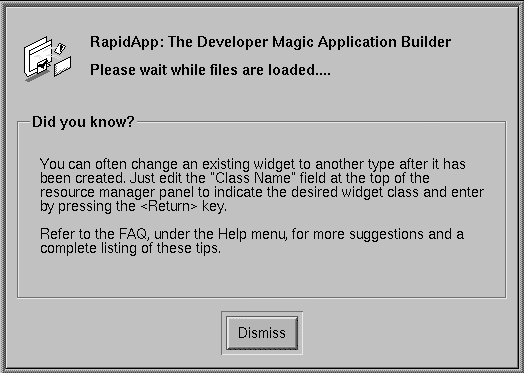
By default, you dismiss the startup screen once RapidApp's main window appears. You can control this behavior through the RapidApp Preferences dialog.
In the RapidApp main window, from the File menu, choose “Preferences.”
In the Preferences dialog, go to the RapidApp card.
Set the “Auto-dismiss start screen” option.
The next time you launch RapidApp and once the main window appears, RapidApp will dismiss the startup screen automatically.
By default, RapidApp's startup screen contains a “tip,” a suggestion for how to use RapidApp. Figure 2-1 above shows the startup screen with a tip.
You can control whether or not the startup screen displays tips through RapidApp's Preferences dialog.
In the RapidApp main window, from the File menu, choose “Preferences.”
In the Preferences dialog, go to the RapidApp card.
Unset the “Show tips on startup” option.
The next time you launch RapidApp the startup screen will not include a tip.
To view the complete list of tips see “RapidApp Tips”.
Figure 2-2 shows the main areas of the RapidApp main window. The following sections describe each of these areas.
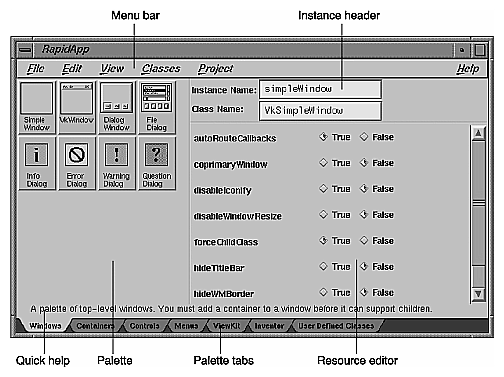
The RapidApp menu bar provides the following menus:
| File | Allows you to create new RapidApp files, save and open RapidApp files, set RapidApp preferences and quit RapidApp. | |
| Edit | Allows you to cut, copy, paste, and manipulate a selected interface element. | |
| View | Allows you to switch between the default “Build Mode,” in which an interface can be constructed, and “Play Mode,” in which an interface can be tested. | |
| Classes | Allows you to create and edit user-defined classes. | |
| Project | Allows you to generate code, browse and edit files, build an application, run the program under a debugger, and so on. | |
| Help | Allows you to access the online help system. |
The palette on the left side of RapidApp's main window contains icons representing interface components used to construct your interface. You access different palettes via tabs that appear along the lower portion of the window. By default, RapidApp contains the following palettes:
Windows—interface elements that serve as top-level windows
Containers—interface elements that serve as containers in which to group other interface elements
Controls—basic interface elements for user interaction
Menus—interface elements used to construct menus
ViewKit— interface elements from the ViewKit library
Inventor—interface elements from the Inventor library
Each of these palettes and their icons are described in detail in Appendix A, “RapidApp Reference.” Also, depending on the libraries you have installed, additional palettes and icons may exist.
The instance header displays the instance and class names of the currently selected interface element.
When you create an element, RapidApp automatically generates its instance name. You can change this by entering a new string in the Instance Name field. RapidApp uses this name when it generates code.
The class name is the widget class name for IRIS IM widgets or the C++ class name for components. For some IRIS IM widgets, you can change the widget class and thus change the type of widget. For example, you can change a label into a push button by changing the class name from XmLabel to XmPushButton.
The resource editor on the right side of RapidApp's main window lists the customizable resources for a newly created or currently selected interface element. The contents of this area change dynamically, depending on the interface element selected.