This appendix contains the following sections:
“Frequently Asked Questions,” answers the most common questions about using RapidApp
“RapidApp Tips,” provides tips for using RapidApp
This section answers frequently asked questions (FAQs) about RapidApp's operation. The questions are divided into the following alphabetical categories:
How do I create icons for bitmaps or pixmaps?
Any number of external tools work well for icon creation. For example:
The “bitmap” program distributed with x_eoe is a reasonable bitmap editor.
Any drawing editor can be used to create color icons. If necessary, convert the icons using the ppm or similar utility.
The xpaint program, available as part of the original IndiZone package, is good for editing pixmaps.
The public domain xv editor is useful for reading and processing various file types and writing the Xpm format recognized by IRIS IM (and RapidApp).
How do I provide client data to my callbacks?
Client data is mostly meaningless in the style of code generated by RapidApp. In C, it is necessary to pass state around to callbacks via client data. In C++, the functions called as a result of an action are member functions, and all the state that can be accessed is available within the current object. Anything else that you could possibly pass as client data would be contained within another class, and therefore passing it in some way would be a violation of encapsulation. The only reasonable use of client data would be to pass a simple value, such as an integer code or string to provide information about the context of the call. While occasionally this is useful, there are other ways to deal with this need (different callbacks that call a second function, for example).
Why does RapidApp-generated code use leading underscores for data member names?
All protected data members are given leading underscores, partly as an indication that these variables are protected members (leading underscores have long been used to denote “private”) and partly to prevent name collisions with member functions of the same name. For example, you can have a data member _name and an access function name() that retrieves _name. This is a convention used throughout ViewKit and happens to lend itself well to code generation.
I want to use C (Ada, Fortran, Pascal, Cobol, ASM, TCL, etc.). Can RapidApp generate these languages instead of C++?
RapidApp is designed to help you write object-oriented programs using the Silicon Graphics C++ class libraries and derives a great deal of its power from the use of object technology and the underlying libraries. While support for other languages may be theoretically possible, only C++ is available at this time. This could change in the future.
How portable is the code generated by RapidApp?
This depends on what elements you use. If you use only the standard IRIS IM widgets, the dependencies are X, Xt, IRIS IM, and ViewKit. As long as you have these libraries on your target platform, it should be possible to recompile the code generated by RapidApp. The desktop icons, FTR files, and so on, are specific to Silicon Graphics.
If you use Inventor classes, you are limited by the availability of Inventor on your target platform. The same is true for other C++ components that may be available for RapidApp from SGI now or in the future.
Several widgets are unique to Silicon Graphics, including the OpenGL widget, the Rubber Board, Spring Box, Thumb Wheel, Dial, Finder, and so on. If you use these widgets, you may not directly port to other platforms.
If I edit the code produced by RapidApp, then change the interface, will I lose my hand-edited changes?
Not if you understand RapidApp's strategy for merging code. RapidApp uses a comprehensive strategy for merging code that it generates with existing code. In addition, RapidApp always makes a backup of your original file when files are merged. If the merge is unsuccessful, RapidApp displays xdiff, a tool that allows you to resolve problem areas by hand. You can help the merge process proceed smoothly by limiting your changes to the provided “user code block” areas, not making gratuitous changes (like reformatting for style) to the generated code, placing large bodies of code in external files, and so on. See “Code Merging” for more information.
Why do some containers change size when I add or remove children?
Each container has its own algorithm for arranging its children. This algorithm is triggered each time a child is added or removed. Even though you specify a size for a container, the container itself may recompute and change this size when its contents change. This is central to the behavior of IRIS IM and there is little that can be done to change it. For more information, see “Moving and Resizing Interface Elements”.
How do I add a button to the dialog window?
In RapidApp, you cannot. The VkDialogManager class and all subclasses allow you to determine what buttons appear when the dialog is posted. See Chapter 7, “Using Dialogs in ViewKit,” in the IRIS ViewKit Programmer's Guide.
How do I create a standard IRIS IM dialog RapidApp?
Dialogs tend to be dynamic by nature. Although RapidApp could allow you to associate an information dialog (for example) with a button in such a way that the dialog is posted when the button is pressed, this is rarely useful in real programs. Although there are exceptions, dialogs are generally posted in response to a condition that can be determined only at runtime. Therefore, RapidApp doesn't provide a way to create these dialogs.
However, because RapidApp generates ViewKit programs, it is easy to add these dialogs programmatically along with the logic associated with the condition that requires a dialog. For example, to post a warning dialog, simply write:
theWarningDialog->post("Warning, serious problem detected");To ask a question that requires an answer, write:
if (theQuestionDialog->postAndWait("Really exit?") == VkDialogManager::OK)
    exit(0);
For more information on dialogs, see “Work With Dialogs” in this guide and Chapter 7, “Using Dialogs in ViewKit,” in the IRIS ViewKit Programmer's Guide.
How do I create a custom dialog?
You create your own dialog by selecting one of the dialog windows from the Windows palette. Add a single container and design the contents of your dialog. The resulting class is derived from an IRIS ViewKit dialog class and supports the same API as other ViewKit dialogs. See “Work With Dialogs” for more information.
How do I launch my own editor from RapidApp?
Set the environment variable $WINEDITOR
From the File menu of RapidApp's main window, choose “Preferences.”
In the RapidApp card, set the “Use $WINEDITOR” option.
Your window-based editor is launched when you choose “Edit File...” from the Project menu.
How do I hook up a Help system to a program RapidApp creates?
Your program makes calls into a specific API for requesting help. There are several libraries that can supply that API, and you can also write your own.
The best option is to use the InSight-based Silicon Graphics help system. See Chapter 9, “Providing Online Help With SGIHelp,” in the Indigo Magic Desktop Integration Guide for information on how the Silicon Graphics online help system works, how it interprets the help token it receives, and how to provide online help for your application.
The vkhelp library distributed with ViewKit provides a simple help system that posts dialogs based on X resources to provide simple help. The source to this library is also part of the ViewKit examples, as a starting point for writing your own help system. See Appendix C, “Using a Help System with ViewKit,” in the IRIS ViewKit Programmer's Guide for information on the ViewKit links to a help system and the vkhelp library.
How do I programmatically access the widgets encapsulated in a C++ class created by RapidApp?
In general, you should not. A class is (or should be) a class because it represents an abstraction. The details are encapsulated in the class. A class is not merely a collection of widgets. Think of the class as an entity in its own right and design the API of the class independent of its implementation.
For example, assume you would like to change a label in a class to “red” to indicate an error condition has occurred. You can write an access function for the label element and use XtSetValues(), and so on, to change the color, but this would be a flagrant violation of encapsulation and object-oriented design. Specifically, the internal details of your implementation (that you have a specific label widget whose color can be set directly) have now become part of your public API.
A better approach is to write a public member function, perhaps:
void setStatus(Status);
where Status is a type that includes Error, Warning, Normal, and so on. What exactly happens in that setStatus() method is now up to the class. You can set the label widget to red, for example. Later you could decide to change the label to a 3D viewer, and sound an audible alarm when an error occurs, without breaking other classes that depend on the public API.
How do I align two or more interface elements?
The best way to align interface elements in RapidApp is to select the appropriate layout containers. The RowColumn container is often used for this. Also consider the Spring Box container, which provides easy and powerful control over alignment of its children. For more information on choosing the right container see “Work With Containers”.
You can also use the universal grid settings found in the View menu to help you with alignment.
Why doesn't RapidApp provide some sort of alignment tool for arranging interface elements?
Alignment tools make sense only when applied to multiple interface elements, and in RapidApp you cannot select multiple elements. RapidApp does offer a grid, found in the View menu, to help with alignment.
Why don't some of my elements, such as labels, appear when I run programs created with RapidApp?
X applications use resource files; files containing widget resources. When an application is running, it uses these resource files to configure its widgets appropriately. RapidApp creates a resource file for your application automatically and stores it in the designated project directory. Unfortunately, X doesn't look in the current directory when searching for an application's resource file. You need to direct the search path using one of the following methods:
To add the current directory to the application's search path, set the environment variable XUSERFILESEARCHPATH to “%N%S”. You might want to do this as part of your login setup.
To guarantee that the resource files are found while testing your application (if you haven't set the environment variable as instructed above), run the application from RapidApp's Project menu.
Install the app-defaults file in /usr/lib/X11/app-defaults. If you enter make install in your application's project directory, the Makefile generated by RapidApp does this for you automatically. If you choose this approach, remember to reinstall any time you make changes.
To cause the resources to be placed in each class as defaults, set the option “Place resources in classes” to true. This option is found on the Code Style card in the Preferences dialog accessed from the File menu.
Sometimes when I drop a widget on a location, the widget is created in a new window instead of where I dropped it. Why?
Some widgets cannot be children of other widgets. If you drop a button on a button, for example, the dropped button cannot be created as a child of the drop site. When this happens, RapidApp searches for a valid container up the widget hierarchy. If none is found, the element is created as a top-level window.
Sometimes I enter a name in RapidApp and RapidApp adds a number after it (for example, “label” becomes “label1”). Why is this and how can I avoid it?
The UIL format used as the underlying document model for RapidApp, as well as many other interface builders, requires unique names for all symbols. Rather than causing an error later, RapidApp enforces this convention when you enter the names. For example, if you have one button with an Instance name of “OK” and you give that same name to another button, RapidApp changes it to the unique name of “OK1”. And, if you provide a callback function called OK(), RapidApp again makes the function name unique and you end up with OK2(). You can avoid this behavior by adopting naming conventions for your interface elements. For example, the OK button, might have the label “OK,” the name “okButton,” and a callback function ok(). (The label doesn't need to be unique.)
I want to apply a resource to multiple interface elements. Is there an easy way to do this?
There is no way to select multiple interface elements, or apply a resource to a group of existing elements. However, if you plan ahead you can create an element, set its attributes, and then copy and paste the element. The copied element retains the attributes of the original.
How can I see the full set of resources supported by IRIS IM?
You can determine a widget's full set of resources by looking at the reference pages for the IRIS IM widget or by consulting an IRIS IM reference guide. RapidApp displays the most commonly used resources. You can set any resource in your program or in the app-defaults file.
How do I set colors for my interface elements?
In the Indigo Magic Desktop environment, colors are controlled by schemes. You can override these schemes either programmatically or in your app-defaults file. By default, RapidApp creates programs whose colors are determined solely by schemes. You can always programmatically set colors for interface elements. All elements are available to derived classes as protected data members, so it's easy to override colors. You can also override the scheme settings by setting colors in your app-defaults file. Simply specify the class name of your program as part of the resource.
If you don't like the scheme being applied, change the scheme your programs use with the scheme browser available from the Toolchest. For information on schemes, see Chapter 3, “Windows in the Indigo Magic Environment,” in the Indigo Magic User Interface Guidelines, and Chapter 3, “Using Schemes,”in the Indigo Magic Desktop Integration Guide.
How do I change the font used by my interface elements?
In the Indigo Magic Desktop environment, fonts are controlled by schemes. You can override these schemes either programmatically or in your app-defaults file. However, you are encouraged to use the scheme-specified fonts. In cases where it makes sense, RapidApp allows you to switch the font of individual elements, such as labels, text, and lists, to one of the scheme-supported fonts. For example, you might want to change a label element from bold to normal, or a text element to a fixed-width font.
Why can't I resize an option menu widget?
The IRIS IM Option menu is really a RowColumn widget with a menu floating inside it. You can resize the outer RowColumn widget, but the inner, visible option menu is totally controlled by the RowColumn. This visible option menu is not accessible to RapidApp and cannot be resized.
Why can't I resize a scale widget?
The IRIS IM Scale widget is really a container with a Scrollbar floating inside. You can resize the outer portion of the Scale widget, but the inner, visible Scrollbar is controlled by the Scale. This visible Scrollbar can be horizontally resized or fully resized by modifying the scaleWidth and scaleHeight resources.
Why does it take so long to create some entries from the Inventor palette?
Some of the elements on these and other palettes are dynamically loaded from shared libraries as needed. The first time one of these libraries is loaded, the symbols in that library must be resolved before proceeding. This operation can cause a slight delay.
Why are the menu items under the Project menu grayed out?
These menu items invoke other Developer Magic tools and are available only if you have the tools installed. For example, you can't build, debug, or run if you don't have the Build Analyzer (cvbuild) installed. The Browse Source menu item invokes the Static Analyzer (cvstatic), which must be installed. In addition, for Browse Source to work, you must set the “Generate CVstatic Database” option found on the RapidApp card in the Preferences dialog. When active, the Makefile automatically generates a static analysis database. While this is useful, this greatly slows down the compilation, so the option is off by default.
Also, If RapidApp doesn't have a license, items are grayed out.
How do I add a menu bar to my window?
If you want a window with a menu bar, create a VkWindow element found on the Windows palette. You can add, remove, or alter the built-in menus as you wish. For more information, see “VkWindow”.
If you want a custom dialog with a menu bar, create a dialog from the Windows palette and add a Menu Bar element from the Menus palette. For more information, see “Creating a Menu Bar”.
How do I add items to a menu?
Access the menu pane by clicking the menu entry on the menu bar, or the option menu, depending on the type of menu you are working with.
Click again to display the menu pane.
Drop new elements onto the pane.
The mouse pointer is the hotspot when dropping items.
Dismiss the menu pane by clicking on the menu entry. For more information, see “Work With Menus”.
How do I move menu elements within a menu pane?
Select the element and choose “Up/Left” or “Down/Right” from the Edit menu of RapidApp's main window.
–or–
Use the arrow keys to reorder elements in a menu.
How do I move menu elements between menu panes?
To move the element:
Select the element and choose “Cut” from the Edit menu of RapidApp's main window.
Choose “Paste” from the Edit menu and click inside the new menu pane.
–or–
Select the element.
Drag and drop the element between menu panes using the middle mouse button while holding down the <Ctrl> key.
To copy the element:
Select the element and choose “Copy” from the Edit menu of RapidApp's main window.
Choose “Paste” from the Edit menu and click inside the new menu pane.
–or–
Select the element.
Drag and drop the element between menu panes using the middle mouse button while holding down the <Ctrl> key.
Is there an easy way to add a company standard header to my files?
Yes, provide the name of a file to be inserted in the “Header Comments” field in the Project card of the Preferences dialog. The file should be properly formatted, with C++ comment characters.
How do I add my own files to the Makefile generated by RapidApp?
The Makefile builds all files listed in C++FILES. This variable is defined as the contents of two lists, BUILDERFILES and USERFILES. For best results with the merging feature of the code generation, add externally-created files to the USERFILES list. List only the source files; the Makefile does the rest.
I'd like to add TCL support to my programs. Can RapidApp help?
Not presently, although support for integrating TCL or similar scripting languages into ViewKit programs may be supported in the future. There is nothing to prevent you from creating TCL interpreters or otherwise integrating TCL into your programs yourself.
How can I browse the tips that RapidApp displays at startup?
See “RapidApp Tips”.
How do I connect classes created using RapidApp to each other?
Connecting classes in C++ is always challenging because of C++'s strong typing. There are two basic ways to do this that work well with RapidApp-generated (ViewKit-style) classes. The first is to hard code the connection by implementing an API that each class can use to connect to the other as needed. The second is to use the ViewKit support for callbacks.
Say you have two classes, Input and Output, and Input has a text field. You would like Output to be notified when the user enters text in Input's text field. You could use either of the following approaches:
Hard code the connection, using your favorite editor:
Add a member function newText() to class Output. This member function does whatever it is you want to do when new text is available.
Add a public member function void setOutput(class Output *) to Input.h
Add a private or protected data member class Output* _output to Input.h
Add #include "Output.h" in Input.C.
Implement setOutput(* output) { _output = output; } in Input.C
At the point where you know text is entered (an activateCallback) in Input.C, call _output->newtext().
Use ViewKit callbacks:
Add a private or protected member function to Output:
void Output::textEntered(VkCallbackObject *, void *, void *);
Add the following line at an appropriate place in the Output class where you want to set up the callback:
VkAddCallbackMethod(Input::newText, input, output, &Output::textEntered, NULL);
where input is the instance of Input, and output is the instance of Output.
Then in Input.h, add a static public member:
const char const * newText;
Then in Input.C, declare the static member:
const char const *Input::newText = “newText”;
At the point where you know text is entered (an activateCallback) in Input, call
callCallbacks(newText, NULL);
Output::textEntered() is invoked.
How do I add dynamic behavior to classes created using RapidApp?
The best way is also the simplest: use your favorite editor to add data members, member functions, and so on. Keep your changes within the defined user code blocks. The merge feature of RapidApp assures that your changes are maintained.
If you want to add resources to components that you load onto a RapidApp custom palette, see “Adding Resources to Components” for instructions.
How can I change a class after I have created it?
Switch to class edit mode by choosing “Edit Classes...” from the Classes menu.
From the displayed list, select a class
This displays the elements of the class.
Edit or manipulate each element as necessary.
Exit class edit mode by clicking the Leave Class Mode button.
Changes apply to all instances of that class.
In RapidApp, how do I create a C++ class with functionality and have that functionality saved with the class?
See Chapter 8, “Component Libraries,” for instructions on creating libraries of components that you can reuse and distribute to other developers.
How do I add the C++ classes I created back onto the RapidApp palette?
You can save a file of components to be loaded into RapidApp for later use. To do this:
Define your classes.
Delete all instances.
Save the file.
Only the class descriptions are saved.
The next time you use RapidApp, and after you've begun creating your application, load the your classes by choosing “Import” from the File menu.
Once I've defined a class, how do I add an instance of the class to an existing container?
When you create a class, an icon representing that class is added to the User-Defined. You create instances of the class by clicking on the icon and clicking in any container (just as you do with any other palette icons).
Also, your original collection of interface elements becomes an instance of the new class. You can move this instance into another container by dragging it to the container while holding down the middle mouse button.
RapidApp creates ViewKit programs. How do I get ViewKit?
ViewKit is bundled with the Silicon Graphics C++ product. If you have C++, you already have ViewKit.
How can I find more about ViewKit? Is there documentation?
The IRIS ViewKit Programmer's Guide is available online if you install the *.books.* subsystem of IRIS ViewKit. You can also order a hard copy of the manual. Reference pages are also part of the ViewKit distribution.
Why does it take so long to create some entries from the ViewKit palette?
Some of the elements on these and other palettes are dynamically loaded from shared libraries as needed. The first time one of these libraries is loaded, the symbols in that library must be resolved before proceeding. This operation can cause a slight delay.
What is VkEZ and why would I use it?
VkEZ is a simple set of wrappers that can be attached to a widget at runtime to provide an easy-to-remember API for manipulating widgets. VkEZ has many of the benefits of “widget wrappers,” in that it offers a C++-like API for manipulating widgets, without basing your entire program to yet another layer above IRIS IM. VkEZ is intended for quick prototyping, and like any wrapper approach, has a cost over and above the normal API. Therefore, it should be replaced in any code that demands efficiency.
VkEZ allows you to substitute easy-to-remember code segments for more complex widget code. For example, assume you want to extract an integer value from a text field widget, add it to the current value of a scale widget, and display a running trace of these values in a scrolled text widget. Using the IRIS IM API, you could write something like:
/* IRIS IM API version */
int value1, value2;
char buf[100];
value1 = atoi(XmTextGetString(_textfield));
XtVaGetValues(_scale, XmNvalue, &value2, NULL);
sprintf(buf, “%d”, value1 + value2);
XmTextInsertString(_scrolledtext, XmTextGetInsertionPosition(_scrolledtext), buf);
The EZ equivalent would be:
EZ(_scrolledtext) << (int)EZ(_textfield) + EZ(scale);
See Chapter 7, “VkEZ Library,” for more information.
Why can't I add elements other than containers to a window element?
Each element on the Windows palette can contain exactly one child which must be a container element or a complex component. If you want to add additional elements, you need to add a container to the window and then add your elements to the container. For information on choosing the correct container, see “Work With Containers”.
How do I create resizable layouts?
The container you choose determines the layout style of your window. For layouts that resize, consider the following containers:
Form: the most frequently used container for resizable layouts. You specify attachments to determine how each child resizes. For information, see “Form”. For detailed information, consult a Motif book.
Rubber Board: easy to use, but has some limitations. For more information, see “Rubber Board”.
Spring Box: offers a resizable layout that is the entire basis of some toolkits. For more information, see “Spring Box”.
Paned Window: offers a limited form of resizable layout. For more information, see “Paned Windows”.
RowColumn: offers limited resizability when its adjustLast resource is set to true. For more information, see “RowColumn”.
Generally, applications use a combination of all these widgets. See “Work With Containers” for information on selecting and using the various containers provided in RapidApp.
This section includes the following:
By default, RapidApp's startup screen contains a “tip,” a suggestion for how to use RapidApp. You can control whether or not the startup screen displays tips. To do so:
In the RapidApp main window, from the File menu, choose “Preferences...”
In the Preferences dialog, go to the RapidApp card.
Unset the “Show tips on startup” option.
The next time you launch RapidApp the startup screen will not include a tip.
The following is a complete list of tips:
Holding down the Control key allows you to operate on the currently selected widget without accidentally changing the selection.
You can select a selected widget's parent by choosing “Select Parent” from the Edit menu, by typing <Ctrl-P>, or by holding both <Shift-Ctrl> while clicking.
You can edit the contents of Pulldown and Option menus by selecting the menu and choosing “Show Menu” from the Edit menu or by clicking on the menu while it is selected.
Many resources are stored in the app-defaults file. This file must be installed in an appropriate location before the resources can take effect.
Generating code does not automatically save the interface you have created. Be sure to choose “Save” or “Save As...” from the File menu before quitting.
Modified text fields have a different background color until you press <Return> or until the text field loses focus.
The Windows palette contains various top-level windows, the Containers palette contains all manager widgets and the Controls palette contains all control widgets.
To create a collection of one-of-many toggle buttons, choose a RadioBox container from the Containers palette and add Toggle Button widgets from the Controls palette. Two buttons are provided by default to get you started. You can delete them, edit them, or add to them.
The RubberBoard widget is an easy-to-use container for creating stretchable layouts. Start with a small window and position all children. Select the RubberBoard and set the setInitial resource to True. Resize the RubberBoard to a large size, reposition all children, and set the setFinal resource to True. The children are resized/repositioned using interpolation.
Labels, accelerators, and mnemonics are automatically placed in the application's app-defaults file.
Interfaces created with RapidApp automatically use the Indigo Magic look and feel, including using schemes for all colors and fonts. See the schemes documentation in the Indigo Magic Integration Guide for information on manipulating schemes and using colors in your application.

Note: You can always programmatically change fonts and colors in your application as well as set them in your app-defaults file. But schemes provide a good starting point. You can alter the font used by some elements by selecting a different schemeFont resource. Some knowledge of Motif makes it much easier to use RapidApp. It is particularly useful to understand how Motif's container widgets and geometry management work. Refer to a Motif tutorial if you have trouble using the various container widgets.
If you accidently resize a widget to the point that it is too small to easily manipulate, you can increase its size by choosing “Grow” from the Edit menu or by typing <Ctrl-G>.
When using a Form container, you can pop up a menu of possible attachments by pressing the right mouse button over one of the attachment icons shown in the selected widget.
When using a Form container, you can attach a widget to another widget by pressing the left mouse button over an attachment icon and dragging the rubberband line to the intended attachment point.
When using a Form container, you can specify “attachSelf” by pressing the left mouse button over an attachment icon, dragging the rubberband line away from the widget, then dragging the line back onto the widget itself.
When using a Form container, you can adjust the offset by moving/resizing a widget, or by holding down <shift> while pressing the left mouse button and dragging. A popup menu shows the offset in pixels.
It is often best to create a complex interface by constructing smaller sections using a single container widget, then placing the completed subsections into the larger layout.
The Project card in the RapidApp Preferences dialog allows you to specify the name and class name of your application, as well as other useful options. Access this dialog from the File menu.
You can often change an existing widget to another type. Replace the value of the “Class Name” field in the instance header with the desired widget class and press <Return>.
The Bulletin Board widget is the easiest container to use if you don't care about resizable layouts and/or internationalization.
The Rubber Board container widget is the easiest way to create resizable layouts, if you don't care about internationalization.
You can rearrange widgets within a RowColumn container or menu pane by choosing “Up/Left” and “Down/Right” from the Edit menu. You can also use the arrow keys.
You can view the widget hierarchy of a panel built inside RapidApp using the editres utility.
For fast building, browsing and debugging, the Project menu provides an interface to the rest of the Developer Magic environment tools.
If you would like your application to exhibit the “runonce” behavior seen on many of the Indigo Magic desktop control panels, check “Use RunOnce” on the Project card in the RapidApp Preferences dialog accessed from the File menu.
You may need to resize a Frame widget slightly to force its children to position correctly.
Saving often prevents loss of data in case of an unexpected exit from any cause.
The RubberBoard, SpringBox, Dial, ThumbWheel, Finder, and GlxMDraw widgets are not part of standard Motif, but are SGI extensions to Motif.
Only the most commonly used widget resources can be modified using RapidApp's resource editor. However, all Motif resources can still be set programmatically or in resource files.
The Delete operation deletes a widget or widget hierarchy, but does not place it on the clipboard.
Each Motif container enforces a specific layout algorithm. Choosing the right container makes your task easier. For example, the RowColumn container arranges widgets in rows and columns, and does not allow arbitrary movement of the widgets.
Changing the name of a widget changes both its resource name and the name of the variable used to represent the widget in any generated code.
Changing the label of a button or label widget does not affect the name of the widget in the program, only the label displayed by that widget.
RapidApp requires all names to be unique, and automatically appends numbers to any names already used: label1, label2, label3, and so on. Avoid this by choosing unique names.
It is easiest to create a labeled frame container by creating the frame, then adding the label. Construct the contents of the frame separately and add it last.
Selecting a palette icon with the left mouse button results in a rubber-banding outline that allows you to position and resize the widget by holding down the left mouse button and sweeping out the widget's size before releasing the mouse button.
Motif widgets were not designed for use with an interactive builder and often exhibit odd behavior when manipulated interactively. It is sometimes helpful to resize a window to trigger Motif's layout routines explicitly.
Toggling the value of the recomputeSize resource of a label or button widget often helps force a re-layout, which can be useful if widgets do not seem to behave as expected.
It is often useful to construct a complex interface bottom-up, by creating small simple interfaces that can be combined to form larger more complex interfaces.
When you generate code, the app-defaults file sets the sgiMode resource to True so your application automatically runs with the SGI look and feel.
You can “show” more than one menu pane at a time, and even drag items between menu panes. Click on a menu and choose “Show Menu” from the Edit menu on RapidApp's main window, or simply click on the menu again — either shows the menu pane. You can dismiss the menu pane by choosing “Show Menu” again, or by clicking on the displayed menu.
When you test a program by choosing “Run Application...” from the Project menu, RapidApp ensures that the app-defaults file is correctly loaded. If you run the program from a shell, be sure to set XUSERFILESEARCHPATH to %N%S or install the resource file in /usr/lib/X11/app-defaults. You can also copy or link the app-defaults file to your home directory while testing.
For best results, modify code only in the areas marked as being outside the generated code sections.
RapidApp treats all widget collections as classes (components). To avoid generated names, explicitly declare the classes you want to use.
Your application can automatically be ToolTalk-smart. On the Project card in the RapidApp Preferences dialog, set the Message system to ToolTalk. Access this dialog from the File menu.
You can make changes to any generated file. RapidApp merges all changes each time code is generated.
You can produce inst images for your completed application by simply typing make image. The images are generated in an images subdirectory. Choose “Edit Installation” from the Project menu to make changes to the installation.
The VkTabbedDeck allows you to stack components on top of each other so they can be selected one at a time, like RapidApp's Palette area. It's best to create the components before placing them in the Deck.
You can specify a pixmap or bitmap for labels and buttons. Enter the name of an Xpm pixmap or bitmap file in the labelPixmap field. The XmNlabelType switches to XmPIXMAP automatically. The pixmap or bitmap is placed in the pixmaps.h file and directly included in your program.
You can remove a component from a palette by choosing “Unmake Class” from the Classes menu and responding to the dialog that appears. You can also choose “Edit Classes” from the Classes menu, display the class, and delete it.
You can save collections of components to be loaded into other projects. Just create one or more components, remove all instances of the component(s), and save to a file.
The VkWindow class creates a ready-made menubar with the most common menu items specified by the SGI Style Guide. You can add to or delete entries from these menus.
You can have a cvstatic database automatically created for you when you compile. Just check “Generate Cvstatic Database” in the RapidApp card of the Preferences dialog.
Classes should normally consist of a widget hierarchy: A container and its children.
If you set the environment variable XUSERFILESEARCHPATH to %N%S, applications run correctly from their development directory without the need to install the application resource file.
To display an image, specify a bitmap or pixmap as the labelPixmap resource for any label or button widget. You can specify a full or relative path.
It is best to start each project in a clean directory. RapidApp assumes a one-project/one-directory model.
If you change the name of a class within RapidApp after you have made changes to the source code, you need to merge your changes into the new class by hand.
If you move a project directory, you should be sure to also move all hidden files and directories. RapidApp creates various files and directories whose names start with a “.” that are needed to maintain your code. The hidden directories are also important if you use configuration management, or share a project between multiple users.
If you wish to remove all files in a project, remember to remove the hidden files and directories (those whose names begin with a “.”) as well. If you start a new project in a previously-used directory, RapidApp could become confused by the presence of the old files.
RapidApp automatically creates the files needed to create inst images. You can execute “make image” to create installable images. “Edit Installation” in the Project menu allows you to edit the information used to build the inst images.
RapidApp automatically creates the files needed to integrate with the Indigo Magic desktop. These include an ftr file that contains file typing rules, a sample icon file, and commands in the inst files. You can edit your icon using IconSmith. If you plan to distribute your application to others you should obtain your own desktop tag. To get your own unique tag, send mail to [email protected].
You can add dynamic behavior to your application using the Developer Magic Debugger's Fix+Continue feature. Choose “Debug Application...” from the Project menu, run your program from the debugger, and then exercise the portion of the interface you wish to complete. If you have a callback associated with the user action, the debugger automatically stops in ::VkUnimplemented(). Return from this function and then use the commands in the Fix+Continue menu to add and execute code for your program.
RapidApp works best if you avoid making gratuitous changes to the generated code. For best results, avoid modifying the code outside designated areas.
RapidApp includes a set of convenience routines in a VkEZ library. This library allows you to connect various widgets without knowing as much as the Motif API requires. For example, to display the value of a Scale widget in a Label widget, you can write:
EZ(_label) = (int)EZ(_scale);
To append the text in a label to the value of a scrollbar and display the results in a TextField widget, you can write:
EZ(_text) << EZ(_label) << EZ(_scrollbar);
The VkEZ library included with RapidApp is useful for prototyping, but is very inefficient. You should plan to replace any uses of the EZ interface with a more direct approach as soon as possible.
To activate or deactivate the sounds used by RapidApp, toggle the “Enable sound” option on the RapidApp card in the RapidApp Preferences dialog, accessed from the File menu.
To configure various application-specific parameters, use the RapidApp Preferences dialog, accessed from the File menu. Some of these options apply only to the current program. Others, such as your preferred file suffixes apply to all future uses of RapidApp, unless changed.
When you add your own files to the Makefile generated by RapidApp, you should add them to the USERFILES list. This makes it easier for RapidApp to merge any changes to the Makefile during development.
Clicking on a pulldown menu while it's selected, displays its contents for editing. Also, this technique works with cascading and option menus.
You can “clone” an existing interface by dragging and dropping with the middle mouse button while holding down <Ctrl>. Cloned objects retain all the characteristics (resources) of the original element.
Option menus are a composite of many different widgets. The base of the option menu is a RowColumn widget, which occupies the area around the visible button. Attempts to resize an option menu appear to be unsuccessful because you can only resize the base RowColumn widget, not the visible button.
You can edit the contents of an option menu by clicking on the button area after selecting the option menu. You can also select the option menu and choose “Show Menu” from the Edit menu.
You can add a title to the left side of an option menu by setting the option menu's labelString resource. Do not confuse this resource with the labelString resource for an entry in the option menu.
You can choose not to have these tips displayed by turning off the “Show tips on startup” option found on the RapidApp card in the RapidApp Preferences dialog accessed from the File menu.
You can choose to have the startup panel dismissed automatically by turning on the “Auto-dismiss start screen” option found on the RapidApp card in the RapidApp Preferences dialog, accessed from the File menu.
To display an image in a file, you can drag the pixmap or bitmap file from the desktop into labels, buttons, and so on. This is equivalent to setting the widget's labelPixmap resource to that pixmap.
You can drag Inventor data files directly onto Inventor viewers to view the image.
RapidApp's code ability to merge changes made to source code is greatly enhanced if you maintain blank lines between code generated by RapidApp and code entered by you.
You can add classes you have created back to the RapidApp palette. See the RapidApp User's Guide for details.
You can create applications or libraries using RapidApp. Specify your library as the Library name on the Project card in the RapidApp Preferences dialog. All non-top-level window classes will be placed in your library so your classes can be shared with others.
An Application class derived from VkApp is a convenient way to support command line options, application-level resources, and application state information. To have RapidApp create an Application class, assign a name in the VkApp subclass field on the Project card in the Preferences dialog.
If you strictly follow the model of not modifying the base classes created by RapidApp, or consistently stay inside the editable code blocks, you may want to set the options on the Merge Options card in the Preferences dialog to “OverWrite” these files. In this mode, RapidApp does not attempt to merge changes to the base class files, thus saving time and reducing the potential for any conflicts.
If you attempt to display many pixmaps that use large numbers of colors, you could run out of colors in the colormap. RapidApp attempts to match the desired colors to the closest available colors currently in use, but the results may be unexpected. You may want to reduce the number of colors a pixmap uses before loading it into RapidApp.
RapidApp's file format can only support pixmaps with 91 or fewer colors. Pixmaps that use more than 91 colors cannot be imported into RapidApp.
RapidApp follows the ViewKit convention of adding leading underscores to all protected and private data members in the generated code. This helps avoid name collisions, allows you to add access methods that have the same name (without the leading underscore), and makes it easy to locate and identify private and protected data members in class code.
If you plan to port your application to other Unix-based platforms, check the non-SGI Platform toggle on the Code Style card in the Preferences dialog. This produces a more portable Makefile. If you want to compile your application on other platforms, you also want to avoid SGI-specific widgets like the SgThumbwheel, SgDial, SgFinder, SgSpringBox and so on.
The code generated by RapidApp is based on ViewKit and Inventor, which are available on many Unix-based platforms. ViewKit is distributed by Integrated Computer Solutions. Contact them at 617-621-0060 for details. Inventor is distributed by Template Graphics, who can be reached at (619) 457-5359.
For classes that are to be reused by others, it is often useful to have default resources in the class rather than in an app-defaults file. If you set the “Place resources in classes” option on the Code Style card in the Preferences dialog, resources are associated with a class, using the ViewKit setDefaultResources() mechanism.
You can change most widgets from one type to another by editing the class name in the instance header area. There are many ways to exploit this feature. For example, it is inherently difficult to add children to the paned window widget. You could, however, create a row column widget and add children in order. Once the children have been added, select the string “XmRowColumn” in the class name field of the header and type “XmPanedWindow.” After pressing <Return>, the row column widget is converted to a paned window widget.
When modifying code generated by RapidApp, it's best to limit your changes to the areas that begin with
//--- Start editable code block
and end with
//--- End editable code block
Keeping your changes inside these markers allows RapidApp to merge changes easily.
Setting the UI class option on the Merge Options card in the Preferences dialog allows you to control what files are merged when code is updated. For best results, limit your changes to derived classes to the areas that begin with
//--- Start user code block
and end with
//--- End user code block
If you limit changes to derived classes, you can configure RapidApp to “Overwrite” Base classes. This speeds up code generation and reduces the possibility of merge problems.
Currently, the best way to use RapidApp with a configuration management system is to check out ALL files in the RapidApp project directory before working with RapidApp. Be sure to include the file named RapidAppData.rap, as well as the various auxiliary files that may be updated when you make changes using RapidApp. For large systems involving teams of programmers, use RapidApp to create libraries of components to organize responsibilities so that each program has a unique RapidApp project directory.
To get the SGI “Percent Done” indicator, create a Scale widget and set the slanted resource to True, the slidingMode resource to XmTHERMOMETER, and the sliderVisual resource to XmFLAT_FOREGROUND.he slanted resource to True, the slidingMode resource to
Before importing new components into RapidApp, it is useful to test them using the Component Tester application. This application is installed as part of RapidApp, and also can be found in the directory /usr/share/src/RapidApp/ComponentTester. If you can load and interact with the component using this application, the component should work in RapidApp. If you have problems, run the source code for Component Tester under a debugger to find the problem.
RapidApp forces some user interface elements to be classes. These include all entries in the Windows palette and the direct child of a SimpleWindow, VkWindow, or VkDialog. Unless you specify a name for these classes, RapidApp provides a generated name, which may be undesirable. You can select any of these elements and make them a class providing a name you prefer.
You can add help to your application without writing any code. By default, a simple help library, libvkhelp, is linked with your program. To use this system, set the resource:
*helpAuthorMode: true
Now, run your application and try the help menu items. A resource string is printed to standard output, which you can use as a resource in your application defaults file. For example, if asking for help produces a token like “application.form.label,” you can add the following to your application defaults file:
application.form.label.helpText: Help on this label
Once added (and after restarting the application), when you ask for help on this item, a dialog appears with the text “Help on this label.”
For a far more sophisticated help system, consider using the SGI Help System. See the SGI Indigo Magic Desktop Integration Guide for details.
You can cycle through all widgets in your interface by pressing <Shift> while clicking the right mouse button over the interface.
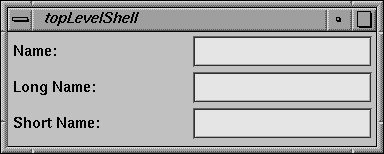
The row column container provides an easy way to create a simple column of labeled fields:
Example programs built using RapidApp can be found under the directory /usr/share/src/RapidApp.
By default, RapidApp creates a base class and a derived class for every class you define. RapidApp places all user interface code in the base class. You can implement virtual functions in the derived class to add behavior to the class. The approach separates the implementation of the user interface from the semantic behavior of the class, which is often a desirable characteristic.
If you do not wish to take advantage of this feature, toggle off the Split UI/Derived option found in the class header area when a class is selected in Class Edit mode. To globally change this behavior, go to the Code Style card in the Preferences dialog and unset the “Split classes into UI/Derived” option.
You can edit the names and files associated with classes from within Class Edit mode. Enter class edit mode, select the class to edit, and issue the Select Parent command until you reach the top of the widget hierarchy. At that point, RapidApp's header area changes to display information about the class, which can be edited.
RapidApp allows you to create your own classes and add them to a palette. You can add behavior to these classes that is presented as resources in the RapidApp resource editor. See the RapidApp User's Guide for details.
When defining a class, you can choose from a set of base classes. The exact set depends on the type of class being created. You can also extend the set of base classes that can be used. See the RapidApp User's Guide for details.