This chapter describes the steps for generating code and RapidApp's approach to code management. It includes the following sections:
“Generate Code” describes how you generate code.
“Code Management” discusses how RapidApp manages the code it generates and the code you write.
The following sections are included:
RapidApp generates and saves all the files needed for your application when you choose “Generate C++” from the Project menu. You need to generate code anytime you change the interface to your application, such as adding a new interface element or moving an interface element, or when you change any of the options in the Preferences dialog.
To have RapidApp generate code:
If you haven't done so, specify the project directory as follows:
From the File menu, choose “Preferences.”
In the Preferences dialog, go to the Project card.
In the Project Directory filed, enter the directory path for the project directory.
Fill in the other options as necessary.
RapidApp creates all the files needed for your application and saves them in the specified project directory. For information on how RapidApp handles the code it generates and the code you write, and for a list of the files RapidApp generates, see “Code Management”.
You can add and edit code using one or a combination of two methods; the a text editor, such as Source View, and the Debugger using the Fix and Continue tool. To generate a working prototype quickly, you might want to use the VkEZ convenience functions. This section includes:
RapidApp uses a code merging process to bring the generated code and the user-defined code together. This merging process is discussed in section “Code Merging.” To guarantee that the code is merged properly, follow a few simple rules:
Do not arbitrarily reformat any generated files.
Try to limit your changes to the areas between the editable code blocks:
//---- Start editable code block:

//---- End editable code block:
RapidApp owns the areas outside of these code blocks. You can make changes to these outside areas, but doing so increases the chances of your code conflicting with code generated by RapidApp when making later revisions to your application.

Tip: If you are using Emacs version 19, refer to RapidApp's release notes for information on how to configure Emacs to highlight and confine your input to the editable code blocks. Use only RapidApp to make changes to the user interface.

Note: If you attempt to alter your application's interface by editing source code, RapidApp won't reflect your changes. This is because RapidApp doesn't read the source code but instead reads a separate file used to save a description of the interface. your changes aren't lost; RapidApp simply doesn't recognize them. For example, if you cut the creation of a widget directly from the interface source code, the widget still appears the next time you run RapidApp. Use the variables at the top of the Makefile to add files and set flags. These are:
IMAGEDIR — the location of inst images built by make image
USERLIBS — use to include addition libraries created outside of RapidApp
OPTIMIZER — use to set -0 or -g flags for the compiler
USERFLAGS — use to include additional files created outside of RapidApp
USERFLAGS — use to set flags for the compiler
By working within RapidApp's intended model, you take advantage of RapidApp's best features in helping you create and build your application. If you work outside of this model, such as reordering functions, reformatting code outside of the editable code blocks, or modifying a file to the point that RapidApp can't identify the original structure programmatically, your ability to continue to use RapidApp is severely limited.
RapidApp prevents you from setting the color or font of an interface element from within RapidApp by not displaying their resources. Instead RapidApp lets SGI's schemes mechanism assign the fonts and colors based on the user's selected scheme. You can still edit the source code or resource file to override the default colors or fonts, but if you do so, use the special symbolic scheme colors and fonts as described in Chapter 3, “Using Schemes,” in the Indigo Magic Desktop Integration Guide.
RapidApp provides access to the Developer Magic Debugger. Aside from the obvious uses for finding and fixing bugs, you can use the Debugger's Fix+Continue feature to interactively add functionality to your application. To learn more about this tool, see the Developer Magic: Debugger User's Guide. The steps in this section get you started with the Debugger and show you how to use its Fix+Continue feature.
| Note: Though you access the Debugger through RapidApp, when you work with the Debugger you are actually working outside of RapidApp, and thus outside of RapidApp's control. |
To use the Debugger from RapidApp:
From the Project Menu, choose “Debug Application.”
If the application is not up-to-date, RapidApp invoke the Build Manager automatically to update the executable.
Run your application by clicking on the Run button.
Test the application by clicking on buttons, selecting menu items, etc.
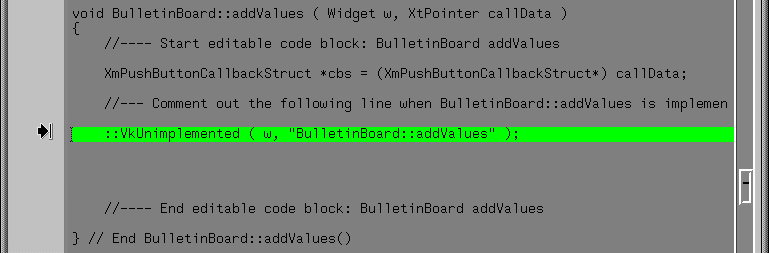
When you encounter an unimplemented function, the Debugger stops in VkUnimplemented. This function is called by the virtual function you really want to modify. Figure 5-1 shows an example of the VkUnimplemented function.
To access your function, click the Return button in the Debugger.
The Debugger displays the file containing the undefined function and highlights the undefined function. Figure 5-2 shows the addValues undefined function. Notice that the area of the function that you need to edit lies between the editable code blocks:
//---- Start editable code block

//----End editable code block
Notice also the line that reads:
::VkUnimplemented (w, "BulletinBoard::addValues" );
Define the function.
From the Fix+Continue menu, choose “Edit.”
The body of the function changes color to indicate the editable region.
Implement the behavior of the function.
Parse the modified function and load it for execution by choosing “Parse and Load” from the Fix+Continue menu.
Restart your application by clicking on the Continue button.
Continue to test your application making changes as necessary.
When you are satisfied with the testing, you might want to comment out the call to VkUnimplemented in all the functions you've changed.
If you don't comment out this line, the function continues to be called.
Save your work by choosing “Save All Files” from the Fix+Continue menu.

You can use the default text editor, Source View, or any editor of your choice.
To set up the use of another editor:
Set the WINEDITOR environment variable to the window-based editor you want to invoke. For example:
setenv WINEDITOR 'winterm -c vi'
In RapidApp, from the File menu, choose “Preferences.”
In the RapidApp card, set the “Use $WINEDITOR” option.
To use the Source View editor or an editor previously specified as shown above:
During the prototyping stage, you can use EZ convenience functions in your callbacks. Specific to RapidApp, EZ functions help you write code to perform operations that would normally require significant knowledge of how IRIS IM deals with reconfiguring widgets, retrieving values, displaying data, etc. For more information on EZ functions, see Chapter 7, “VkEZ Library.”
RapidApp generates all the files needed to build your application. Although RapidApp can generate a significant portion of your application's code, you must still write some parts. This introduces the challenge of keeping RapidApp and your text editor from interfering with each other; you don't want to lose changes made in one when you make changes using the other. RapidApp addresses this challenge in two ways: class architecture and code merging. This section describes how RapidApp manages code and includes the following sections:
To understand how all of the files that RapidApp generates work together, consider a very simple example—the calculator application described in “Building a Calculator: A RapidApp Example.” To demonstrate more of the RapidApp code generation features, assume that you've encapsulated the calculator interface into a component called Calculator (“Work With User-Defined Components” demonstrates how to do this).
These files fall into four basic categories: the program driver, a top-level window class, components, and configuration or support files
In the case of the calculator program, RapidApp generates the following directories and files:
Table 5-1 shows the files generated by RapidApp.
Table 5-1. Files Created by RapidApp
File/Directory Name | Description | Category |
|---|---|---|
.backup (dir) | A directory containing backups of previous versions of files. | Support |
.buildersource (dir) | A directory supporting RapidApp code merge features. | Support |
main.C | All programs have a main.C file that
instantiates a VkApp object and one or
more top-level windows. Alternatively,
if you provide a subclass name in the
RapidApp Preferences dialog,
RapidApp creates a subclass of VkApp
for the application instead of directly
instantiating a VkApp object. This
allows you to modify the VkApp
subclass to handle application-specific
needs (for example, parsing
command-line options). See Chapter 3,
“The ViewKit Application Class,” in the
IRIS ViewKit Programmer's Guide for
more information on the VkApp class.
You don't have to use the generated
main.C, but there is little reason to have
anything different. Note: If you want to handle ToolTalk™ messages in your application, you need to set the Message System option in the RapidApp Preferences dialog to ToolTalk. This causes RapidApp to instantiate a VkMsgApp object instead of a VkApp object. See Appendix A, “ViewKit Interprocess Message Facility,” in the IRIS ViewKit Programmer's Guide for more information on the VkMsgApp class and the IRIS ViewKit support for ToolTalk. | Driver |
CalcWindow.h | The header file that describes the window class you created as your top-level window. | Top-level window |
CalcWindow.C | The source file that implements the window class you created as your top-level window. This is the source file. | Top-level window |
CalculatorUI.h | The header file containing the user interface code that describes your application. | Component |
CalculatorUI.C | The source file containing the user interface code that implements your application. | Component |
Calculator.h | The header file containing the code that describes the derived class from CalculatorUI.h. | Component |
Calculator.C | The source file containing the code that implements the derived class. | Component |
Calculator | The application resource file | Support |
Makefile | The file that describes the dependencies for compilation | Support |
calculator.idb | The installation database (idb) file used by Software Packager. | Support |
calculator.spec | The specification file used by Software Packager. | Support |
icon.fti | The file containing the desktop icon for the application. | Support |
desktop.ftr | The file typing rules for the desktop icon used to represent the application. | Support |
Calculator.icon | The file containing the icon used when the application is iconified. | Support |
unimplemented.C | The file that contains the VkUnimplemented function described in “Using the Debugger to Add Code.” | Support |
In most cases, you should only need to edit the various class files to add functionality, the desktop.ftr and icon.fti file to customize the desktop icon, and the <Application>.icon file to customize the minimized window icon.
To minimize conflicts when it generates code for a component, RapidApp generates two separate C++ classes by default. One class, which normally has the suffix “UI” appended to the class name, contains all the code needed to generate the user interface, including creating components and IRIS IM widgets, registering callbacks, and so on. The second generated class is a subclass of the “UI” class and contains the code that implements the actual functionality of the component.
Separating the user interface code from the functional code allows RapidApp to “own” the UI class. Generally, you should only need to make changes only to the derived class. The UI base class declares all widgets and components as protected data members so that you can access and manipulate them freely in the derived class. RapidApp implements widget callback functions in the base UI class. Each callback corresponds to a virtual function declared initially in the base class but overridden in the derived class. You can use any text editor to complete the bodies of the derived class's virtual functions.
With this separation of interface and functional code, when you make changes to a component's interface, RapidApp can update the UI class without affecting the subclass containing the functional code. In fact you can completely redesign a component's interface, but as long as you retain the same callback functions, you might require only minimal changes to the functional code in the derived class. (You might need to change some widget access code, for example, if you replace a radio box and toggle buttons with an option menu.)
| Tip: In general, for greatest separation between the generated code and the code you add by hand, add and change code in only the derived classes (that is, those classes without the “UI” suffix). |
You can choose to not use this separation when you create a class, in which case both RapidApp's generated code and any changes you make will be in the same file. The advantage of this approach is that your project will have fewer files. The disadvantage is that there is less separation between the generated code and hand-written code.
When you make changes using RapidApp and then generate new code, RapidApp merges the changes you've made with the code it generates. This allows you to extend the code using your own editor, without losing the ability to evolve the code using RapidApp.
By default, RapidApp uses two independent merge algorithms applied in sequence, the block merge and the three-way merge.
In this first merge RapidApp replaces all sections in the newly generated code that lie between commented editable code blocks with the code from the same section of the current file. The editable code blocks are set off by the comments:
//--- Begin editable code block //--- End editable code block |
When block merging is used, you can add any amount of code between the comment markers. The code is retained, exactly as-is, each time you regenerate code from RapidApp. RapidApp places editable code blocks in nearly every member function, as well as other strategic places in files. You should be able to limit your changes to these areas, thus ensuring a smooth merge process.
To customize RapidApp's block merge, do the following:
From the File menu, choose “Preferences.”
Go to the Merge Options card.
Set or unset the “Do block merge” option.
Note: Although this option is configurable, it would be very unusual to deactivate this portion of the merge algorithm.
In this second merge RapidApp uses a three-way, line-by-line differencing algorithm to detect changes made since the last time code was generated and attempts to silently merge any differences. It is meant to catch any changes you may have made that lie outside of the editable code block comments.
RapidApp applies this merge to four different file types.
| UI classes | The base UI classes | |
| Derived classes |
| |
| Makefile | The Makefile used to compile your application | |
| Aux files | Auxiliary files such as the application resources file, the desktop icon, the FTR file, and the files used by Software Packager to generate an installable image |
To customize RapidApp's three-way merge, do the following:
From the File menu, choose “Preferences.”
Go to the Merge Options card.
Specify how RapidApp applies the three-way merge to the four different file types.
Merge RapidApp attempts to merge changes you've made to the existing file with the new file it is generating. The merge process is described below. Typically, this is the best choice if you have made edits outside the editable code blocks, and it is the default for all files.
Don't Merge RapidApp writes all the new files with a .RapidApp extension. You must then merge the files by hand. You might want to specify this method if you make complex changes to files (for example, creating a highly customized Makefile) and want to be certain that your changes are preserved.
Overwrite RapidApp overwrites the existing file with the newly generated file. In this case, RapidApp always backs up the old file to the project's .backup directory even if you've unset off the “Save backup” option in the Merge Style card. This is the fastest method of the three.
You might use the Overwrite method for Makefiles, UI and Derived classes if you know you are limiting your changes to the editable code blocks. You might also use this method for auxiliary files early in development. When you begin customizing your application's resource file, desktop icon, and files used by Software Packager, you'll want to change to one of the other methods.
When you select the merge method, RapidApp performs the following steps for each file each time you generate code (these steps use Makefile as an example):
| Note: For the most part, you should not need to be aware of the code merging process. These details are provided to help you understand the underlying mechanisms both to promote confidence and to help you recover from difficulties in case anything should go wrong. |
RapidApp writes the newly generated Makefile to a different name, .Makefile.N.
If Makefile doesn't exist, RapidApp moves .Makefile.N to Makefile. RapidApp also saves Makefile to a hidden subdirectory in your project directory, .buildersource. RapidApp then terminates the merge process.
If Makefile exists, RapidApp compares .Makefile.N to Makefile. If there are no differences, RapidApp removes .Makefile.N and terminates the merge process.
If there are differences between the newly generated file and the current Makefile, RapidApp compares .Makefile.N to the version it generated previously (which it stored in .buildersource). If there are no differences between those two versions, then you must have added the changes to the current Makefile by hand, so RapidApp removes .Makefile.N and terminates the merge process.
If there are differences between the newly generated file and the current Makefile and the previous version, RapidApp extracts all sections that lie between the editable code blocks in the current Makefile, and inserts them into the newly generated file. This step is only performed if the “Do block merge” option is set.
Next, if there are differences in all three files, and the merge option for this file is “Merge”, RapidApp initiates a three-way merge (see “Three-Way Merge”, or the merge(1) reference page). This merge treats the last known file generated by RapidApp as an ancestor and compares your changes (if any) to Makefile to those found in .Makefile.N and attempts to resolve the differences. If the differences are resolved successfully, the merged changes are made to Makefile, and .Makefile.N becomes the new ancestor and is saved in the .buildersource directory to be used in future merges. RapidApp also saves the original file in a .backup subdirectory as Makefile.<#> (where <#> is a generated number) as a guard against any possible failure of the merge.
If the merge process couldn't resolve all differences, RapidApp offers you the option to manually merge the files, to discard the current Makefile, or to keep the current Makefile. In all three cases, RapidApp copies the original file to Makefile.<#>, where <#> is the highest number not currently in use.
If you choose to merge, RapidApp invokes an interactive merge tool that visually shows the areas that are in conflict and offers you a chance to manually resolve the differences.
If you choose to discard the current Makefile, RapidApp overwrites the current file with the newly generated file.
If you choose to keep the current Makefile, RapidApp moves the generated file to Makefile.New and leaves the current file untouched.
In addition to these steps, RapidApp takes some precautions to make the ancestor files used in the merge process transparent. Each time RapidApp generates code, it also saves a file named RapidAppData.rap. This file contains information about the state of the project at the time of this code generation and can be used to provide the ancestor files in the .buildersource directory, as well as to provide other information about the project. If you use a configuration management system and are working with multiple users, this file should be placed under source control. You do not need to place the contents of the .buildersource directory under source control.