This chapter describes the minimum steps required to get DMF up and running with a SGI 400 VTL system:
For more information, see the following:
DMF 6 Administrator Guide for SGI InfiniteStorage
DMF 5 Filesystem Audit Guide for SGI InfiniteStorage
DMF man pages:
dmput(1) dmls(1) dmf.conf(5) dmdidle(8)
To install the DMF license, copy the DMF license key into the /etc/lk/keys.dat file on the DMF server. For more information, see the chapter about licensing in the DMF administrator's guide.
To set up the environment for DMF, do the following:
Verify that the required DMF administrative filesystems and DMF-managed filesystems are mounted. For example:
dmfserver# df -h
...
/dev/lxvm/lun5s3       47G   65M   47G   1% /dmf/move
/dev/lxvm/lun5s5       47G   66M   47G   1% /dmi_fs
/dev/lxvm/lun5s0       47G   70M   47G   1% /dmf/tmp
/dev/lxvm/lun5s2       47G   79M   47G   1% /dmf/home
/dev/lxvm/lun5s1       47G  107M   47G   1% /dmf/spool
/dev/lxvm/lun5s9       47G   69M   47G   1% /dmf/journals
/dev/lxvm/lun5s7       47G   65M   47G   1% /dmf/cache
...
For more information, see “Create the Directories that DMF Requires” in Chapter 1.
Create an empty /dmf/home/dump_tasks/tapes file. For example:
dmfserver# touch /dmf/home/dump_tasks/tapes
This section discusses the following:
Table 2-1 and Table 2-2 highlight the configuration file parameters that are of particular interest when using SGI 400 VTL shelves, grouped by the object in the sample file that contains the parameter. For details, see DMF 6 Administrator Guide for SGI InfiniteStorage.
Table 2-1. Parameters of Particular Interest for SGI 400 VTL as Permanent Storage
Table 2-2. Parameters of Particular Interest for SGI 400 VTL as Fast-Mount Cache
Sample Object Name | Object Type | Parameter | |||||
|---|---|---|---|---|---|---|---|
DMF (shield icon) | base |
| |||||
nodename | node |
| |||||
copan_ls | libraryserver |
| |||||
vg_c00 through vg_c03 | volumegroup |
| |||||
mg_fmc | migrategroup |
| |||||
fmc_task1 and fmc_task2 | taskgroup |
| |||||
copan_fmc1 and copan_fmc2 |
|
To create the DMF configuration using the DMF Manager graphical user interface, do the following:
Start the DMF Manager service:
dmfserver# service dmfman start
Invoke DMF Manager by pointing your browser to the following location:
https://your_hostname:1179
Accept the security certificate.
For more information, see the chapter about using DMF Manager in the DMF administrator's guide. You can use the Help button in DMF Manager to access the DMF administrator's guide.
Log in as the admin user. Click the Log In button in the upper-right corner of the window.

Note: The first time you configure DMF, you are automatically given admin access. After you save the configuration, you must thereafter log in as the admin user to make changes. For more information, see the chapter about DMF Manager in the DMF administrator's guide. Populate DMF Manager with the sample DMF configuration file for SGI 400 VTL use. To do this, right-click in the Overview panel and select one of the following: [2]
Pre-Configured -> COPAN VTL LS Sample
Pre-Configured -> Fast-Mount Cache Sample
COPAN VTL LS Sample creates the following:
One library server: vtl_ls
Eight drive groups: dg_c00 through dg_c07
Eight volume groups: vg_c00 through vg_c07
Two migrate groups: mg0 and mg1
The DMF administrative filesystems, as described in “Create the Directories that DMF Requires” in Chapter 1
Fast-Mount Cache Sample creates the following:
Two fast-mount caches: copan_fmc1 and copan_fmc2
One tape library server: tape_ls
Two tape drive groups: dg1 and dg2
Four tape volume groups: vg1a, vg1b, vg1c, and vg2
Two migrate groups: mg0, mg_fmc
One resource watcher: rw
The DMF administrative directories, as described in “Create the Directories that DMF Requires” in Chapter 1
Depending upon your site-specific configuration, or if you choose a different naming convention (“Naming Convention” in Chapter 1), you must modify the DMF configuration accordingly.
Make the following changes to the sample configuration, based on the configuration at your site:
Note: This procedure describes the minimum changes you must make. If your configuration differs from the sample configuration, which is likely, you may need to make more modifications. For each filesystem that DMF will manage, copy and paste the /dmi_fs object, renaming it with the filesystem name. Right-click the /dmi_fs object and select:
Configure... -> Copy
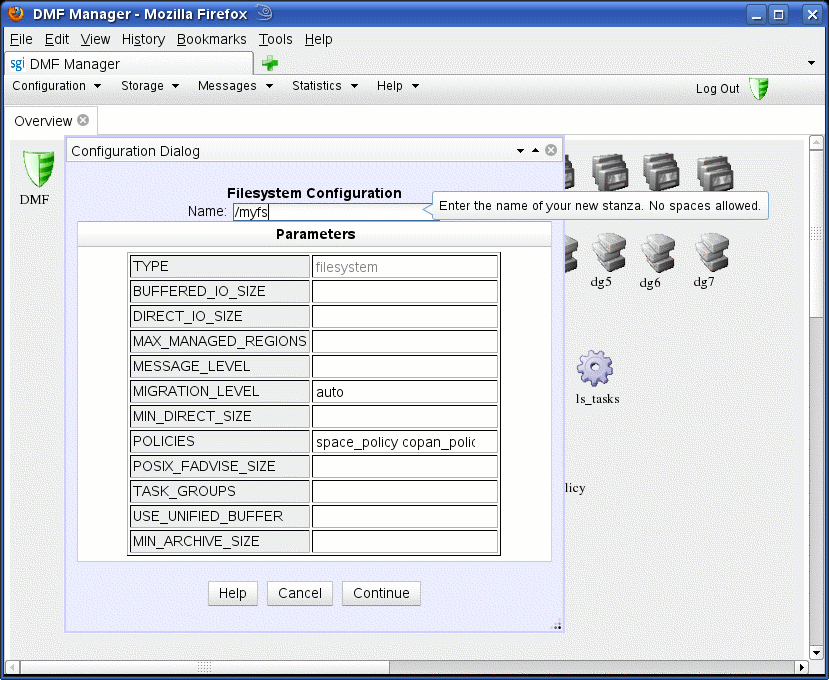
In the copy, delete the /dmi_fs name and replace it with the name of your filesystem. Figure 2-1 shows an example using the name /myfs.
You may want to enter a value for the DIRECT_IO_SIZE parameter in order to improve I/O performance. Then click Continue.
Note: For help on a parameter, right-click the parameter name. After have created an object for each filesystem, delete the sample /dmi_fs object.
Modify the DUMP_FILE_SYSTEMS parameter so that it contains all of the filesystems that you want backed up. You should include /dmf/home, /dmf/journals , and all of the user filesystems that are managed by DMF. Right-click the dump_tasks icon and select:
Configure ... -> Modify
Modify the DATABASE_COPIES parameter so that it specifies the directories in which you want to store copies of the DMF databases (see “Create the Directories that DMF Requires” in Chapter 1). Right-click the daemon_tasks icon and select:
Configure ... -> Modify
Change the ADMIN_EMAIL parameter to an appropriate address for your site. Right-click the DMF shield icon and select:
Configure ... -> Modify Base
Delete the default address and enter in the address for your site. Click Continue.
Modify the number of drive groups and volume groups according to the number of COPAN shelves in your configuration. Using the procedures in this guide, there should be one drive group and one volume group per shelf, and the migrate groups should contain a balanced number of volume groups. For example, if you have six shelves (0-5) and you are using SGI 400 VTL as permanent storage, you would do the following:
Delete dg_c06, dg_c07, vg_c06, and vg_c07
Move vg_c03 to mg1 (so that mg0 and mg1 each have three volume groups)
If you are using the Parallel Data Mover Option:
Right-click the DMF shield icon and select:
Configure ... -> Modify Base
Set SERVER_NAME to the system hostname of your DMF server. Click Continue.
For each node in your DMF configuration, right-click anywhere within the Overview panel and select:
Add Object... -> Node...
Set the name of the object to the node's system hostname. If you are using alternative networks for DMF communication, set INTERFACE appropriately.
For fast-mount cache, modify the parameters for the permanent storage target (such as a tape library) as appropriate for your site.
Validate your changes. Right-click anywhere within the Overview panel and select:
Configure -> Validate Configuration
You will see errors about OpenVault and a DMF database, because they are not yet configured:
ERROR:  No OpenVault drives configured.
ERROR:  OpenVault server is not up or client is misconfigured.
ERROR:  Database (/dmf/home/vtl_ls/tpvrdm.dat) does not exist.
The above errors are expected at this point, and you can disregard them. However, if there are any other errors or warnings, fix them and then rerun the validation. Proceed to step 9 when there are no errors and preferably no warnings, other than the expected OpenVault and database errors.
Save the configuration. Right-click anywhere within the Overview panel and select:
Configure -> Apply Configuration
| Note: If you do not use the suggested naming conventions later in this procedure (such as c00 when you get to step 3g of “Add the Set of DCPs for the Library” in Chapter 3), you must modify the MOUNT_SERVICE_GROUP parameter to tell the DMF drive group the name of the OpenVault drive group. If you follow the suggestions in the procedure, no change is required. |
[2] For historic reasons, the SGI 400 VTL is sometimes referred to as “COPAN” in literals and the graphical user interfaces.