This chapter describes various tasks you must perform to complete the initial configuration your site. It contains the following sections:
This task leads you through the steps to create Console Manager nodes, groups, and users. All Console Manager tasks, including the tasks grouped together in this task, can be launched from Console Manager.
 | Note: In every Console Manager task, you can click any blue text to see instructions on how to fill in a field. |
As you create components on your system, you can use the Nodes, Users, and Groups views in the Console Manager window for visual feedback of your progress (see “Console Manager View” in Chapter 1).
To add nodes, groups, and users to Console Manager, follow these steps:
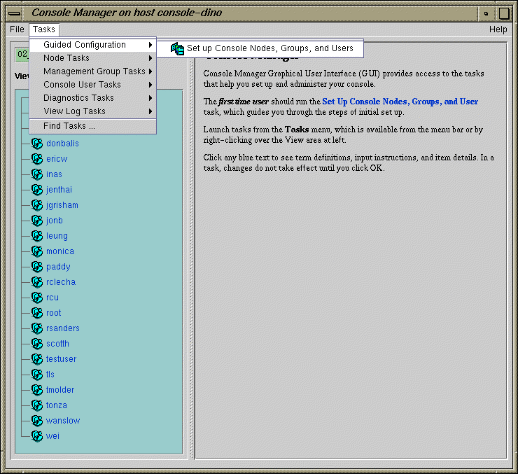
From the Tasks pulldown menu, choose the following, as shown in Figure 3-1.
Guided Configuration -> Set up Console Nodes, Groups, and Users
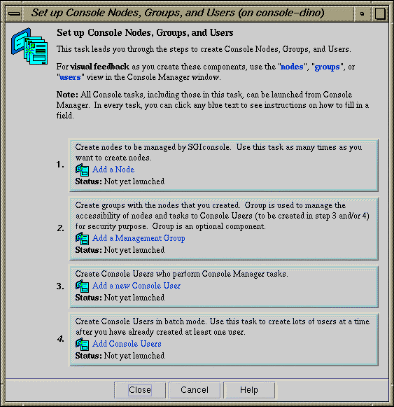
The Set up Console Nodes, Groups, and Users dialog box appears, as shown in Figure 3-2.
Perform the following steps:
Click on the Add a Node button. For information on this task, see “Adding a Node”.
Click on the Add a Management Group button. For information on this task, see “Adding a Management Group”.
Click on the Add a new Console User button. For information on this task, see “Adding a Console User” in Chapter 2.
Click on the Add Console Users button. For information on this task, see “Adding Multiple Users” in Chapter 2.
An error message appears if a task fails.
An icon entry appears on the View panel when adding users, groups, and nodes.
Click the Close button.
This task lets you define a new node. The task is executable only by the root console user. After defining the node, you can use Console Manager to perform functions such as reset, power up, power down, get console, and spy console by running tasks from the Node Tasks pulldown menu.
The following tables shows which fields are required for various node types (see step 2 for more information on node types):
| Node Type | Fields Required | |
| All Nodes | Node name, user name, hostname for this node | |
| L2 | Partition number, L2 address, system controller password (optional), | |
| L1 | System Controller TTY device name | |
| MSC | System controller TTY device name, console TTY device name, system controller password (optional), Serial speed. | |
| MMSC | System controller TTY device name, system controller password (optional). | |
| No Management Port (Console Only) | No Management Port (Console Only) supports console connections to servers that are not from SGI. This management port type appears in the Nodes view as SCO (Serial Console Only). |
To add a node to Console Manager, follow these steps:
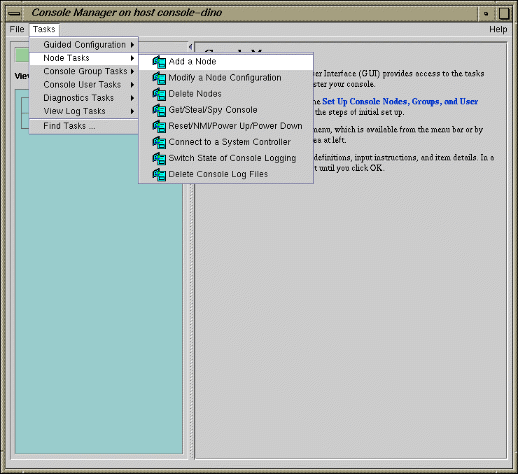
From the Tasks pulldown menu, choose the following, as shown in Figure 3-4.
Node Tasks -> Add a Node
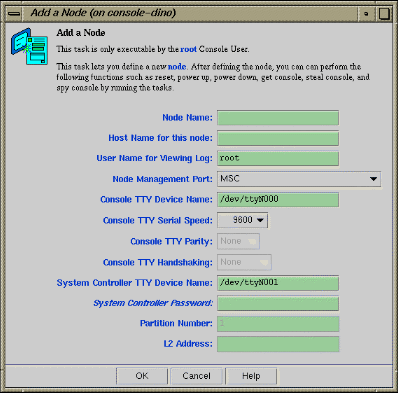
The Add a Node Dialog dialog box appears, as shown in Figure 3-4.
In the Add a Node dialog box fields, add the following information:
Node Name: The name you want to assign to this node, such as lightning1.
Host Name for this node: Hostname of the node you are defining, such as mynode.company.com.
The host name is for ssh(1) access to the node managed by the Console Manager. The host name provided should be a fully-qualified hostname (or whatever the hostname is recorded as in the SGIconsole user account's .ssh/known_hosts file if it already appears there). The hostname is used by other Console Manager tasks to implement other SGIconsole services.
User Name for Viewing Log: Example: root user. This user name is used to log into the node to obtain the logs to display, such as the system logs (syslog) of the server and the system controller logs of the server.
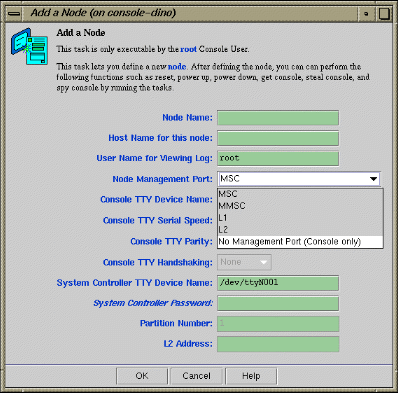
Node Management Port: From the Node Management Port pulldown menu (see Figure 3-5) choose one of the following node types:
Note: When you select a type, the non--applicable fields are deactivated.
Note: Console Manager supports the following nodes: SGI Origin 200, SGI Origin 2000, Silicon Graphics Onyx2, SGI Origin 300, SGI Origin 3000, SGI Altix 350, SGI Altix 3000 family of servers and superclusters, Silicon Graphics Prism Visualization System, SGI Origin 300 with a NUMUlink module and a Silicon Graphics Onyx 3000. Any node that does not support MMSC, MSC, L1, or L2 protocols will not work, with the exception of SCO (Serial Console Only) connections.
Console connections to servers that are not from SGI are supported by the No Management Port (Console Only) management port type.02000 Single Module (MSC) SGI Origin 2000 system with a single module System Controller (MSC).
02000 Rackmount Module (MMSC) SGI Origin 2000 rackmount system with a multimodule System Controller (MMSC).
0200 (MSC) SGI Origin 200 system with MSC.
03000 (L2) SGI Origin 3000 system with rack-level L2 system controllers.
03000 (L2) SGI Altix 3000 system with rack-level L2 system controllers.
0300 (L1) SGI Origin 300 system with an L1 system controller or an SGI Origin 3200C system with an L1 system controller or an SGI Altix 350 system.
No Management Port (Console only) supports connections to servers that provide access to consoles using the RS-232 serial interface. This management port type appears in the Nodes view as SCO (Serial Console Only).
Once a node using this port type is defined, accessing consoles is the same as accessing consoles for nodes of other management port types, except for the following:
SCO does not support controller consoles and controller console logging, since it is assumed that there is no controller to contact.
SCO provides support for serial communications using 8 data bits, 1 stop bit, under a wide selection of serial port speeds from 50 bps to 115200 bps (all selectable speeds common to Linux and IRIX). Parity and handshaking parameters for the serial port connection can also be specified.
Power and reset functions are disabled under SCO, since this support requires a controller (in which case, another management port type will need to be used).
SCO supports the terminal BREAK signal. The reception of the command used to issue this signal is recognized for both telnet(1) and non-telnet client connections (SGIconsole uses telnet(1) client connections to connect to consoles).
To use the SCO management port type, connect the device for which you want console access to an available port on your multiplexer and configure SGIconsole to use a serial port device (/dev/ttyNxxx) that corresponds to the port used on the multiplexer. You also need to provide the required serial port settings and other parameters, such as, node name and other corresponding network and identification information for the device.
Note: The names of EtherLite serial devices are determined at SGIconsole installation and configuration time via the SGIconsole_startup script (for more information see the SGIconsole 2.x Start Here). The unit ID assigned for a given EL-16 or 160 device determines what the /dev/ttyIDxx names actually are for that unit. This guide uses N0 as the unit ID for illustrative purposes (since it was the unit ID assigned by default by earlier EtherLite drivers for earlier versions of SGIconsole).
Console TTY Device Name: The device name of the port that is connected to the console port on the node, such as /dev/ttyN011, which would be port 12 on the EL-16 unit. This field is not applicable for L2 management port type.
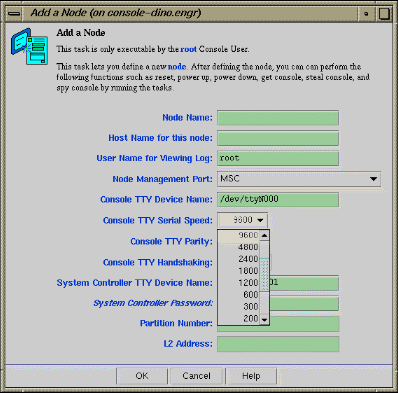
Console TTY Serial Speed: If you selected the 02000 Single Module (MSC) or 0200 (MSC) Management Port type from the pulldown menu, select one of the following baud rates: 300, 1200, 2400, 4800, 9600, 19200, 38400, or 57600, as shown in Figure 3-6.
For MMSC and L2 Management Port types, this field is disabled.Console TTY Parity: For serial ports, the parity of the signal and the mode of handshaking (and speed) has to be set match the device. For L1, L2, MSC, MMSC connection types, this field is grey because the value is known by default. If you wanted to add an L2 management port type as a serial only node, you would set the parity and handshaking as follows:
Speed: 38400
Parity: None
Handshakeing: RTSCTS
Console TTY Handshaking: For serial ports, the parity of the signal and the mode of handshaking (and speed) has to be set match the device. For L1, L2, MSC, and MMSC connection types, this field is gray because the value is known by default. For more information, see the Console TTY Serial Parity field description.
System Controller TTY Device Name: Name of the terminal port (TTY) on the EL-16 unit to which the system controller is connected, such as /dev/ttyN012. The other end of the cable connects to this node's system controller port, so the node can be controlled remotely by the other node.
System Controller Password: The password for the system controller port, not the node's root password or PROM password. On some machines, the system administrator may not have set this password. If you wish to set or change the system controller port password, consult the hardware manual for your node.
Partition Number: Uniquely defines a partition in a partitioned SGI Origin 3000 system or SGI Altix 350 or SGI Altix 3000 systems. Valid partition numbers range from 1 to 256. This is a required parameter for SGI Origin 3000 or SGI Alitx 3000 systems with an L2 controller. If your system is not partitioned, enter zero in this field.
L2 Address: L2 system controller Internet Protocol (IP) address of the private network or hostname. You can either enter a resolvable hostname, a fully qualified hostname, such as name.sgi.com or an IP address, such as 192.1.2.3. This is a required parameter for SGI Origin 3000 and SGI Altix 3000 systems with an L2 controller.
Note: The SGIconsole startup script sets up dynamic host configuration protocol (DHCP) configuration for the L2 controller such that L2 controller is configured with same IP address. This IP address is specified by the user when startup script is run. Console Manager assumes that the IP address of the L2 controller never changes and node configuration has to be changed if the IP address is changed.
If L2 controller is rebooted, or the network connection to the L2 controller otherwise interrupted, it may be necessary to close all console connections to the L2 controller and open new ones. For more information on the SGIconsole startup script, see the SGIconsole 2.x Start Here.
You can use the cfg command from the >L2 prompt to determine the address of an existing L2 controller. For information on connecting to the L2 controller from Console Manager, see “Connecting to the System Controller for a Node” in Chapter 4.
For information on how to find the L2 address on a new L2 controller, see Procedure 3-2.
To find the L2 address of a new L2 controller, perform the following:
To ensure you can always use the l2find command from the L3 controller, follow the instructions in “Configuring SGIconsole” in chapter 3 of the SGIconsole 2.x Start Here on how to configure eth1.
Use the /stand/sysco/bin/l2term command to connect to the 2 controler.
At the >L2 prompt, enter an exclamation sign (!) to enter the Linux shell as follows:
sling-001-L2>!
From the Linux shell, use the ifconfig eth1 command to find the MAC address for the L2 controller as follows:
eth1      Link encap:Ethernet  HWaddr 08:00:69:11:A8:38
          inet addr:128.162.243.107  Bcast:128.162.243.255  Mask:255.255.255.0
          UP BROADCAST RUNNING MULTICAST  MTU:1500  Metric:1
          RX packets:7595296 errors:0 dropped:0 overruns:0 frame:12
          TX packets:1853383 errors:1853383 dropped:0 overruns:0 carrier:0
          collisions:0 txqueuelen:100
          RX bytes:626933763 (597.8 Mb)  TX bytes:139280989 (132.8 Mb)
          Base address:0xe00
The MAC address in this example is HWaddr 08:00:69:11:A8:38 .
From the Linux shell, enter exit to return to the L2 controller as follows:
sh-2.03# exit
exit
sling-001-L2>
From the >L2 prompt, use the ip command to set the IP address.
Enter the IP address and MAC address for the L2 in the /etc/dhcpd.conf file on the SGIconsole system in case the L2 controller broadcasts for an address in the future (for example, after firmware upgrade.)
Click the OK button.
An error message appears if the task fails.
An icon entry appears on the View panel.
This tasks allows you delete a node or group of nodes.
To remove a node from Console Manager, follow these steps:
From the Tasks pulldown menu, choose the following, as shown in Figure 3-4.
Node Tasks -> Delete Nodes
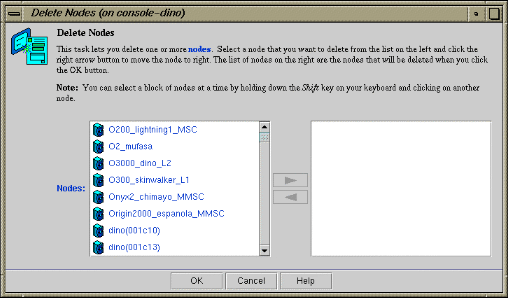
The Delete Nodes dialog box appears, as shown in Figure 3-7.
In the Nodes field, use the arrow to move the name of the nodes that you want to delete from the left to the right.
Click the OK button
An error message appears if the task fails.
The icon entry is removed from the View panel.
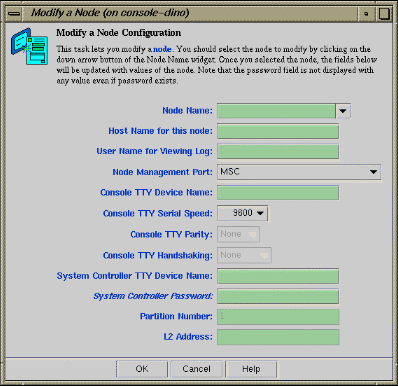
This task lets you modify a node. You select the node to modify by clicking on the down arrow button on the Node Name tab.
To modify a Node configuration, follow these steps:
From the Tasks pulldown menu, choose the following:
Node Tasks -> Modify Node configuration
The Modify a Node Configuration dialog box appears, as shown in Figure 3-8.
In the Modify a Node Configuration dialog box fields, modify the fields as required. For an explanation of each field, see “Adding a Node”.
Click the OK button
If you attempt to modify a node in a way not allowed by the Console Manager, an error message appears.
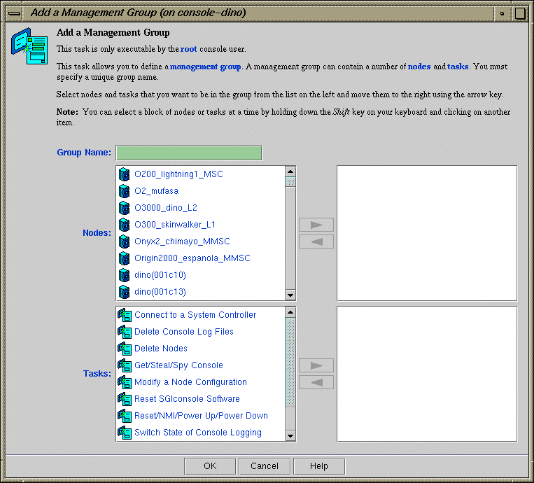
This task allows you to define a management group . A management group contains either a number of nodes or number of tasks that can be performed on the nodes. This task is only executable by the root console user. You must specify a unique group name. To add a management group to Console Manager, follow these steps:
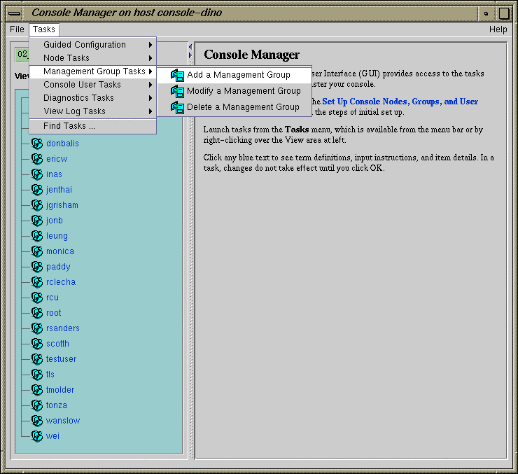
From the Tasks pulldown menu, choose the following, as shown in Figure 3-9.
Management Group Tasks -> Add a Management Group
The Add a Management Group dialog box appears, as shown in Figure 3-10.
In the Group Name field, enter a unique name for this group.
In the Nodes field, use the arrow to move the name of the nodes that you want to include in this management group from the left to the right.
Note: You can select a block of nodes or tasks at a time by holding down the Shift key on your keyboard and clicking on another item.
In the Tasks field, use the arrow to move the name of the tasks that you want to be able to perform on the nodes in the management group you are creating.
Click the OK button.
An icon entry appears on the View panel.
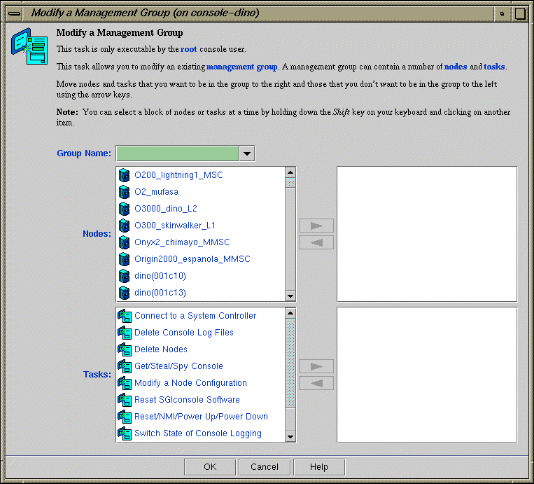
This task allows you to modify an existing management group. This task is only executable by the root console user. You must specify the unique group name. To add a management group to Console Manager, follow these steps:
From the Tasks pulldown menu, choose the following:
The Modify a Management Group dialog box appears, as shown in Figure 3-11.Management Group Tasks -> Modify a Management Group
In the Group Name field, enter a unique name for this group.
In the Nodes field, use the arrow to move the name of the nodes that you want to include in this management group from the left to the right.
In the Tasks field, use the arrow to move the name of the tasks that you want to be able to perform on the nodes in the management group you are creating.
Click the OK button.
An icon entry appears on the View panel.
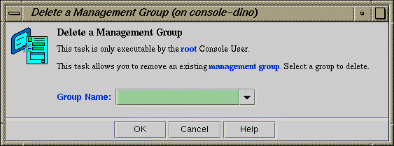
This task allows you to delete an existing management group. This task is only executable by the root console user. You must specify the unique group name.
To delete a management group from Console Manager, follow these steps:
From the Tasks pulldown menu, choose the following:
The Delete a Management Group dialog box appears, as shown in Figure 3-12.Management Group Tasks -> Delete a Management Group
In the Group Name field, enter the unique name for this group.
If you try to remove a group that includes a user that only belongs to the group you are attempting to remove, the operation fails and the following message appears:
Task failed.

Removal of this group would have made some users
no longer belong to any groups.
The operation has been aborted.
This prevents access restrictions on a user being mistakenly removed. To resolve this error, peform one of the following:
Add another group to the group memberships of the affected user, using the Modify a User task, before deleting the group you want to remove.
Remove the memberships to the group for any affected users, using the Modify a User task before attempting to delete the group.
Note: If the user is not assigned to any group, the user has access to all SGIconsole tasks (except for administration tasks that only the root user can perform) for every node defined in the system. This provides the same access rules as those originally provided in the SGIconsole 1.0 release.
Click the OK button.
An icon entry disappears from the View panel.