This chapter provides illustrations and procedures used to mount your SGI 1200 server in a 19-inch equipment rack.
This section provides information about installing the SGI 1200 server into a rack. Before you begin, check Table 3-1, Table 3-2, and Table 3-3 to make sure that you have the hardware necessary to complete the installation.
 | Warning: Service personnel could be seriously injured and equipment damaged if the rack topples over. Make sure that only one SGI 1200 server at a time in the rack is extended forward on slides. Install all equipment into the rack from the lowest available position. The rack must be anchored to the floor with stabilizing feet to enhance stability. Also, make certain that the rack has sufficient power for the server's needs. Check with the appropriate facilities authorities before installing this server into a rack. |
 | Note: This installation requires two people and a #2 Phillips screwdriver. |
 | Tip: After you have removed the server from its shipping materials, remove the shipping tape (if any) that secures the removable hard drives during transit. |
This section describes how the slide rails are installed.
Table 3-1. Rack Installation Hardware for Slide Rail Mount
Part Description | Quantity |
|---|---|
10-24 x 1/4" screws | 10 |
10-32 x 1/4" screws (used to mount the slides to the rear mounting brackets) | 8 |
10-32 nuts (kepnuts) | 8 |
1 | |
Rear mounting bracket extenders (right and left pair) | 1 |
10-32 x 1/2" screws (black) | 12 |
10-32 barnuts | 4 |
Find the two slides and mounting hardware within the shipping container. Check Table 3-1 to make sure that you received all items necessary to complete the installation.
Identify the right and left side slide rails.
Extend each slide out until the tab snaps into place.
Press the tab, and remove the slide from the rail.
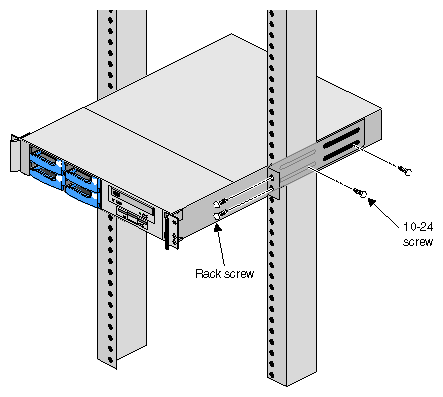
Place the SGI 1200 server on a flat surface and attach the right and left side slide rails. Line up the five screw holes on each side, and install five 1/4-inch (0.64 cm) length 10-24 screws to attach each slide.

Caution: Use only the included 1/4-inch (0.64 cm) length screws. Using longer screws will damage the power supply case. Install the right and left rear mounting brackets and extenders into the rack frame. See Figure 3-1.
Tip: Make sure you install the rails level. Count the holes on the rack rails from the bottom of the rack carefully on each side. Make sure the ends of the brackets face toward the front of the rack. As one person holds each bracket, the other person lines up the front screw holes and attaches the 10-24 rack screws on the right and left sides.
From the sides of the rack, line up the four screw holes on each side of the rear mounting bracket and extender, and install four 1/4-inch (0.64 cm) length 10-32 screws and 10-32 nuts on the inside.
At the back of the rack, line up the rear screw holes and attach the 10-24 rack screws on the right and left sides.
With one person holding each side, slide the SGI 1200 server chassis with slides attached onto the rails into the rack. Line up the slides and rails carefully on each side, press the locking tabs, and slide the chassis into the rack. See Figure 3-1.
Install two 10-24 rack screws at the front of each rail to secure the slide rail. The server chassis is now securely attached to the rack.

This section describes how the SGI 1200 server is installed into a rack with center mount brackets. Table 3-2 lists the installation hardware included with your shipment.
Table 3-2. Rack Installation Hardware for Center Mount
Part Description | Quantity |
|---|---|
10-24 chassis screws with captive washers (from rack, not supplied) | 4 |
Front mounting brackets | 2 |
2 | |
10-24 x 1/4” screws | 4 |
Find the mounting hardware within the shipping container. Check the table above to make sure you received all items necessary to complete the installation.
Place the SGI 1200 server on a flat surface.
Install the right and left rear mounting brackets loosely onto the back of the rack frame.
Tip: Make sure you install the rails level. Count the holes on rack rails from the bottom of the rack carefully on each side. As one person slides the system onto the brackets from the front of the rack, and holds it in place, the other person lines up the top two front screw holes. Tip the system up slightly, and install the front two top chassis screws loosely to hold the majority of the system's weight. See Figure 3-2.
Install the bottom two chassis screws.
Tighten the front two bottom chassis screws first (one on each side), then the front two top screws next.
See Figure 2-11 for the location of the back panel connectors.
Check to be sure the AC power switch at the back of the chassis is in the Off (-) position.
Connect the AC power cable to the power receptacle.
Connect the mouse cable from the optional mouse.
Connect the keyboard cable from the optional keyboard.
Connect any other cables (serial, EMP, and S-VGA monitor) as applicable.
Connect the Ethernet cable.
Turn the AC power switch on the power supply to the On (|) position.
Press the AC power switch on the front panel.