There is no front cover on the four hard disk drive locations. To access or use the CD and floppy drives, you must open or remove the plastic front cover. The following section describes how.
As shown in Figure 4-1, the plastic front cover swings open to the right. Note that there is no fastener to hold the cover closed.
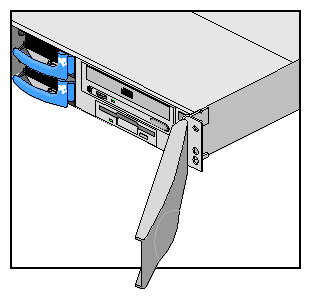
You can remove the cover using the following information:
Grasp the plastic cover close to the right edge (where the door attaches to the bracket).
Pull outward and downward on the door and the cover detaches from the bracket.
To reinstall the door:
Seat the lower ball in the hole in the bottom of the bracket.
Push the upper ball forward until it snaps into the hole on the top of the bracket.
If your SGI 1200 server has a RAID controller, it is essential to keep the following warnings in mind as you begin using the hot-swap drives.
If your SGI 1200 server does not have a RAID controller, the hot- swap drives function as removable drives only. Data is not protected if a hard drive crash occurs.
Use Figure 4-2 to correlate removable hard drives with their SCSI bay locations .

Remove a hard disk from the system using the following steps and Figure 4-3:
Grasp the middle of the release handle.
Squeeze the middle of the drive handle .

Note: If you are using an optional RAID controller, you must have the RAID configured properly to remove and replace a hard drive carrier with the power on. Refer to the PCI RAID card's documentation for additional information. Slide the hard drive out, see Figure 4-4.

Caution: If you do not have an optional PCI RAID card you will probably lose data on a failed drive. You will need to restore backup data after the failed drive is replaced. Also, allowing 30 seconds for the hard drive to spin down after releasing the drive handle is highly recommended. Slide a new drive into the drive bay using the drive release handle in a two step motion as shown in Figure 4-5.
Find the icon on the drive release handle. Push the drive carrier in.
Press the handle toward the chassis, and lock the drive release handle.


This section provides information about hard drive upgrade strategies for SGI 1200 servers with RAID and non-RAID drives. The SGI 1200 server can be configured with up to four internal hard disk drives.
| Note: When upgrading storage, the system must be powered down to install the new drives, regardless of the drive type or RAID controller being used. |
To install internal hard drives perform the following steps:
Back up your system.
Safely shut down the system.
Install the hard drive.
Restart the operating system.
Configure the new device as applicable to your operating system.
The two independent SCSI channels on the motherboard enable a variety of external SCSI connections. Table 4-1 shows that the SGI 1200 server can be connected to Ultra SCSI by way of an optional SCSI connector, and some versions can connect with an Ultra2 connection.
Table 4-1. SGI 1200 Server External SCSI Connection Choices
Internal RAID | No RAID |
|---|---|
Ultra2, Ultra SCSI or none | Ultra SCSI or none |
Table 4-2 describes some of the internal and external RAID upgrade parameters for the SGI 1200 chassis with midplane and optional RAID controller.
Table 4-2. SGI 1200 RAID Configurations
SGI 1200 Version | ||
|---|---|---|
4 bay hot-swap hard drives with RAID controller | Yes | Yes |
Non-RAID hard drives | No | Yes |
For the SGI 1200 with hot-swap hard drives and the optional RAID controller, there are two different methods to install new hard drives into a chassis with existing hard drives already configured for RAID 5. The chassis must have a minimum of three hard drives to support RAID 5 . Both of these methods are summarized as B in Table 4-3. The first method involves the following steps:
The second alternative involves the following steps:
Table 4-3. RAID 5 Hard Drive Upgrade Strategy
Drive Slot Number |
|
|
|
|
|
|---|---|---|---|---|---|
Number of installable hard drives | 1 | 2 | 3 | 4 |
|
Three hard drives + one new in slot 4 | R5 | R5 | R5 |
|
|