This chapter tells you how to install the OCTANE/SI or /SE graphics board in the OCTANE workstation.
The existing graphics board is the primary head. The OCTANE/SI or /SE board that you install becomes the secondary head in a Duo configuration.
This chapter provides the following information and instructions:
Dual graphics boards in the OCTANE workstation are designated primary and secondary heads.
The primary head is the graphics board pre-installed in the workstation (slot A or slot A and covering slot D). It carries any texture memory option board.
The secondary head is the option board, which is installed in slot B or possibly C. It may carry a texture memory option board if both graphics boards are OCTANE/SI or /SE. See Table 6-1 for supported configurations with the texture memory option board.
Table 6-1. Supported Graphics Board Configurations
Primary Graphics Board
Secondary Graphics Board
OCTANE/SI or /SE (slot A)
OCTANE/SI or /SE
OCTANE/SI or /SE with texture memory board (slot A)
OCTANE/SI or /SE
OCTANE/SI or /SE with texture memory board (slot A)
OCTANE/SI or /SE with texture memory board
OCTANE/SSI or /SSE (slots D and A)
OCTANE/SI or /SE
OCTANE/MXI or /MXE (slots D and A)
OCTANE/SI or /SE
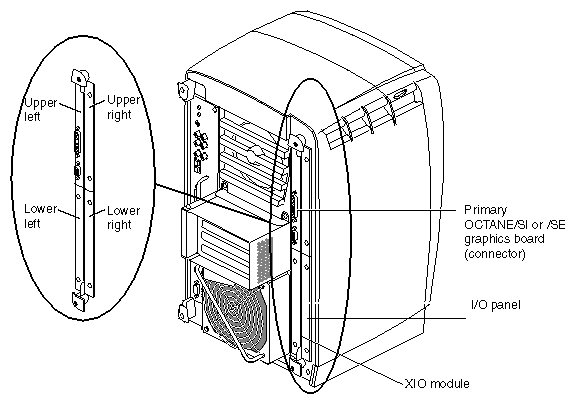
All graphics boards reside on the XIO module. Access to this module is from the back of the OCTANE workstation.
The XIO module is the holding mechanism for XIO graphics or XIO option boards and holds up to four boards. It can be thought of as a tray to which boards are attached.
Follow the directions in this chapter to install the OCTANE/SI or /SE graphics board, beginning with “Collecting the Graphics Board Installation Materials”.
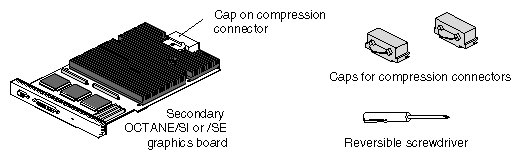
Gather these parts to install the secondary OCTANE/SI or /SE graphics board:
The secondary OCTANE/SI or /SE graphics board.
The reversible screwdriver.
Caps for the primary graphics board and any option board attached to the XIO module. You place these caps on the compression connectors on the board to prevent damage when the XIO module is out of the workstation.
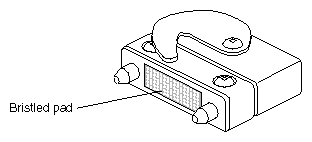
 | Caution: Before you remove the XIO module, be aware that compression connectors are on graphics and option boards. The connectors are on the side opposite the handle. Do not grab the back of the XIO module when you remove it, or the compression connectors may be damaged. |
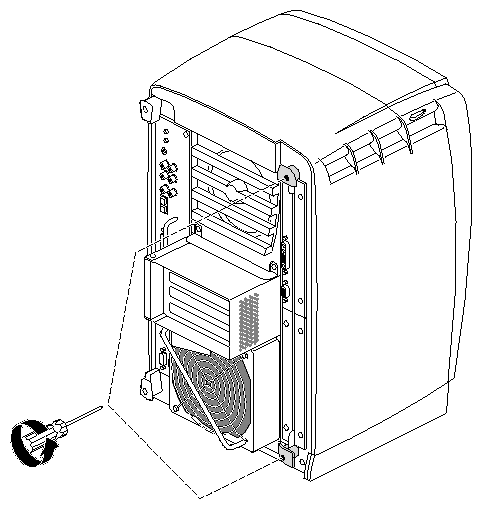

Warning: The heat sinks on the XIO boards become very hot. Wait five minutes after powering off the OCTANE workstation before you remove the XIO module. Test before touching any of the XIO boards.
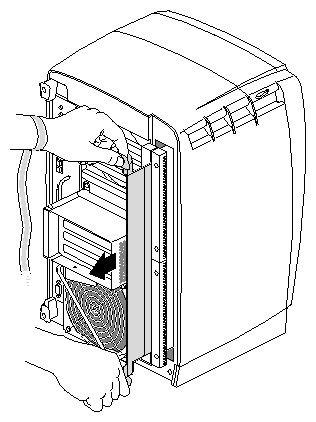
Loosen the two captive screws in the XIO module handles with the supplied Phillips screwdriver until the screws are disconnected from the chassis.
Grasp the handles and pull until the XIO module protrudes about an inch from the chassis.
The handles and XIO module move out about one inch before the I/O panels move.
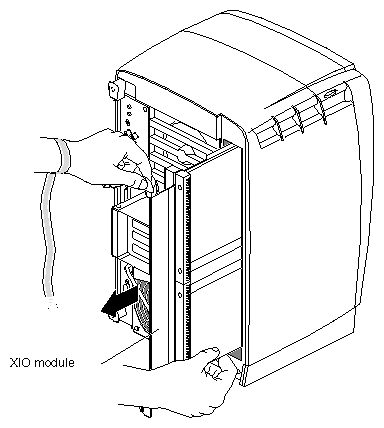
Pull gently on the handles until the XIO module is about three or four inches out of the workstation.
Grasp the XIO module along its length, and support the base of the module as you remove it from the chassis.
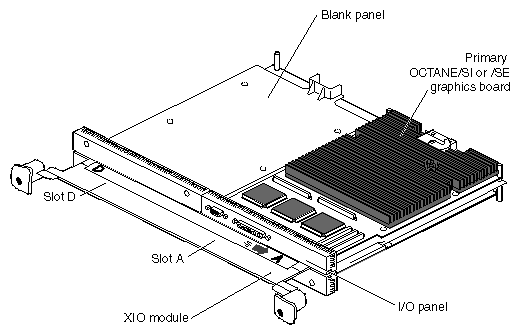
The handle area protrudes when the XIO module is out of the chassis. When the handle protrudes, the identification label for slots D and A is visible; slots B and C are on the reverse side. See Figure 6-7.

Note: Do not push on the handle area after you have removed the XIO module. The XIO module locks to the workstation only if the handle area is protruding. Place the XIO module on a flat, antistatic surface. An empty antistatic bag on your desk works well.
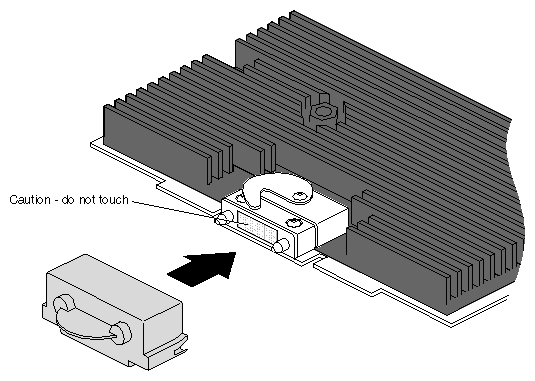
Place a cap on the XIO graphics board compression connector. Spare caps are located on the blank panels. See Figure 6-8.
Caution: Do not touch or bump the gold (front) surface of the compression connector. Touching it could damage the connector. Place a protective cap on the compression connector to prevent damage when the XIO boards are removed from the OCTANE workstation. See Appendix B, “Care and Cleaning of the Compression Connectors.”
The XIO module is the holding mechanism for XIO graphics or XIO option boards and holds up to four boards. It can be thought of as a tray to which boards are attached.
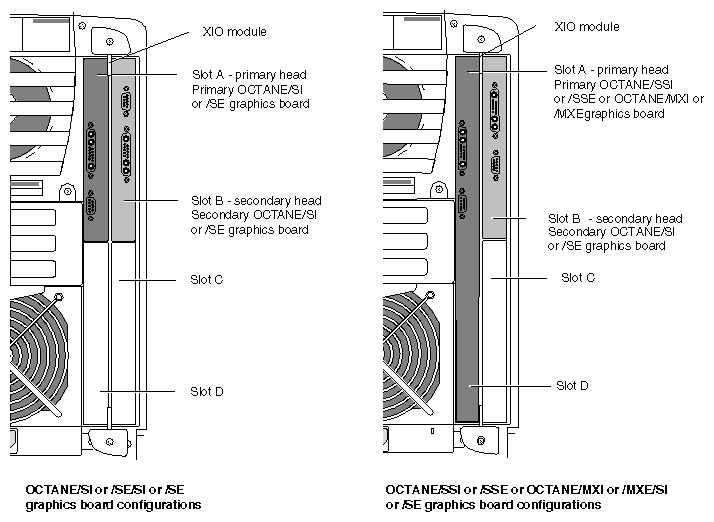
The four quadrants of the XIO module are Slots A, B, C, and D. Slots D and A are on one side, slots B and C on the other.
A graphics board, option board, or blank panel attaches to each slot on the XIO module. The only exception is the OCTANE/SSI or /SSE or OCTANE/MXI or /MXE graphics boards, which occupy two slots, A and D.
The graphics boards must be placed at the top left and right, as you insert the XIO module, or they may overheat and be damaged.
The primary head graphics board must be in slot A (OCTANE/SI or /SE) or slots A and D (OCTANE/SSI or /SSE, or OCTANE/MXI or /MXE). The secondary head (OCTANE/SI or /SE board) occupies slot B, or possibly slot C.
The primary graphics board carries the texture memory option board with one exception. Only in the following configuration can the secondary head carry the texture memory option board: OCTANE/SI or /SE with texture memory option board (as the primary head), OCTANE/SI or /SE with texture memory option board (as the secondary head).
The secondary OCTANE/SI or /SE graphics board occupies slot B, unless it is occupied by an option board with flex cables to the graphics board. Then the secondary OCTANE/SI or /SE graphics board occupies slot C. (Exception: Do not install a secondary OCTANE/SI or /SE graphics board with the Digital Video option board.)
Graphics and option boards may be linked by flex cables.
Extra caps for the compression connectors come with the workstation.
If you lose a screw that holds the graphics board, single-layer option boards, or blank panels to the XIO module, use M3 x 8 mm size screws. (See your option board manual for the screw size for attaching option boards with daughterboards.)
If you are installing the texture memory option board on the secondary OCTANE/SI or /SE graphics board (only in an OCTANE/SI or /SE workstation with texture memory OCTANE/SI or /SE with texture memory configuration), do so before installing the secondary head on the XIO module. See the OCTANE Texture Memory Option Board Installation Guide for instructions. Be sure you fully seat this board.
Install the secondary OCTANE/SI or /SE graphics board in slot B. If it is occupied by an option board with flex cables to the graphics board, install the secondary OCTANE/SI or /SE graphics board in slot C.
| Caution: If the Digital Video option board is in slot B, remove it before installing the secondary OCTANE/SI or /SE graphics board in slot B. The Duo upgrade and the Digital Video option in the same system are not a supported configuration. See the OCTANE Digital Video Option Board and OCTANE Compression Installation Guide for instructions on removing this option board. |
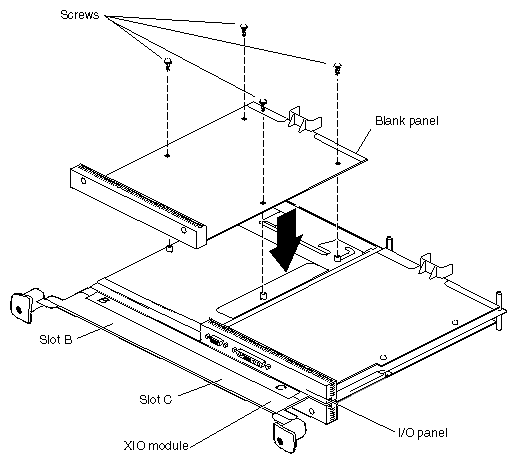
Before you install the secondary OCTANE/SI or /SE graphics board, you need to remove a protective blank panel or option board from any available slot. The processes for removing a blank panel or option board are the same. If you are removing an option board (from slot B), refer to the board's installation guide for instructions on removing it.
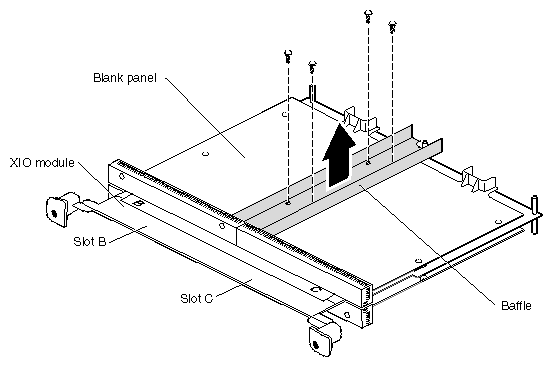
If you are removing a blank panel that is next to an option or graphics board, skip to step 8. If you are removing a blank panel that is side by side with another blank panel, go to the next step.
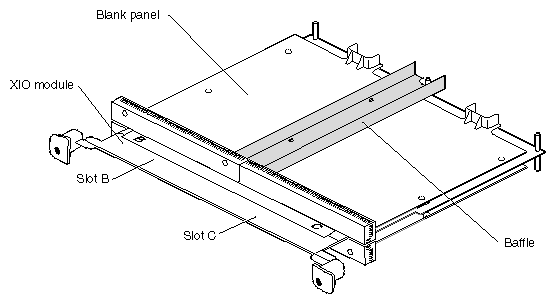
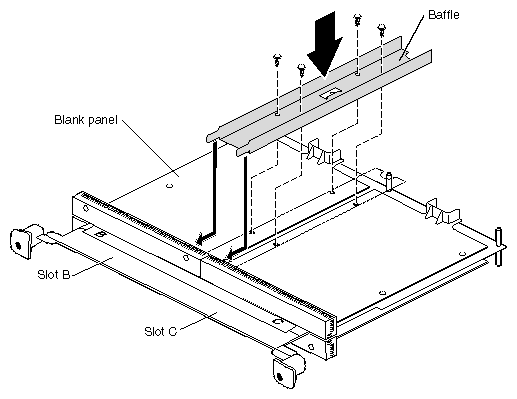
Remove the baffle attached to two blank panels.
Remove the four screws holding the baffle to the blank panels, and remove the baffle. The baffle is used only when two blank panels are side by side on the XIO module. (Keep it and use it if you ever place two blank panels side by side on the XIO module.)
Remove the remaining screws from the blank panel you are removing.
Replace two screws in the blank panel that you are not removing.
Skip to “Attaching the Secondary Head to the XIO Module”.
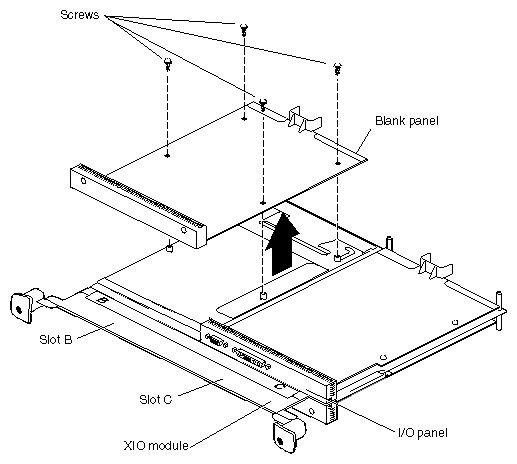
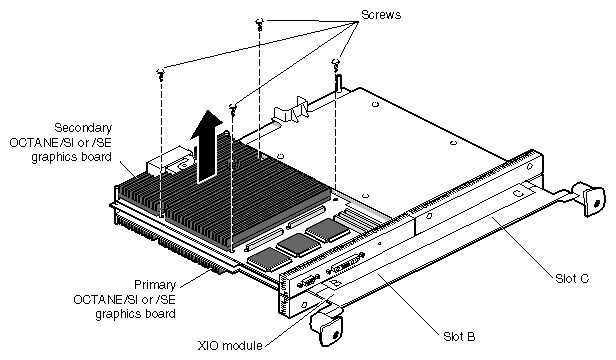
Using a Phillips screwdriver, remove the screws from the blank panel or option board.
Grasp the blank panel or option board by the I/O panel and the opposite side of the board and lift. It is a good idea to save the blank panel to reinstall in the workstation should you need to remove an option board.
With the same side facing up, place the board on a clean, antistatic surface.
Go to the next section to install the secondary OCTANE/SI or /SE graphics board.
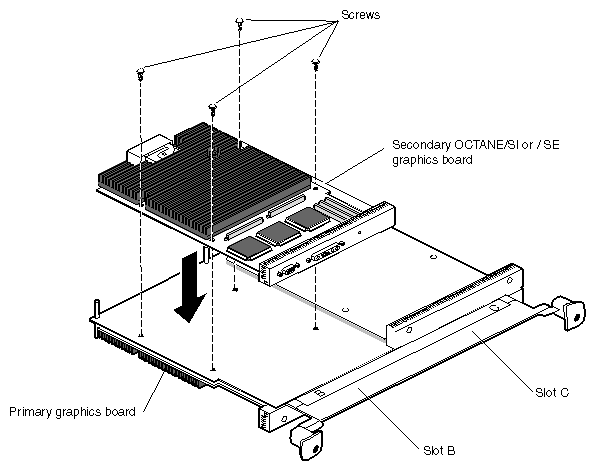
Place the secondary OCTANE/SI or /SE graphics board in slot B (or slot C if B is occupied with an option board with flex cables to the graphics board.)
Caution: Do not remove the cap on the XIO compression connector until your installation process is complete. Replace the screws, tightening the board to the standoffs.
Note: Be sure all the slots are filled with a graphics board, option boards, or blank panels. The system will not cool properly if any of the slots are empty. (Do not install the baffle except on side-by-side blank panels.)
Remove the caps from the compression connectors.
Keep the caps from the compression connectors to place them on the XIO boards, the system module, or PCI module whenever you have any part with a compression connector removed from the OCTANE workstation.
Go to “Replacing the XIO Module”.

Before you remove the secondary OCTANE/SI or /SE graphics board, gather together the new graphics board or blank panel, a Phillips screwdriver, a wrist strap, and compression connector caps for the graphics and option boards attached to the XIO module.
To remove the secondary OCTANE/SI or /SE graphics board, go to Chapter 1, and follow the instructions in that chapter for powering off the workstation and attaching the wrist strap. Then return to this chapter, and follow the instructions for “Removing the XIO Module,”. Then come to this section for instructions on removing the secondary OCTANE/SI or /SE graphics board.
Place protective caps on the compression connectors on the graphics boards.
Remove the four screws that hold the secondary OCTANE/SI or /SE graphics board to the XIO module.
Place the secondary OCTANE/SI or /SE graphics board on a clean, dry, antistatic surface. Your desktop works well.
Place a new secondary OCTANE/SI or /SE graphics board, blank panel, or other XIO board in the slot from which you just removed the secondary OCTANE/SI or /SE graphics board.
Use the four screws you just removed from the graphics board to secure the blank panel, graphics board, or option board to the XIO module. (Do not install the baffle unless you have two side-by-side blank panels.)
If your board configuration results in two side-by-side blank panels, install a baffle across them.
Remove the caps from any compression connectors.
Caution: If you have an option board in one slot, do not attempt to install the baffle; you will damage the components on the option board.
Go to “Anticipating a Problem Area”, and read that section before replacing the XIO module.
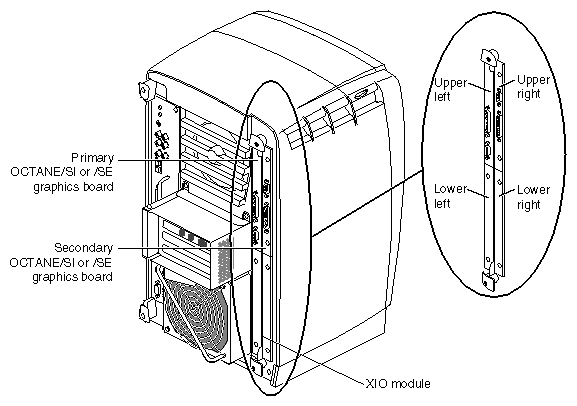
Be aware that location matters: The graphics boards must be placed toward the top of the workstation. If the XIO module is placed up side down, the graphics boards can overheat and be damaged.
Go to “Replacing the XIO Module”.
| Caution: Be sure you replace the XIO module with the graphics boards at the top of the workstation. This will prevent overheating and damage to the boards. Refer to Figure 6-18. |
If the XIO module is incorrectly inserted with an OCTANE/SSI or /SSE, or OCTANE/MXI or /MXE graphics board attached, a notifier appears during power-on telling you to insert the XIO module with the graphics boards toward the interior of the workstation, and stops the power-on process. Power off and follow the steps in this manual to insert the XIO module correctly.
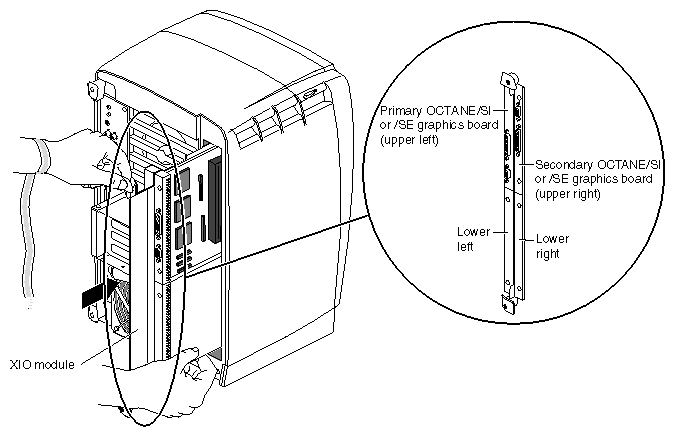
| Caution: Replace the XIO module only with the graphics boards toward the top, as shown in Figure 6-19. The primary board must always be placed toward the upper left to avoid overheating and damage to the boards. |
Replace the XIO module in the OCTANE workstation as shown in Figure 6-19. Slide the XIO module into guides on the top and bottom of the workstation.
Before you insert the XIO module, make sure the handle portion protrudes in a locked position from the I/O panels, as shown in Figure 6-19.
If the handles are flush with the I/O panels, the XIO module will stop during insertion. Pull out the handles, and then continue inserting the XIO module into the chassis.
Grasp the handle area while supporting the XIO module, and slide the module firmly into the chassis. You may need to use some force to insert this to a place where the hooks on the handles of the XIO module will attach to the workstation.
Use the handles to push the XIO module into a locked position. (The I/O panels are nearly flush with the workstation when properly inserted; however, there may be a slight variation in the depth of the boards.)
Tighten the captive screws in the handles.
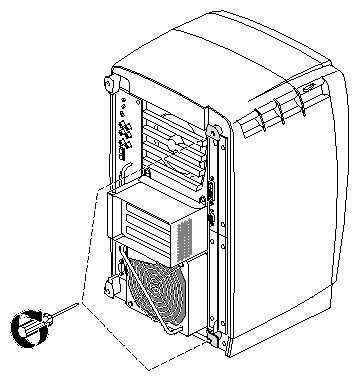
You are finished installing the secondary OCTANE/SI or /SE graphics board.
Go to Chapter 7 for instructions for your next tasks: connecting the two graphics monitors, the secondary keyboard and mouse, and remaining cables.