This chapter provides detailed information on removing the OCTANE Channel Option (OCO) board.
The following topics are included in this chapter:
Removing an OCTANE Channel Option board requires following a series of steps that lead up to the board removal, through the steps that complete the task. These detailed steps begin with the next step.
Follow the directions in this chapter to remove this board and to install anther board or blank panel in its place.
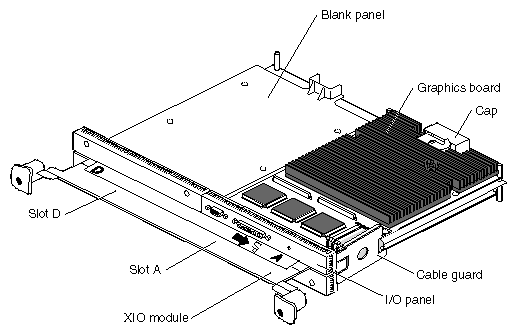
Go to Chapter 1, “Preparing the Workstation”, and follow the directions through removing the XIO module. Be sure you have placed a cap on the graphics board XIO compression connector. Then return to this section, and begin with step 2.
Position the XIO module so that slots D and A are facing you.
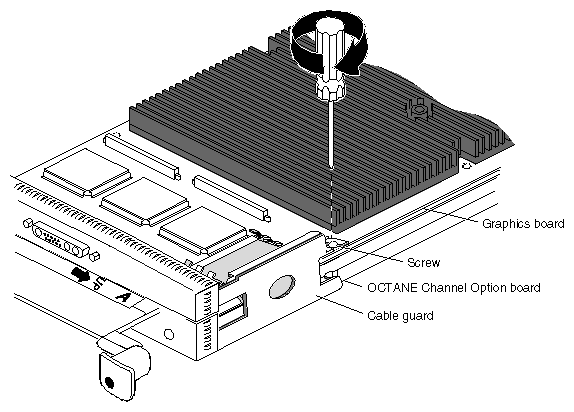
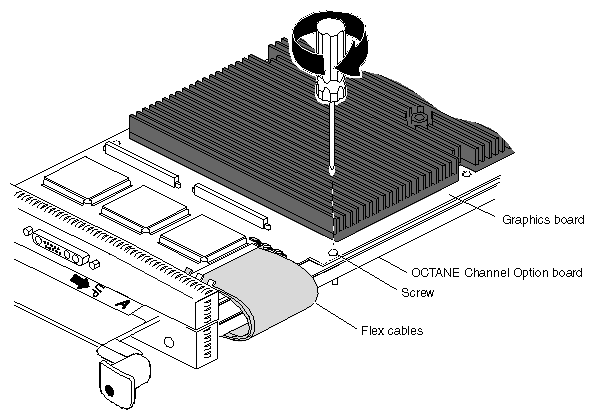
Remove the cable guard by removing the screw that holds the cable guard to the graphics board and XIO module.
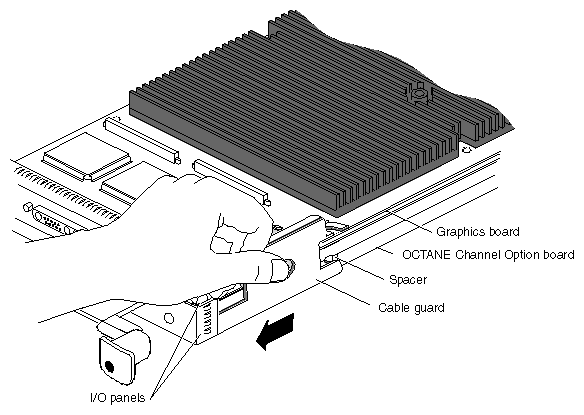
Press down on the middle of the cable guard and slide it beneath the I/O panels. This action releases the cable guard half-hook from behind the spacer on the OCO board. You feel pressure from the flex cables.
Slide the cable guard off the XIO module and boards.
Pull the cable guard away from the XIO module so that the hook and half-hook are free.
Slide the cable guard out from under the edges of the I/O panels.
Keep the cable guard. Use it whenever you are connecting an option board to the graphics board with flex cables.
Replace the screw through the graphics board into the standoff on the XIO module.
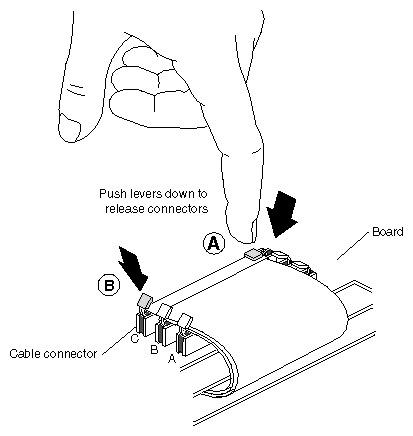
Detach the flex cables from the graphics board beginning with the cable labeled C.
Press down on one release lever on the end of the flex cable, then on the other.

Note: Pressing both release levers at the same time usually results in the connector remaining seated.
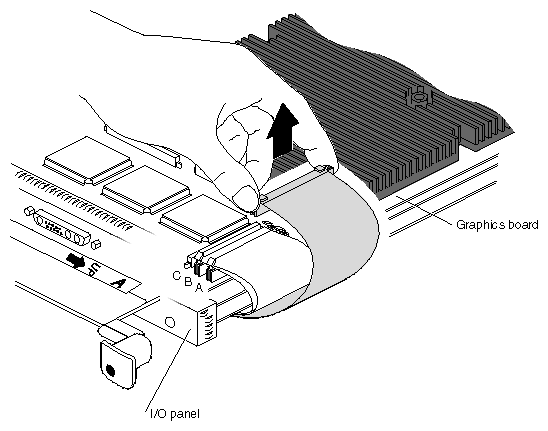
Pull up on the connector until it releases.
Remove flex cable B, then flex cable A, following the instructions in steps 6 and 7.
Turn the XIO module over.
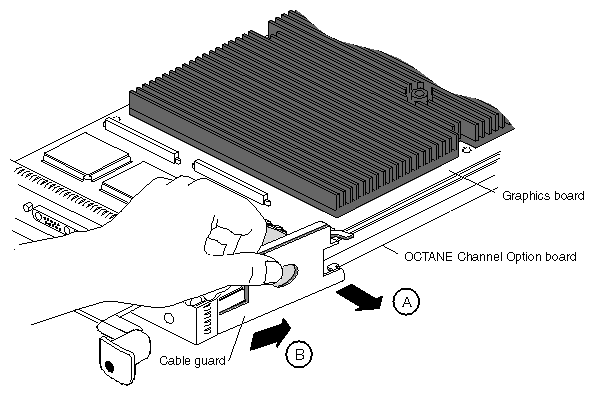
If you have not already done so, go to “Removing the Cable Guard and Flex Cables” and follow these steps before removing the OCO board.
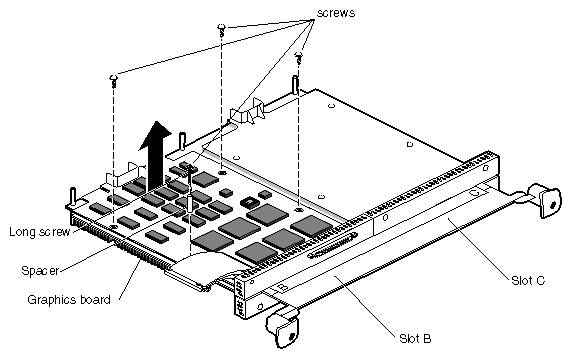
Remove the four screws holding the OCO board to the XIO module.
Note: The spacer used to hold the cable guard comes off with the screws. Lift the OCO board from the XIO module. Place it on an antistatic bag on a clean, dry, surface such as your desktop.
Note: Do not try to remove the flex cables from the OCO board. They are permanently attached.
After you have removed the OCTANE Channel Option board, choose your next step from Table 4-1.
Table 4-1. Choosing the Next Instruction
Task | Go To |
|---|---|
Installing a new OCO board | Chapter 1, “Attaching the OCTANE Channel Option Board to the XIO Module” |
Installing a different option board | The installation guide for that option board |
Installing a blank panel | The next step |
A blank panel must be installed in slot B of the XIO module if no option board is installed in that slot. If a blank panel is also in slot C, a baffle must be placed over them to allow proper airflow in the workstation.
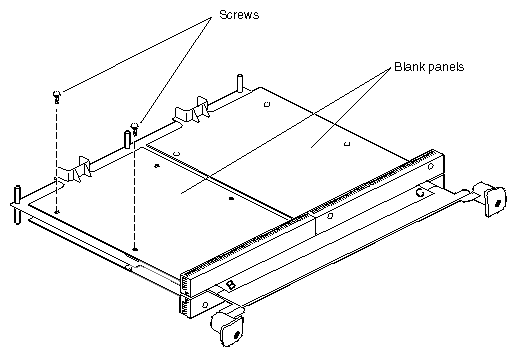
Place the blank panel on the standoffs in slot B.
Use two short screws to attach the blank panel (on the outside edge) to the XIO module if you are installing a baffle, as shown in Figure 4-9.
If you are not installing a baffle, use four short screws (in all four holes) to install the blank panel to the XIO module if you are not installing a baffle. Use an M3 x 8 mm screw for the fourth hole, if you cannot find the fourth short screw that came with the blank panel.

Caution: Do not use the long screw that comes with the spacer to attach a blank panel to the XIO module. It will damage the XIO module standoffs.
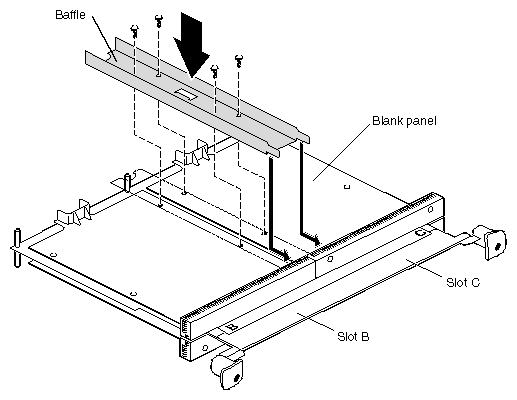
If you have a blank panel in slot C, place a baffle over both blank panels.
First remove the two inside screws from the blank panel in slot C.
Place the baffle across the two blank panels.
Insert and tighten the four screws that hold the baffle to the blank panels and XIO module.
Caution: You must replace the baffle for cooling purposes when you install two side-by-side blank panels. The baffle is only used with two side-by-side blank panels. If you are sending the OCTANE Channel Option board to your authorized service representative, use the packing material and box in which you received your replacement part.
Go to “Replacing the XIO Module”.
Silicon Graphics, Inc. provides a comprehensive range of product support for its products. If you are in North America and would like support for your Silicon Graphics supported products, contact the Technical Assistance Center at 1-800-800-4SGI or your authorized service provider. If you are outside North America, contact the Silicon Graphics subsidiary or authorized distributor in your country.