This chapter describes how to configure the Netscape Commerce and Communications Servers by using the Server Manager configuration forms.
After you install your server, you'll need to do periodic maintenance. This includes making infrequent changes to configurations, such as changing the server's name and port number, to daily tasks such as adding, changing, and removing users in user database files.
Use the Administration Manager to jump to the Server Manager for the server you want to configure. The Administration Manager lists all the servers installed on your host. It lists them according to type (Communications or Commerce) and by the port number they are listening to.
To jump to the Server Manager, click the link in the Administration Manager for the server you want to configure. You can return to the Administration Manager by clicking the link at the bottom of the Server Manager page.
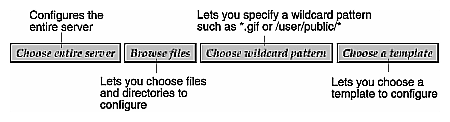
Once in the Server Manager, you click links to configure parts of the server. Most links go to forms that configure the entire server. Some links go to forms that can configure files or directories the server maintains. These forms have four buttons at the top that let you specify what resource to configure, as described in Figure 3-1.
The rest of the chapter is organized by main topics on the Server Manager page.
You can configure the server's basic functions with the forms under Server Control in the Server Manager.
You can configure the server's technical options, including its location, the user account it uses, and the processes the server spawns.
For various reasons, you might need to move the server from one directory to another. To do this, you change the location that the server references (it needs to know where the binary files are). Then you shut down the server and copy the server files and subdirectories to a new location.
 | Warning: If you change the default server root directory from /usr/ns-home, you must edit the /etc/init.d/netsite file (/etc/init.d/netsite_commerce for the Commerce Server) to reflect the change. |
The Server User specifies an IRIX user account that the server uses (all the server's processes are assigned to this user account).
You don't need to specify a server user if you chose a port number greater than 1024 and aren't running as the root user (in this case, you don't need to be logged as root to start the server). If you don't specify a user account, the server runs with the user account you start it with, so make sure that when you start the server, you use the correct user account.
Even if you need to start the server as root, you don't want it to run as root all the time. You want it to have restricted access to your system resources and run as a nonprivileged user. The user name you enter as the Server User should already exist as a normal IRIX user account. After the server starts, it runs as this user.
If you want to avoid creating a new user account, you can choose the user nobody or an account used by another HTTP server running on the same host. However, on some systems the user nobody can own files but not run programs.
Whenever people use the server, the server uses background processes to service their requests. You can specify the minimum number of processes dedicated to the server. These processes are spawned when the server starts and they remain idle until needed. The maximum number sets a limit on the number of processes your server can use. The actual number of processes fluctuates between the minimum and maximum numbers.
 | Note: The number of processes the server can use is limited by the process table for the computer the server runs on. |
Base your choice on achieving a balance between system load and server requests:
Process lifespan specifies the number of requests that each of the child processes serves before the processes exit and are respawned (this is set to 32 by default). When the processes are stopped and restarted, the memory they use is freed and then reused.
By stopping and restarting a process, the server ensures that memory isn't wasted by “lost” processes. For example, on rare occasions, there might be resource “leaks” in operating system libraries or in the server itself (though none are currently known). By specifying a lifespan, a process answers a certain number of requests before exiting and respawning.
The server can be configured to never use Domain Name Service (DNS) lookups during normal operation. Even though DNS lookups are a useful tool, they can be expensive in terms of performance.
| Warning: Be aware of the consequences of turning off DNS on your server— hostname restrictions won't work, and hostnames won't appear in your log files. |
You can stop, start, or restart the server from the Server Manager.
Restart performs a soft restart. This means the server reloads its configuration files and service isn't interrupted. Sometimes you'll need to do a hard stop and start, such as if you change the port number, enable security, and so on. (If you aren't sure if you need to do a hard start or soft restart, do a hard stop and restart.)
Stop shuts down the server completely, interrupting service until it is restarted.
The server uses several log files. It logs accesses to the server and any errors that occur. There are times when you'll want to archive the log files and have the server create new log files.
When you rotate log files, the server renames the existing log files and then creates new log files with the original names. This lets you back up or archive (or simply delete) the old logs. The old log file is saved with the name of the file combined with the date the file was rotated. For example, access becomes access.24-Apr.
URL configuration lets you change elements that effect the URLs to documents on your server. You can change the server name and port number and the directories to your documents, and you can map URLs for one directory to another. The general structure for URLs is
http://hostname.domain.dom[:portnum]/directory/filename |
You can also map URLs to another server or directory. This is useful when you move files and directories among filesystems.
This section configures the structure of all the URLs for your server.
The server name is the full hostname of your server host. When clients access your server, they use this name. The format for the server name is hostname.yourdomain.domain. For example, if your full domain name is sgi.com, you could install a server with the name www.sgi.com.
If your system administrator has set up a DNS alias for your server, then you should use that alias here. If not, you should use the host's name combined with your domain to construct the full hostname.
Server Port Number specifies the TCP port the server listens to. The port number you choose can affect your users—if you use a nonstandard port, then anyone accessing your server must specify a server name and port number in the URL. For example, if you use port 8080:
http://www.sgi.com:8080 |
If you aren't sure that the port number you plan to use is available, look at the contents of /etc/services on the server host.
Port numbers for all network-accessible services are maintained in the file /etc/services. The standard HTTP port number is 80. The standard secure HTTPS port is 443.
Technically, the port number can be any port from 1 to 65535. If you aren't running as root or superuser when you install or start the server, you'll have to use a number above 1024.
At times you'll want the server host to answer to two URLs. For example, you might want to answer both http://www.a.com/ and http://www.b.com/ from one host.
Because of limitations in the HTTP protocol, this is difficult to configure. However, there is a trick to do this that involves making your host answer to more than one IP address. This works only on certain systems.
If you have already set up your system to listen to multiple IP addresses and want to use this feature, you must tell the server which IP address it belongs to.
This section configures the how the server deals with URLs.
For a public server, you probably don't want to make all the files on your filesystem available to remote clients. The easiest way make sure this does not happen is to keep all of your server's documents in a central location, known as a document root.
Another benefit of the document root is that you can move your documents to a new directory (perhaps on a different disk) without changing any of your URLs because the paths specified in the URL are relative to the document root directory.
For example, if your document root is /usr/htmldocs, a request such as http://www.acme.com/products/info.html tells the server to look for the file in /usr/htmldocs/products/info.html. If you change the document root (that is, you move all the files and subdirectories), you only have to change the document root directory that the server uses instead of mapping all URLs to the new directory or somehow telling all your users to look in the new directory.
You can choose not to use a document root, but it isn't recommended because the server assumes / as the document root, which means users have access to all files on your server.
In your document root directory, you'll probably have several subdirectories. For example, you might create a directory called products, another called people, and so on. It's often helpful to let clients access an overview (index) of these directories.
There are two ways the server can do this:
It first searches the directory for an index file called index.html, which is a file you create and maintain as an overview of the directory's contents. You can specify any file as an index file for a directory. This means you can also use CGI programs to configure pages.
If an index file isn't found, the server generates an index file for you that lists all the files in the document root. The generated index has two formats:
Fancy directory indexing is fairly detailed. It includes a graphic that represents the type of file, the date the file was last modified, the file size, and a description.
Simple directory indexing is less detailed but takes less time to generate.
When users first access your server, they usually use a URL such as http://www.acme.com/. When the server receives a request for this document, it returns a special document called a home page. Usually this file has general information about your server and links to other documents.
You can either specify a file in the document root as the home page, or the server will create an index file instead.
When a document is sent to a client, the server includes a section that identifies the document's type, so the client knows what to do with the document. However, sometimes the server can't determine the proper type for the document. In those cases, a default value is sent.
The default is usually “text/plain,” but it should reflect the most common type of file stored in your server. Some common types are:
text/richtext
text/plain
text/html
image/tiff
image/jpeg
image/gif
application/x-tar
application/postscript
application/x-gzip
audio/basic
audio/x-wav
URL mappings let you map URLs to another server or directory. You specify a URL prefix to map and where to map it. When a client accesses the server with a mapped URL, the server gets the requests from the mapped server or directory.
URL mappings are used to point to documents in directories outside of the document root directory.
Most of the time, you keep all of your documents in the document root. Sometimes, though, you want to refer to a directory outside of your document root. You can do this through directory mapping.
First, you choose the URL prefix to map. This is the URL users send to the server when they want documents in the mapped directory (this is seamless to the user). For example, a mapped URL could be http://www.acme.com/products/index.html where products/ is the prefix you specify.
Next you specify the directory to map those URLs to. For example, the directory could be called /sales/tools/products. It should be a full system path.
Finally, you might want to use a template to specify how this directory should be configured. You can choose an existing template or choose cgi to specify that all files in this directory are CGI programs. For more information on templates, see “Creating a Template”.
Redirection is a method for the server to tell a user that a URL has changed (for example, if you move files to another directory or server). You can also use redirection to seamlessly send a person from your server to another.
To map a URL to another server, you must first specify the URL prefix you want the server to redirect. For example, if the URL you want to map is http://www.sgi.com/info/movies, you'd type /info/movies as the prefix to redirect.
Choose which URL you want to redirect them to. You have two choices:
Specify a single URL. You must specify a complete URL (hostname, directory, and filename). For example, type http://w3.acme.com/new-files/info/movies.
Specify a URL prefix. Use this if the directory on the new server is the same as in the mapped URL. For example, you type only the new server name http://w3.acme.com/.
You can view all URL mappings on a server, and then use links to edit and remove any URL mappings.
Each URL mapping is listed with a pair of links next to it for editing and removing the URL mapping. The “Edit” link takes you to the same page you used to add the mappings, except you can change the values in the form. The “Remove” link immediately and permanently removes the mapping from your server.
You can configure public information directories that let all the users on your host create home pages and other documents without your intervention.
| Note: Another way to do this is to create a URL mapping to a central directory that all of your users can modify. |
With this system, clients can access your server with a certain URL that the server recognizes as a public information directory. For example, suppose you choose the prefix ~ and the directory public_html. If a request comes in for http://www.sgi.com/~bob/aboutbob.html, the server recognizes that ~bob refers to a users' public information directory. It looks up bob in the system's user database and find Bob's home directory. The server then looks for the request (aboutbob.html) in Bob's home directory.
To configure your server to use public directories, you need to choose a user URL prefix. The usual prefix used is ~ because it's a character that is rarely used. Next, you need to choose the subdirectory where the server looks for user home directories. A typical directory is public_html.
The server needs to know where to look for a file that lists users on your system. The server uses this file to determine valid user names and to find their home directories. You can use the system password file for this, which means the server uses standard library calls to look up users. Or, you can create another user file to use to look up users. You can specify that user file with an absolute link.
Each line in the file should have this structure (the elements in the /etc/passwd file that aren't needed are indicated with *):
username:*:*:groupid:*:homedir:* |
You also have the option of loading the entire password file on startup. If you choose this option, the server loads the password file into memory when it starts, making user lookups much faster. On the other hand, if you have a very large password file, this can use too much memory.
Finally, you can choose a configuration template that the server uses so that you can control what is allowed from public information directories. This can prevent users from creating symbolic links to information you don't want made public, and so on. See “Creating a Template” for more information.
User databases are lists of users who can access the server. Each user has a username and password. User databases control who has access to documents through the server.
The server stores its user files in a high speed format called a DBM. This format can search an infinitely large database with one filesystem read (normal files search the database linearly).
The server stores its databases in the directory /userdb in the server root. When specifying a database, use only the name, not the full path.
To create a user database for your server:
Click the Server Manager link to create a user database.
Type a name for the database. Don't type a path, because all databases are stored in /userdb. The database name can be up to 256 characters, but must not include any spaces.
Check the type of database you want to create. A DBM file stores the passwords unencrypted, so each line has the format user:password. An NCSA-style database encrypts the passwords.
Type a password for this database. The password can be up to 8 characters. Retype the password to ensure accuracy. When you click the Make These Changes button, the server creates the database, then lets you jump to the page where you can add users to the new database.
Click the Server Manager link to remove a user database.
In the form that appears, choose the database you want to remove.
Type the password for the database. You can't remove the file unless you have the password.
Click the Make These Changes button. The user database is permanently removed from the server.
Choose the database and type the password for the database.
Type a user name. This is the name the user types when authenticating with the server. It can be up to 254 characters.
Type a password for the user. It can be up to 8 characters. Type it twice to ensure accuracy. The user types this password when authenticating with the server.
Click the Make These Changes button. The user name and password are added to the database. You can continue adding names to the database, or you can return to the Server Manager.
If you want to change a user's name, you need to remove the user, then add them with the new name. You can change a user's password. To change user passwords in a database:
Click the link to edit users.
Choose the database that contains the user whose password you want to edit.
Type the password for the database file.
Type the user name you want to edit.
Type the new password.
Click the Make These Changes button. You can continue removing users or return to the Server Manager.
To remove users from a database:
Click the link to remove users.
Choose the database that contains the user name that you want to remove.
Type the password for the database file.
Type the user name you want to delete.
Click the Make These Changes button. You can continue removing users or return to the Server Manager.
The server stores its databases in the server root, in the directory /userdb. The NCSA-style or text file can reside anywhere for the conversion, but the converted file is stored in /userdb.
The format of the file to convert should look something like this:
user1:password1 user2:password2 user3:password3 user4:password4 |
If the file is an NCSA file, the passwords will already be encrypted. If the passwords aren't encrypted, you can have the converter encrypt the passwords for you.
You need to choose a name for the converted file. You don't need to type a full path name because the user databases are always kept in /userdb.
Sometimes, a user may be entered twice into a database. You can choose how the convertor behaves under this circumstance: either it can overwrite the existing user, or it can leave the user unchanged and keep track of those users.
You also need to specify a password for the user database; type it twice to ensure accuracy. You need this password to add, remove, or edit users.
Access Control lets you restrict access to a resource according to the client's hostname or IP address. You can either protect your entire server or select a resource to apply it to.
You can restrict access to your entire server or a particular section of it (files or directories) by using HTTP user authorization. You need a user database that provides the server with a list of users. Be sure to choose the section of the server you want to restrict! See Figure 3-1 for directions on choosing a resource.
When a user accesses a port of the server that uses user authorization, the client application asks the user for a name and a password before continuing. After the user enters this information, the server checks it, and then either allows or denies the user. If you have the Commerce server configured to use SSL, the user name and password are send encrypted.
To set up user authorization, choose the database that the server uses to look up user names and passwords. Next, type a wildcard pattern to tell the server which users from the database are allowed access. For example, if your database contained Bob, Fred, Mary, and Joe, but you only wanted Bob and Mary to have access to this section, you could use a wildcard pattern of (Bob|Mary). If you leave this entry blank, all users from the database are allowed access.
Finally, you create a realm that describes the part of the server on which you're using access control. This is a text string that helps the user know what part of the server they are trying to access. For example, if you were restricting access to a directory of product schedules, you might name the realm “Confidential product schedules.”
You can restrict access to pages on your server by hostname or IP address. You limit access to only the sites that you want to have access to various parts of your server.
Address restriction is an easy way to get better control over who is seeing your documents. When a request comes in for a document, the server knows the IP address that the request is coming from. Once it has this address, it uses DNS to look up the hostname that corresponds to that IP address. Then, it checks its address restriction.
The address restriction is done in two steps: first, the server tries to match the incoming hostname with the restriction hostname. If the client passes, the document is served. If the client fails the test, the server then checks its IP address against the restriction IP addresses. If it passes, the document is served. If it fails, then the server takes appropriate action.
First, you should choose which files or directories inside this resource you want to protect. This is simply a way to be more specific about what the server should apply restriction to.
For example, if you choose the directory /usr/html-docs/info/* as the resource you want to edit, you could specify:
No additional specification—protects everything in this resource with hostname restrictions.
A wildcard pattern matching only certain files—for example, *.gif.
Note that by using this specification, you can protect many different things in the same directory with different address restrictions for all of them.
| Note: To deny all hosts (for example, to hide your C source files from everyone), type a hostname restriction of *~*. |
Enter a wildcard pattern of hosts to allow. You have the choice of restricting access by hostname or by IP address. Restricting by hostname is more flexible—if a host's IP address changes, you won't have to update your server. But on the other hand, restricting by IP address is more reliable—if a DNS lookup fails for a connected client, hostname restriction cannot be used.
Remember that the hostname and IP addresses should be specified with either a wildcard pattern, or a comma separated list, but not both. Also be sure your wildcard pattern is not recursive—there should only be one level of parentheses in the expression.
Finally, you should specify what should happen when a client is denied access. Normally, the server sends Not Found, which is the same thing that happens when a client requests a document that does not exist. However, sometimes you want to let the user know what they are missing. In those cases, you can specify a specific file that the server sends back. The filename should be an absolute path.
You can limit the use of filesystem links in your server. Filesystem links are references to files stored in other directories or filesystems. The reference makes the remote file as accessible as if it were in the current directory.
Because filesystem links are an easy way to create pointers to documents outside of the normal document root and because anyone can create these links, you might be concerned about what people might create pointers to (for example, confidential documents or system password files).
Hard links and soft links are simply two different methods of achieving this goal. You can choose to disable both of these methods, or just one.
You should choose whether or not to allow links in the resource you have selected, and what level of restriction you want.
Finally, you should choose from which directory the server should start looking for filesystem links. You can give one of two directory types here:
A full pathname—In this case, the server treats the path you give as a prefix, and when it recognizes that prefix in a request, any directories following the prefix are checked for filesystem links.
A partial pathname—In this case, the server looks for the partial pathname you give here as a substring of the incoming request; that is, if you give the directory nolinks for the “from” directory, then the server looks for a directory named nolinks in the incoming request If it finds the nolinks directory, it checks all following directories for filesystem links.
Web server content is seldom managed entirely by one person. Many times, different parts of a web server are written by different people. For example, each employee maintains a home page.
When these users need to configure something, it is unrealistic for you as the administrator to allow all of them access to the Netscape Server Manager. In these cases, it is useful to allow them a subset of configuration options so they can control only what they need to.
| Note: If you haven't already, configure an area of your server to use these configuration files. |
Normally, your server gets its configuration from two or three files that are kept in the server root and modified with the Server Manager.
With this feature, you can give users the ability to control more about their home pages in their public information directories. You can allow them to apply access control or customize error messages without allowing them to use CGI or parsed HTML. The format and capability of these dynamic configuration files is described in the following section.
When a request is made for a resource in which dynamic configuration is enabled, the server must search for the configuration files within one or more directories of that resource. This search can be an expensive operation in terms of performance, so the server lets you configure how much flexibility you need, weighing it against the efficiency cost.
You provide a base directory to the server. The server starts its search for configuration files from this filesystem directory. Alternatively, you may provide no base directory, in which case the server will attempt to infer the base directory from the URL. That is, if the requested URL is going to be serviced with a file from the document root, then it will start searching from the document root. The same applies to URL mappings, user public information directories, and CGI mappings.
You also specify the name of the configuration file to search for within the base directory.
Normally, you will want to centralize all of your configuration information for the subdirectories of the base directory into the configuration file in the base directory. This makes the server more efficient, because it does not have to waste time searching for configuration files in each of the subdirectories.
However, for convenience you will sometimes want to tell the server to search the subdirectories. That is, say that you have selected the base directory inferred from URL translation, and selected .nsconfig for your configuration filename. When a user requests the filesystem path /usr/ns-home/docs/icons/logo.gif, instead of just searching for /usr/ns-home/docs/.nsconfig you want the server to search all subdirectories:
/usr/ns-home/docs/.nsconfig /usr/ns-home/docs/gfx/.nsconfig /usr/ns-home/docs/gfx/icons/.nsconfig |
Finally, enter a wildcard pattern of file types you want to absolutely disable in directories where dynamic configuration is enabled. To disable CGI programs and parsed HTML, use:
*(cgi|parsed-html) |
Dynamic configuration files consist of sets of directives that control the server. These sets are surrounded by Files directives that tell the server which files in the configuration file's directory the directives apply to. For example:
<Files PATTERN1> ... directives ... </Files> <Files PATTERN2> ... directives ... </Files> |
PATTERN1 and PATTERN2 are wildcard patterns that tell the server which filesystem pathnames to apply the directives they surround to. Any pattern given is first prefixed with the directory containing the configuration file to ensure that it is applied only to subdirectories. There can be as many files sets in the .nsconfig file as you need.
The file can contain blank lines. Lines beginning with # are treated as comments.
Each directive can take a variable number of parameters. The directives that can appear inside Files regions are:
AddType exp=SHEXP type=mime-type enc=http-encoding
AddType assigns the given type or encoding to the paths represented by the wildcard pattern SHEXP. One or both of “type” and “enc” can appear, but only one “exp”.
ErrorFile reason=error-string code=error-code path=html-file
ErrorFile causes the HTML file described by the URL suffix “path” to be sent in place of the server's default error message when an error, described by one or both of “reason” and “code”, occurs. “path” is a valid URL to the local server, but without the http://server prefix. The error codes are the standard HTTP error codes:
401 Unauthorized
403 Forbidden
404 Not found
500 Server error
RequireAuth dbm=dbmfile userfile=user:passwords realm=string
userpat=PATTERN userlist=user1,user2,...usernRequireAuth lets you ask the user for a username and a password when accessing the directory. “realm” is a unique string to tell your users which password they should use. “dbm” is a user database. “userfile” is a simple file consisting of lines in the format user:encryptedpassword. “userpat” and “userlist” determine which users from the given dbm or userfile are allowed access.
RestrictAccess method=HTTP-method type=allow|deny
ip=addrpattern dns=hostpattern return-code=403|404RestrictAccess applies access control to the directory and restricts certain users. “method” is an optional parameter specifying a wildcard pattern of HTTP methods to protect (no method means all of them). More than one RestrictAccess can appear in the file. “type” determines whether the IP address wildcard pattern or hostname wildcard pattern is allowed or denied access. If the only RestrictAccess directives in a Files set are of type “allow”, then all hosts not specified by the patterns are denied.
Configuration templates are an easy way to apply a set of options to specific files or directories that your server maintains. For example, you can create a template that configures access logging. You can then apply that template to the files and directories you want to log. This saves you having to individually configure access logging for all the files and directories.
To create a template:
Click the link called “Create a template.”
In the form that appears, type the name you want to give the template.
Click the Make These Changes button. The template is created as a named object in obj.conf.
When you return to the Server Manager, you configure the attributes for your template, then click the “Apply a template to part of your server” link to apply the template to files or documents in your server. When configuring attributes for a template, the forms list the template name at the top of the form.
Not all links in the Server Manager apply to templates. The links you can use for templates are listed here for your reference (a graphic also appears next to the link in the Server Manager page).
You can apply templates to files or directories in your server. You can either specifically choose files and directories, or you can specify wildcard patterns (such as *.gif).
To apply a template:
Click the “Apply a template to part of your server” link.
In the form that appears, click a button to choose the resources you want to apply the template to. The buttons are described as follows:
Choose Entire Server applies the template to every document the server maintains.
Browse files applies the template to specific files or directories. You can view files or directories and you can specify whether or not to view files that are symlinks to files in other directories.
Choose Wildcard Patterns lets you apply the template to files or directories that you specify with wildcard patterns. This is an easy way of specifying lots of files in different directories (such as *.gif) or many subdirectories (such as /public/*).
Choose a template is normally used to choose templates when configuring other aspects of the server. Use the template drop-down list instead of clicking this button to apply a template.
Select the template you want to apply. The None template can be applied to files or directories to remove any templates previously applied to the resource.
Click the Make These Changes button. The template is applied to the resources. You'll need to restart the server for the template to take effect.
When you remove a template, the template is deleted from the obj.conf file (it was stored as a named object). The template isn't unapplied from any resources you have applied it to. This means that before you remove a template, you should apply the None template to any files or directories first. You can also remove a template and then search and replace all instances of the template in obj.conf. If you don't remove these entries, you'll get a server misconfiguration error when anyone accesses the files or directories that had the template.
To remove a template:
Click the link called “Remove a template.”
In the form that appears, select the template you want to remove.
Click the Make These Changes button. The template is removed.
The error handling section lets you view the error log file and customize error messages sent to clients.
Click the View error log link to see a list of all errors the server has encountered since the log file was started (you can rotate log files to save the current log file and then start adding entries to a new log file).
You can limit the number of errors you see by typing ?nn at the end of the URL in the Locations box in Netscape Navigator. The question mark specifies a query, and nn represents the number of errors you want to view. After you type the query at the end of the URL, press <Enter>. The page redraws, showing you the most recent errors.
You can specify a custom error response that sends a detailed message to users when they encounter errors from your server. You can specify a file to send or a CGI script to run.
You may want to change the way a directory behaves when it gets an error. Instead of sending back the default file, you may want to send a custom error response instead. For example, if a user tried to repeatedly connect to a section of your server protected by access control, and failed, you could have the error file returned with information on how to get an account.
There are several different kinds of errors that you can customize the server's response to:
Unauthorized. This error occurs when a user tries to access a document in the server that is protected by access control but doesn't have permission to access the document. You might send information on how they can get access.
Forbidden. This error occurs when the server doesn't have filesystem permissions to read something, or if the server is not permitted to follow symbolic links.
Not Found. This error occurs when the server can't find a document, or when it has been instructed to deny the existence of a document.
Server Error. This error occurs when the server is misconfigured or when a catastrophic error occurs, such as the system running out of memory or a core dump.
Before you can set up the response, you need to either write the HTML file to send, or create the CGI program to run. After you do this, jump to the customizing error response form and select the error response you want to customize.
Type the absolute pathname to the file or script you want to return for that error code. Check if the file is a CGI program that you want to run. Do this for each of the errors you want to customize, then click the Make These Changes button.
To remove a customization, return to the form and delete the filename from the text box next to the error code.
You can customize access logging to any resource by specifying whether or not to log accesses, who not to record accesses from, and whether the server should spend time looking up the domain names of clients when they access a resource.
You need to decide whether or not you want to use access logging for this resource in the server. If you decide to log accesses, then the server records in common logfile format many things about the request, including the client's address, how long the transfer took, the response the server made, how many bytes were transferred, and whether or not the user was authenticated.
You also need to choose a name and location for the access log file. If you specify a partial pathname here, the server assumes the path is placed in the server root in the directory logs. The means you create a log file for each resource you want to log.
You also have the option of recording only the IP addresses of incoming requests. DNS lookups to turn an IP address into a hostname, but this can be quite costly in terms of performance.
You can also choose to have the server not log accesses from certain addresses. That way, you can tell the server not to log accesses from addresses within your own company. Type a wildcard pattern of hosts the server should not record accesses from; for example *.sgi.com doesn't log access from people with the domain sgi.com. You type wildcard patterns for either hostnames, IP addresses, or both.