This chapter tells you how to begin configuring the Netscape Commerce and Communications Servers for your needs.
Before you install the either the Netscape Commerce Server or the Netscape Communications Server, make sure you perform the tasks listed below. This makes the installation process much smoother.
Make sure the Domain Name Service (DNS) is up and running.
Create a home page.
Create an alias for the server.
Create an IRIX user account.
Choose unique port numbers.
When you install the Netscape Commerce and Communications Servers, some items on the installation forms request either a hostname or an IP address (or multiple entries of the same) as input strings.
A hostname is a name for a specific computer in the form host.subdomain.domain, which is translated into a dotted IP address by a Domain Name Service (DNS). For example, www.sgi.com is the host “www” in the subdomain” sgi” and domain “com”.
Internet Protocol (IP) address is a set of numbers, separated by dots, that specifies the actual location of a host on the Internet. For example, the hostname www.sgi.com has the IP address 192.82.208.8.
As you prepare for installation, make sure your Domain Name Service (DNS) is up and running properly. Otherwise, the server can't resolve hostnames and can't connect to any remote hosts.
A home page is usually the first document users see when they access your server. The content should introduce your server, company, or organization, or even yourself. It's used as an index to the information your server provides.
If you already have a home page, you can specify it during the installation process. If you don't have a home page, you can either create one before installation, or you can use the one the installation process creates. (You can edit it after installing the server.) To create a home page, you need a text editor or an application that generates HTML documents (these are ASCII text files). Hypertext Markup Language (HTML) documents contain text and flags that a Web browser uses to display the page. The optional WebMagic Author™ from Silicon Graphics, Inc. is a WYSIWYG editing tool that enables you to create HTML files without requiring you to know HTML syntax.
If you are unfamiliar with HTML, and need to learn more, you can use the Netscape Navigator to view the HTML source code for a page.Start the navigator, go to any page on the Web, and then choose “View/Source” from the menu. You can read Appendix A to start learning HTML. You can also read other books about HTML, or you can go to http://home/netscape.com/home/how-to-create-web-services.html to get the information online.
If your server runs on one host among many in a network, you should set up a DNS CNAME record or an alias (such as www) that points to the actual server host. Later, should the need arise, you can change the actual hostname or IP address of the server host without having to change all of your URLs.
For example, you might call the server myserver.anycompany.com and then use an alias like www.anycompany.com. The URLs to documents on your server would then use the www alias instead of myserver.
You should create an IRIX user account for the server. You probably want the server to have restricted access to your system resources and run under a nonprivileged system user account.
When the server starts and runs, it runs with this IRIX user account (you'll specify this account during installation). Any child processes of the server are created with this account as the owner. The account requires read permissions for the configuration files and write permissions for the log file directory. For security reasons, the user account should not have write permissions to the configuration files. This means that in the unlikely event that someone compromises the security of the server, they can't write to the configuration files.
You can use the account with the name nobody, but this might not work on some systems. Some hosts have a UID of -2 for the user nobody. A UID less than zero generates an error during installation. Check the /etc/passwd file to see if the UID for nobody exists, and make sure it is greater than zero (the default UID for user nobody is 60001).
 | Caution: We strongly recommended that you use a dedicated account for the server. |
The administration manager can also run with a user account that has write permission on the configuration files for all installed servers. However, it is much easier to run the administration manager as root because then it can start and stop servers with port numbers less than 1024. You must make sure you always shut down the administration manager when you're done with it.
You need two port numbers: one for the administration server and one for the Commerce or Communications server. The administration server is a separate daemon that lets you manage multiple servers from a single forms-based interface.
Port numbers for all network-accessible services are maintained in the file /etc/services. The standard HTTP port number is 80, but you can install the server to any port.
 | Warning: If you change the default HTTP port number from 80, you must edit the /etc/init.d/netsite file (/etc/init.d/netsite_commerce for the Commerce Server) to reflect the change. |
You should choose a random number for the administration server to make it more difficult for anyone to breach your server security. When you access the administration forms, use the administration server's port number.
Make sure the port you choose isn't in use. Look at the file /etc/services on the server host to make sure you don't assign a port number that is used by another service.
 | Note: If you choose a server port number less than 1024, you'll need to be logged in as root to start the server. After the server is bound to the port, the server changes from root to the user account you specify. If you choose a port number greater than 1024, you don't have to be root to start the server. |
If you're running a 1.0 server, the install program upgrades your 1.0 server and puts it and the new 1.1 server in a new server root directory (you specify this directory, but we recommend you use the default of /usr/ns-home).
| Warning: If you change the default server root directory from /usr/ns-home, you must edit the /etc/init.d/netsite file (/etc/init.d/netsite_commerce for the Commerce Server) to reflect the change. |
Stop running the 1.0 server while you do the upgrade. After installation, check that the upgraded server runs correctly, and then delete the old 1.0 directory structure. This lets you bind the upgraded server to the same port as the 1.0 server.
If you have existing 1.1 servers, install the new server to the same server root. This lets you use one administration manager to manage all servers.
If you're upgrading a secure Commerce server, you must manually start the upgraded server because you have to specify a password when starting it.
| Note: If you aren't upgrading a server, the new server must be installed in an empty directory. We recommend the /usr/ns-home directory. |
| Warning: If you change the default server root directory from /usr/ns-home, you must edit the /etc/init.d/netsite file (/etc/init.d/netsite_commerce for the Commerce Server) to reflect the change. |
After you fill out all of the install forms and click the link called “Go For It,” the actual installation takes place. Before that point, no file outside of the installation working directory is modified.
Some temporary files are written to /tmp and removed after installation. No other files or directories are modified in any way.
The installation process places all the files under the server root directory that you specified in the installation forms. The following directories and files are created under the server root directory:
start-admin and stop-admin are scripts that start the server manager. The server manager lets you configure all servers installed in the server root directory.
admserv/ contains the server administration files, the user name and password for the administration account, and the binary files for running the server manager.
bin/ contains the binary files for the server, such as the actual server, the administration forms, and so on.
[type]-[port#]/ are the directories for each server you have installed on the host. The directory name uses the server type (either httpd or https) and the server's port number, for example httpd-80. Each server directory has the following subdirectories and files:
config/ contains the servers configuration files: magnus.conf, obj.conf, and mime.types. It also contains the server key and other encryption certificates.
logs/ contains any error and access log files.
There are shell scripts to start, stop, and restart the server and a script to rotate log files.
userdb/ contains all user databases. This central directory lets any number of servers use the same user databases.
mc-icons/ contains icons for FTP listings and Gopher menus.
extras/ contains utilities such as a log file analyzer.
nsapi/ contains header files and example code for created your own functions using the Netscape API. See the Netscape Servers Programmer's Guide for more information.
| Note: You must restart the server for your changes to take place. After you submit a form, you receive a pointer to a script that restarts your server. |
Once installed, the Netscape server and its child processes run constantly, listening for and accepting requests. If your host crashes or is taken offline, the server processes die with it. Make sure your server is configured for automatic restart on reboot with the following procedure
Use the chkconfig command to see if it is set to “on”:
# chkconfig | grep netsite
If you see:
netsite offEnter the following command:
# chkconfig netsite on
For the Commerce Server, enter:
# chkconfig netsite_commerce on
Repeat step 1 until you see:
netsite on(or “netsite_commerce on”).
When the system is rebooted, the server starts automatically.
| Note: If the server doesn't restart after a reboot, make sure the /etc/init.d/netsite file (or the /etc/init.d/netsite_commerce file for the Commerce Server) reflects the proper directory location and port for the server. |
To keep the server from automatically restarting when the system is rebooted, enter:
# chkconfig netsite off |
For the Commerce Server, enter:
# chkconfig netsite_commerce off |
If you ever need to start the server from the command line, you must log in as root or become superuser and type this at the command-line prompt:
# /etc/init.d/netsite start |
If you ever need to stop the server manually, log in as root or become superuser, and check the full process load using ps -el to see if other users might be using the server. If not, type this at the command-line prompt:
# /etc/init.d/netsite stop |
After you install the server files, the server should run without problems. However, you might need to change configuration information (for example, by adding security) or perform general maintenance on the server. All this is done with the Server Manager.
The Server Manager is a set of forms you use to change options and control your server. You can view the Server Manager immediately after installation (there is a link to it). You can use the Server Manager from any remote host—you don't need to use the host the server is installed on.
| Note: The administration server uses its own configuration file. |
Before you can do any server configuration, you must start the administration server.
Go to the server root directory and enter
# start-admin
This starts the administration server using the port number you specified during installation.
When you are done configuring your servers, stop the administration server by changing to the server root directory and entering
# stop-admin
To view the Server Manager at any time, use a forms-capable browser to point to the URL:
http://[servername].[yourdomain].[domain]:[port]/ |
Use the port number for the administration process that you specified during installation—don't use the port number for an individual server.
You'll be prompted for a user name and password. This is the administration username and password you specified during the installation process. The administration manager appears, listing all of the servers you have installed on the host.
Click the link for the server you want to configure. The Server Manager appears, as shown in Figure 1-1.
The rest of this manual describes the forms and options used to manage and maintain your server.
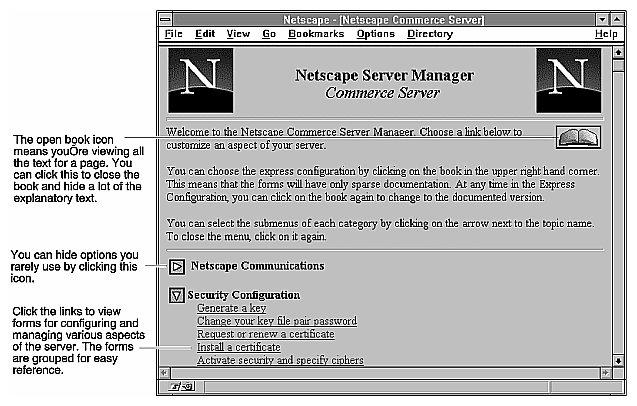
You can configure the administration server to restrict access to certain people based on hostname or IP address. You can also change the port number that the administration server runs on (this is not the same port as any of the Commerce or Communications servers). In the Server Manager for any server (not the main administration page that lists the servers), click the link called “Configure administration server.” The following sections describe what you can configure.
You will probably want to restrict which hosts are allowed to administer your server. This means only hosts that you specify can access the server manager and make changes to any of your installed servers.
You can enter a wildcard pattern of hosts to allow. You can restrict access by hostname or by IP address. Restricting by hostname is more flexible—if a host's IP address changes, you won't have to update your server. On the other hand, restricting by IP address is more reliable—if a DNS lookup fails for a connected client, hostname restriction cannot be used.
If you think you might have problems with DNS, you should use IP address restriction.
You can also change the user name that the administration server uses to verify that you are the server administrator. The authentication password is the password you give the server after you enter the authentication user name.
| Note: If you leave this password blank, the administration password remains unchanged—leaving it blank doesn't remove the password. |
You must choose an IRIX user account to run the administration server. By using a separate server for administration, you can safely allow this administration server to run as the superuser because you run the administration server only when you need to configure a server (you don't leave the server running constantly, as you do with other servers).
The port you choose must be specified in the URL you use to configure your server.
This section describes the most common installation problems and how to solve them.
I accidentally denied all access to the Server Manager forms.
Log in as root or with the server's user account. In the admserv directory, edit the ns-admin.conf file. There's a line for allowed hosts and a line for allowed addresses. Modify the lines to include your host and address, save the file, and then restart the administration manager.
Clients can't locate the server.
First, try using the hostname. If that doesn't work, use the fully-qualified name (such as www.domain.dom). If that doesn't work, use the dotted IP address.
The port is in use.
Most likely, you didn't shut down a server before you upgraded it. Shut down the old server, then manually start the upgraded one.
The server is slow and transfers take too long.
If you log files to SYSLOG, you might encounter reduced performance. Switch to using the server's error log files instead. The server host might need more RAM, or if there are other applications on the host, they might be using CPU cycles, which degrades server performance.
In many parts of the server configuration, you specify wildcard patterns to represent one or more items to configure. For example, to restrict access, you specify a wildcard pattern that matches all of the clients who should get access. Wildcard patterns use special characters. If you want to use one of these characters without the special meaning, precede it with a backslash (\) character.
Table 1-1 lists wildcard patterns and their meaning.
Pattern | Meaning |
|---|---|
* | Matches zero or more characters. |
? | Matches exactly one character, and it can be any character. |
| | An OR expression. It matches either the substring this or the substring that. The substrings can contain other special characters such as * or $. |
[abc] | Matches one occurrence of the characters a, b, or c. Within these expressions, the only character that needs to be escaped in this is ] (right bracket), all others are not special. |
[a-z] | Matches one occurrence of a character between a and z. |
[^az] | Matches any character except a or z. |
*~ | Followed by another expression removes any pattern matching the expression from the match list. |
$ | Matches the end of the string. |
*.sgi.com matches any string ending with the characters .sgi.com.
(quark|energy).sgi.com matches either quark.sgi.com or energy.sgi.com.
198.93.9[23].??? matches a numeric string starting with either 198.93.92 or 198.93.93 and ending with any 3 characters.
*.* matches any string with a period in it.
*~sgi-* matches any string except those starting with sgi-.
*.sgi.com~quark.sgi.com matches any host from domain sgi.com except for a single host quark.sgi.com.
*.sgi.com~(quark|energy|neutrino).netscape.com matches any host from domain sgi.com except for hosts quark.sgi.com, energy.sgi.com and neutrino.sgi.com.
*.com~*.sgi.com matches any host from domain com, except for hosts from subdomain sgi.com.