This chapter contains these sections:
The Movie Maker tool lets you combine audio, video, and still images and save them as a movie. Use the controls below the movie to play a sample movie.
You can open Movie Maker in one of several ways:
Double-click the Movie Maker icon on the Media Tools page of the Icon Catalog.
Open a shell window, then type the word moviemaker.
Click the words Movie Maker to open Movie Maker now.
To open an existing movie file, choose “Open” from the File menu. Use the file browser that appears to select the movie file you want to open.
 | Note: You can only open movie files that are saved in the SGI movie file or QuickTime™ format. If you have a file of another format, use the tool Movie Convert to change the format. See Chapter 3, "The Movie Convert Tool," for details. |
Movie Maker edits movies in place; it does not have a “Save” option. Any changes you make take effect immediately—you don't have to click an Apply or Accept button. For this reason, type in a new file name when you open a new movie file and make a backup copy of any existing file you open. The system prompts you in both cases. You will be changing the original file, not the backup.
Neglecting to make backups will cause you to lose your original movie. See “Exporting a Movie” for information on using the “Export” command under the File menu to save movie files.
| Note: You can't make backups of or edit movie files that are marked Read Only. |
Movie Maker saves your movie into a file as you create or edit it. You also have several options for exporting a movie file. When you export a movie file, you make a new file out of an existing file.
To export a section of the movie into its own file, select the region you want to save, then choose “Movie File...” from the Export rollover menu. To select a different file format or compression scheme, see “Exporting QuickTime Movies” and “Compressing Movie Files.”
To export only the images that make up the movie, select the images you want to save, then choose “One Sequenced Image...” or “Collection of Images...” from the Export rollover menu. “One Sequenced Image.” saves a sequence of images into one FIT image file; “Collection of Images.” saves each image into a separate image file and lets you choose which format to use—TIFF, SGI image, or FIT.
To save the soundtrack of a movie, select the region of audio you want to save, then choose “Audio File...” from the Export rollover menu.
By default, Movie Maker creates movie files in the SGI movie file format. You can choose to export files as QuickTime™ files instead. To do so:
Select the movie, or region of the movie, you want to export as a QuickTime movie.
The selected region is highlighted lavender.
Choose “Movie Export Options...” from the Export Movie Selection rollover on the File menu.
The window shown in Figure 5-1 appears.
Click QuickTime.
A blue triangle indicated it's selected.
Click Accept to apply the setting and close window.
Choose “Movie File...” from the Export Movie Selection rollover to actually save the QuickTime file.

“Compressing Images When Creating a Movie” describes how to compress images when you make your movie. This section describes how to choose a compression scheme when you export your movie.
Select the movie, or region of the movie, you want to export.
The selected region is highlighted lavender.
Choose “Movie Export Options...” from the Export Movie Selection rollover on the File menu.
Select a compression scheme from the menu button labeled Use compression.
If you are exporting the file as an SGI movie file, these compression options are available:
No Compression
Video 1 (MVC1)
Video 2 (MVC2)
Animation (RLE)
Photo (JPEG)
If you are exporting to a QuickTime file, these compression options are available:
No Compression
Video (RPZA)
Animation (RLE)
Photo (JPEG)
Compact Video
If desired, adjust the movie quality with Quality slider bar.
Higher quality will translate to a higher movie quality, but a larger file. Lower movie quality will translate to a more compressed file.
Click Accept to apply the settings and close the window.
Choose “Movie File...” from the Export Movie Selection rollover to actually export the file with that compression scheme.
If you want to change the compression scheme on an existing movie, open the movie in Movie Maker, then choose “No Compression” from the Movie Export Options window. Finally, choose “Movie File...” from the Export Movie Selection rollover to actually export the file with a new name.
You can save selected images into one file or as a collection of separate image files. This section describes how to save the images as a collection and specify the file format.
Select the images you want to export.
The selected images are highlighted lavender.
Choose “Collection of Images...” from the Export Selected Images or Export Movie Selection rollover on the File menu.
A File Browser appears.
Use the button labeled File Format to choose the format in which you want to save the file.
Close the File Browser when you are finished.
When you edit a movie, you rearrange, insert, or remove audio and video tracks. As you do this, the new information is appended to the end of your movie file. This saves time by allowing you to edit without having to wait for the system to rearrange the movie tracks every time you make a change.
When you optimize a movie you tell the system to rearrange and save the tracks as they appear in the Movie Maker window. This makes the movie play back at its best, with the audio and video fully integrated.
To optimize a movie choose “Optimize” from the Options menu. If you forget to optimize a movie before you quit Movie Maker, a dialog box appears prompting you to do so.
This section describes how you use Movie Maker to create movies. The following sub-sections describe how to put the parts of a movie together:
Movie Maker lets you combine audio, video, and still images and save them as a movie. Most of this section describes how you insert and manipulate existing movie, image, and audio files. This section briefly describes the ways in which you can create the original content.
If you have an Indy workstation, you can turn video and audio into a movie file using the Capture tool. For more information on how to use the Capture tool to record a movie or create soundtracks and still images, see the help cards on the Capture tool or Chapter 2, “The Capture Tool.” To open the Capture tool, click the words Capture tool now.
If you have an Indigo with an Indigo Video board, use the svtomovie command to capture live video. When you type svtomovie, a video input window appears and a message appears in the shell window from which you ran svtomovie. The message prompts you to press the <Enter> key when you are ready to begin recording the video into a movie file.
For further details on svtomovie, see the svtomovie man page. For more details on working with video, see the help cards on the Video Panel or Chapter 2, “Video Panel,” of the Media Control Panels User's Guide.
You can use one of several tools to record a soundtrack for your movie.
Use the Capture tool to record sound from a microphone or other audio source. To open the Capture tool, click the words Capture tool now.
Use Sound Editor to record sound and edit the track once it's recorded. To open Sound Editor, click the words Sound Editor now.
Use CD Manager or DAT Manager to record sounds from compact disc or DAT tape.
You can use one of several tools to create images for your movie:
Use the Capture tool to take pictures from a video camera or snapshots from the screen. To open the Capture tool, click the words Capture tool now.
Use the program Image Works to create special effects for still images. To open Image Works, click the words Image Works now.
To insert still images into a movie:
Place the edit line where you want to insert the images. The new images are inserted after the edit line.
See “Selecting a Portion of the Movie” for directions on how to place the edit line.
Choose “Insert” from the File menu.
The File Browser appears.
Double-click the name of the image files you want to insert.
To insert many images at once, hold down the <Shift> key while selecting the images. The images are inserted in the same order as they appear in the File Browser. You can also insert many images at once if you drag over multiple file names.
By default, the images you insert are resized to match the size of the existing images. See also “Resizing Images.”
Click the Accept button. The cursor turns into a watch.
Resizing images can take up to five seconds per frame. A snapshot of each image appears in the Movie Maker window. The snapshot for the first and last image you insert appears to be twice the size of the others.
All of the frames—images—in your movie need to be the same size. If you're inserting images into an existing movie, the images you insert will be resized to match the size of the existing images. Otherwise, you can use the Movie Composition form to specify how you want the images to be resized.
Choose “Insert” from the File menu.
The File Browser appears.
Click the Options... button.
The Movie Composition form appears. See Figure 5-2.
Specify how you want to resize images:
Click the button next to “Make frame size same as first inserted frame.”
Or, click the button next to “Make frame size as follows;” then fill in the fields for Width and Height.
Click Accept to apply the settings and close the window.
You can create a smaller movie by compressing images when you insert them into a new movie.
Choose “Insert” from the File menu.
The File Browser appears.
Click the Options... button on the File Browser to open the Movie Composition form. See Figure 5-2.
Click the button next to the label Use compression to view a pop-up menu listing available compression schemes.
SGI Movie Video [MVC1]
Compresses relatively quickly. Compresses about 5 bits per pixel, on average. Results in a file that's 5 times smaller. Half-size movies play back at 15 frames per second, at least, depending on your system's capabilities.SGI Movie Video [MVC2]
Compresses more slowly than MVC1. Compresses about 2 bits per pixel, on average. Results in a file that's approximately 20 times smaller. Half-size movies play back at 25 frames per second, at least, depending on your system's capabilities.SGI Movie Animation [RLE}
Best used with synthetically-generated material, such as a screen snapshot, that has large areas of the same color. This scheme is not recommended for live video. Compression rates depend heavily on the nature of the source material.SGI/Apple Photo [JPEG]
Compresses the file so it's 16 times smaller. Half-size movies play back at 2 frames per second, at least, depending on your system's capabilities.If desired, adjust the movie quality with Quality slider bar.
Higher quality will translate to a higher movie quality, but a larger file. Lower movie quality will translate to a more compressed file.
Click the Accept button to apply the setting and close the window.
This becomes the default setting.
Use the File Browser to select the images to insert.

Movie Maker lets you import sound into a movie file. You can add a series of different sound tracks, intersperse sounds with voice-overs or silence, or mix your own combination of sounds and import them into your movie file.
To add audio to your movie:
Place the edit line where you want to insert the sound. The new audio is placed after the edit line.
See “Selecting a Portion of the Movie” for directions on how to place the edit line.
Choose “Insert” from the File menu.
The File Browser appears.
Double-click on the name of the audio file you want to insert.
Drag over multiple file names if you want to add more than one audio file to your movie.
All audio files must have the same sampling rate, sampling width, file format, and number of channels. Use Sound Filer to print this information about a sound file. See Chapter 8, “Sound Filer,” and the Media Control Panels User's Guide, Chapter 3, “Audio Control Panel,” to learn more about sampling rates.
Click Accept. The cursor turns into a watch.
After a few seconds, a waveform appears in the lower portion of the Movie Maker window. This represents the audio file you inserted.
You can use existing movies as source material for a new movie.
Place the edit line where you want to insert the new movie. The new movie is placed after the edit line.
See “Selecting a Portion of the Movie” for directions on how to place the edit line.
Choose “Insert” from the File menu. The File Browser appears.
Move to the directory that contains the file you want to insert; then click on the name of the file.
Click on or drag over multiple file names if you want to add more than one file to your movie.
Click Accept.
The cursor turns into a watch. After a few seconds, a snapshot of each image appears in the upper portion of the Movie Maker window and, if the movie contains a soundtrack, a waveform appears in the lower portion of the Movie Maker window.
| Note: If both movies have soundtracks, the soundtracks must have the same sampling rate, sampling width, file format, and number of channels. |
Once you've compiled the different pieces of your movie, you can rearrange them using the “Cut,” “Copy,” “Clear, “and “Paste” commands on the Edit menu. These sections describe how to edit a movie:
You select a portion of your movie if you want to cut, copy, clear, or save a section of it. You can select different tracks of the movie—the images or the soundtrack—or the entire movie.
To select a portion of a movie:
Place your cursor in the part of the editing area that contains the items you want to select; then click the left mouse button.
To select images, place the cursor in the top third of the editing area, where you see snapshots of the images.
To select audio, place the cursor in the lower third of the window, where you see the audio waveform.
To select the entire movie—images and audio—place the cursor in the middle section, where you see numbers representing the frame count of the movie. The button next to the “Select” label changes to reflect your selection.
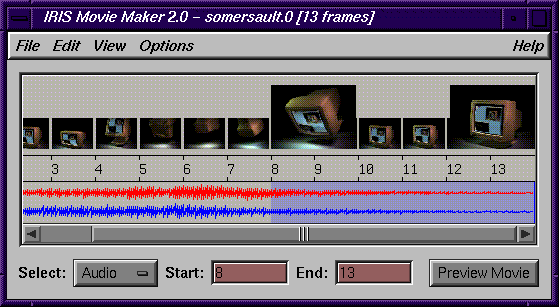
Press and drag the cursor to select an area. Several visual cues indicate the area you have selected. See Figure 5-3.
 | Tip: You can extend your selection by pressing the <Shift> key and sliding the cursor. |
You can also use the controls along the bottom of the Movie Maker window to make and change a selection.
Place the cursor over the Images menu button then press the left mouse button.
A menu appears with three choices: “Images,” “Movie,” and “Audio.” Select the one you want to edit.
Type the starting and ending frame number in the fields next to “Start” and “End”.
Before moving the cursor out of each field, press the <Enter> key.The selection region is highlighted in lavender.
| Tip: You can extend your selection by pressing the <Shift> key and sliding the cursor. |
To delete a portion of a movie:
Select the portion of the movie, images, or audio you want to delete.
See “Selecting a Portion of the Movie” for instructions on how to place the edit line.
Choose “Cut...” from the Edit menu.
The word “Cut” is followed by “movie, “images,” or “audio,” depending on what you have selected.
The selected portion disappears and is stored in a cut buffer so that it can be pasted later.
To copy a portion of a movie:
Select the portion of the movie you want to copy.
See “Selecting a Portion of the Movie” for detailed instructions.
Choose “Copy...” from the Edit menu.
The word “Copy” is followed by “movie, “images,” or “audio,” depending on what you have selected.
Place the cursor where you want to insert the copy; then choose “Paste...” from the Edit menu.
To replace selected frames or audio with blank frames or silence:
Select the portion of the movie you want to replace.
See “Selecting a Portion of the Movie” for detailed instructions.
Choose “Clear...” from the Edit menu.
The word “Clear” is followed by “movie, “images,” or “audio,” depending on what you have selected. The selected portion of the movie is cleared. Frames turn into black snapshots; the audio waveform turns into a straight line.
The Preview button lets you view your movie. Clicking it opens the Movie Player display window. (See also Chapter 6, “Movie Player.”)
Click the Preview Movie button.
The Movie Player window appears.
Play the movie by doing one of the following:
Place the cursor in the window; then click the left mouse button over the white triangle to start playing the movie.
Click and hold down the right mouse button. A mini-control panel appears. Use the controls to rewind, stop, and play.
Click and hold down the middle mouse button to adjust the volume.
Move the mouse up and down in the scroll bar to control the volume.
Click the left mouse button again to stop playing the movie.
When you stop a movie, a white triangle appears in the Movie Player window. This indicates how much of the movie has played.
Close the Movie Player display window to resume editing your movie.
You can specify how fast a movie plays and whether it plays once, loops continuously, or swings back and forth. The following sections tell you how to set this and other playback options. See:
By default, movies you create are set to play once. To change this behavior:
Choose “Playback Options...” from the Options menu.
The Playback Options dialog box appears. See Figure 5-4
Click one of the buttons next to the Loop Behavior label.
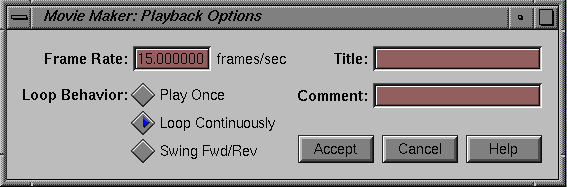
You can give your movie a title and type a few words to describe your movie. The title can be different from the file name you give the movie when saving it.
Choose “Playback Options...” from the Options menu.
The Playback Options form appears. See Figure 5-4.
Type in the fields next to “Title” and “Comment.”
The frame rate specifies how many frames (images) display per second— that is, it determines the speed at which the movie plays. For example, a frame rate of 15 means that 15 frames display per second.
If your movie is silent, you can set the frame rate. If your movie has a soundtrack, avoid changing the frame rate as this will alter the sound.
To change the frame rate:
Choose “Playback Options” from the Options menu.
The Playback Options form appears. See Figure 5-4.
Type a number in the field next to the “Frame Rate” label.
The default frame rate is 15.
| Note: The compression scheme you choose can affect the playback rate. The movie will still take the same amount of time to play, you just won't see all of the frames. For example, if the movie is 30 seconds long, it always plays for 30 seconds. However, if the compression scheme is demanding, you won't see all of the frames in those 30 seconds. |
The Movie Maker window contains four menus and help, the main editing area, a scroll bar, and controls to let you preview the movie. This section describes each of the main components: You'll find:
The main editing area is divided into three smaller areas that let you work with different parts of the movie track.
The top third of the editing area displays the image track. Click in this region to work with images. The blue editing line appears in the top third of the editing area.
The middle part of the editing area displays the movie frame count. Click in this region to work with the entire movie—images and audio. The blue editing line spans all three of the editing areas.
The lower part of the editing area contains the soundtrack. Stereo soundtracks appear as red and blue waveforms. Mono soundtracks appears as two identical, black waveforms. Click in this region to work with the audio.
Use the mouse to place the edit line at the beginning or end of the portion of the movie you want to work with. Click and drag the mouse to highlight more than one part of the track.
Along the bottom of the window you see controls that let you select and preview your movie.
The Select button tells you what track you are selecting. Use it to pick images, audio, or the entire movie.
The Start and End fields let you select frames by typing in a starting and ending frame number.
The Preview Movie button opens Movie Player so you can preview the movie you're creating.
Movie Maker has five menus: File, Edit, View, Options, and Help. For details on the available commands, see:
| “New” | Lets you open an empty file so you can create a new movie. Type in a name for the new movie in the dialog box that appears when you choose “New.” | |
| “Movie Creation Options...” |
| |
| “Open” | Lets you open existing movie files. Save a backup of the file before you begin editing. | |
| “Insert...” | Lets you insert images, audio, and existing movie files. Use this command to create your movie. | |
| “Export” | Provides options for saving the selected material to a new file. All options are active when you select the movie; only certain options are active when you select just the images or audio. This command name changes depending on what you have selected. See “Exporting a Movie.” | |
| “Quit” | Quits the program. |
Most all commands on the Edit menu change depending on where your cursor is placed in the editing area—in the image track, the audio track, or both.
| “Select All” | Selects all material. | |
| “Cut” | Deletes the selected material and puts it in a cut buffer. | |
| “Copy” | Copies the selected material so it can be pasted elsewhere. | |
| “Paste” | Pastes the copied or cut material at the location of the blue cursor. | |
| “Clear” | Replaces the selected material with blank frames or silence. |
The view menu lets you choose how much of the movie you want to display in the editing area.
| “Zoom In” | Exposes more frames. | |
| “Zoom Out” | Condenses the frames so more fit in the editing area; starts hiding every other frame. | |
| “Show Every Frame” |
|
The Options menu contains two commands:
| “Playback Options...” |
| |
| “Optimize Movie” |
|
The Movie Composition window lets you control the way images are inserted into a new movie file.
All images in a movie must be of the same size. When you insert images, you can choose whether you want them all to match the size of the first image or match a specified size.
When you're creating a new movie, you can choose whether you want the movie to be compressed. By default, movies are uncompressed. See “Compressing Images When Creating a Movie” for step-by-step instructions.
The Movie Export Options window lets you choose the file format and compression scheme for movies you export. To open this window, choose “Movie Export Options...” from the Exports rollover on the File menu.
You have two choices for file format: SGI movie file format and Apple QuickTime. By default, movies are saved as SGI movie files.
Your choices for compression vary depending on the file format you select. See “Compressing Movie Files” for details.
The Playback Options window lets you specify how fast a movie plays and whether it plays once, loops continuously, or swings back and forth.
| Frame Rate | Lets you specify how quickly you want the movie to play. See “Choosing the Frame Rate for a Movie” for details. | |
| Loop Behavior | Lets you specify how you want the movie to play—once, continuously, or alternating between playing regularly and in reverse. | |
| Title | Lets you give you movie a descriptive title. This does not need to match the file name. | |
| Comment | Lets you add an optional comment about the movie. |