This chapter describes how to
attach an external CD-ROM drive to either a Challenge or Onyx deskside or rackmount system
eject the CD-ROM and disconnect the CD-ROM drive
You need to attach an external CD-ROM drive only if there is no internal CD-ROM drive installed on the system.
Installing an external CD-ROM drive consists of these basic tasks:
Attaching a 68-pin-to-50-pin Centronics® SCSI cable (018-0348-xxx) to the CD-ROM drive.
Installing a 68-pin connector in the Cardcage 2 I/O panel and connecting the attached ribbon cable to the single-ended SCSI connector on the main IO4 board.
Attaching the 68-pin-to-50-pin Centronics SCSI cable to the newly installed 68-pin connector on the I/O panel.
 | Caution: Use only Silicon Graphics CD-ROM drives. CD-ROM drives from other manufacturers may have firmware incompatibilities that can cause the operating system to crash. |
The following section describes how to attach an external CD-ROM drive to a rackmount system. Instructions for attaching an external CD-ROM drive to a deskside system are in Section A.1.2, "Attaching a Drive to a Deskside System."
Follow these steps to attach an external CD-ROM drive to either a Challenge or Onyx rackmount system:
If you have not already done so, shut down the system and turn off the chassis power switch.
Open the rear chassis door of the rackmount unit.
Make sure the CD-ROM drive you are using is terminated.
Attach a 68-pin-to-50-pin Centronics SCSI adapter cable (p/n 018-0347-001) to the external CD-ROM drive. Place the CD-ROM drive on top of the rackmount unit or on another convenient, flat surface and plug the CD-ROM drive into a power outlet. Note that the length of the adapter cable limits where you can place the CD-ROM drive.
Place the distribution software CD in a CD caddy and load the caddy into the CD-ROM drive.
Unlatch the fasteners that hold the Cardcage 2 I/O panel closed, and swing the I/O panel door down.
Locate the IO4 board. On a system with multiple IO4 boards, locate the master IO4 board. For Challenge systems, it is in EBus slot 15. For Onyx systems, it is in slot 11.
Disconnect the ribbon cable from the single-ended connector on the IO4 board. This is usually the topmost connector on the edge of the board.

Note: If the system uses the single-ended connector (SCSI Channel 0) for the main system disk, you must use the second SCSI channel (SCSI Channel 1) for the external CD-ROM drive. The IO4 board typically has a differential personality module attached to SCSI Channel 1. The differential module is red and is marked "DIFF" (p/n 030-0304-003). Replace this module with a single-ended module, which is green and is marked "SE" (p/n 030-0305-002). Also, some systems may use differential personality modules on both SCSI channels. You must replace one of the differential modules with a single-ended module and connect the CD-ROM drive to the single-ended module. Remove one of the blanking plates from the I/O panel and set it aside. You will need to replace the blanking plate later when the retrofit is complete.
Install the 68-pin SCSI connector (p/n 018-0310-002) in the open space where you removed the blanking plate.
Attach the edge connector on the end of the newly installed ribbon cable to the single-ended SCSI connector on the IO4 board. See Figure A-1.
Close and latch the I/O panel.
Connect the 68-pin to 50-pin Centronics SCSI adapter cable to the 68-pin SCSI connector you installed on the I/O panel. See Figure A-2.
Turn on power to the CD-ROM drive.
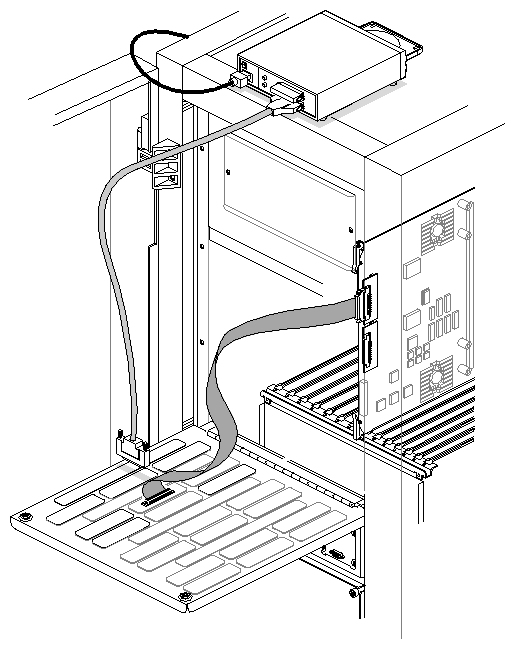
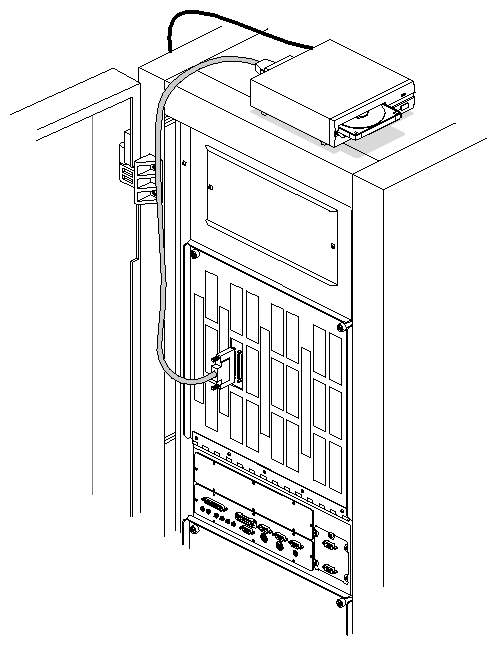
The external CD-ROM drive is now attached and ready to use. You are ready to power on the system and use the CD-ROM drive.
Follow these steps to attach an external CD-ROM drive to either a Challenge or Onyx deskside system:
If you have not already done so, shut down the system and turn off the chassis power switch.
Make sure the CD-ROM drive is terminated.
Open the front chassis door of the deskside unit.
Attach a 68-pin-to-50-pin Centronics SCSI adapter cable (p/n 018-0347-001) to the external CD-ROM drive. Place the CD-ROM drive on top of the deskside unit or on another convenient, flat surface and plug the CD-ROM drive into a power outlet. Note that the length of the adapter cable limits where you can place the CD-ROM drive.
Place the distribution software CD in a CD caddy and load the caddy into the CD-ROM drive.
Unlatch the fasteners that hold the I/O panel closed, and swing the I/O panel door down.
Locate the IO4 board. On a system with multiple IO4 boards, locate the master IO4 board. On Challenge systems, it is in slot 5. On Onyx systems it is in slot 3.
Disconnect the ribbon cable from the single-ended connector on the IO4 board. This is the topmost connector on the edge of the board.
Note: If the system uses the single-ended connector (SCSI Channel 0) for the main system disk, you must use the second SCSI channel (SCSI Channel 1) for the external CD-ROM drive. The IO4 board typically has a differential personality module attached to SCSI Channel 1. The differential module is red and is marked "DIFF" (p/n 030-0304-003). Replace this module with a single-ended module, which is green and is marked "SE" (p/n 030-0305-002). Also, some systems may use differential personality modules on both SCSI channels. You must replace one of the differential modules with a single-ended module and connect the CD-ROM drive to the single-ended module. Remove one of the blanking plates from the I/O panel and set it aside. You will need to replace the blanking plate later when the retrofit is complete.
Install the 68-pin SCSI connector (p/n 018-0310-002) in the open space where you removed the blanking plate.
Attach the edge connector on the end of the newly installed ribbon cable to the single-ended SCSI connector on the IO4 board. See Figure A-3.
Close and latch the I/O panel.
Connect the 68-pin-to-50-pin Centronics SCSI adapter cable to the 68-pin SCSI connector you installed on the I/O panel. See Figure A-4.
Turn on power to the CD-ROM drive.
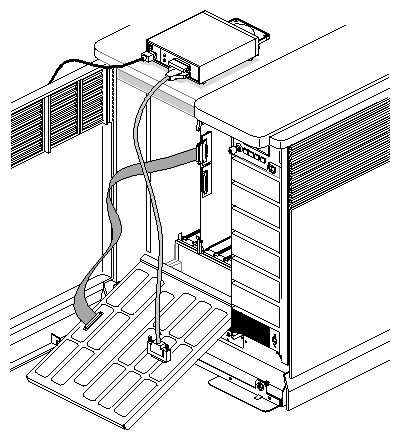
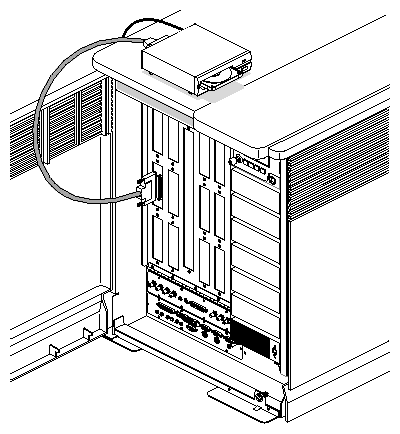
The external CD-ROM drive is now attached and ready to use. You are ready to power on the system and use the CD-ROM drive.
You cannot use the manual eject button on the front of the drive to eject a CD while the system is booted and running IRIX. The next section describes the steps you should take to eject a CD.
Disconnecting the CD-ROM drive is physically the reverse of connecting the drive.
You can eject a CD-ROM from the drive in either of two ways:
If the system is booted and you are running IRIX, use the eject(1) command. Enter the following command at a shell prompt:
eject
If the system is not yet booted, or you are at the PROM level, or the CD-ROM drive is powered on but not attached to the system, eject a CD by pressing the eject button located on the front of the CD-ROM drive.
| Note: Do not use the eject button to eject a CD if the system is booted and running IRIX. Often, the CD will not eject if you press the eject button while the system is running. If a CD is mounted as a file system and the CD is ejected while the file system is still mounted, the operating system is left in an inconsistent state. If the system is running UNIX, it is safest to use the eject command to eject a CD from the CD-ROM drive. |
After you have completed the retrofit, you are ready to disconnect the external CD-ROM drive. Follow these steps:
Shut down and power off the system. Turn off power to the CD-ROM drive.
Disconnect the 68-pin-to-50-pin Centronics SCSI cable from the I/O panel.
Remove the CD-ROM drive from the top of the system, disconnect the 68-pin-to-50-pin Centronics SCSI cable from the drive, and unplug the CD-ROM drive power cord.
Open the I/O panel and disconnect the ribbon cable from the single-ended connector on the IO4 board.
Remove the 68-pin connector you installed in the I/O panel and replace the blanking plate that was originally installed in that slot.
Replace any personality modules you changed (for example, if you installed a single-ended module on SCSI Channel 1).
Reconnect the proper ribbon cable to its original connector on the IO4 board (for example, to SCSI Channel 0).
Close and fasten the I/O panel door and close the chassis door.
You are ready to power on the system.