If your IRIS FailSafe system uses a Challenge RAID system for shared storage, configure it following the instructions in this section.
Load the Challenge RAID software from the CD-ROM. The Challenge RAID software images are created in inst format; thus, they require that the Inst utility be used. Installation software and instructions are included with the standard Silicon Graphics software products.
This chapter explains
Vault configuration for IRIS FailSafe
Challenge RAID configurations for IRIS FailSafe
creating the Challenge RAID configuration file
restarting the agent and checking the configuration file
configuring LUNs (logical unit numbers)
creating SCSI device nodes
enabling command-tagged queuing on the LUNs
 | Note: For information on the Challenge RAID software, see the CHALLENGE RAID Owner's Guide. |
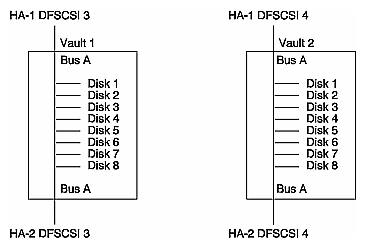
These configurations have been designed to ensure availability of services
in the case of disk failures: by plexing shared storage using XLV
during repair of failed disks: by placing each plex of a shared volume on a separate vault (in multivault systems)
in the case of failure of a single SCSI channel: by placing each vault on a separate SCSI channel
In a single-bus plexed configuration, each volume element on Vault 1-Disk 1 is plexed on Vault 2-Disk 1, as diagrammed in Figure 4-1.
In a split-bus plexed configuration, each volume element on Vault 1-Disk 1 is plexed on Vault 2-Disk 1, as diagrammed in Figure 4-2.
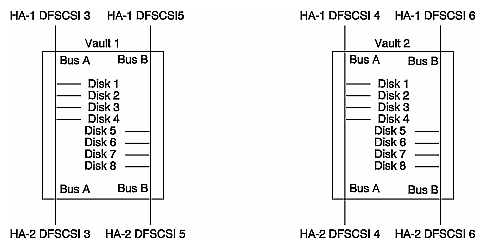
The configuration in Figure 4-2 uses more SCSI buses than that in Figure 4-1, but is easier to service because there are fewer disks per SCSI bus. Replacing a faulty disk while the cluster is up requires that you manually stop all I/O to all disks on the same bus as the faulty drive.
The only configuration of RAID disks supported is the dual-bus, dual-initiator configuration, which provides the highest availability. Each host has two SCSI-2 adapters, each of which connects by a separate SCSI-2 bus to a separate storage-control processor (SP) in the Challenge RAID storage system. Since this configuration protects against a SCSI-bus cable failure, SP failure, or SCSI-2 adapter failure, it provides higher availability than the dual-initiator configuration for enterprises requiring the highest level of availability.
This configuration was designed for these goals:
The Challenge RAID storage system allows the online hot replacement of failed disk drives (by owner or SSE) and other redundant system components, such as SPs and power supplies (by SSE only).
By placing each storage-control processor (SP) of each CHALENGE RAID storage system on a separate controller, system availability is ensured if a single SCSI channel, a single SP, or a SCSI-2 adapter fails.
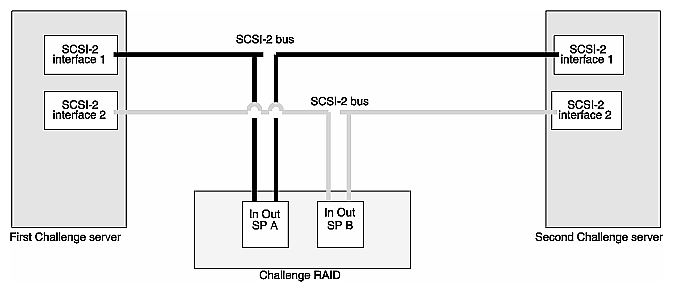
 | Caution: Because both hosts have access to all disk modules and their data in this configuration, you must configure the filesystem appropriately and install the IRIS FailSafe software to prevent one host from overwriting the other's data. Furthermore, configuring these systems requires following the guidelines in the IRIS FailSafe Administrator's Guide. |
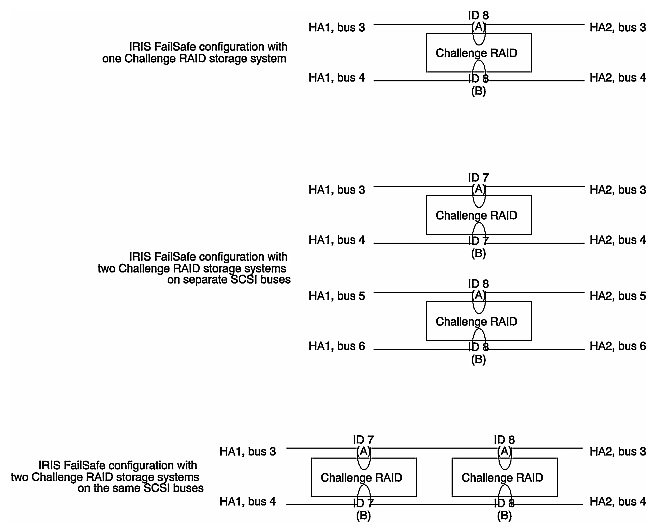
Figure 4-4 shows supported Challenge RAID configurations.
Using XLV on the Challenge RAID storage system requires certain considerations on the part of the system administrator. Without these considerations, failover functionality can be compromised.
When a Challenge RAID storage system is configured correctly, it can provide an alternate path to peripheral data. XLV takes advantage of this capability and automatically switches to the alternate path if the primary path becomes unavailable, for example, because of a SCSI host adapter failure, a loose cable, or a failing SP. When failure occurs, the XLV software issues a command to the SP on the alternate SCSI channel, causing it to take ownership of the LUN containing the desired data. Subsequent references to this data use the alternate channel.
This XLV path failover mechanism requires the hardware configuration be determined at boot time. The XLV command xlv_assemble uses the /dev/scsi path to determine the hardware configuration.
Challenge RAID administration is done through a daemon called the RAID agent, which also communicates to the RAID through /dev/scsi device nodes. When it is active, the RAID agent opens the /dev/scsi device nodes in exclusive mode, so that no other process (including xlv_assemble) can open them. As a consequence, xlv_assemble does not correctly assemble the failover paths to a RAID device if the RAID agent is active. At boot time, the system takes care to assure that xlv_assemble is allowed to complete prior to launching the RAID agent.
The administrator can also run xlv_assemble manually. In this case it is important to be sure that the RAID agent has been turned off first:
# /etc/init.d/raid5 stop |
After xlv_assemble has completed, the RAID agent must be restarted:
# /etc/init.d/raid5 start |
When disks are bound in a LUN, ownership of that LUN goes to the first SP that does an I/O to it after the bind operation is complete. If the objectserver is running, ownership of the newly created LUN is most likely given to the SP connected to the lowest-numbered SCSI channel. If both SPs are on the same SCSI channel, ownership goes to the SP with the lowest TargetID.
Once ownership is assigned, access to that LUN through the dksc interface (/dev/dsk device nodes) is available only through the SP that has ownership. Therefore, the objectserver must not be running when a LUN is being bound.
To stop the objectserver, execute the following:
# /etc/init.d/cadmin stop |
To start the objectserver, execute the following:
# /etc/init.d/cadmin start |
In a server configuration, leave the objectserver off. If it is on, execute the following command to configure it off permanently:
# /etc/chkconfig objectserver off |
The Challenge RAID agent, which interprets commands from the command line interface for the Challenge RAID storage system, uses the configuration file /usr/raid5/raid5-agent.config. This file contains the following specifications:
description specification: list of objects that can be specified in the file
RAID specification: format for RAID devices
user specification: list of users allowed to perform write operations; root is the default
poll specification: a value that determines whether polling is performed and whether the agent stores a copy of the log in its memory
To create the Challenge RAID configuration file, follow these steps:
Run hinv.
Open /usr/raid5/raid5-agent.config.proto in your favorite editor. This file is self-documenting and contains samples.
Save /usr/raid5/raid5-agent.config.proto as /usr/raid5/raid5-agent.config.
In the RAID specification section, add RAID devices, using the controller numbers displayed in the hinv output.
Add the storage-control processors (SPs):
device sc6d6l0 sgi_clariion_SPA "SGI Agent Development System"
device sc6d5l0 sgi_clariion_SPB "SGI Agent Development System"
Note: In /usr/raid5/raid5-agent.config, only the SCSI device number for LUN 0 is required. In the User Specification section, enter the user IDs of those who can perform write operations.
In the Poll Specification section, enter the poll specification.
Save and exit the configuration file. Restart the agent as explained in the next section.
To restart the Challenge RAID software after editing /usr/raid5/raid5-agent.config, follow these steps:
Enter as root:
/etc/init.d/raid5 stop
/etc/chkconfig -f raid5 on
/etc/init.d/raid5 start
If the agent is not active, the Challenge RAID storage system is not available to the server and an error message appears. For error conditions and solutions, see the CHALLENGE RAID Owner's Guide.
Note: Error messages from the agent are not reported to the console, but are stored in the syslog file. Use the /usr/raid5/raid5 getagent command to display information on RAID devices. The output of this command covers all devices. Since the disks have not been bound into LUNs, information for only the storage control processors (SPs) is shown; for example:
Name: sgi-clariion-SPA
Desc: SGI Agent Development System+SGI Agent Development System
Node: sc6d6l0
Signature: 0xcde20300
Peer Signature: 0x11151f00
Revision 7.57.0
SCSI Id: 6
Prom Rev: 0x00076300
SP Memory: 64
Serial No: 94-2555-445

Name: sgi-clariion-SPB
Desc: SGI Agent Development System
Node: sc7d7l0
Signature: 0x11151f00
Peer Signature: 0xcde20300
Revision 7.57.0
SCSI Id: 7
Prom Rev: 0x00076300
SP Memory: 64
Serial No: 94-2555-445
The output lists the SCSI ID numbers and SCSI node numbers for each SP.
A usable RAID unit is known by a logical unit number, or LUN. The LUN is a decimal (actually octal) number between 0 and 7, even though no more than four LUNs can be specified for the Challenge RAID storage system.
To group physical disks (disk modules) into units, use the /usr/raid5/raidclibind command. This command has several required and optional parameters; for details, see Appendix B of latest version of the CHALLENGE RAID Installation and Maintenance Instructions (108-0128-006 or later). For steps on binding LUNs, see Chapter 4.
To create SCSI device nodes, follow these steps:
As superuser, enter this command in the /dev directory:
MAKEDEV dks scsi
The result of this command is that a device is created for each LUN:
LUN 0: /dev/{r}dsk/dks<controller-#>d<drive-#>{s<partition-#>|vh|vol}; note that the device for LUN 0 is different from that for the other LUNs
LUN 1 through 7: /dev/{r}dsk/dks<controller-#>d<drive-#>l<lun-#>{s<partition-#>|vh|vol}
Note: If the Challenge RAID storage system is not connected to a Challenge server during the software installation process, no device nodes are created. Use ls -l in the /dev/scsi directory to display the SCSI device nodes. The following is a fragment of an example output for the first SP:
    crw-r--r--    1 root     sys      195,387 Mar  6 12:30 /dev/scsi/sc6d6l0
    crw-------    1 root     sys      195,403 Mar 21 15:40 /dev/scsi/sc6d6l1
    crw-------    1 root     sys      195,419 Mar 21 15:40 /dev/scsi/sc6d6l2
    crw-------    1 root     sys      195,435 Mar 21 15:40 /dev/scsi/sc6d6l3
    crw-------    1 root     sys      195,451 Mar 21 15:45 /dev/scsi/sc6d6l4
    crw-------    1 root     sys      195,467 Mar 21 15:45 /dev/scsi/sc6d6l5
    crw-------    1 root     sys      195,483 Mar 21 15:45 /dev/scsi/sc6d6l6
    crw-------    1 root     sys      195,499 Mar 21 15:45 /dev/scsi/sc3d3l7
In this example, the first line lists LUN 0 and the next seven lines show LUN 1-7. In this address:
the digit after sc is the SCSI controller number
the digit after the letter d in this address is the number of the RAID disk module
the digit after the letter l in this address (the last character in the address) is the LUN number
Once the LUNs are bound, use fx to partition the LUNs as needed. The syntax of the fx program is as follows:
fx -x "controllertype(controller_number, drive_number, lun_number)" |
For more information on this command, consult its reference page, fx(1M).
Follow these steps:
Enter the fx command with appropriate parameters; for example:
fx -x dksc(6,6,2)
Output such as the following appears:
fx version 5.3, Jan 3, 1995
...opening dksc(6,6,2)
...controller test...OK
Scsi drive type == SGI RAID 5 0767
fx: Warning: bad sgilabel on disk

creating new sgilabel

----- please choose one (? for help, .. to quit this menu)-----
[exi]t             [d]ebug/           [l]abel/           [a]uto
[b]adblock/        [exe]rcise/        [r]epartition/     [f]ormat
Update parameters; at the fx> prompt, enter the following:
fx> label/set/param
Output such as the following appears:
    fx/label/set/parameters: Error correction = (enabled)
    fx/label/set/parameters: Data transfer on error = (enabled)
    fx/label/set/parameters: Report recovered errors = (enabled)
    fx/label/set/parameters: Delay for error recovery = (enabled)
    fx/label/set/parameters: Err retry count = (0)
    fx/label/set/parameters: Transfer of bad data blocks = (enabled)
    fx/label/set/parameters: Auto bad block reallocation (write) = (enabled)
    fx/label/set/parameters: Auto bad block reallocation (read) = (enabled)
    fx/label/set/parameters: Read ahead caching = (disabled)
At the Enable CTQ prompt, enter enable:
fx/label/set/parameters: Enable CTQ = (disabled) enable
At the CTQ depth prompt, enter 12:
fx/label/set/parameters: CTQ depth = (2) 12
Output such as the following appears.
fx/label/set/parameters: Read buffer ratio = (0/256)
fx/label/set/parameters: Write buffer ratio = (0/256)
 * * * * * W A R N I N G * * * * *
about to modify drive parameters on disk dksc(6,6,2)! ok?
At the prompt in the last line in step 4, enter yes.
The following output appears:
----- please choose one (? for help, .. to quit this menu)-----
[exi]t             [d]ebug/           [l]abel/           [a]uto
[b]adblock/        [exe]rcise/        [r]epartition/     [f]ormat
To repartition the disk, enter r.
Enter exit to exit fx. The following message appears:
label info has changed for disk dksc(6,6,2). write out changes? (yes)
Enter y to write the changes to disk