This appendix describes the preventive maintenance required for systems having 1/4-inch tape drives, 4-mm DAT, and 8-mm tape drives, as well as CD-ROM drives.
These are the manufacturers' recommended cleaning schedules:
Clean the 4-mm DAT drive every 25 hours of use.
Clean the 8-mm tape drive once every 30 GB of data transferred or after 15 passes.
 | Note: When dirty drive heads need cleaning, the units may exhibit either read or write errors. |
Use only an approved cleaning kit. A cleaning kit can only be used a limited number of times before you must replace it. For example, you can use the 4-mm drive cleaning kit approximately 60 times; however, you can use the 8-mm drive cleaning cartridge only 12 times. Refer to the information supplied with the cleaning kit to determine the replacement interval. Do not use cleaning kits that are intended for use in audio DAT units, because those cassettes are not recognized by the drives covered in this guide.
The Archive Python 4320 NT provides 1.3 GB of storage on a 60-meter digital data storage (DDS) DAT cassette and 2.0 GB of storage on a 90-meter DDS DAT cassette. The 4320 NT drive complies with the American National Standards Institute (ANSI) DDS format and uses a small DAT with 4-mm tape. The data transfer rate is 183 KB per second. Note that these capacity and transfer-rate figures are approximate.
To load a tape cassette, insert it into the drives, do that the arrow on the top of the cassette enters the drive first, and push gently on the middle of the cassette until the tape is fully recessed in the drive unit.
When you load a cassette, the unit checks to see if the tape is initialized. This checking process takes between 10 and 20 seconds. If the tape has never been initialized, the drive will initialize it when you first start to write data to the tape. Initializing the tape takes an extra 30 seconds beyond what is required to write the data.
| Note: Do not remove the tape from the drive while it is being initialized. |
To remove a cassette, press the unload button on the face of the drive. The unit automatically rewinds the tape and ejects it partway. Grasp the cassette and remove it from the drive. Note that the unload button is disabled when the drive is in use.
To clean a 4-mm DAT drive,
Insert the cleaning cassette into the drive. The drive automatically detects the cleaning cassette, and then loads and runs it. After about 10 to 15 seconds, the cleaning is complete and the drive ejects the cassette.
Remove the cleaning cassette from the drive and make a note, either in a log book or on the cassette itself, of the date when you used the cleaning kit.
| Note: Every time you use the cleaning cassette, the drive uses a new, unused portion of the tape. Eventually, the entire tape is used up and you must obtain a new cleaning cassette. It is therefore a good idea to keep track of the number of times you use each cleaning cassette. |
To remove a tape that has jammed in a 4-mm tape drive, follow these steps:
Power cycle the tape drive and then try ejecting it.
If this does not eject the drive, power cycle it while holding down the unload button.
If neither of these two steps ejects the jammed cassette, contact your service provider.
The 4-mm drive has two LEDs, one green and one amber, that indicate the status of the unit (see Table D-1).
Table D-1. 4-mm DAT Drive Front Panel LEDs
LED | Action | Meaning |
|---|---|---|
Amber | On (lit) | The drive is reading or writing the tape (normal operation). |
Amber | Flashing rapidly | A hardware fault occurred or condensation was detected in the unit (error). |
Green | On (lit) | A cassette is loaded in the drive and it does not generate excess errors (normal operation). |
Green | Flashing slowly | A cassette is inserted but is generating excess soft errors beyond a predefined error threshold (warning: heads may need cleaning). |
Green | Flashing slowly with amber LED | A prerecorded audio cassette is inserted and is being played automatically. |
Green | Flashing rapidly | The drive cannot write the tape correctly (error). |
The Exabyte® 8-mm tape drive provides 2.3 GB of data storage on a standard 8-mm cartridge tape.
Cleaning the tape drive requires use of an Exabyte or Exabyte-approved 8-mm cleaning cartridge.
Follow these steps to clean the tape drive,
Check to see if an 8-mm tape cartridge is present in the drive. If so, press the unload button and remove the cartridge. Leave the drive's door open.
Insert the Exabyte or compatible cleaning cartridge and close the drive. The tape drive will automatically run through the 15-second cleaning cycle. The cleaning tape automatically ejects when the cleaning is complete.
Remove the cleaning cartridge from the drive, record the date on the label, and store it for future use.
To remove a tape that has jammed in an 8-mm tape drive, follow these steps:
Power cycle the tape drive and then try ejecting the tape.
If this does not eject the tape, power cycle the drive again while holding down the unload button.
If neither of these two steps ejects the jammed cassette, contact your service provider.
The 8-mm tape drive has two front panel lights: an amber LED and a green LED. In general, the green LED indicates whether or not the drive is ready to accept commands, and the amber LED indicates that the drive is busy or an error has occurred. Table D-2 lists the LED status and error messages.
Table D-2. 8-mm Tape Drive Front Panel LEDs
Amber LED | Green LED | Meaning and Corrective Action |
|---|---|---|
On | On | Power-on initialization-approximately 60 seconds. |
Off | Off | Passed power-on self-tests. |
Off | On | Tape is loaded, drive is ready. |
Off or on | Slow flashing | The drive is reading or writing a tape (normal operation). |
On, off, or flashing | Flashes four times, then stays on | Servo error-press the unload button to reset the drive. If this does not clear the problem, power cycle the drive. If the problem persists, call your service provider. |
Slow flashing | On or off | A CRC error occurred within the first two seconds of a power-on reset. Power cycle the drive. If the problem persists, the drive needs service. |
Slow flashing | On or off | An unrecoverable fault has occurred during operation. Press the unload button to reset the drive. If this does not correct the problem, power cycle the unit and clean the tape heads. If these steps fail, call your service provider. |
Fast flashing | Off | The drive failed a power-on self-test; try power cycling the drive. If the problem persists, the drive needs service. |
CD-ROM drives are most vulnerable to damage when they are unpacked and not yet mounted in a computer system. When handling a drive after unpacking, there are two major types of damage to be aware of:
rough handling (impact damage)
electrostatic discharge (ESD)
Dropping an unpacked drive onto a hard surface can damage it. A sharp jolt can cause the laser to track improperly.
Avoid touching the drive's printed circuit board (PCB). Leave the unit in ESD protective wrap as long as possible. Use a static-conductive mat or antistatic grounding devices when inspecting or handling the drive. Additional handling tips are
Keep the drive in the packing box or antistatic bag until the installation.
Handle the drive by its frame; avoid touching the drive's PCB.
Install drives in a clean work area.
Wear a properly grounded ESD strap when handling the drive.
To remove dust or other particles from a CD, use compressed air. You may also clean the CD in running water and then blot it dry with a soft lintless cloth. Do not use a paper towel because the paper fibers and material imbedded in the paper can scratch the CD, and the paper might leave behind paper dust. Wipe the cloth directly outward from the center of the disc (radially). Do not rub in a circular motion as you would with a standard phonograph record. The reason for this difference is that if you accidentally scratch a CD while cleaning it, a radial scratch will probably affect less data per track than a scratch that follows a track; the CD-ROM drive can correct for small, radial scratches.
| Note: Do not use solvents or other common cleaners and do not use your mouth to blow dust or other particles off the disc. |
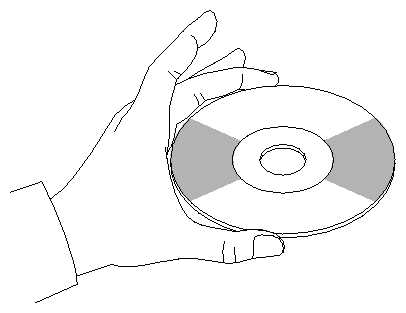
Individual discs should be handled by the edges only (see Figure D-1). Touching and scratching the bottom of the disc can mar the finish and degrade the optical readability of the medium. Do not write on, label, or mark any surface of the compact disc. An auto-eject occurs when a dirty or scratched disc (or a disc placed in the operating case caddy, label-side down) is inserted.
Bringing a disc from a cold to a warm environment may cause moisture to form on its surface. Wipe any condensed moisture off with a soft, lint-free cloth (not a paper towel) before use. Allow approximately one hour for the disc to acclimate to room temperature.
Protect discs from dust, scratches, and warping by storing them in a caddy or nonfunctional plastic storage container (known as a jewel case). Never leave or store discs in the following areas:
locations exposed to direct sunlight
dusty and humid environments
areas directly exposed to heating appliances or heat outlets
a vehicle parked in the sun
A number of operation controls are located on the front panel of the CD-ROM drive:
The headphone jack accepts a 3.5-mm-diameter stereo plug. Monitoring of audio signals is available.
The volume control knob (located to the right of the headphone jack) adjusts the sound level of the headphones.
An emergency eject hole (located just above the volume control) ejects the caddy when the normal procedure does not work. Power off the CD-ROM drive and insert the end of a large, straightened paper clip into the hole until the caddy ejects.
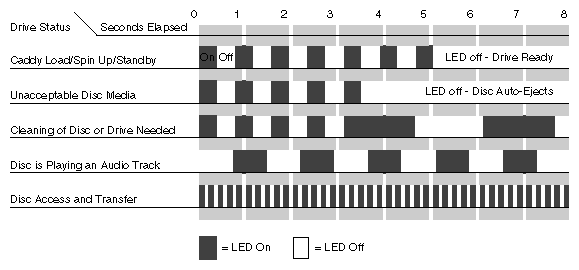
A drive busy indicator LED (located to the left of the eject button) blinks to indicate drive activity. The LED stays dark when no disc caddy is loaded in the drive. See Figure D-2 for details on blink patterns and the status they indicate for the drive.
The eject button works only when the CD-ROM drive is powered on. The caddy will not eject if the CD-ROM is in an active (busy) state. After pushing the eject button, two to three seconds will elapse before release occurs.
Head cleaning is the only preventive maintenance required by the 1/4-inch tape drive. The tape head should be cleaned after every eight hours of tape drive operation and after every two hours of operation when new tapes are used exclusively.
| Note: Clean the heads every two to eight hours of operation to ensure that the tape drive functions correctly. |
Clean the tape head by following these steps:
Remove the tape cartridge from the tape drive.
Push the head loading lever to the right, as if you had installed a tape. This will engage the tape head, allowing you to reach it.
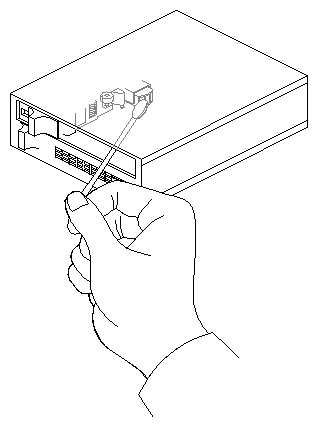
Dip a clean, nonfibrous cotton swab in either tape head cleaning fluid or Freon-TF and wipe the tape head (see Figure D-3).
Use a second clean swab and wipe the head again to remove any residue.

Caution: Do not use cotton swabs with wooden stems. The tip of the swab can break off and become lodged in the tape drive.