This chapter covers installing the driver and installing, removing, and configuring the dial box, button box, or both on your system. Instructions are provided for each of these options.
Install the driver before installing the hardware.
On systems running IRIX 5.3 and earlier, the dial and button box driver is installed by default. On systems running IRIX 6.2 and later, the driver must be manually installed.
The dial box driver is never installed by default.
On an IRIX 6.2 or later systems, to check whether the dial and button driver has been
installed, follow these instructions:
From the Toolchest > Desktop, open a UNIX shell.
At the prompt, type showprods eoe.sw.optinput.
If the driver is installed, you see lines similar to these:
Name | Date | Description |
|---|---|---|
eoe.sw.optinput | xxx.xx, xxxx | Output Input Devices |
If a driver is not installed, follow the appropriate procedure below to install it.
Read any release notes and the instructions on the CD booklet about installing
software.Install the Dial and Button driver using Software Manager or inst.
For instructions on using either installation process, from the Toolchest > Help >
Online books > SGI_EndUser, choose Personal System Administration Guide, Chapter
2, “Installing and Removing Software.”The driver is located in the subsystem eoe.sw.optinput.
Reboot your system to enable the driver.
When configuring the serial device, choose Dial and Button Box.
If you are installing only the dial box, use the dial box driver found in the following patches:
IRIX Version | Patch No. |
|---|---|
5.3 | 1749 |
5.3 IMPACT | 1575 |
6.2 | 1576 |
6.3 | 1750 |
Call your authorized service provider or, in North America, the Technical Assistance Center at 1-800-800-4SGI if you need assistance in locating these patches.
Follow the instructions in the CD booklet for installing the patches. IRIX 6.4 and later contains the dial box driver, subsystem eoe.sw.optinput, found on the IRIX Foundation CD.
After installing the driver, reboot your system. Then configure the dial box serial device.
When configuring the serial device, choose Dial Box, not Dial and Button Box.
See your owner's manual for instructions on powering off and powering on your workstation or system, and for help in locating the serial ports.
Power off and unplug your workstation or system before you begin installing the dial box and/or the button box option. Some systems have power switches on the front and on the back, and both need to be turned off.
Included in this shipment are
a dial box (with stand and overlays) and/or
a button box (with overlays)
a power supply
two cables
a serial adapter cable
a U.S. power cord

Unpack the dial and button box shipment on a clean work space near your system.
Figure 2-1 shows both the dial box and the button box package contents.
Before you connect any cabling, install the stand on the dial box.
Place the dial box in the vertical position.
Place the plastic buttons on the ends of the metal stand. See Figure 2-2.
Attach the metal stand to the dial box with screws.

To install the dial and button boxes, connect the cabling between the boxes and power supply before attaching them to the workstation.

Connect one end of the 6-foot cable to the dial box.
Connect the other end of the 6-foot cable to the CN1 port of the button box.
Connect the round, single connector of the split cable to the round connector on the power supply.
Connect the other single split-cable connector to the CN2 connector on the button box.
Connect the (flagged) connector of the split cable to any serial port on the workstation. See the workstation or system owner's manual for the location of the serial ports.
If necessary, connect the serial adapter cable to the flagged end of the split cable, then attach the other end of the adapter cable to the workstation.

Note: If the flagged connector and non-flagged connector are reversed, the dial and button boxes do not work. No damage occurs. Simply attach the cable connectors to the correct port. Connect one end of the power supply cord to the power supply.
Plug the other end of the power supply cord into an electrical outlet.
Power on your workstation. See your owner's guide for instructions on powering on your workstation or system.
Go to page 12 for configuration instructions.
To install the dial box, connect the cabling between it and the power supply before attaching the cable to the workstation.

Connect the round connector of the split cable to the round connector on the power supply cable.
Connect the non-flagged connector of the split cable to the dial box.
Connect the flagged connector on the split cable to any system serial port. See the workstation or system owner's manual for the location of the serial ports.
If necessary, connect the serial adapter cable to the flagged end of the split cable, then attach the other end of the adapter cable to the workstation.
Connect one end of the power supply cord to the power supply.
Plug the other end of the power supply cord into an electrical outlet.
Power on your workstation. See your owner's guide for instructions on powering on your workstation or system.
Note: If the flagged connector and non-flagged connector are reversed, the dial and button boxes do not work. No damage occurs. Simply attach the cable connectors to the correct port. Go to page 12 for configuration instructions.
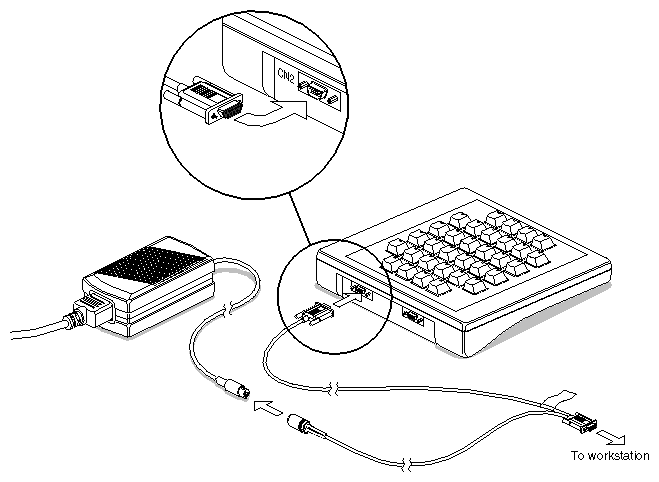
To install the button box, connect the cabling between it and the power supply before attaching the cable to the workstation.
Connect the round, single connector of the split-cable to the power supply.
Connect the other single connector of the split-cable to the button box.
Connect the remaining (flagged) connector to any system serial port. See the workstation or system owner's manual for locations of the serial ports.
If necessary, connect the serial adapter cable to the flagged end of the split cable, then attach the other end of the adapter cable to the workstation.
Connect one end of the power supply cord to the power supply.
Plug the other end of the power supply cord into an electrical outlet.
Power on your workstation. See your owner's guide for instructions on powering on your workstation or system.
| Note: If the flagged connector and non-flagged connector are reversed, the dial and button boxes do not work. No damage occurs. Simply attach the cable connectors to the correct port. |
See below for configuration instructions.
After you have logged in to your workstation or system, go to the Toolchest > System > System Manager > Tools menu and choose System Admin Tools. The Admin Tools window opens at the bottom of the System Manager window. Open the Port Setup Icon by double-clicking it. The Port Setup window gives you information about which serial port is available.
You need to know the number of the serial port to which you connected the dial and/or button box.
Select an available port by clicking on the icon. Then click the Connect button.
After you have logged in to your workstation or system, go to the Toolchest > System > System Manager > Hardware and Devices > Serial Devices. Choose Adding a Serial Device.
You need to know the number of the serial port to which you connected the dial and/or button box.
Follow the directions in the dialog box to configure your serial device.
If your system does not recognize the dial and button box, follow these steps to check your installation:
Follow the installation instructions again to see if the cables are connected to the correct connector.
Check the cable connections to be sure the cables connectors are completely inserted in each port.
Use the serial adapter cable if needed.
Call your authorized service provider if you cannot configure the dial and button boxes after following the above steps.
Follow these instructions to remove a dial and button box.
Power off your workstation. See your owner's manual for instructions.
Unplug the power cord from the workstation to the electrical outlet.
Unplug the power cord form the power supply to an electrical outlet.
Disconnect the cable from the system to the dial box or button box.
Disconnect the cable between the dial box and button box.
Disconnect the cable from the dial box or button box to the power supply.
Connect the power cord from the workstation or system to the electrical outlet.
See your owner's manual for instructions on powering on the workstation or system.
You are finished removing the dial and button boxes.
Silicon Graphics provides a comprehensive product support and maintenance program for its products. If you are in North America and would like support for your Silicon Graphics supported products, contact the Technical Assistance Center at 1-800-800-4SGI or your authorized service provider. If you are outside North America, contact the Silicon Graphics subsidiary or authorized distributor in your country.