The SGI 2 Gb Total Performance 9100 (2 Gb TP9100) Fibre Channel storage system provides you with a high-capacity, high-availability Fibre Channel storage solution. The storage system can be configured for JBOD (“just a bunch of disks”) or RAID (“redundant array of inexpensive disks”) operation, and is available in both rackmount and tower formats. The modular design of the 2 Gb TP9100 expands easily to meet your needs.
The following sections describe the structure and features of the storage system:
The features of the SGI 2 Gb TP9100 storage system are outlined in the following sections:
64-drive maximum configuration
32 logical units maximum
1 to 16 disk drives can be combined into a pack (15+1 RAID group)
5 RAID Levels (0, 1, 0+1, 3, and 5)
1 Gb/s or 2 Gb/s front end (FE) and back end (BE)
Fibre Channel arbitrated loop (FC-AL)Immediate LUN availability (ILA)
Transparent disk drive rebuilds
Variable stripe size per controller (8K, 16K, 32K, and 64K)
Mirrored cache
Drive roaming during power off
Cache coherency
Transparent failover and failback
Automatic error recovery
Write through, write back, or read ahead support
Automatic detection of failed drives
Hot-swappable drives
SAN mapping server to LUN mapping
Automatic firmware flashing
In a dual controller configuration, the firmware of the replacement controller is automatically flashed to match the firmware of the surviving controller.
96 drive maximum configuration
1x16 (more storage) and 2x8 (more bandwidth) disk topologies
Dual power feeds with dual power supplies
Redundant cooling
Battery back-up (BBU) maintains cache in case of power failure
IRIX path failover
Dynamic hot-sparing
Non-disruptive component replacement
Enclosure services interface (ESI) for SCSI enclosure services (SES)
Software: IRIX, CXFS, FailSafe
Hardware: SGI Altix 3000, SGI Origin 200, Origin 300, Origin 2000, and Origin 3000 family servers. Silicon Graphics Octane, Silicon Graphics Octane2, and Silicon Graphics Fuel visual workstations
| Note: Copper Fibre Channel host bus adapters (HBAs) are not supported by the TP9100 (2Gb TP9100). |
QLogic 2200 optical 33/66-MHz HBA
QLogic 2310 optical 66-MHz HBA
QLogic 2342 optical 66-MHz dual channel HBA
Brocade family SAN switches
SilkWorm 2400 8-port switch
SilkWorm 2800 16-port switch
SilkWorm 3200 2Gb/s 8-port switch
SilkWorm 3800 2Gb/s 16-port switch
IRIX release level 6.5.16 or later
The enclosure is the basic unit of the SGI 2 Gb TP9100 storage system. Each enclosure contains a minimum of 4 and maximum of 16 disk drives and the component modules that handle I/O, power and cooling, and operations.
The enclosure is available in two formats: RAID (Redundant Array of Inexpensive Disks) and JBOD (Just a Bunch of Disks). An enclosure with single or dual RAID modules is a RAID (base) enclosure. An enclosure without a RAID module is a JBOD or expansion enclosure. The expansion enclosure can be cabled to a RAID enclosure and provides additional disk modules. The RAID controller can address up to 64 disk drives; thus, three expansion enclosures can be cabled to it.
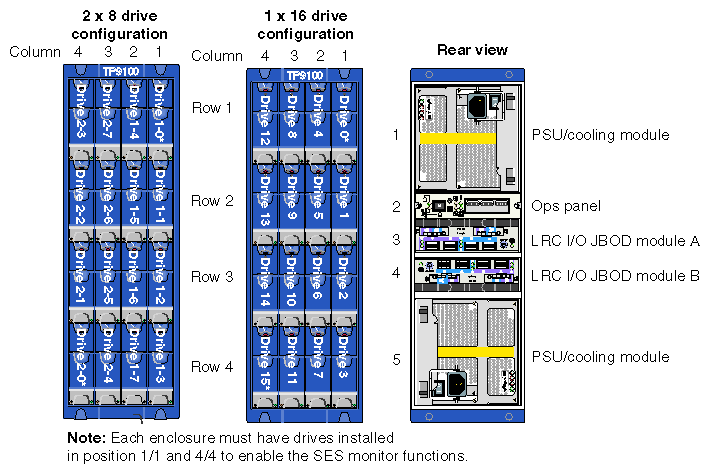
Enclosures can be installed in industry standard 19-in. racks or be configured as a stand-alone tower. Figure 1-1 shows the front view of a rackmount enclosure fully populated with drives.
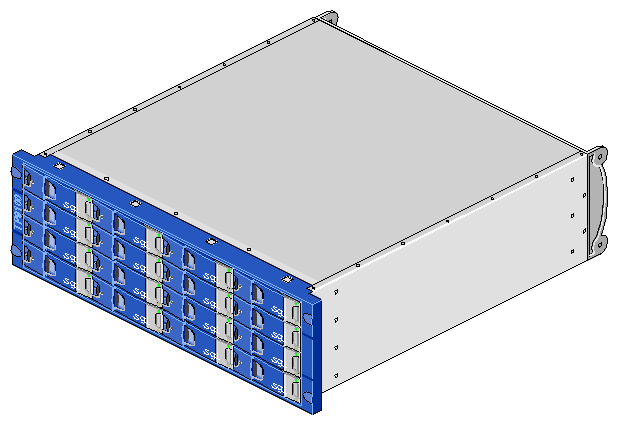
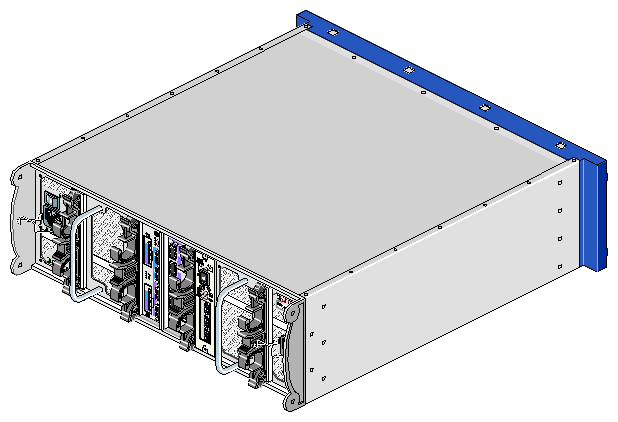
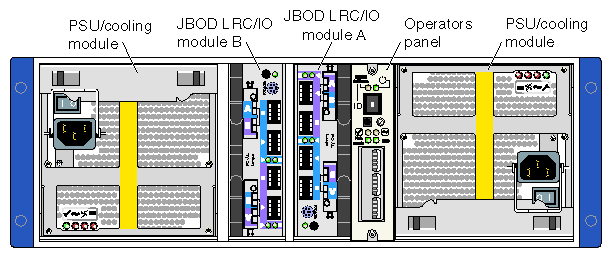
Figure 1-2 shows the rear view of a rackmount enclosure.
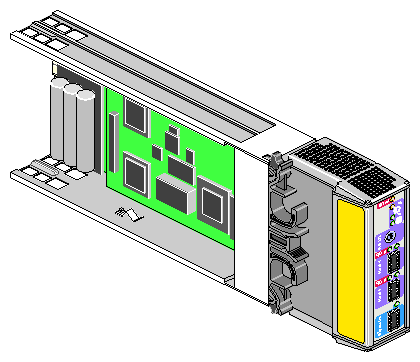
The enclosure contains the following component modules (see Figure 1-3 and Figure 1-4):
Integrated operators panel (ops panel)
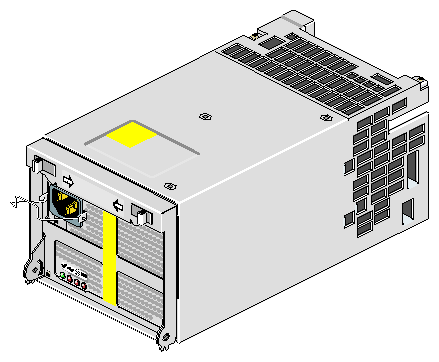
Two power supply cooling modules (PSU/cooling modules)
One or two loop resiliency circuit input/output (LRC I/O) modules with optional integrated Mylex FFX-2 RAID controllers

Note: In simplex RAID configurations, the enclosure will contain a RAID loopback LRC module in place of one of the RAID LRC I/O modules. Up to 16 disk drive carrier modules
Dummy drive carrier modules
Figure 1-3 shows a front view of the enclosure components.
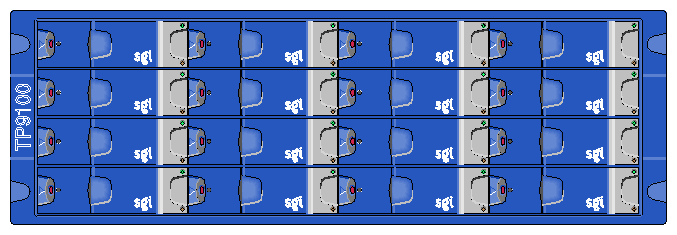
Figure 1-4 shows a rear view of the RAID (base) enclosure components.
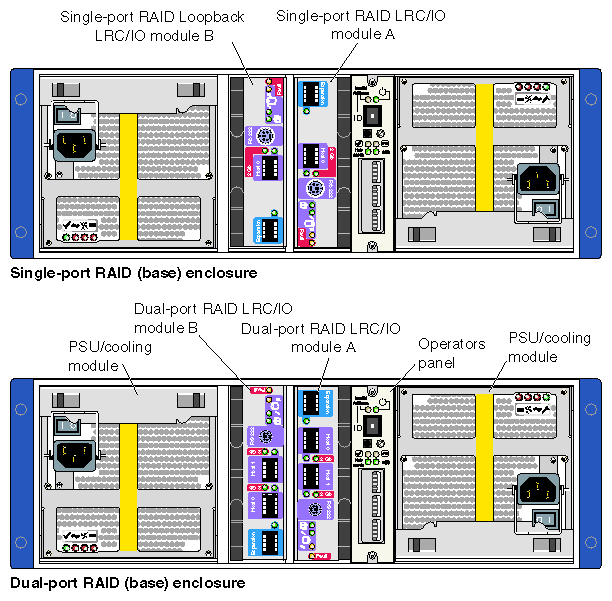
Figure 1-5 shows a rear view of the JBOD (expansion) enclosure components.
These components are discussed in the following sections:
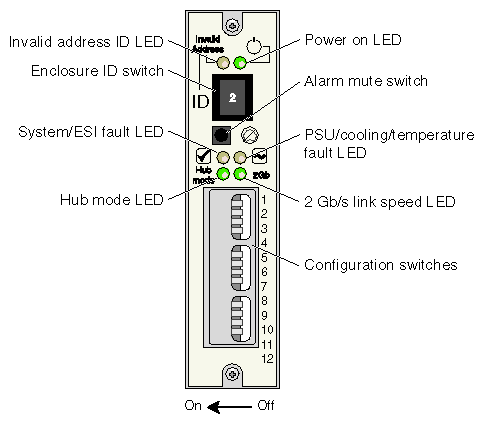
The operators panel (ops panel) contains an enclosure services processor that monitors and controls the enclosure (see Figure 1-6). The ops panel contains LEDs which show the status for all modules, an audible alarm that indicates a fault state is present, a push-button alarm mute switch, and a thumb-wheel enclosure ID address range selector switch. When the 2 Gb TP9100 is powered on, the audible alarm sounds for one second, and the power-on LED illuminates.
Figure 1-6 shows the ops panel and identifies its components. For more information about the LEDs and configuration switches, see “ESI/Ops Panel LEDs and Switches” in Chapter 5.
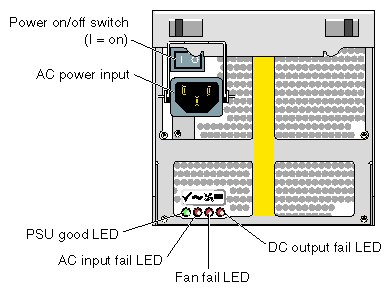
Two power supply cooling modules (PSUs) are mounted in the rear of the enclosure (see Figure 1-7). These modules supply redundant cooling and power to the enclosure. Voltage operating ranges are nominally 115 V or 230 V AC, selected automatically .
| Note: If a power supply fails, do not remove it from the enclosure until you have a replacement power supply. The cooling fans in the power supply will continue to operate even after the power supply fails. Removing a failed power supply and not replacing it immediately can result in thermal overload. |
Four LEDs mounted on the front panel of the PSU/cooling module (see Figure 1-8) indicate the status of the power supply and the fans. Module replacement must be completed within 10 minutes after removal of the failed module. For more information, see “Power Supply/Cooling Module LEDs” in Chapter 5.
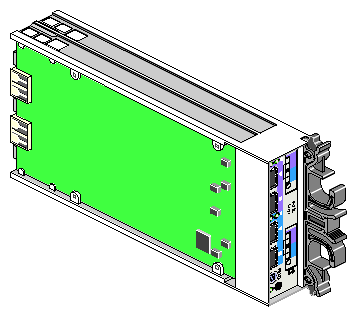
The storage system enclosure includes two loop resiliency circuit (LRC) I/O modules with optional integrated RAID controllers. There are two RAID LRC I/O modules available: a dual-port version and a single-port version (see Figure 1-9 and Figure 1-10). The enclosure is available with or without RAID LRC I/O modules. An enclosure with one or two RAID LRC I/O modules is a RAID base enclosure. An added enclosure with JBOD LRC I/O modules is called an expansion enclosure, which must be cabled to a RAID LRC I/O enclosure. The base and expansion enclosures can be connected with the copper SFP cables that are included with the expansion enclosure or with optical SFP cables.
The FC-AL backplane in the enclosure incorporates two independent loops formed by port bypass circuits within the RAID LRC I/O modules. The RAID LRC I/O modules use FC-AL interfacing with the host computer system. Processors in the RAID LRC I/O modules communicate with the enclosure services interface (ESI) to devices on the backplane, PSU, LRC and ops panel, to monitor internal functions. These processors operate in a master/slave configuration to allow failover
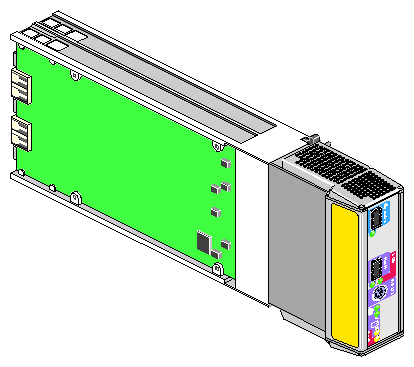
The RAID LRC I/O modules can address up to 64 disk drives. A maximum of two fully populated JBOD expansion enclosure can be cabled to a RAID base enclosure. The disk drives in each enclosure can be of different capacities, but all of the disk drives in an individual LUN must be of the same capacity.
For information about the LEDs on the rear of the RAID LRC I/O modules, see “RAID LRC I/O Module LEDs” in Chapter 5.
A RAID loopback LRC I/O module may be installed in slot B to create an simplex RAID configuration. The loopback LRC I/O modules do not contain the FFX-2 circuitry and connect RAID LRC I/O module A to the B-side of the disk drives. These modules are sometimes referred to as a RAID wrap LRC I/O modules. There are two version of the the RAID loopback LRC I/O module available: a single-port version and a dual-port version. (See Figure 1-11 and Figure 1-12).
| Note: The RAID LRC I/O modules in an enclosure must both be single-port controllers, or they must both be dual-port controllers. SGI does not support single-port and dual-port controllers in the same enclosure. |
The JBOD LRC/IO module uses a Fibre Channel arbitrated loop (FC-AL) to interface with the host computer system. The FC-AL backplane incorporates two independent loops formed by port bypass circuits within the LRC I/O modules. Processors housed on the LRC modules provide enclosure management and interface to devices on the backplane, PSU/cooling module, and ops panel, to monitor internal functions. These processors operate in a master/slave configuration to allow failover.
| Note: The JBOD LRC I/O module can address up to 96 disk drives; thus, six JBOD enclosures can be cabled together. |
The enclosure may be configured with either one or two LRC I/O modules. If only one module is installed, an I/O blank module must be installed in the unused bay.
For information about the LEDs on the rear of the JBOD LRC I/O module, see “RAID Loopback LRC I/O Module LEDs” in Chapter 5.
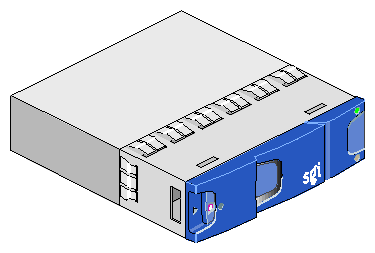
The disk drive carrier module consists of a hard disk drive mounted in a die-cast aluminum carrier. The carrier protects the disk drive from radio frequency interference, electromagnetic induction, and physical damage and provides a means for thermal conduction. For more information about drive carrier modules, see Chapter 6, “Installing and Replacing Drive Carrier Modules”.
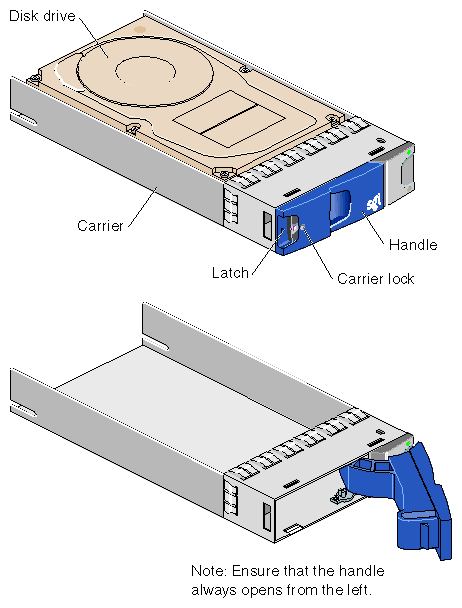
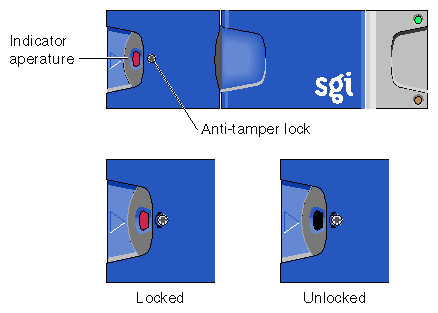
The drive carrier module has a handle integrated into its front face. This handle cams the carrier into and out of the drive bay, holds the drive to the backplane connector, and prevents the unauthorized removal of the drive by means of an anti-tamper lock (see Figure 1-15). For more information about operating the anti-tamper lock, see “Replacing a Drive Carrier Module ” in Chapter 6.
For information about the drive carrier module LEDs, see “Drive Carrier Module LEDs” in Chapter 5.
Dummy drive carrier modules must be installed in all unused drive bays. They are designed as integral drive module front caps with handles and must be fitted to all unused drive bays to maintain a balanced airflow. For information about replacing the dummy drive carrier modules, see “Replacing the Disk Drive Module” in Chapter 6.
This section contains information about enclosure bay numbering in the following sections:
The rackmount enclosure is 4 bays wide and 4 bays high, and the bays are numbered as follows:
The disk drive bays, located in front, are numbered 1 to 4 from left to right and 1 to 4 from top to bottom. Drives in bays 1/1 and 4/4 are required for storage system management; these bays must always be occupied.
The rear bays are numbered 1 to 5 from right to left.
The location of a disk drive module is identified by combining the column and row numbers (top and side numbers in Figure 1-20). For example, the disk drive in the upper left corner of the enclosure is disk 1-1. A module located in the rear of the enclosure is identified by its bay number. For example, the PSU/cooling module on the far left side of the enclosure is in bay 5.
Figure 1-17 shows the enclosure bay numbering convention and the location of modules in the rackmount enclosure.

The tower enclosure is 4 bays wide by 4 bays high, and the bays are numbered as follows:
The disk drive bays, located in front, are numbered 1 to 4 from right to left and 1 to 4 from top to bottom. Drives in bays 1/1 and 4/4 are required for storage system management; these bays must always be occupied.
The rear bays are numbered 1 to 5 from top to bottom.
The location of a disk drive module is identified by combining the column and row numbers (top and side numbers in Figure 1-18). For example, the disk drive in the upper right corner of the enclosure is disk 1-1. A module located in the rear of the enclosure is identified by its bay number. For example, the PSU/cooling module on the bottom of the enclosure is in bay 5.
Figure 1-18 shows the correct positions of the modules and the enclosure bay numbering convention for the tower.
This section contains information about the 2 Gb TP9100 storage system rack in the following sections:
The 2 Gb TP9100 rack is 38U high and is divided into 12 bays. Eleven of these bays can house enclosures; the 2U bay at the top of the rack accommodates the SGI Fibre Channel Hub or one or more Fibre Channel switches. All eleven of the enclosure bays can be occupied by independent RAID enclosures or a combination of RAID enclosures and expansion enclosures. (Each RAID enclosure can support up to three expansion enclosures). Unoccupied bays must contain a 3U filler panel to provide proper airflow.
| Caution: Equipment must be installed in the bays only as described above. |
Figure 1-19 shows the front of a 2 Gb TP9100 rack with two enclosures installed.
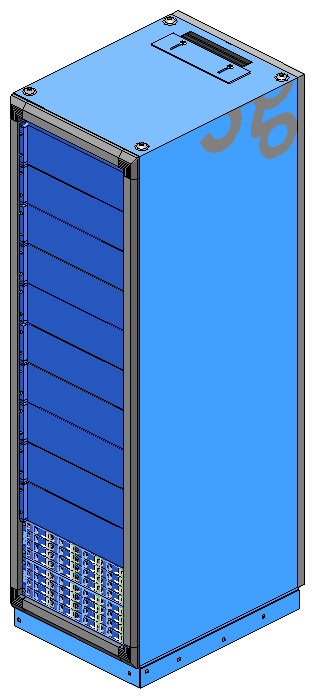
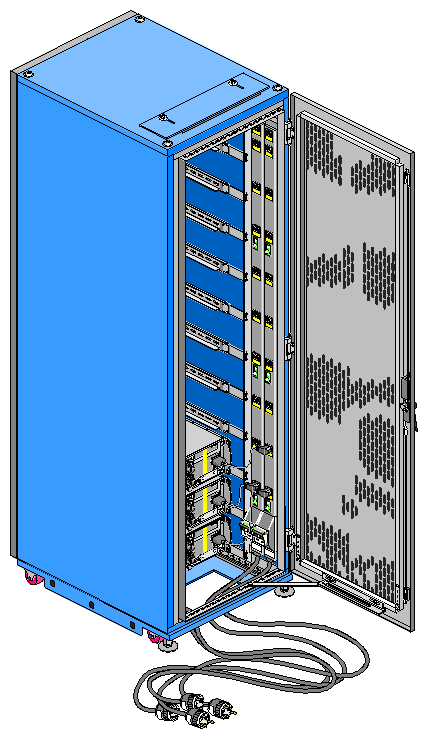
Figure 1-20 is a rear view of the 2 Gb TP9100 rack.
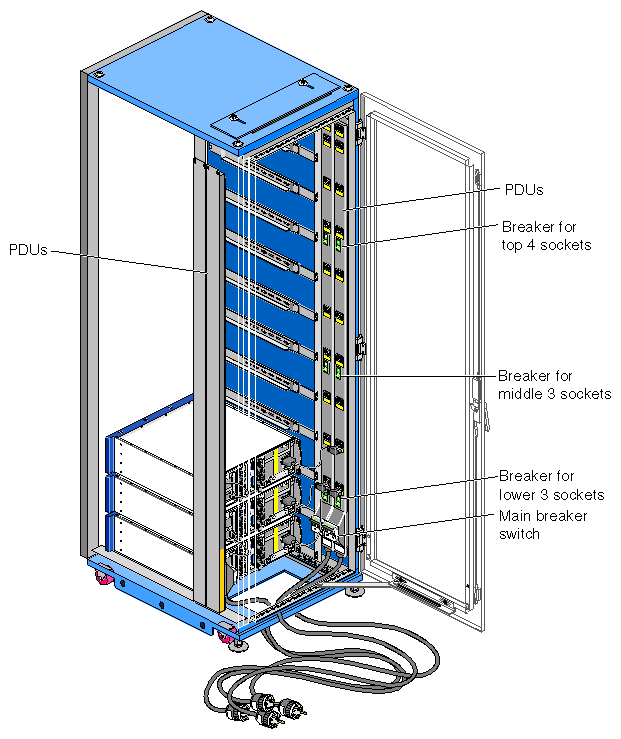
The power distribution units (PDUs) mounted in the rear of the rack provide power to the enclosure and switch bays. The breakers on the PDUs also provide a power on/off point for the rack and enclosures. See Figure 1-21 for socket and breaker locations and functions. All sockets in the PDUs are rated at 200 to 240 VAC, with a maximum load per bank of outlet sockets of 8 A, and are labeled as such. The sockets are connected to equipment in the bays as follows:
Socket 1 at the top of each PDU is for the 2U bay at the top of the rack that houses the SGI Fibre Channel hub or one or more Fibre Channel switches.
Sockets 2 through 12 on each PDU are for the 11 3U bays, which accommodate 2 Gb TP9100 enclosures.

Warning: The power distribution units (PDUs) contain hazardous voltages. Do not open the PDUs under any circumstances.
Figure 1-21 shows the PDUs and describes the function of the sockets and breakers.
To open the rear rack door, follow these steps:
Locate the latch on the rear rack door.
Push up the top part of the latch, as shown in the second panel of Figure 1-22.
Press the button as shown in the third panel of Figure 1-22. This action releases the door lever.
Pull the door lever up and to the right, to approximately the 2 o'clock position, as shown in the fourth panel of Figure 1-22. The door opens.
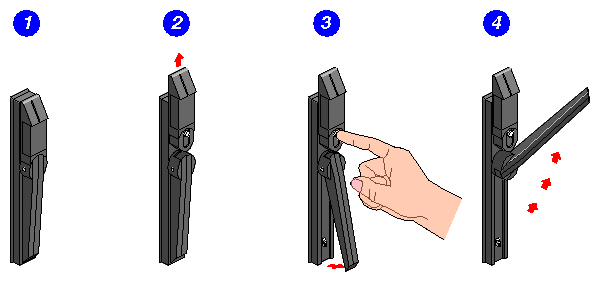
To close the door, lift the locking brace at the bottom. Then reverse the steps shown in Figure 1-22 to latch the door.
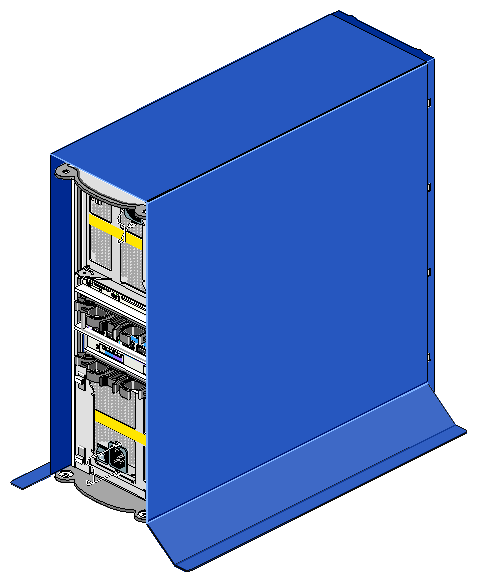
The tower ( deskside) version of the storage system houses one RAID enclosure. The tower is mounted on four casters for easy movement. The enclosure in the tower system is rotated 90 degrees from the rackmount orientation.
Figure 1-23 shows the front of the tower.

Figure 1-24 shows a rear view of the tower.
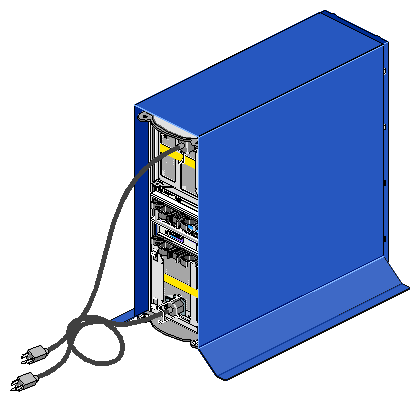
The tower storage system receives power from standard electrical sockets. Figure 1-25 shows the power cords attached to the rear of the tower.
The tower enclosure can be adapted for rackmounting; contact your service provider for more information.