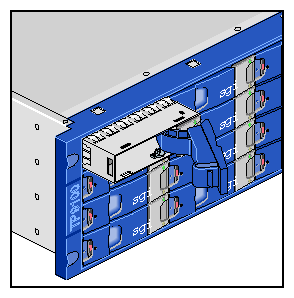
This chapter explains how to install a new drive carrier or replace an existing one in the following sections:
“Replacing a Drive Carrier Module ”

Note: The RAID controller supports hot-swap disk drive replacement while the storage system is online: depending on the RAID level, a disk drive can be disconnected, removed, or replaced with another disk drive without taking the storage system offline.
Note the following:
All disk drive bays must be filled with either a drive carrier module or a dummy drive; no bay should be left completely empty.
The drives in bays 1/1 and 4/4 are required for enclosure management; these bays must always be occupied.
To add a new disk drive module to the storage system, follow these steps:
Ensure that you have enough drive carrier modules and dummy modules to occupy all bays.
Carefully open the bag containing the drive carrier module.

Warning: The disk drive handle might have become unlatched in shipment and might spring open when you open the bag. As you open the bag, keep it a safe distance from your face. Place the drive carrier module on an antistatic work surface and ensure that the anti-tamper lock is disengaged (unlocked). A disk drive module cannot be installed if its anti-tamper lock is activated outside the enclosure.
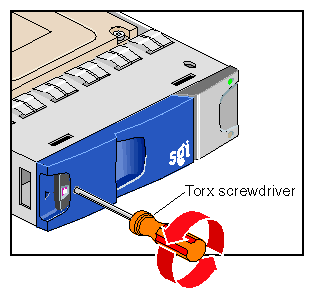
Drives are shipped with their locks set in the unlocked position. However, if a drive is locked, insert the key (included with the disk drive) into the socket in the lower part of the handle trim and turn it 90 degrees counterclockwise until the indicator visible in the center aperture of the handle shows black. See Figure 6-1.
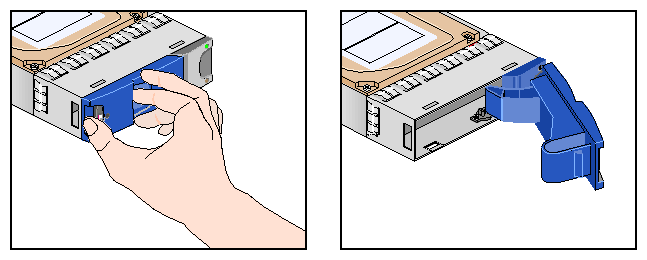
Open the handle of the replacement carrier by pressing the latch handle towards the right (see Figure 6-2).
Orient the module so that the hinge of the handle is on the right. Then slide the disk carrier module into the chassis until it is stopped by the camming lever on the right of the module (see Figure 6-3).
Swing the drive handle shut and press it to seat the drive carrier module. The camming lever on the right of the module will engage with a slot in the chassis. Continue to push firmly until the handle fully engages with the module cap. You should hear a click as the latch engages and holds the handle closed.
Repeat steps 2 through 6 for all drive modules to be installed.
When you have finished installing the drive carrier module(s), activate the anti-tamper lock(s). Insert the key and turn it 90 degrees clockwise. The indicator in the drive carrier module turns red when the drive is locked. See Figure 6-4.
Fit any empty drive bays with dummy drive carrier modules. The drive handle and camming mechanisms operate the same way that those in a standard drive carrier module do.
This section explains how to replace a defective drive carrier module in the following sections:
When a disk drive fails in a RAID 5, 3, 1, or 0+1 LUN, the amber LEDs on all disks in the LUN (except the failed one) alternate on and off every 1.2 seconds until the fault condition is cleared. The amber LED on the failed disk remains lit.
| Note: Before replacing a drive carrier module, use the storage system software to check the disk status. |
For a RAID 5, 3, 1, or 0+1 LUN, you can replace the disk module without powering off the array or interrupting user applications. If the array contains a hot spare on standby, the controller automatically rebuilds the failed module on the hot spare. A hot spare is a special LUN that acts as a global disk spare that can be accessed by any RAID 5, 3, 1, or 0+1 LUN. A hot spare is unowned until it becomes part of a LUN when one of the LUN's disk modules fails.
A RAID 0 array must be taken offline to be replaced if a single disk module fails. Also, if a second disk drive fails in a RAID 5, 3, or 1 LUN, the system drive is marked offline—regardless of whether a second hot spare is available—and the host cannot access data from that system drive.
In these cases, the LUN's data integrity is compromised and it becomes unowned (not accessible by the controller). After you replace the failed disk modules (one at a time), you must delete and then re-create the affected LUN(s). If the data on the failed disks was backed up, restore it to the new disks.
If an LED indicates that a disk drive is defective, follow these steps to remove the faulty drive:
Make sure enough disk drives and dummy drives are available to occupy all bays.
Ensure that users are logged off of the affected systems; back up data if necessary.
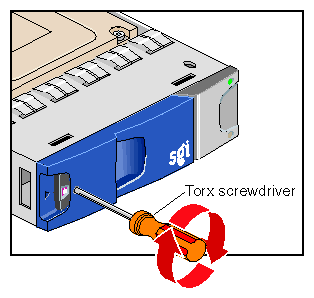
Note: Replace disk drive modules one at a time. If the drive module is locked, insert the key into the anti-tamper lock and turn it 90 degrees counterclockwise. The indicator in the drive carrier module turns black when the drive is unlocked.
Ensure that the faulty drive has spun down.

Caution: Damage can occur to a drive if it is removed while still spinning. Open the handle by pressing the latch on the module handle towards the right. Then gently slide the module out of the enclosure approximately 25 mm (1 inch) and wait 30 seconds. See Figure 6-6.
Withdraw the module from the drive bay. Replace it immediately; follow instructions in “Adding a Drive Carrier Module ”.
If you are replacing a module in a LUN that uses a hot spare, note the location of the replacement module; it is the new hot spare.