This chapter describes the installation of the hardware portion of the Silicon Graphics Octane2 Duo upgrade.
The upgrade consists of the following sections:
This chapter relies heavily on your Octane2 Workstation Owner's Guide. Make sure you have it handy before proceeding with the upgrade.
Before installing any new hardware in your workstation, you should first perform a complete backup of your system.
After making a backup you should shut down the operating system and power off the workstation.
The memory, PCI module, and PCI card upgrades require the use of the static dissipating wrist strap that came with your upgrade kit.
The Octane2 Duo upgrade includes an additional internal hard disk drive (“option drive”) for your Octane2. This provides the additional storage required in order for two people to simultaneously use the system.
The instructions for installing the internal drive may be found in Chapter 7, “Installing and Removing Internal Drives and Front Module Parts,” in your Octane2 Workstation Owner's Guide. The steps involved in the process are outlined below, along with references to specific portions of Chapter 7 in your Octane2 Workstation Owner's Guide.
To install the option drive, follow these steps:
Shut down and power off your workstation, as described on page 161 of your Octane2 Workstation Owner's Guide.
Remove the lock bar and the front bezel from your workstation, as described on pages 162 through 164 of your Octane2 Workstation Owner's Guide.
Install the internal drive into one of the empty drive bays (either the middle bay or the upper bay), as described on pages 165 through 167 of your Octane2 Workstation Owner's Guide.

Note: The lower bay is used for the system drive, and will already be occupied. Remove the appropriate blank panel (that is, the middle or upper one) from the front bezel, as described on pages 168 and 169 of your Octane2 Workstation Owner's Guide. Save the blank panel for reinstallation in case you later remove the internal drive.
Reinstall the front bezel and the lock bar, as described on pages 195 and 196 of your Octane2 Workstation Owner's Guide.
Power on your workstation, as described on page 197 of your Octane2 Workstation Owner's Guide.
Test the new internal option drive, as described on page 176 of your Octane2 Workstation Owner's Guide.
Your additional hard disk drive is now installed.
The Octane2 Duo upgrade includes additional system memory (RAM) for your Octane2. This provides the additional main memory required when two people are simultaneously using the Octane2 system.
The instructions for installing additional memory may be found in Chapter 2, “Installing and Removing the CPU and Memory,” in your Octane2 Workstation Owner's Guide. The steps involved in the process are outlined below, along with references to specific portions of Chapter 2 in your Octane2 Workstation Owner's Guide.
To install the additional memory, follow these steps:
Shut down and power off your workstation, as described on page 32 of your Octane2 Workstation Owner's Guide.
Remove the lock bar from your workstation, as described on page 33 of your Octane2 Workstation Owner's Guide.
Remove the cables from your workstation system module, as described on page 34 of your Octane2 Workstation Owner's Guide.
Note: Make a note of the location of each of the cables in order to facilitate their reconnection. Attach a wrist strap to your wrist and to a ground, as described on page 35 of your Octane2 Workstation Owner's Guide.

Caution: The components inside your workstation are extremely sensitive to static electricity. Always wear a wrist strap when you replace parts inside your workstation. Remove the system module, as described on pages 36 through 40 of your Octane2 Workstation Owner's Guide.
Caution: Be sure to place a cap over each of the two compression connectors on the system module, as described on page 40 of your Octane2 Workstation Owner's Guide. For more information about compression connectors, refer to Appendix A, “Care and Cleaning of Compression Connectors”, in this manual. Install the additional memory into the system module, as described on pages 47 through 52 of your Octane2 Workstation Owner's Guide.
Reinstall the system module into the workstation, as described on pages 53 through 56 of your Octane2 Workstation Owner's Guide.
Reconnect the cables to the system module, as described on page 57 of your Octane2 Workstation Owner's Guide.
Reinstall the lock bar, as described on page 59 of your Octane2 Workstation Owner's Guide.
Power on your workstation, as described on page 58 of your Octane2 Workstation Owner's Guide.
Verify the new memory, as described on page 60 of your Octane2 Workstation Owner's Guide.
Your additional system memory is now installed.
The Octane2 normally has ports to connect one keyboard and one mouse. In order to support an additional keyboard and an additional mouse, the Duo upgrade includes a PCI card that has an additional keyboard port and an additional mouse port. This card also includes an additional Ethernet port.
In order to accept a PCI card, the Octane2 requires a special PCI card cage (also called the PCI module), which is included with the Octane2 Duo upgrade.
The instructions for installing the PCI card and PCI module may be found in Chapter 4, “Installing and Removing PCI Boards,” in your Octane2 Workstation Owner's Guide. The steps involved in the process are outlined below, along with references to specific portions of Chapter 4 in your Octane2 Workstation Owner's Guide.
To install the PCI card and PCI module, follow these steps:
Shut down and power off your workstation, as described on page 72 of your Octane2 Workstation Owner's Guide.
Attach a wrist strap to your wrist and to a ground, as described on page 74 of your Octane2 Workstation Owner's Guide.
Caution: The components inside your workstation are extremely sensitive to static electricity. Always wear a wrist strap when you replace parts inside your workstation. Open the PCI module, as described on page 78 of your Octane2 Workstation Owner's Guide.
Select a slot for the PCI board. Unless you intend to use slot 1 for some other purpose, use slot 1 for the Duo PCI board. For slot location information, see page 79 of your Octane2 Workstation Owner's Guide.
Install the PCI board into the PCI module, as described on pages 80 through 83 of your Octane2 Workstation Owner's Guide.
Install the PCI module into the workstation, as described on pages 100 through 103 of your Octane2 Workstation Owner's Guide.
Note: Save the PCI blanking plate, as it will be required in case you ever decide to remove the PCI module. Note: Installation of the keyboard and mouse cables are covered in this book, in Chapter 4, “Connecting the Secondary Keyboard and Mouse”. Power on your workstation, as described on page 104 of your Octane2 Workstation Owner's Guide.
Verify the PCI module and PCI card installation, as described in “Verifying the PCI Card Installation” in Chapter 5 of this book.
Your PCI card and PCI module are now installed.
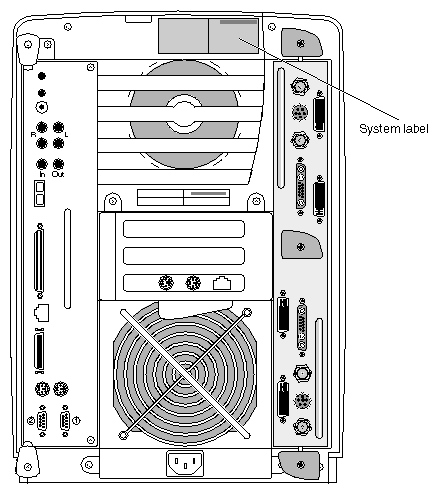
If you received a system upgrade label with your Duo kit, place it on the Octane2 system label, as follows:
Face the back of the Octane2 workstation. The system label (containing the model number/CMN number) is located at the top center of the back of the workstation, as shown in Figure 3-1.
Place the upgrade label over the VCCI and CISPR 22 information.
Proceed to Chapter 4, “Connecting the Secondary Keyboard and Mouse” to connect the second keyboard and mouse.