This chapter includes the following sections:
This section introduces basic Volume Copy premium feature concepts, and describes how information is copied between volumes within a single storage array and how other premium features can be used in conjunction with the Volume Copy premium feature.
The Volume Copy premium feature is used to copy data from one volume (the source) to another volume (the target) in a single storage array. This feature can be used to back up data, to copy data from volume groups that use smaller capacity drives to volume groups using greater capacity drives, or to restore snapshot volume data to the associated base volume.
This section introduces you to source volume and target volumes, and describes how they interact to copy data from one volume to another volume within a single storage array.
 | Note: Examples have been used throughout this chapter and the remainder of the guide to provide further explanation. |
When you create a volume copy, a copy pair is created, which consists of a source volume and a target volume that are located on the same storage array.
The source volume is the volume that accepts host I/O and stores data. The source volume can be a standard volume, snapshot volume, base volume of a snapshot volume, or a Remote Volume Mirror primary volume.
When a volume copy is started, data from the source volume is copied in its entirety to the target volume. The source volume is available for read I/O activity only while a volume copy has a status of In Progress, Pending, or Failed.
After the volume copy completes, the source volume becomes available to host applications for write requests. The target volume automatically becomes read-only to hosts, and write requests to the target volume will be rejected.
The Read-Only attribute can be changed after the volume copy is completed or has been stopped. For more information about the Read-Only attribute, refer to “ Setting Target Volume Permissions”.
 | Caution: A volume copy will overwrite data on the target volume. Ensure that you no longer need the data, or have backed up the data on the target volume, before starting a volume copy. |
A target volume contains a copy of the data from the source volume. The target volume can be a standard volume, the base volume of a Failed or Disabled snapshot volume, or a Remote Volume Mirror primary volume.
When a volume copy is started, data from the source volume is copied in its entirety to the target volume.
While the volume copy has a status of In Progress, Pending, or Failed, read and write requests to the target volume will be rejected by the controllers. After the volume copy completes, the target volume automatically becomes read-only to hosts, and write requests to the target volume will be rejected.
The Read-Only attribute can be changed after the volume copy has completed or has been stopped. For more information about the Read-Only attribute, refer to “ Setting Target Volume Permissions”.
Creating a volume copy (copying data from the source volume to the target volume) is managed by the controllers and is transparent to host machines and applications. This section describes how data is copied using the storage management software, and the actions taken by the controllers during a volume copy.
The Create Copy Wiz ard guides you through the process of creating a new volume copy. The first dialog in the Wizard is the Introduction dialog, which allows you to select a source volume from the list of valid source volumes on the storage array.
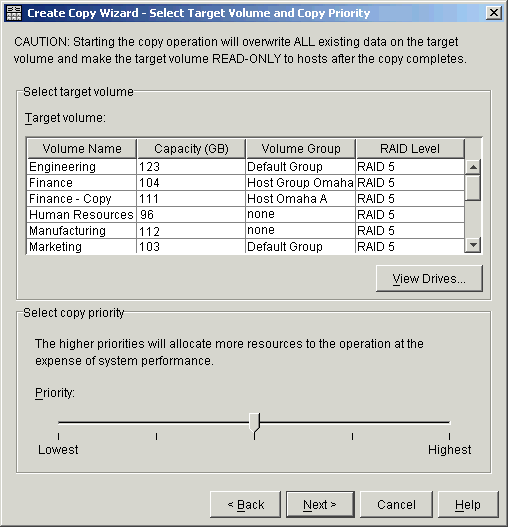
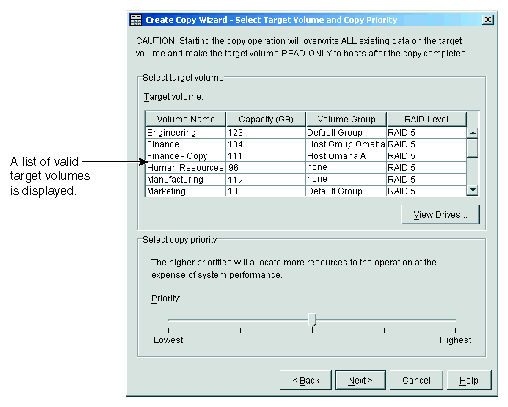
The n ext dialog in the Create Copy Wizard is the Select Target Volume and Copy Priority dialog. It allows you to select the target volume for the volume copy and set the copy priority. The copy priority determines how much of the controller's resources are used to complete the volume copy versus fulfill I/O activity.
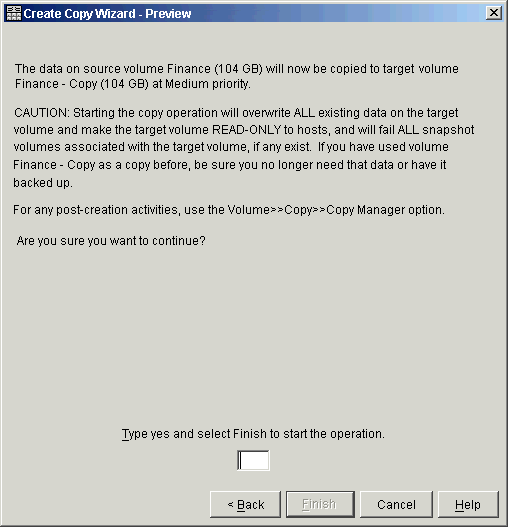
The Preview dialog is the final dialog in the Wizard. It provides an overview of the selected source volume, target volume, and copy priority for the volume copy.
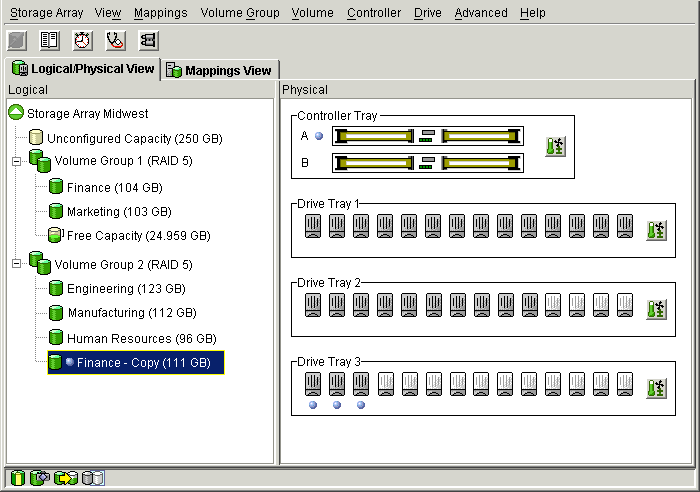
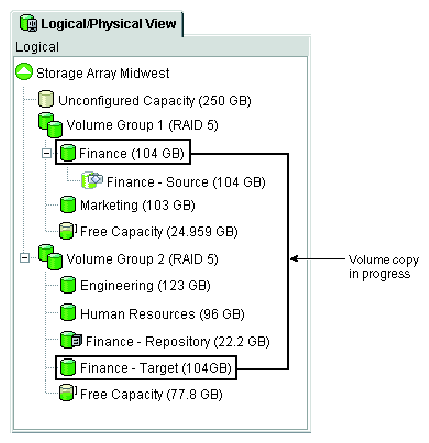
When you have completed the Wizard dialogs, the volume copy starts and the preferred controller of the source volume reads data from the source volume and writes it to the target volume, as shown in Figure 4-1. Operation in Progress icons are displayed on the source volume and target volume while the volume copy is completing.
While a volume copy has a status of In Progress, Pending, or Failed:
The source volume is available for read I/O activity only
The target volume is not available for read or write I/O activity
After the volume copy has completed:
The source volume is available for both read and write I/O activity
The target volume is available for read I/O activity, unless the Read-Only attribute has been disabled. For more information about setting the target volume's Read-Only attribute, refer to “ Setting Target Volume Permissions”.
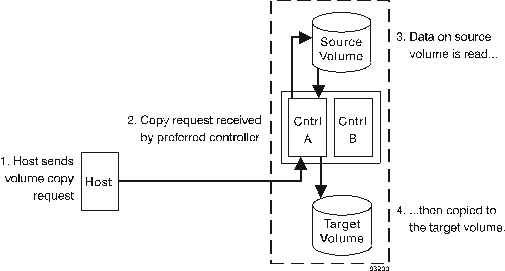
While a volume copy is In Progress, the same control ler must own both the source volume and target volume. If the same controller does not own both the source volume and target volume prior to the volume copy being created, ownership of the target volume is automatically transferred to the controller owner of the source volume.
When the volume copy is completed or is stopped, ownership of the target volume is restored to its preferred controller. If ownership of the source volume is changed during the volume copy, ownership of the target volume is also changed.
| Note: Standard volumes holding a legacy or persistent reservation will not be available in the Create Copy Wizard - Introduction dialog or Create Copy Wizard - Select Target and Set Copy Priority dialog. |
Persistent reservations are configured and managed through the server cluster software, and prevent other hosts from accessing the reserved volume.
Unlike other types of reservations, a persistent reservation reserves host access to the volume across multiple host ports, providing various levels of access control. The Persistent Reservations option enables you to query the storage array about registered host ports and reservations, and will retain reservation details in the event of a storage array power loss.
For more information about persistent reservations, refer to the Array Management window online help.
During a volume copy, the storage array's resources may be diverted from processing I/O activity to completing a volume copy, which may affect the storage array's overall performance.
Several factors contribute to the storage array's performance, including I/O activity, volume RAID level, volume configuration (number of drives in the volume groups and cache parameters), and volume type (snapshot volumes may take more time to copy than standard volumes).
When you create a new volume copy, you will define the c opy pr iority to determine how much controller processing time is allocated for a volume copy versus I/O activity.
There are five relative settings rangin g from Lowest to Highest. The Highest priority rate supports the volume copy, but I/O activity may be affected. The Lowest priority rate supports I/O activity, but the volume copy will take longer.
The copy priority can be specified before the volume copy begins in the Select Target Volume and Copy Priority dialog of the Create Copy Wizard, as shown in Figure 4-2.
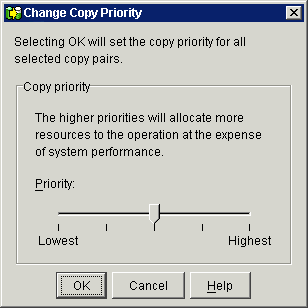
While the volume copy is In Progress or after it has completed, the priority can be set in the Change Copy Priority dialog, as shown in Figure 4-3. The copy priority can also be specified in the Re-Copy dialog when a new volume copy for an existing copy pair is created.
For more information about the Re-Copy dialog, see “Re-Copying a Volume”.
This section describes how the Volume Copy premium feature can be used in conjunction with other premium features available in this version of the storage management software. Premium features covered in this section include Storage Partitioning, Snapshot, and Remote Volume Mirroring.
Storage Partitioning is a premium feature that enables hosts to share access to volumes in a storage array. A storage partition is created when you define a collection of hosts (a host group) or a single host and then define a vo lume-to-LUN (Logical Unit Number) mapping.
This mapping allows you to define what host group or host will have access to a particular volume in the storage array.
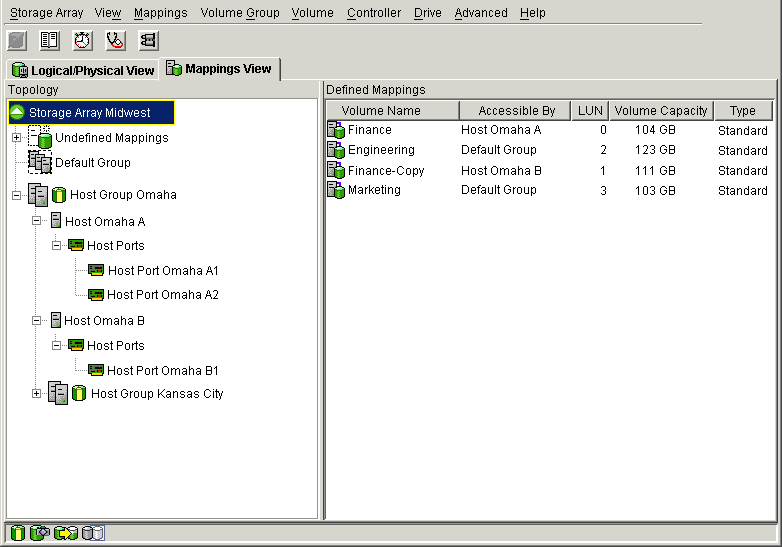
Figure 4-4 shows the Mappings View of the Array Management window where the source volume Finance has been included in a partition accessible by Host Omaha A, and the target volume Finance-Copy has been included in a partition accessible by Host Omaha B.
After a volume copy has been created, the target volume automatically becomes read-only to hosts to ensure that the data is preserved. Hosts that have been mapped to a target volume will not have write access to the volume, and any attempt to write to the read-only target volume will result in a host I/O error.
If you want hosts to have write access to the data on the target volume, use the Copy Manager to disable the Read-Only attribute for the target volume. For more information about changing the target volume Read-Only attribute, see “ Setting Target Volume Permissions”.
A snapshot volume is a point-in-time image of a standard volume and is typically created so that an application, such as a backup application, can access the snapshot volume and read the data while the base volume remains online and accessible to hosts.
Snapshot volumes can be selected as the source volume for a volume copy. This is one of the best ways to use this feature, as it enables complete backups without any impact to the storage array I/O.
| Note: If you choose the base volume of a snapshot volume as your target volume, you must disable all snapshot volumes associated with the base volume before you can select it as a target volume. For more information about disabling snapshot volumes, see “Volume Copy Scenarios”. |
When you create a snapshot volume, a snapshot repository volume is automatically created. The snapshot repository volume stores information about the data that has changed since the snapshot volume was created. Snapshot repository volumes cannot be selected as a source volume or target volume in a volume copy.
The Snapshot Volume premium feature can be used in conjunction with the Volume Copy premium feature to back up data on the same storage array, and to restore the data on the snapshot volume back to its original base volume. For more information about volume copy usage scenario's, see “Volume Copy Scenarios”.
The Remote Volume Mirroring premium feature is used for online, real-time replication of data between storage arrays over a remote distance. In the event of a disaster or a catastrophic failure of one storage array, you can promote a second storage array to take over responsibility for computing services.
When you create a Remote Volume Mirror, a mirrored volume pair is created, consisting of a primary volume at the primary storage array and a s econdary volume at a secon dary, remotely located storage array.
The primary volume is the volume that accepts host I/O and stores data. When the mirr or relationship is initially created, data from the primary volume is copied in its entirety to the secondary volume. This process is known as a full sy nc hronization and is directed by the controller owner of the primary volume. During a full synchronization, the primary volume remains fully accessible for all normal I/O activity.
The controller owner of the primary volume initiates remote writes to the secondary volume to keep the data on the two volumes synchronized. Whenever the data on the primary volume and the secondary volume becomes unsynchronized, the controller owner of the primary volume initiates a full synchronization.
The secondary volume maintains a mirror of the data on its associated primary volume. The controller owner of the secondary volume receives remote writes from the primary volume controller owner, but will not accept host read or write requests.
The secondary volume remains unavailable to host applications while mirroring is underway. In the event of a disaster or catastrophic failure at the primary site, you can perform a role reversal to promote the secondary volume to a primary role. Hosts will then be able to access the newly promoted volume and business operations can continue. For more information about performing a role reversals, see “Role Reversals”.
A primary volume participating in a Remote Volume Mirror can be selected as the source volume for a volume copy, as shown in Figure 4-5. A secondary volume participating in a Remote Volume Mirror cannot be selected a source volume or target volume and will not be available in the Create Copy Wizard when you create a volume copy.
For more information about the Remote Volume Mirroring premium feature, refer to the Array Management window online help.
A role reversal is the act of promoting the secondary volume to be the primary volume of the mirrored volume pair, and demoting the primary volume to be the secondary volume.
In the event of a disaster at the storage array containing the primary volume, you can fail over to the secondary site by performing a role reversal to promote the secondary volume to the primary volume role. This will allow hosts to continue accessing data and business operations to continue.
A role reversal may be performed using one of the following methods:
Change a secondary volume to a primary volume by selecting the Volume >> Remote Volume Mirroring >>Change >> Role to Primary option.
This option promotes the selected secondary volume to become the primary volume of the mirrored pair, and would be used when a catastrophic failure has occurred. For step-by-step instructions, refer to the Array Management window online help.
Change a primary volume to a secondary volume by selecting the Volume >> Remote Volume Mirroring >> Change >> Role to Secondary option.
This option demotes the selected primary volume to become the secondary volume, and would be used during normal operating conditions. For step-by-step instructions, refer to the Array Management window online help.
If the primary volume is selected as the source volume for a volume copy, any volume copies that have a status of In Progress or Pending when the role reversal takes place will fail and cannot be started again until the primary volume is demoted back to its original Remote Volume Mirror secondary volume role.
If the primary storage array is recovered but is unreachable due to a link failure, a forced promotion of the secondary volume will result in both the primary and secondary volumes viewing themselves in the primary volume role (du al-primary condition). If this occurs, the volume copy in which the primary volume is participating will be unaffected by the role change.
The following restrictions apply to the source volume, target volume, and storage array:
While a volume copy has a status of In Progress, Pending, or Failed, the source volume will be available for read I/O activity only. After the volume copy completes, read and write I/O activity to the source volume will be permitted.
A volume can be selected as a target volume for only one volume copy at a time.
The ma ximum allowable number of volume copies per storage array is dependent upon your storage array's configuration. Contact technical support for more information.
A volume that is reserved by the host cannot be selected as a source volume or target volume.
A volume with a status of Failed cannot be used as a source volume or target volume.
A volume with a status of Degraded cannot be used as a target volume.
A volume participating in a modification operation cannot be selected as a source volume or target volume. Modifi cation operations include Dynamic Capacity Expansion (DCC), Dynamic RAID Level Migration (DRM), Dynamic Segment Sizing (DSS), Dynamic Volume Expansion (DVE), and defragmenting a volume.
This section provides step-by-step procedures for enabling the Volume Copy premium feature, creating volume copies, viewing volume copy properties, and managing volume copies using the Copy Manager.
Before you can begin creating volume copies, you will need to enable the Volume Copy premium feature. To complete this procedure, you will need to obtain a F eature Key File from your storage supplier.
From the Array Management window, select Storage Array >> Premium Features >> Enable.
The Select Feature Key File dialog is displayed.
Note: The Select Feature Key File dialog filters for files with the *.key extension. Select the folder in which you placed the feature key file.
Select the appropriate feature key file, and then select OK.
The Enable Premium Feature dialog box is displayed.
Select Yes.
The Volume Copy premium feature is now enabled. The icon in the premium feature status area is no longer displayed with a red slash. To further verify the status of the feature, select Storage Array >> Premium Features >> List.
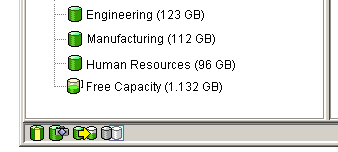
If the Volume Copy premium feature is disabled, but volume copy pairs exist, all of the options in the Copy Manager (stop copy, remove copy pairs, start copy, enable and disable read-only) will still be available. However, you will not be permitted to create any new volume copies.
This section introduces you to selecting or creating a target volume, selecting the source volume, creating the volume copy, and managing the volume copy using the Copy Manager.
| Caution: A volume copy will overwrite data on the target volume. Ensure that you no longer need the data, or have backed up the data on the target volume, before starting a volume copy. |
Before creating a volume copy, ensure that a suitable target volume exists on the storage array, or create a new target volume specifically for the volume copy. Only valid target volumes with a capaci ty equal to or greater than the source volume will be displayed in the Create Copy Wizard - Select Target Volume and Copy Priority dialog, in alphanumeric order.
The following are valid ta rget volumes and will be displayed in the Create Copy Wizard - Select Target Volume and Copy Priority dialog:
Standard volume
Base volume of a disabled or failed snapshot volume
Primary volume participating in a Remote Volume Mirror
The following are not valid target volumes and will not be displayed in the Create Copy Wizard - Sel ect Target Volume and Copy Priority dialog:
Base volume of an active snapshot volume
Snapshot volume
Mirror repository volume
Snapshot repository volume
Secondary volume in a Remote Volume Mirror
Failed volume
Missing volume
A volume with a status of Degraded
A volume currently in a modification operation
A volume holding a legacy or persistent reservation
A volume that is a source volume or target volume in another volume copy that has a status of In Progress, Pending, or Failed
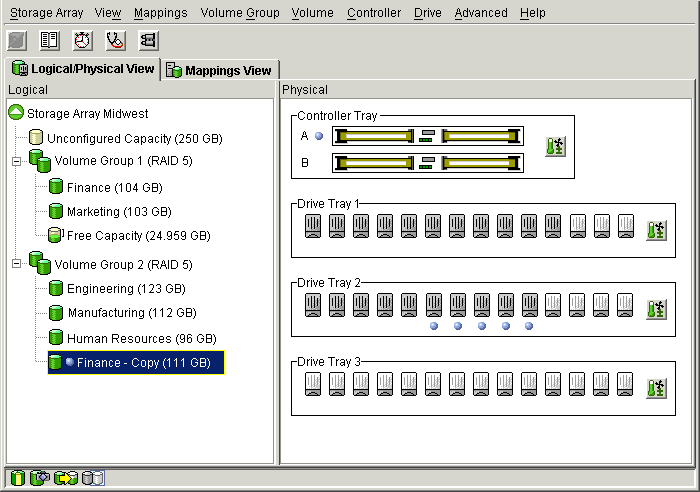
To make locating the target volume in the Logical View easier, ensure that you add “target” or “copy” to the target volume's name, as shown in Figure 4-7. For example, if the source volume name is Finance, name the target volume Finance-Copy. That way you can quickly identify the source volumes and target volumes available on the storage array.
Once the volume copy has completed, the target volume automatically becomes read-only to hosts. Any write requests to the target volume will be rejected, unless you disable the Read-Only attribute in the Copy Manager. For more information about disabling the target volume's Read-Only attribute, see “ Setting Target Volume Permissions”.
The first dialog of the Create Copy W izard allows you to choose the source volume from which data will be copied. A source volume is a standard volume that accepts host I/O and stores data.
| Note: If the volume you selected is not a valid source volume, the Create Copy Wizard will not be displayed. You will need to select a valid volume to begin the Wizard. |
When the volume copy is started, data from the source volume is copied in its entirety to the target volume. While a volume copy has a status of In Progress, Pending, or Failed, the source volume will be available for read I/O activity only. After the volume copy completes or is stopped, read and write access to the source volume will be permitted.
The follow ing are valid source volumes and will be displayed in the Create Copy Wizard - Introduction dialog:
Standard volume
Snapshot volume
Base volume of a snapshot volume
Primary volume participating in a Remote Volume Mirror
The following are not valid source volumes and will not be displayed in the Create Copy Wizard - Intr oduction dialog:
Secondary volume participating in a Remote Volume Mirror
Snapshot repository volume
Mirror repository volume
Failed volume
Missing volume
A volume currently in a modification operation
A volume holding a legacy or persistent reservation
A volume that is a source volume or target volume in another volume copy that has a status of In Progress, Pending, or Failed
After you have started the Create Copy Wizard, all of the valid source volumes on the storage array are displayed in a table in alphanumeric order, based on volume capacity, as shown in Figure 4-8.

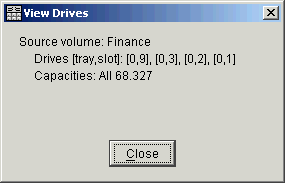
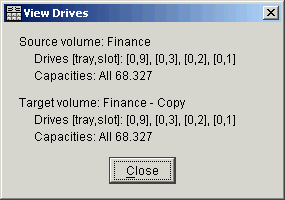
The View Drives dialog displays the drive tray, slot, and capacity information for the selected source volume or target volume. The View Drives dialog is available in the Create Copy Wizard - Introduction and Create Copy Wizard - Select Target Volume dialogs.
Content for this dialog will automatically update dynamically if you select a different source volume or target volume in the Copy Wizard dialog while the View Drives dialog is open.
The information presented in the View Drives dialog can be used to copy high-access volumes to different volume groups for increased accessibility, or to copy volumes to a volume group that uses drives with a greater capacity.
The Create Copy Wizard allows you to create a full copy of a source volume, overwriting any existing data on the target volume. To create a volume copy, complete the following steps.
Stop all I/O activity to the source volume and target volume.
Unmount any filesystems on the source volume and target volume, if applicable.
In the Logical View of the Array Management window, select the volume that will be the source volume for the volume copy.
Select Volume >> Copy >> Create from the menu.
The Create Copy Wizard - Introduction dialog is displayed, as shown in Figure 4-10.
Note: If the volume you selected is not a valid source volume, the Create Copy Wizard will not be displayed. You will need to select a valid volume to begin the Wizard. Select Next.
The Create Copy Wizard - Select Target Volume and Copy Priority dialog is displayed, as shown in Figure 4-11.
Caution: A volume copy will overwrite data on the target volume. Ensure that you no longer need the data, or have backed up the data on the target volume, before starting a volume copy. Select the target volume from the list of available volumes.
Only valid target volumes are listed, with the volume closest in size to the source volume highlighted.
Note: If you select a target volume with a capacity similar to the source volume, you will reduce the risk of having unusable space on the target volume after the volume copy completes. Set the copy priority for the volume copy.
The higher priorities will allocate more resources to the volume copy at the expense of the storage array's performance.
Select Next.
The Create Copy Wizard - Preview dialog is displayed, as shown in Figure 4-12. The source volume and target volume you selected are displayed, together with the selected copy priority.
Review the information displayed in the Pre view dialog. Type Yes and select Finish to start the volume copy.
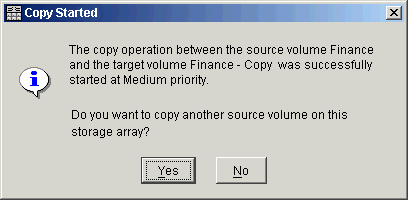
The Copy Started dialog is displayed, verifying that the volume copy has started, as shown in Figure 4-13. This dialog also gives you the option to create a new volume copy or exit the Wizard.
Choose one of the following, based on whether you want to create another volume copy:
Yes – create a new volume copy.
No – exit the Wizard and return the Logical/Physical view.
Remount any filesystems on the source volume and target volume.
The Go To option can be used to quickly jump to an associated source volume or target volume displayed in the L ogical View of the Array Management window.
| Note: This option is available only if the Volume Copy premium feature has been enabled, or if volume copies currently exist on the storage array. It is not accessible using the Mappings View of the Array Management window. |
To locate an associated source volume or target volume, complete the following steps.
Select a source volume or target volume in the Logical View of the Array Management window.
Choose one of the following, based on the volume type selected:
Source volume – Select the View >> Go To >> Target Volume menu option
The selection jumps to the associated target volume in the Logical View of the Array Management WIndow
Target volume – Select the View >> Go To >> Source Volume menu option
The selection jumps to the associated source volume in the Logical View of the Array Management window.
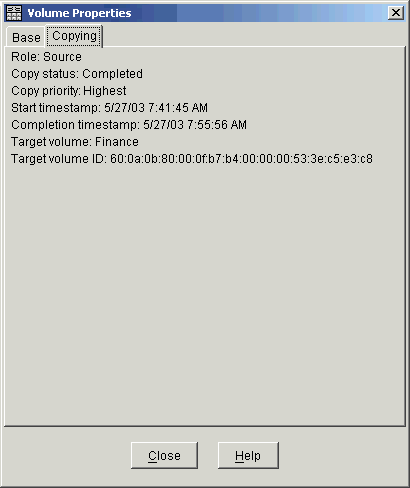
The Volume Properties dialog enables you to view information about a s elected source volume or target volume.
This dialog displays the role, copy status, copy priority, start timestamp, completion timestamp, the target volume's read-only attribute setting, the source volume or target volume World Wide N ame (WWN), and if the volume copy is in progress, a progress bar with the estimated completion time for the volume copy is displayed.
To view the volume copy properties for a source volume or target volume, complete the following steps.
Select the source volume or target volume in the Logical View of the Array Management window.
Select Volume >> Properties to display the Volume Properties dialog, as shown in Figure 4-14.
Select the Copying tab.
The Copy Properties tab is displayed. The volume properties displayed include:
Role: Source or Target
Copy Status: Pending, In Progress, Completed, Stopped, Failed
Copy Priority: Lowest, Low, Medium, High, Highest
Start Timestamp: MM/DD/YY HH/MM/SS
Completion Timestamp: MM/DD/YY HH/MM/SS
Read-Only: Enabled/Disabled (only if target volume is selected)
Source/Target Volume: Volume Name
Source/Target Volume ID: WWN (World Wide Name)
Select Close to exit the dialog.
If a volume is participating in more than one volume copy (can be a source volume for one volume copy and the target volume for another volume copy), the details will be repeated for each associated copy pair.
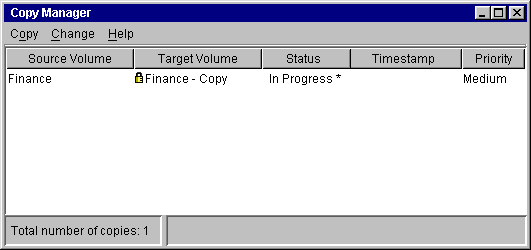
The Copy Manager dialog, launched from the Array Management window, moni tors the progress of a volume copy and allows you to manage volume copies while they are in progress and after they have been created.
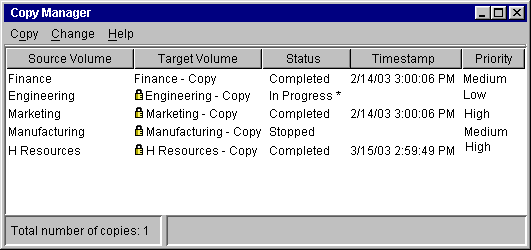
Information is displayed for all the volume copies on the storage array, including the source volume from which data is being copied, the target volume for the copied data, the status of the volume copy, a timestamp for any completed volume copies, and the volume copy priority that was assigned to the volume copy, as shown in Figure 4-15.
The source volume and target volume for a single volume copy are known as a cop y pair.
| Note: A maximum of eight volume copies can have a status of In Progress at one time. If more than eight volume copies are created, they will each have a status of Pending until one of the volume copies with a status of In Progress completes. |
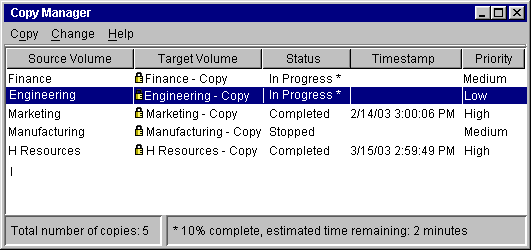
The prog ress of the volume copy is displayed in the status bar at the bottom of the Copy Manager dialog as a percentage, with an estimation of the time remaining for the volume copy to complete. The total number of volume copies on the storage array is also displayed in the status bar at the bottom of the Copy Manager dialog.
The Copy Manager can be used to re-copy a volume copy, stop a volume copy with a status of In Progress, remove copy pairs (which removes associated volume copy configuration information from the storage array), change the volume copy priority, and disable the target volume's Read-Only attribute.
To manage a volume copy using the Copy Manager, complete the following steps.
Select Volume >> Copy >> Copy Manager.
The Copy Manager dialog is displayed.
Select a copy pair in the table by clicking on a specific copy pair.
Select an option from the pull-down menu bar to manage the highlighted volume copy.
The Copy Manager automatically refreshes when the information for a volume copy changes, and will poll the storage array at regular intervals when a volume copy has a status of In Progress to display the most accurate information possible.
| Caution: This option will overwrite existing data on the target volume and make the target volume read-only to hosts. This option will fail all snapshot volumes associated with the target volume, if any exist. |
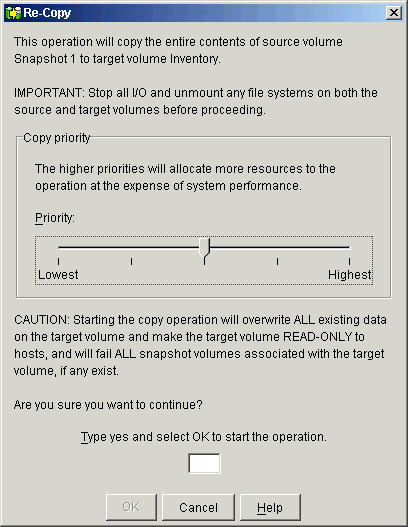
The Re-Copy option enables you to create a new volume copy for a previously defined copy pair that may have been Stopped, Failed, or has Completed. This option can be used for creating scheduled, complete backups of the target volume that can then be copied to tape drive for off-site storage.
After starting the Re-Copy option, the data on the source volume is copied in its entirety to the target volume.
You can also set the copy priority for the volume copy at this time. The higher priorities will allocate storage array resources to the volume copy at the expense of the storage array's performance.
To create a new volume copy for an existing copy pair, complete the following steps.
Stop all I/O to the source volume and target volume.
Unmount any filesystems on the source volume and target volume, if applicable.
Select Volume >> Copy >> Copy Manager.
The Copy Manager dialog is displayed.
Note: Only one copy pair at a time can be selected to be re-copied. Select the copy pair in the table by clicking on a specific copy pair.
Select Copy >> Re-Copy from the Copy Manager menu.
The Re-Copy dialog is displayed, as shown in Figure 4-16.
Set the copy priority, as needed.
This setting defines how much of the system resources are used to complete a volume copy versus fulfill I/O requests. There are five relative settings ranging from Lowest to Highest. The Highest priority rate supports the volume copy, but I/O activity may be affected. The Lowest priority rate supports I/O activity, but the volume copy will take longer.
Type Yes and select OK.
The volume copy begins. The volume copy has a status of In Progress or Pending in the Copy Manager, as shown in Figure 4-17. In the Logical View, Operation in Progress icons are displayed on the source volume and target volume.

The Stop C opy option allows you to stop a volume copy that has a status of In Progress, Pending, or Failed.
Using this option on a volume copy with a status of Failed clears the Needs Attention status displayed for the storage array in the Logical View of the Array Management window.
After the volume copy has been stopped, the Re-Copy option can be used to create a new volume copy using the original copy pair. For information about recreating a volume copy, see “Re-Copying a Volume”.
To stop a volume copy, complete the following steps.
Select Volume >> Copy >> Copy Manager, as shown in Figure 4-18.
The Copy Manager dialog is displayed.
Select the copy pair in the table by clicking on a specific copy pair.
Select Copy >> Stop from the Copy Manager menu.
The Stop Copy dialog is displayed.
Note: When the volume copy is stopped, all mapped hosts will have write access to the source volume. If data is written to the source volume, the data on the target volume will no longer match the data on the source volume. Select Yes to stop the volume copy for the selected volumes.
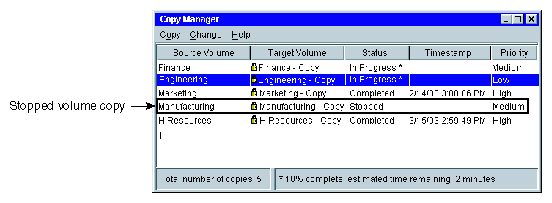
The volume copy is displayed in the Copy Manager with a status of Stopped.
The Remove Copy Pairs option allows you to remove one or more volume copies from the Copy Manager. Any volu me copy-related information for the source volume and target volume is removed from the Volume Properties and Storage Array Profile dialogs.
After the volume copy is removed from the Copy Manager, the target volume can be selected as a source volume or target volum e for a new volume copy.
Removing a volume copy from the Copy Manager also permanently removes the Read-Only attribute for the target volume.
| Note: If the volume copy has a status of In Progress, you must stop the volume copy before you can remove the copy pair from the Copy Manager dialog. |
To remove volume copies from the Copy Manager, complete the following steps.
Select Volume >> Copy >> Copy Manager.
The Copy Manager dialog is displayed.
Select one or more copy pairs in the table.
Select Copy >> Remove Copy Pairs from the Copy Manager menu.
The Remove Copy Pairs dialog is displayed.
Select Yes to permanently remove the copy pair from the Copy Manager.
Note: The data on the source volume or target volume is not deleted.
The Change Copy Priority dialog allows you to set the rate at which the volume copy completes, as shown in Figure 4-19. The copy priority setting defines how much of the storage array's resources are used to complete a volume copy versus fulfill I/O requests.
There are five relative settings ranging from Lowest to Highest. The Highest priority rate supports the volume copy, but I/O activity may be affected. The Lowest priority rate supports I/O activity, but the volume copy will take longer.
You can change the copy priority for a copy pair before the volume copy begins, while the volume copy has a status of In Progress, or after the volume copy has completed when recreating a volume copy using the Re-Copy option.
To change the copy priority for a volume copy, complete the following steps.
Select Volume >> Copy >> Copy Manager.
The Copy Manager dialog is displayed.
Select the copy pair in the table by clicking on a specific copy pair.
Select Change >> Copy Priority from the Copy Manager menu.
The Change Copy Priority dialog is displayed.
In the Copy Priority section, use the slider bar to select the appropriate copy priority, as shown in Figure 4-19.
There are five choices: Lowest, Low, Medium, High, and Highest. These settings are shown with five marks on the slider bar. The Lowest and Highest settings are labeled. The higher the setting, the larger the impact to system performance.
Select OK.
The Change Copy Priority - Progress dialog is displayed.
Select OK.
The copy priority for the selected volume copy is changed.
Read and write requests to the target volume will be rejected while the volume copy has a status of In Progress, Pending, or Failed.
After the volume copy has completed, the target volume automatically becomes read-only to hosts. You may want to keep the Read-Only attribute enabled in order to preserve the data on the target volume.
Examples of when you may want to keep the Read-Only attribute enabled include:
If you are using the target volume for backup purposes
If you are copying data from one volume group to a larger volume group for greater accessibility
If you are planning to use the data on the target volume to copy back to the base volume in case of a disabled or failed snapshot volume
If you decide to allow host write access to the data on the target volume after the volume copy is completed, use the Copy Manager to disable the Read-Only attribute for the target volume.
The Disable Read-Only option allows you to change the target volume permissions, allowing host read and write access to the target volume after the volume copy is completed.
To disable the Read-Only attribute for the target volume, complete the following steps.
Select Volume >> Copy >> Copy Manager.
The Copy Manager dialog is displayed.
Select the copy pair in the table by clicking on a specific copy pair.
Select Change >> Target Volume Permissions >> Disable Read-Only from the Copy Manager menu.
The Read-Only attribute for the target volume is disabled, and the lock icon displayed next to the target volume in the Copy Manager is removed, as shown in Figure 4-20. Write requests are allowed to the target volume.
The Enable Read-Only option allows you to change the target volume permissions, preventing host write access to the target volume after the volume copy is completed, or prior to starting the volume copy.
To enable the Read-Only attribute for the target volume, complete the following steps.
Select Volume >> Copy >> Copy Manager.
The Copy Manager dialog is displayed.
Select the copy pair in the table by clicking on a specific copy pair.
Select Change >> Target Volume Permissions >> Enable Read-Only from the Copy Manager menu.
The Read-Only attribute for the target volume is enabled, and the lock icon is displayed next to the selected target volume. Write requests to the target volume are rejected.
This chapter describes three key usage scenarios for the Volume Copy premium feature and the major tasks associated with each scenario.
Using the Volume Copy premium feature, you will be able to relocate data for better performance, create complete copies for backups, and be able to restore snapshot volume data.
As your storage requirements for a volume change, the Volume Copy premium feature can be used to copy data to a volume in a volume group that uses greater capacity drives within the same storage array.
Copying data for greater access allows you to move data to greater capacity drives (73GB to 146 GB), drives with a higher data-transfer rate (1 Gb/s to 2 Gb/s), or drives utilizing new technologies for higher performance.
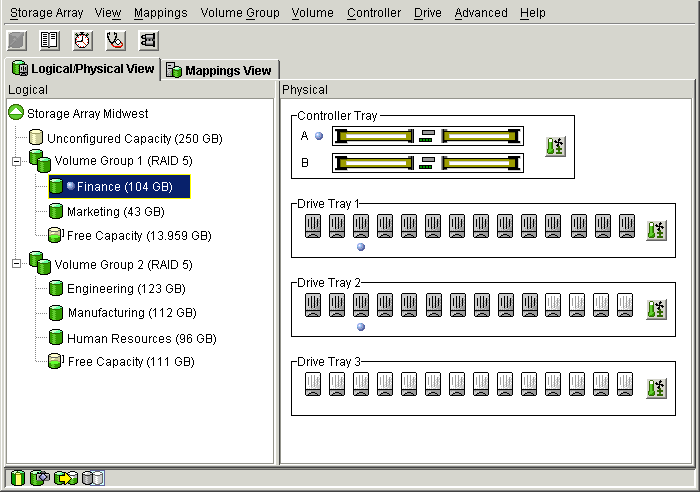
In the following example, Storage Array Midwest consists of a command module and threedrive modules: Drive Modules 1 and 2 contain fourteen 73GB drives, and Drive Module 3 contains fourteen 146GB drives.
Volume Finance is associated with the drives in slot 3 on Drive Module 1 and slot 3 in Drive Module 2. To improve efficient access to the data on Finance, a volume copy will be created to copy the data to drives on Drive Module 3, as shown in Figure 4-21).
To copy data to a volume in a volume group using greater capacity drives, complete the following steps.
Use the Create Volume Wizard to create a new volume with the required parameters (RAID level, overall capacity, number of drives) on a volume group associated with the greater capacity drives, as shown in Figure 4-22. This will be the target volume for the volume copy.
Select the Free Capacity node on Volume Group 2.
Select Volume >> Create to display the Create Volume Wizard.
Follow the directions on each Wizard dialog, and select Next when you are ready to move to the next dialog.
Note: To make locating the target volume in the Logical View easier, ensure that you add “target” or “copy” to the target volume's name. For more information about creating a standard volume, refer to the Array Management window online help.
Stop all I/O activity to the source volume.
Unmount any file systems on the source volume and target volume.
Delete the volume-to-LUN mapping for the source volume. Ensure that you record the LUN number used to provide access to the source volume. You will need this in step 8 when you define a volume-to-LUN mapping for the target volume.
From the Mappings View select the source volume, and then select Mappings >> Delete to display a confirmation dialog.
Select Yes to delete the selected volume-to-LUN mapping and close the Delete confirmation dialog.
The volume-to-LUN mapping is deleted and the source volume is moved back under the Undefined Mappings node in the Mappings View.
Use the Create Copy Wizard to create a new volume copy. as shown in Figure 4-23.
Select Volume >> Copy >> Create to display the Create Copy Wizard - Introduction dialog. The source volume will be highlighted in the table.
Follow the directions on each Wizard dialog, and select Next when you are ready to move to the next dialog.
Select the volume you created in step 1 as the target volume.
Select Volume >> Copy >> Copy Manager to open the Copy Manager to view the status of the volume copy, as shown in Figure 4-24.
Note: Wait until the volume copy has completed successfully before attempting to use the target volume Select the copy pair in the Copy Manager, and then select Copy> Remove Copy Pairs to remove the copy from the table.
The Read-Only attribute for the target volume is also removed, enabling hosts read and write access.
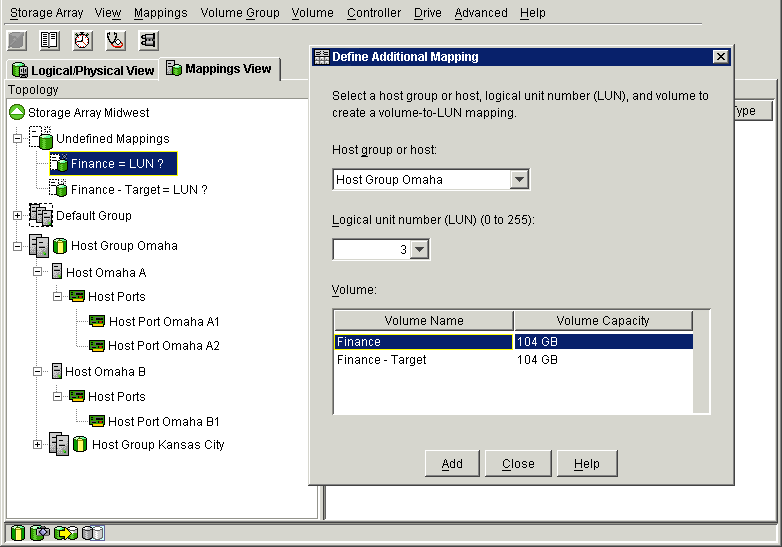
Define an additional mapping for the target volume (containing the copied data) by mapping it to the original host, using the LUN recorded in step 4, as shown in Figure 4-25.
From the Topology pane of the Mappings View, select the target volume, and then select Mappings >> Define >> Additional Mapping.
The Define Additional Mapping dialog is displayed.
Select the same host and LUN used for the source volume, and then choose the target volume from the list of available volumes.
Select Add to define the additional mapping.
Run the following utilities to register the additional volume-to-LUN mapping with the host operating system.
As root, issue the following commands:
# scsiha -p bus_number
For example, enter scsiha -p 2 6 7
# ioconfig -f /hw
This assigns logical ontroller numbers to all devices in the I/O subsystem.
For more information about the scsiha and ioconfig utilities, see the scsiha(1m) and the ioconfig(1m) man pages.
Run the tpssmdevices utility to ensure that the volume name and the physical device name (assigned by the operating system) correspond.
For more information about the tpssmdevices utility, refer to the SGI TPSSM Administration Guide.
Remount any file systems on the source volume and target volume.
Restart I/O activity to the source volume and target volume.
Delete the original source volume, if needed.
It may be desirable to maintain the original source volume for a period of time in case you need to access the data from that volume.

T he Volume Copy premium feature enables you to restore data from a snapshot volume to its original base volume. After a volume copy has been created, it may become apparent, due to possible corruption or data loss, that the data on the snapshot volume is preferred to the data on its associated base volume.
If you need to restore data to the base volume from its associated snapshot volume, the Volume Copy premium feature can be used to copy the data from the snapshot volume to the base volume.
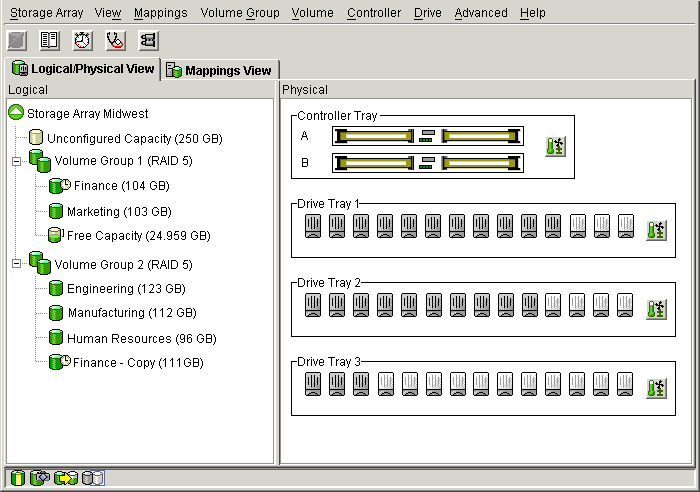
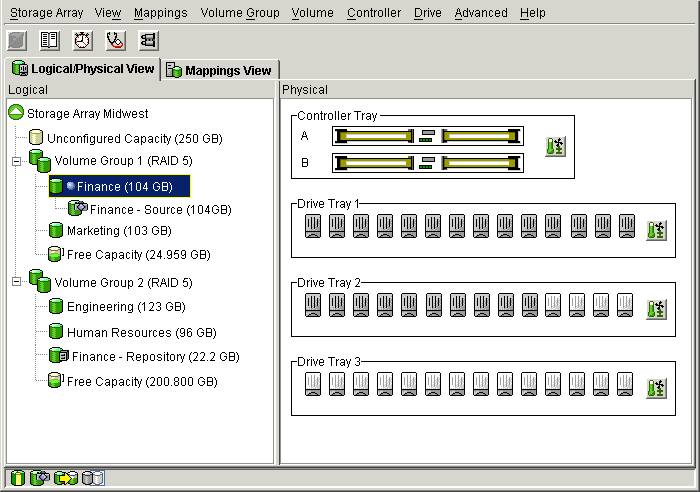
In the following example, on Storage Array Midwest, volume Finance contains business critical data. A point-in-time snapshot copy was created for backup purposes, as shown in Figure 4-26. After the backup was created, data on the original base volume was accidentally deleted or corrupted.
The data from the snapshot volume is now preferred to the data on the base volume, and can be restored to the original base volume using the Volume Copy premium feature.
To copy the data on an existing snapshot volume back to its associated base volume, complete the following steps.
| Note: This procedure assumes that a snapshot volume has already been created. |
Stop all I/O activity to the base volume.
Unmount any file systems on the base volume.
If a suitable target volume has not already been created, create a standard volume with a capacity equal to the capacity of the base volume of the snapshot volume, as shown in Figure 4-27.
Select a volume group's Free Capacity node or the storage array's Unconfigured Capacity node, and then select Volume >> Create.
The Create Volume Wizard is displayed.
Follow the directions on each Wizard dialog, and select Next when you are ready to move to the next dialog.
Note: To make locating the target volume in the Logical View easier, ensure that you add “target” or “copy” to the volume name. For more information about creating a standard volume, refer to the Array Management window online help.
Use the Create Copy Wizard to create a new volume copy between the snapshot volume and the target volume, as shown in Figure 4-28.
Select the snapshot volume, and then select Volume >> Copy >> Create.
The Create Copy Wizard - Introduction dialog is displayed, and the source volume is highlighted in the table.
Follow the directions on each Wizard dialog, and select Next when you are ready to move to the next dialog.
Select Volume >> Copy >> Copy Manager to open the Copy Manager to view the status of the volume copy, as shown in Figure 4-29.
Note: Wait until the volume copy has completed successfully before attempting to use the target volume. Select the copy pair in the Copy Manager and select Copy >> Remove Copy Pairs to remove the copy pair from the table.
The Read-Only attribute for the target volume is also removed, enabling hosts to have read and write access to the target volume.
Remove the volume-to-LUN mapping for the base volume (Finance). Ensure that you record the LUN number used to provide access to the base volume. You will need this in step 13 when you define a volume-to-LUN mapping for the target volume.
From the Mappings View select the base volume, and then select Mappings >> Remove.
A confirmation dialog is displayed.
Select Yes.
The volume-to-LUN mapping is removed, and the base volume is moved back under the Undefined Mappings node in the Topology View.
Run the following utilities to register the additional volume-to-LUN mapping with the host operating system.
As root, issue the following commands:
# scsiha -p bus_number
For example, enter scsiha -p 2 6 7
# ioconfig -f /hw
This assigns logical ontroller numbers to all devices in the I/O subsystem.
For more information about the scsiha and ioconfig utilities, see the scsiha(1m) and the ioconfig(1m) man pages.
Disable the snapshot volume to allow the base volume to become a valid target volume for the volume copy, as shown in Figure 4-30.
Note: If the base volume has multiple associated snapshot volumes, you will need to disable all the associated snapshot volumes before the base volume can be selected as a valid target volume. Select the snapshot volume in the Logical View, and then select View >> Snapshot >> Disable.
The Disable Snapshot Volume dialog is displayed.
Type Yes in the text field and select OK.
The snapshot volume is disabled and copy-on-write activity to the snapshot repository volume is stopped until the snapshot volume is recreated.
Use the Create Copy Wizard to create a new volume copy between the target volume and the original base volume to restore the data to the base volume (Finance), as shown in Figure 4-31.
Select the target volume from the previous volume copy, and then select Volume >> Copy >> Create.
The Create Copy Wizard - Introduction dialog is displayed.
Follow the directions on each Wizard dialog, and select Next when you are ready to move to the next dialog.
Select Volume >> Copy >> Copy Manager to open the Copy Manager to view the status of the volume copy, as shown in Figure 4-32.
Note: Wait until the volume copy has completed successfully before attempting to use the target volume. Select the copy pair in the Copy Manager and select Copy >> Remove Copy Pairs to remove the copy pair from the table.
The Read-Only attribute for the target volume is also removed, enabling hosts to have write access to the target volume.
Define a volume-to-LUN mapping for the base volume (containing the copied data) by mapping it to the original host using the LUN recorded in step 7, as shown in Figure 4-33.
From the Topology pane of the Mappings View, select the target volume and then select Mappings >> Define >> Additional Mapping.
The Define Additional Mapping dialog displayed.
Select the same host and LUN used for the base volume, and then choose the target volume from the list of available volumes.
Click Add to define the additional mapping.
Run the following utilities to register the additional volume-to-LUN mapping with the host operating system.
As root, issue the following commands:
# scsiha -p bus_number
For example, enter scsiha -p 2 6 7
# ioconfig -f /hw
This assigns logical ontroller numbers to all devices in the I/O subsystem.
For more information about the scsiha and ioconfig utilities, see the scsiha(1m) and the ioconfig(1m) man pages.
Run the tpssmdevices utility to ensure that the volume name and the physical device name (assigned by the operating system) correspond.
For more information about the tpssmdevices utility, refer to the SGI TPSSM Administration Guide.
If you need a new point-in-time image of the data on the base volume, recreate the snapshot volume you disabled in step 9.
Select Volume >> Snapshot >> Create.
The Create Snapshot Volume Wizard - Introduction dialog is displayed.
Follow the directions on each Wizard dialog, and select Next when you are ready to move to the next dialog.
Remount any file systems on the base volume and target volume.
Restart I/O activity to the base volume.
The Volume Copy premium feature allows you to create a backup of a volume by copying data from one volume (source) to another volume (target) in the same storage array, minimizing the time that the source volume is unavailable to host writes.
The target volume can then be used as a backup for the source volume, as a resource for system testing, or to copy data to another device such as a tape drive or other media.
The following example details how to back up data on your storage array using the Volume Copy premium feature.
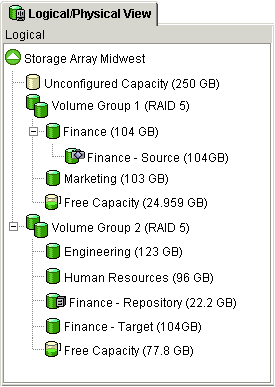
In this example, on Storage Array Midwest, volume Finance contains data that needs to be backed up. The backup will be created on the storage array, and eventually transferred to a tape drive for off-site storage.
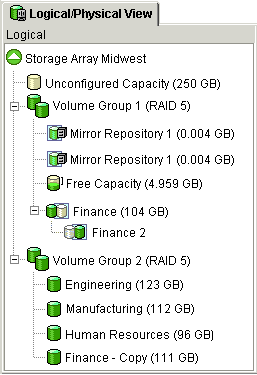
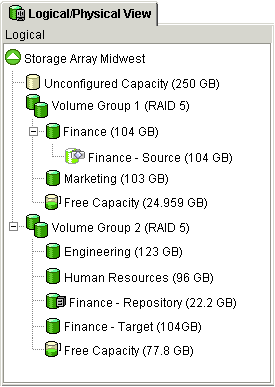
The source volume's actual capacity is 104 GB, as shown in Figure 4-34. Using the Volume Copy premium feature, a complete copy of Finance will be created and stored on the storage array as a backup of the base volume.
To copy data from the base volume to the target volume, which can then be used to back up data to a drive tape or some other media, complete the following steps.
Stop all I/O activity to the base volume (Finance).
Unmount any filesystems on the base volume.
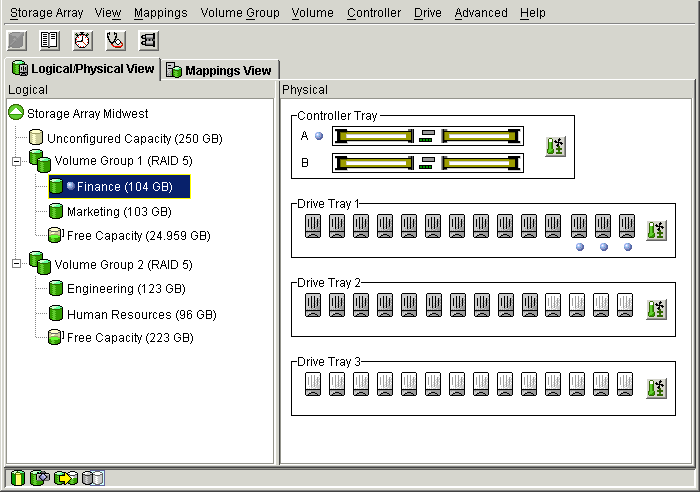
Select the base volume (Finance) in the Logical View of the Array Management window.
Use the Create Snapshot Volume Wizard to create a snapshot volume, as shown in Figure 4-35.
Remount any file systems on the base volume.
Restart I/O activity to the base volume.
Finance is now available for host read and write access. The snapshot volume created in step 4 can now be selected as the source volume for the volume copy.
If a target volume has not already been created, create a standard volume with a capacity equal to or greater than the snapshot volume's capacity, as shown in Figure 4-36.
Select a volume group's Free Capacity node or the storage array's Unconfigured Capacity node, and then select Volume >> Create.
The Create Volume Wizard is displayed.
Follow the directions on each Wizard dialog, and select Next when you are ready to move to the next dialog.
Note: To make locating the target volume in the Logical View easier, ensure that you add “target” or “copy” to the target volume name. For more information about creating a standard volume, refer to the Array Management window online help.
Use the Create Copy Wizard to create a new volume copy, using the snapshot volume as the source volume and the volume you created in step 7 as the target volume, as shown in Figure 4-37.
Select the snapshot volume, then select Volume >> Copy >> Create.
The Create Copy Wizard - Introduction dialog is displayed, with the snapshot volume highlighted in the table.
Follow the directions on each Wizard dialog, and select Next when you are ready to move to the next dialog.
Select Volume >> Copy >> Copy Manager to open the Copy Manager to view the status of the volume copy, as shown in Figure 4-38.
Note: Wait until the volume copy has completed successfully before attempting to use the target volume. Select the copy pair in the Copy Manager, and select Copy >> Remove Copy Pairs to remove the copy pair from the table.
The Read-Only attribute for the target volume is also removed, enabling hosts to have write access to the target volume.
Disable the snapshot volume to stop any further copy-on-write activity to its associated snapshot repository volume, as shown in Figure 4-39.
Select the snapshot volume in the Logical View, and then select Volume >> Snapshot >> Disable.
The Disable Snapshot Volume dialog is displayed.
Type Yes in the text field, and then select OK.
The snapshot volume is disabled, and copy-on-write activity to the snapshot repository volume is stopped until the snapshot volume is recreated.
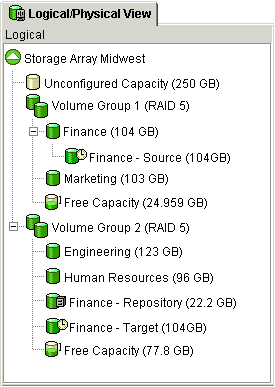
The target volume can now be used to back up data to a tape drive (to be stored off-site), for application or system testing, or be retained on the storage array for quick recovery of the data on the base volume (Finance).
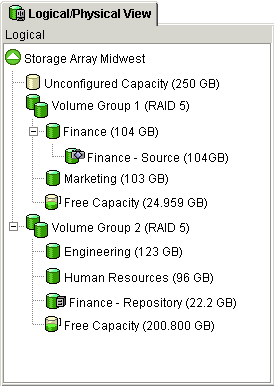
Data can be recovered instantly from the backup volume you created in the previous procedure by simply unmapping the base volume (Finance) from its host, and then mapping the backup volume (Finance - Target) to the same host.
To recover data from Finance - Target, complete the following steps.
Stop all I/O activity to the base volume (Finance).
Unmount any file systems on volume Finance.
Remove the volume-to-LUN mapping for the original base volume (Finance). Ensure that you record the LUN number used to provide access to the base volume. You will need this in step 4 when you define a volume-to-LUN mapping for the target volume.
From the Mappings View select the base volume, and then select Mappings >> Remove.
A confirmation dialog is displayed.
Select Yes.
The volume-to-LUN mapping is removed, and the base volume is moved back under the Undefined Mappings node in the Topology View.
Run the following utilities to register the additional volume-to-LUN mapping with the host operating system.
As root, issue the following commands:
# scsiha -p bus_number
For example, enter scsiha -p 2 6 7
# ioconfig -f /hw
This assigns logical ontroller numbers to all devices in the I/O subsystem.
For more information about the scsiha and ioconfig utilities, see the scsiha(1m) and the ioconfig(1m) man pages.
Define a volume-to-LUN mapping for the target volume (containing the copied data), using the same LUN as the original base volume, recorded in step 3.
From the Topology pane of the Mappings View, select the target volume and then select Mappings >> Define >> Additional Mapping.

Tip: The Define Additional Mapping dialog is displayed. Select the same host and LUN used for the base volume, and then choose the target volume from the list of available volumes.
Click Add to define the additional mapping.
Run the following utilities to register the additional volume-to-LUN mapping with the host operating system.
As root, issue the following commands:
# scsiha -p bus_number
For example, enter scsiha -p 2 6 7
# ioconfig -f /hw
This assigns logical ontroller numbers to all devices in the I/O subsystem.
For more information about the scsiha and ioconfig utilities, see the scsiha(1m) and the ioconfig(1m) man pages.
Run the tpssmdevices utility to ensure that the volume name and the physical device name (assigned by the operating system) correspond.
For more information about the tpssmdevices utility, refer to the SGI TPSSM Administration Guide.
Remount any file systems on the target volume.
Restart I/O activity to the base volume and target volume.
This section provides information about troubleshooting some of the more common problems encountered when using the Volume Copy premium feature.
Troubleshooting topics included are general Volume Copy problems and premium feature troubleshooting.
Locate the section that is directly related to your problem, or consult the section describing general troubleshooting techniques. If your problem is not discussed in any of the sections in this chapter, contact technical support.
This section describes some of the typical problems you may encounter when using the Volume Copy premium feature. The information in this section is presented in sequence, from the time the premium feature is enabled to problems that you may encounter using the Volume Copy premium feature.
Information about the probable cause and recommended resolution for each problem are provided. If your problem is not addressed in this chapter, contact technical support.
The Volume Copy Menu options in the Array Management window are greyed out and unavailable
| Cause: | The Volume Copy premium feature is not enabled. | |
| Resolution: | Enable the Volume Copy premium feature. You must use a Feature Key File to enable premium features. If one has not been supplied, contact your storage supplier. For step-by-step instructions about enabling the Volume Copy premium feature, refer to “Enabling the Volume Copy Premium Feature” or the Array Management window online help. |
The Volume Copy icon in the premium status area is greyed out with a red line
| Cause: | The Volume Copy premium feature is not enabled. | |
| Resolution: | Enable the Volume Copy premium feature. You must use a Feature Key File to enable premium features. If one has not been supplied, contact your storage supplier. For step-by-step instructions about enabling the Volume Copy premium feature, refer to “Enabling the Volume Copy Premium Feature” or the Array Management window online help. |
The Create Copy option is not available after selecting a source volume in the Logical View
| Cause: | The volume you have chosen to be the source volume for the volume copy is not a valid source volume. The following volumes are not valid source volumes and will not appear in the list:
| |
| Resolution: | Select a valid source volume, which can be a standard volume, snapshot volume, the base volume of a snapshot volume, or a primary volume participating in a Remote Volume Mirror. |
The source volume/target volume is displayed as being a Missing Volume
| Cause: | A physical drive on which the Volume Copy depends (source volume or target volume) has been removed, and the volume is now displayed under the Missing Volumes node in the Logical View of the Array Management window. | |||
| Resolution: | If missing volumes are detected because drives have accidentally been removed, or are detected as missing because of a power loss to the drive modules, recovery of these volumes is possible by completing the following steps:
|
The controller owner for the source volume/target volume changes after the volume copy has completed
| Cause: | When the volume copy started, the preferred controller did not have ownership of both the source volume and target volume. | |
| Resolution: | During a volume copy, the same controller must own both the source volume and the target volume. If both volumes do not have the same preferred controller when the volume copy starts, the ownership of the target volume is automatically transferred to the preferred controller of the source volume. When the volume copy is completed or is stopped, ownership of the target volume is restored to its preferred controller. If ownership of the source volume is changed during the volume copy, ownership of the target volume is also changed. |
A volume copy that includes a source volume participating in a Remote Volume Mirror has a status of In Progress, Pending, or Completed, but has failed
| Cause: | In response to a catastrophic failure at the primary storage array, a role reversal has occurred. The secondary volume in the mirrored pair was promoted to the primary volume role, while the primary volume was demoted to the secondary volume role. | |
| Resolution: | Once the preferred controller of the primary volume can be contacted, a role reversal will automatically take place and you can then restart the volume copy. For more information about role reversals, refer to “Role Reversals”. |
Error message indicates that the Volume Copy premium feature is out of compliance
| Cause: | The Volume Copy Premium Feature is out of compliance. This normally occurs if a volume group with existing Volume Copies has been moved into a storage array where the feature is not authorized, or if you have disabled the feature on a storage array where the feature is authorized, and you have existing volume copies present. | |
| Resolution: | If the Volume Copy feature is not authorized for this storage array and you want to authorize it, or the Volume Copy feature is authorized for this storage array but you have disabled it, complete the following steps to clear the out of compliance error:
|
Error message indicates that the selected source volume has a reservation placed on it
| Cause: | Volumes configured with a legacy or persistent reservation cannot be selected as a source volume or a target volume for a volume copy. | |
| Resolution: | Clear the reservation for the selected volume, and then recreate the volume copy.
|
Critical Major Event Log (MEL) events are generated when an error occurs that can affect data availability or that results in a degraded mode of operation. The storage management software responds by alerting the appropriate administrators via email, SNMP trap, or other configured mechanisms.
Because administrative action is required to correct the problem, the storage array will generally enter a Needs Attention status. This causes the appropriate indications to be presented through the storage management software and an associated Recovery Guru procedure to be displayed when requested.
The following table provides a description of critical MEL events, with a brief explanation of what caused the event, and the recommended resolution. If your critical MEL event is not included in this section, contact technical support.
Event 6600 - Volume Copy Operation Failed
| Cause: | This event is logged when a Volume Copy with a status of In Progress or Pending has failed. A Needs Attention status is also reported for the storage array. This failure can be caused by a read error on the source volume, a write error on the target volume, or because of a failure that occurred on the storage array that affects the source volume or target volume. | |
| Resolution: | For specific recovery procedures, refer to Recovery Guru. |
This section provides definitions of terms that you may encounter when using the Volume Copy feature.
| Array Management window (AMW) | The interface from which you can manage a storage array. Use the Array Management window to manage and configure physical and logical components, recover from errors, and monitor performance. | |
| Base Volume | A volume from which you create a snapshot volume. A base volume must be a standard volume in the storage array. | |
| Copy Complete | This status is displayed in the Copy Manager signifying that the data on the source volume has been successfully copied to the target volume. This status is accompanied by a timestamp attribute. | |
| Copy Failed | This status is displayed in the Copy Manager when an error occurred during the volume copy. A status of Failed can occur because of a read error from the source volume, a write error to the target volume, or because of a failure on the storage array that affects the source volume or target volume. A critical event is logged in the Major Event Lot (MEL) and a Needs-Attention icon is displayed. | |
| Copy-In-Progress | This status is displayed in the Copy Manager while data on the source volume is being read and then written to the target volume. While a volume copy has this status, the host has read-only access to the source volume, and read and write requests to the target volume will not take place until the volume copy has completed. | |
| Copy Manager | The Copy Manager is a dialog in the Volume Copy premium feature used to monitor the progress of a volume copy, and to manage all volume copies on a single storage array after they have been created. | |
| Copy-on-Write | A copy-on-write operation occurs the first time any data block is modified on the base volume of a snapshot volume. The point-in-time data you wish to preserve from the snapshot volume is stored on the base volume until the storage array controller receives a write request for the base volume. Before the write occurs, the data blocks to be modified are copied over to the snapshot repository volume for safekeeping. | |
| Copy Pair | A copy pair refers to a source volume and a target volume in a volume copy that are located on the same storage array. | |
| Copy Pending | A volume copy status displayed in the Copy Manager when a volume copy has been created, but system resources do not allow it to start. While in this status, the host has read-only access to the source volume, and read and write requests to the target volume will be rejected until the volume copy has completed. | |
| Copy Priority | This setting defines how much of the system resources are used to complete a volume copy versus fulfill I/O requests. There are five relative settings ranging from Lowest to Highest. The Highest priority rate supports the volume copy, but I/O activity may be affected. The Lowest priority rate supports I/O activity, but the volume copy will take longer. You can set the copy priority for each volume copy in the Create Copy Wizard or by using the Copy Manager. | |
| Copy Stopped | This status is displayed in the Copy Manager immediately after a volume copy is created in the Wizard, or when the volume copy is stopped in the Copy Manager.This status does not occur as a result of a failure. While a volume copy has this status, no data is copied between the source volume and target volume. | |
| Enterprise Management window (EMW) | A graphical user interface (GUI) from which a user can manage storage arrays, monitor the health of the storage arrays, configure e-mail and Simple Network Management Protocol (SNMP) alert notifications, launch an appropriate Array Management window for a particular storage array, or edit and execute a script to perform batch management tasks. | |
| Feature Key File | The storage array controller uses this file to enable an authorized premium feature. The file contains the Feature Enable Identifier of the storage array for which the premium feature is authorized, and contains generated data about the premium feature. | |
| Missing Volume | A missing volume is a placeholder node displayed in the Logical View, indicating that the storage array has detected that drives associated with a volume are no longer accessible. Typically, this is the result of removing drives associated with a volume group or the loss of power to one or more drive trays. | |
| Persistent Reservation | A reservation on a volume that prevents other hosts from accessing the volume. Unlike other types of reservations, a persistent reservation reserves access across multiple host ports, provides various levels of access control, offers the ability to query the storage array about registered ports and reservations, and optionally, provides for persistence of reservations in the event of a storage array power loss. | |
| Preferred Controller Ownership | The preferred controller ownership of a volume or volume group is the controller of an active-active pair that is designated to own these volumes. The preferred controller owner is the controller that currently owns the volume or volume group. If the preferred controller is being replaced or is undergoing a firmware download, ownership of the volumes is automatically shifted to the other controller, and that controller becomes the current owner of the volumes. This is considered a routine ownership change and is reported with an informational entry in the event log. There can also be a forced failover from the preferred controller to the alternate controller because of I/O path errors. This is reported with a critical entry in the event log, and will be reported by the Enterprise Management software to e-mail and SNMP alert destinations. | |
| Premium Feature | A storage array feature that may not be available in the standard configuration of the storage management software. Use the Storage Array >> Premium Features >> Enable pull-down menu option to enable a premium feature. | |
| Primary Volume | The primary volume in a Remote Volume Mirror is the volume that accepts host I/O and stores application data. The data on a primary volume is replicated to the secondary volume. | |
| Secondary Volume | A secondary volume is used to store data replicated from a primary volume. The controller owner of a secondary volume receives remote writes for the volume from the controller owner of the primary volume. The controller owner of the secondary volume does not accept host read or write requests. | |
| Tpssmdevices | tpssmdevices is a host-based utility used to associate the mapping between a physical device name and a volume name. Once volumes have been created and volume-to-LUN mappings have been defined, this utility is run to ensure that the volume name and the physical device name (assigned by the operating system) correspond. | |
| Snapshot Repository Volume | A snapshot repository volume is a special volume in the storage array that is created as a resource for a snapshot volume. A snapshot repository volume contains snapshot data and copy-on-write data for a particular snapshot volume. A snapshot repository volume is not host-addressable, but you can increase its capacity, rename it, specify the action (either failing it or failing writes to the base volume) when it becomes full, or view its capacity or media scan properties. | |
| Snapshot Volume | A snapshot volume is a logical point-in-time image of another volume, called a base volume, in the storage array. A snapshot is the logical equivalent of a complete physical copy, but you create it much more quickly than a physical copy and it requires less disk space. Because a snapshot is a host-addressable volume, you can perform backups using the snapshot while the base volume remains online and user-accessible. In addition, you can write to the snapshot volume to perform application testing or scenario development and analysis. | |
| Source Volume | A standard volume in a volume copy that accepts host I/O and stores application data. When the volume copy is started, data from the source volume is copied in its entirety to the target volume. | |
| Standard Volume | A logical structure you create on a storage array for data storage. | |
| Storage Array | A storage entity managed by storage management software. A storage array consists of a collection of both physical components (such as drives, controllers, fans, and power supplies) and logical components (such as volume groups and volumes). A storage array can span multiple physical enclosures. For example, several drive modules connected to a command module constitutes one storage array. A unit that contains drives and a controller in a single enclosure is also considered one storage array. A rackmount subsystem may contain more than one storage array. Also known as a RAID Module. | |
| Target Volume | A standard volume in a volume copy that maintains a copy of the data from the source volume. Read and write requests to the target volume will be rejected while the volume copy has a status of In Progress, Pending, or Failed. When a volume copy is started, the data from the source volume is written to the target volume. A volume copy will overwrite data on the target volume. Ensure that you no longer need the data on the volume, or have backed it up, before starting the volume copy. | |
| Usable Capacity | The minimum of the primary volume and secondary volume actual capacities. In a given Array Management window, all primary or secondary volumes present in the same storage array display both actual and usable capacity in the Logical View. | |
| Volume | A volume is a logical structure that you create on a storage array for data storage. A volume is defined over a set of drives called a volume group, and has a defined RAID level and capacity. The drive boundaries of the volume group are hidden to the host computer. | |
| Volume Copy | The Volume Copy premium feature is used to copy data from one volume (the source volume) to another volume (the target volume) within a single storage array. | |
| Volume Reservation | A feature of cluster software that allows one or more host ports to reserve a volume and prevent other host ports from accessing the same volume. | |