This chapter provides information for the following tasks:
preparing for installation
installing the tape drive
installing the software driver

Note: The 8505XL requires either IRIX 5.3, 6.1 or later software. If your system already has IRIX 6.1, software driver installation is not required. testing your installation
To install the tape drive properly, follow all of the instructions in this chapter. You can use the checklist at the beginning of each section to keep track of the steps you need to perform.
 | Caution: The tape drives described in this manual are single-ended SCSI devices. Do not install the tape drive on a differential SCSI bus. |
The 8505XL currently installs in the following Silicon Graphics systems and data storage units:
CHALLENGE™ and POWER CHALLENGE XL (rackmount) and L (deskside) systems
Onyx and POWER Onyx™ rackmount and deskside systems
CHALLENGE Vault XL
CHALLENGE Vault L
CHALLENGE S
To prepare for installation, follow the steps described in this chapter.
Ensure ESD protection (see “Ensuring ESD Protection”).
Unpack the tape drive and save the packing materials (see “Unpacking the Tape Drive and Saving the Materials”).
Check the tape drive accessories (see “Checking the Tape Drive Accessories”).
If you are installing an internal tape drive, follow these procedures to protect the tape drive from electrostatic discharge (ESD):
Attach a ground strap to your wrist when connecting/disconnecting the drive.
Do not disconnect the power cord from the wall socket and the chassis if you are servicing a system or installing a hardware upgrade. You will lose the system ground and could damage the equipment as a result.
Ensure that you and all electrical equipment that you handle during this installation are at ground potential to avoid damage from ESD.
Leave the tape drive in its antistatic bag until you are ready to install it. When possible, remove the internal tape drive from its bag and install it directly into the computer without setting it down. If you must lay the tape drive down, place it on top of the antistatic bag or mat.
If possible, use an antistatic mat and grounded static protection wristband. If a mat and wristband are unavailable, touch a known grounded surface (such as your computer's metal chassis) to discharge static electricity from your body before handling the tape drive.
Limit your movement. Movement can cause static electricity to build up around you.
Handle the tape drive carefully and by the edges.
Do not place the tape drive on top of the computer or on a metal table.
Carefully remove the tape drive from its box. Save all the original packaging materials in case you need to reship the tape drive. The tape drive's packaging helps protect the tape drive from shock, vibration, moisture, and electrostatic discharge (ESD).
Installing your tape drive requires the following general tasks:
Set the SCSI ID.
Install the tape drive in an empty drive bay.
Power on the tape drive.
Install your software driver, if required.
Test your installation.
Each device attached to a SCSI bus must have a unique address or SCSI ID. This SCSI ID, which can be a value from 0 through 7, allows the host computer to communicate with the specific devices attached to the bus.
Before setting the tape drive's SCSI ID, determine the SCSI IDs of all the other SCSI devices currently attached to your bus (for example, a hard drive or a CD-ROM reader).
| Caution: SCSI ID 0 is reserved for the system controller and cannot be used. |
The tape drive is shipped with the SCSI ID set to 6. If you are installing the tape drive on an existing SCSI bus and another device (for example, a hard drive) is already assigned to that ID, you must change the tape drive's ID.
Follow these steps to change the SCSI ID of the 8505XL:
| Note: The 8505XL SCSI jumpers are located in the back of the drive and are covered by the drive sled hardware. To change the SCSI ID, you must remove the 8505XL from the drive sled. |
Remove the four screws that secure the drive to the bottom of the mounting sled (see Figure 1-1) and set them aside.
Remove the drive adapter and power cables from the 8505XL (see Figure 1-1) and then place the drive on an anti-static surface.
Locate the SCSI ID jumper block on the back of the tape drive (see Figure 1-2).
Using a pair of flat-nose pliers, slide the small plastic jumpers over the pins on the jumper block to obtain the desired address. Extra jumpers are shipped in a separate bag. Save the unused jumpers in case you need to select a different SCSI ID later.
Caution: Do not allow loose jumpers to fall inside the tape drive. After changing the SCSI ID, place the tape drive back on the drive sled (see Figure 1-1).
Reconnect the drive adapter and power cables (see Figure 1-1).
Install the four screws that secure the bottom of the drive to the drive sled (see Figure 1-1).


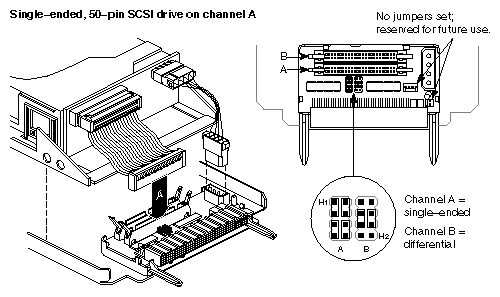
The 8505XL drive sled assembly houses a SCSI channel adapter board. You must ensure that the drive sled assembly is set to single-ended operation.
| Caution: Use proper handling and storage procedures to minimize the loss of data and equipment. In particular, do not remove disk drives while they are operating. Always power off the system before removing a front-loading drive (FLD). Be sure to use standard electrostatic discharge prevention precautions when removing, storing, transporting, or replacing an FLD. |
To determine the sled board settings, do the following:
Be sure the sled-to-drive connector cable is plugged into the correct SCSI channel. Single-ended is A; differential is B. Plug the cable to channel A (see Figure 1-3).
Set both jumper blocks H1 and H2 on the sled board to reflect the SCSI channel operation, regardless of which channel is plugged into the drive.
| Note: Your system disk should always be set to SCSI ID 1. Be sure each SCSI device on a bus has a unique SCSI address (ID). The SCSI bus cannot function properly if more than one device has the same SCSI ID. |
The internal SCSI channels in a rackmount or deskside system and a data storage unit are configured so that front-loading devices (FLDs) can be added or removed without affecting the channel termination. No additional termination is required.
The drive must be properly mounted on a drive sled and configured for a channel and single-ended operating protocol, as described in “Configuring the Drive Sled for Single-Ended Operation”.
Follow these instructions to install a half-height front-loading device:
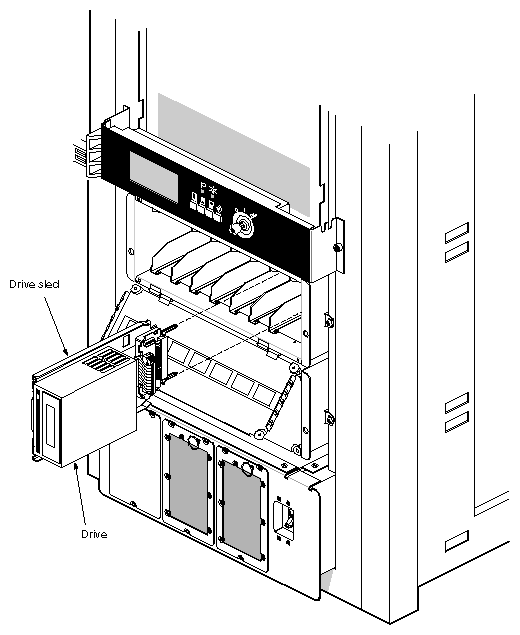
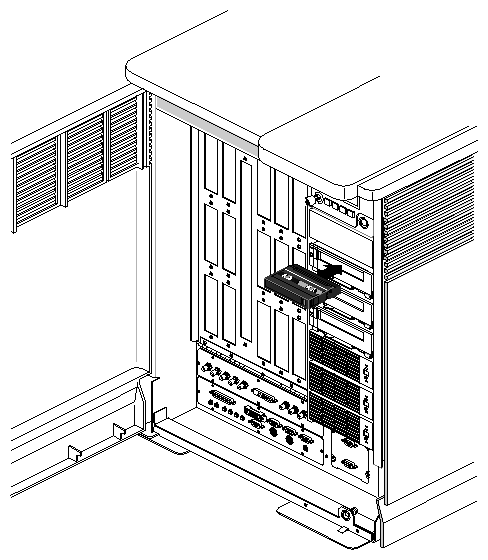
Follow these instructions to install the drive into a horizontal drive bay.
Orient the FLD and sled assembly so that the connectors on the back are on the bottom half of the drive and face away from you (see Figure 1-4).
Carefully insert the device into the drive bay until it seats firmly into the lever catch and the locking lever has moved all the way to the right.
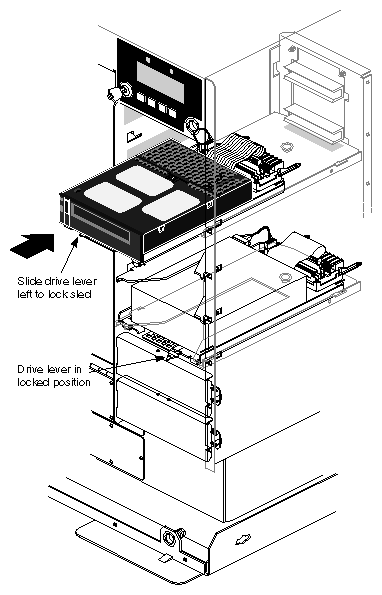
Follow these instructions to install the drive (sideways) into a vertical drive bay.
Orient the FLD relative to the drive bay so that the drive is facing toward the right (see Figure 1-5).
Select a vacant drive bay and carefully align the rails on the drive sled with the corresponding rails in the drive bay.
Slide the FLD into the bay until the locking mechanism is engaged and the locking lever on the drive sled moves down to the locked position. Push the lever down to ensure that it is fully engaged.
When power is applied to the 8505XL, watch for the following:
All three of the tape drive's LEDs light.
The tape drive's 30-second power-on self-test begins.
When the self-test is complete, the top and bottom LEDs turn off; the middle LED is off or flashes irregularly.
| Caution: Do not insert a data cartridge into the tape drive during the self-test. The tape drive will eject it. If the top LED does not go out after the self-test, an error has occurred. Contact your service provider for further assistance. |
The 8505XL requires IRIX 5.3, 6.1, or later software for proper operation. If your system has IRIX 5.3, an 8505XL software driver from a CD must be installed. If your system has IRIX 6.1 or later software, no additional driver software is required. See the software release notes for further information on installing software.
After installing your tape drive and driver software (if required), check the installation by performing a simple backup and restore operation to verify that your software and tape drive are communicating properly before you begin operation.
| Note: If this is the first time you have used the tape drive or if the tape drive has been stored for six months or more, repeat steps 4 and 5 of the following procedure at least two times or for two hours (whichever is greater). |
To check the installation, follow these steps:
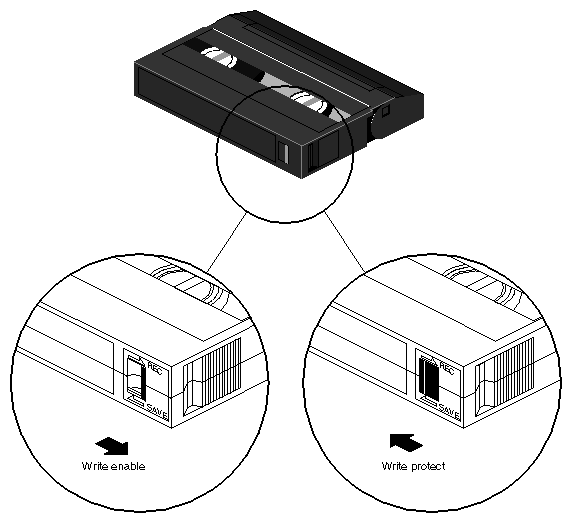
Locate a data cartridge that does not contain any valuable information and make sure that its write-protect switch is set to write-enable (see Figure 1-6).
Gently push the data cartridge as shown (in Figure 1-7) until the load mechanism pulls the cartridge into the drive.
Wait while the tape drive loads the tape, determines the tape format, and positions the tape to the logical beginning of the tape (LBOT). This takes about 45 seconds. When the green LED is on solid, the tape drive is ready.
Perform a backup operation to write a small amount of data to the tape (see your IRIX administration documentation, as required).
Rewind the tape and read the data written in step 4 and compare it to the original. This determines whether the software and tape drive are functioning properly.
If problems occur, see Table 1-1.
Table 1-1. Problems and Possible Solutions
Problem | Corrective action |
|---|---|
The tape drive does not successfully read and write data. | Check the following: —Are you using the correct type of data cartridge (see—Is the data cartridge write enabled? —Is your software correctly installed and configured? —Press the unload button and remove the data cartridge. Repeat steps 2 through 5 (see“Checking the Tape Drive Accessories”) using a different data cartridge. If the error occurs again, refer to Chapter 4. |
The tape drive's LEDs are on or flashing. | See Chapter 2. |
You are unable to resolve the problem yourself. | See your service provider. |