This chapter contains several error recovery procedures:
Section 4.1, “Replacing a Disk Drive,” describes the procedure for replacing a disk drive that has failed or has predicted its failure.
Section 4.2, “Restoring Data from Tape after Two Failures,” explains the procedure to follow when two disk drives or a disk drive and the controller in a RAID have failed.
Section 4.3, “Restarting a Hung RAID,” explains how to proceed if a RAID stops responding to commands.
Section 4.4, “Resetting a RAID to Factory Defaults,” explains how to put a RAID into an uninitialized state.
It is important to replace a failed or about-to-fail disk drive as soon as possible to reduce the possibility of a second disk drive's failing before the first is replaced. If a second disk drive fails, the data on the entire RAID must be recovered from tape backups.
 | Caution: Don't remove the wrong disk drive! When a disk drive has failed, removing any disk drive other than the failed disk drive will probably result in the loss of all data on the RAID. Before removing any disk drive, confirm that you are removing the correct one. |
Follow the procedure below to replace a disk drive in a RAID unit and rebuild the disk drive. The replacement disk drive must be the same type as the failed disk drive (contact your Silicon Graphics Sales Representative or distributor of Silicon Graphics equipment to purchase disk drives for RAID). During rebuilding, the contents of the non-failed disk drives are used to reconstruct the data that was stored on the failed disk drive.
Make a backup tape of the data on the RAID. This step is optional, but it is highly recommended.
Get the controller and unit of the disk drive you plan to replace from hinv(1M).
If the disk drive is predicted to fail, but has not actually failed yet, telling the controller to mark the disk drive as down is recommended. Give this command as superuser:
raid -d driveno /dev/rdsk/radcontrollerdunitvh
driveno is the drive number of the disk you are replacing. It was in any PFA messages. This command won't mark the about-to-fail disk drive as down if there is another disk drive in the RAID already marked down, or if the RAID controller and the disk drive contain inconsistent information. The output of this command explains if it found any disk drives already marked down, and if it was able to force the disk drive down as requested.
If a disk drive is already marked down, it should be replaced before replacing a disk drive that has been predicted to fail.
Because you could lose the data on the RAID if you remove the wrong disk drive, you may want to reduce the chances of losing data. Choose and implement one of these options (least risky to most risky):
Shut the system down and power it off. Before powering off the system, mark the drive to be replaced with a Post-it™ note, since the LEDs that note its location won't be lit.
Quiesce the RAID. Stop any applications that are accessing the RAID and unmount the RAID filesystem(s).
Open the cabinet that contains the RAID unit so that you can see the front of the RAID unit. Figure 4-1 shows the front of one type of RAID unit enclosure; the other type of enclosure is very similar.
Twist and pull the fasteners at the top of the unit front (see Figure 4-1) and lower the door into a fully open position.
Note the physical location of the disk drive you plan to replace. On a failed disk drive or on a disk drive that has been marked down, its amber LED is lit (see Section 1.5.2, “RAID Disk Drive LEDs”) and its LED on the edge of its controller is lit (see Section 1.5.1, “RAID Controller LEDs”). These LEDs are not lit on disk drives that have been predicted to fail but haven't been marked down.
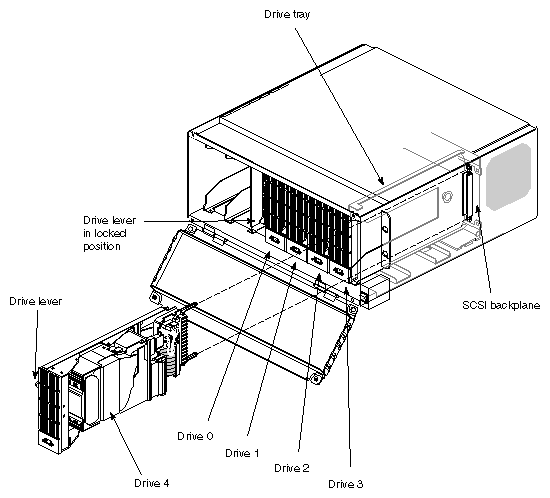
Push up on the drive lever on the lower left side of the disk drive you want to remove to release the disk drive module.
Slide the disk drive module out (see Figure 4-2).
Use the push buttons on the front of the replacement disk drive to set its drive number to the same number as the disk drive you just removed (see Figure 1-6).
Slide the replacement disk drive module into the opening in the RAID unit. As you slide in the module and push it to the back, its drive lever moves down.
Push down on the drive lever to lock it in position. Try pulling the module out to make sure that it is locked.
Raise the unit door and turn the fasteners to secure the front cover.
Caution: The front cover must be in place during operation for proper air flow and to comply with FCC and other regulatory requirements. If you powered off the workstation or server, turn the power back on and wait one minute for the RAID disk drives to spin up.
If you unmounted the RAID filesystem(s), mount it again.
Rebuild the RAID by giving this command as superuser:
/etc/raid -r /dev/rdsk/radcontrollerdunitvh
When the rebuilding of the RAID is complete (about 30 minutes on a lightly loaded system), the RAID is again fully functional.

As explained in Section 1.7, “RAID Failure Recovery,” when two disk drives or a disk drive and the controller in a RAID fail, the data on the RAID becomes inaccessible. Examples of situations that result in two failures are:
A disk drive fails, but the failure is not noticed or not repaired, and then a second disk drive fails.
A disk drive fails and while attempting to hot plug a replacement for the failed disk, the wrong disk drive is accidently removed from the RAID.
A disk drive fails, and then the controller fails.
If two disk drives have failed, follow this procedure:
Replace the failed disk drives by following steps 4 through 15 in Section 4.1.
Format the RAID as if it were a new RAID using the procedure in Chapter 2, “Formatting a RAID.”
Reload the files that were on the RAID from a backup tape.
A service call is required to replace a failed RAID controller.
If a RAID becomes hung, it doesn't respond to commands. This can occur as a result of an internal hardware fault in the controller. Two ways to attempt to restart it are:
| Caution: When you perform either of these procedures, there is some risk of corruption of data on the RAID, just as there is when you press the Reset button on a workstation or server. |
To reset the RAID controller, follow these steps:
Open the RAID unit as explained in steps 5 and 6 of Section 4.1.
Press the RAID controller Reset button shown in Figure 1-5.
Close the RAID unit as explained in steps 13 and 14 of Section 4.1.
Some RAID units have a power switch as shown in Figure 4-1. To power cycle this type of RAID unit, follow these steps:
Open the cabinet that contains the RAID unit so that you can see the front of the RAID unit.
Turn off power to the RAID unit (see Figure 4-1 for the location of the switch).
Wait 15 seconds.
Turn on the power.
Replace the front panel of the cabinet.
To power cycle RAID units that don't have their own power switches, you must power cycle the entire workstation or server.
Under certain error conditions, for instance when configuration information in the RAID is internally inconsistent, you may need to make a last ditch effort to get the RAID into a known state. The raid –z option puts a RAID into an uninitialized state, just as it is when it is shipped from the factory.
| Caution: Using the –z option of raid makes all data on a RAID inaccessible. Do not use it if you need any of the data on the RAID. |
Give this command to restore the internal configuration information of a RAID to its factory default, uninitialized state:
raid -z /dev/rdsk/radcontrollerdunitvh |
controller is the controller number and unit is the unit number (both can be obtained from hinv). To use the RAID again, you must format it (see Chapter 2, “Formatting a RAID”).