This appendix discusses system controllers that can be used in CXFS system reset configurations:
| Note: Serial cables are provided with SAN server configurations for TTY ports. Other configurations that use TTY ports require that you purchase serial cables. |
SGI recommends that you use the baseboard management controller (BMC) system controller when it is available.
The BMC must not be on the primary CXFS private network. Ideally, the BMC should be on a different private network that is reachable by all server-capable administration nodes in the cluster. A public network is not ideal for security reasons, but is acceptable.
Altix XE systems contain an integrated BMC. CXFS uses Intelligent Platform Management Interface (IPMI) to communicate with the BMC.
To use the BMC, you must create an admin user ID and assign the BMC a static IP address. This can be done using ipmitool(1) on the system containing the BMC. Do the following:
Verify that you have ipmitool(1) version 1.8.9 or later:
# ipmitool -V
ipmitool version 1.8.9
Load the following IPMI modules:
# modprobe ipmi_msghandler
# modprobe ipmi_devintf
# modprobe ipmi_si
Create a user named admin with a password and ADMINISTRATOR privileges:
Find the next available user ID:
ipmitool -d /dev/ipmi0 user list 1|2
Assign the user name admin to the next available user ID:
ipmitool -d /dev/ipmi0 user set name userID admin
Set the password for user admin:
ipmitool -d /dev/ipmi0 user set password userID admin_password
Enable the access modes and set the privilege level to ADMINISTRATOR:
ipmitool -d /dev/ipmi0 channel setaccess 1|2 userID callin=on ipmi=on link=on privilege=4

Note: You must apply the privilege change separately for channel 1 and for channel 2. Verify that the correct settings were applied:
ipmitool -d /dev/ipmi0 user list 1|2
ipmitool -d /dev/ipmi0 channel getaccess 1|2 userID
For example (line breaks shown here for readability):
# ipmitool -d /dev/ipmi0 user list 1
ID  Name             Callin  Link Auth  IPMI Msg   Channel Priv Limit
1                    true    false      true       ADMINISTRATOR

# ipmitool -d /dev/ipmi0 user list 2
ID  Name             Callin  Link Auth  IPMI Msg   Channel Priv Limit
1                    true    false      true       ADMINISTRATOR

# ipmitool -d /dev/ipmi0 user set name 2 admin
# ipmitool -d /dev/ipmi0 user set password 2 password
# ipmitool -d /dev/ipmi0 channel setaccess 1 2 callin=on \
ipmi=on link=on privilege=4
[root@linux root]# ipmitool -d /dev/ipmi0 channel setaccess 2 2 callin=on \
ipmi=on link=on privilege=4

# ipmitool -d /dev/ipmi0 user list 1
ID  Name             Callin  Link Auth  IPMI Msg   Channel Priv Limit
1                    true    false      true       ADMINISTRATOR
2   admin            true    true       true       ADMINISTRATOR

# ipmitool -d /dev/ipmi0 user list 2
ID  Name             Callin  Link Auth  IPMI Msg   Channel Priv Limit
1                    true    false      true       ADMINISTRATOR
2   admin            true    true       true       ADMINISTRATOR

# ipmitool -d /dev/ipmi0 channel getaccess 1 2
Maximum User IDs     : 15
Enabled User IDs     : 2
User ID              : 2
User Name            : admin
Fixed Name           : No
Access Available     : call-in / callback
Link Authentication  : enabled
IPMI Messaging       : enabled
Privilege Level      : ADMINISTRATOR

# ipmitool -d /dev/ipmi0 channel getaccess 2 2
Maximum User IDs     : 15
Enabled User IDs     : 2
User ID              : 2
User Name            : admin
Fixed Name           : No
Access Available     : call-in / callback
Link Authentication  : enabled
IPMI Messaging       : enabled
Privilege Level      : ADMINISTRATOR
Apply the following local area network (LAN) settings for the BMC on the Altix XE system, for which the IPMI device is /dev/ipmi0. The BMC LAN settings apply to LAN channels 1 and 2.
Note: You must apply each change separately for channel 1 and for channel 2. Set the IP Address (use the same IP address for both channels):
ipmitool -d /dev/ipmi0 lan set 1|2 ipaddr IP_address
Set the subnet mask (use the same value for both channels):
ipmitool -d /dev/ipmi0 lan set 1|2 netmask netmask
Enable address resolution protocol (ARP) responses:
ipmitool -d /dev/ipmi0 lan set 1|2 arp respond on
Enable gratuitous ARP, which broadcasts the MAC address to IP address mappings on a specified interface:
ipmitool -d /dev/ipmi0 lan set 1|2 arp generate on
Set the gratuitous ARP interval (in seconds):
Note: An interval of 5 seconds is supported for CXFS. ipmitool -d /dev/ipmi0 lan set 1|2 arp interval 5
For example:
# ipmitool -d /dev/ipmi0 lan set 1 ipaddr nodename-bmc.company.com
Setting LAN IP Address to nodename-bmc.company.com
# ipmitool -d /dev/ipmi0 lan set 2 ipaddr nodename-bmc.company.com
Setting LAN IP Address to nodename-bmc.company.com
# ipmitool -d /dev/ipmi0 lan set 1 netmask 255.255.0.0
Setting LAN Subnet Mask to 255.255.0.0
# ipmitool -d /dev/ipmi0 lan set 2 netmask 255.255.0.0
Setting LAN Subnet Mask to 255.255.0.0
# ipmitool -d /dev/ipmi0 lan set 1 arp respond on
Enabling BMC-generated ARP responses
# ipmitool -d /dev/ipmi0 lan set 2 arp respond on
Enabling BMC-generated ARP responses
# ipmitool -d /dev/ipmi0 lan set 1 arp generate on
Enabling BMC-generated Gratuitous ARPs
# ipmitool -d /dev/ipmi0 lan set 2 arp generate on
Enabling BMC-generated Gratuitous ARPs
# ipmitool -d /dev/ipmi0 lan set 1 arp interval 5
BMC-generated Gratuitous ARP interval:  5.0 seconds
# ipmitool -d /dev/ipmi0 lan set 2 arp interval 5
BMC-generated Gratuitous ARP interval:  5.0 seconds
Verify your changes by using the following command:
ipmitool -d /dev/ipmi0 lan print 1|2
For example:
# ipmitool -d /dev/ipmi0 lan print 1
Set in Progress         : Set Complete
Auth Type Support       : NONE MD5 PASSWORD
Auth Type Enable        : Callback :
                        : User     :
                        : Operator :
                        : Admin    : MD5 PASSWORD
                        : OEM      :
IP Address Source       : Static Address
IP Address              : nodename-bmc.company.com
Subnet Mask             : 255.255.0.0
MAC Address             : 00:04:23:d5:af:3c
SNMP Community String   :
IP Header               : TTL=0x40 Flags=0x40 Precedence=0x00 TOS=0x10
BMC ARP Control         : ARP Responses Enabled, Gratuitous ARP Enabled
Gratituous ARP Intrvl   : 5.0 seconds
Default Gateway IP      : 0.0.0.0
Default Gateway MAC     : 00:00:00:00:00:00
Backup Gateway IP       : 0.0.0.0
Backup Gateway MAC      : 00:00:00:00:00:00
RMCP+ Cipher Suites     : 0,1,2,3,4,5,6,7,8,9,10,11,12,13,14
Cipher Suite Priv Max   : XXXXXXXXXXXXXXX
                        :     X=Cipher Suite Unused
                        :     c=CALLBACK
                        :     u=USER
                        :     o=OPERATOR
                        :     a=ADMIN
                        :     O=OEM
Verify the BMC configuration and connectivity from a remote node by issuing ipmitool(1) commands remotely :
ping IP_address_or_hostname
ipmitool -H IP_address_or_hostname -U admin -P admin_passwd lan print 1|2
For example (line breaks shown here for readability):
# ping nodename-bmc.company.com

# ipmitool -H nodename-bmc.company.com -U admin \
-P mypassword lan print 1
Set in Progress         : Set Complete
Auth Type Support       : NONE MD5 PASSWORD
Auth Type Enable        : Callback :
                        : User     :
                        : Operator :
                        : Admin    : MD5 PASSWORD
                        : OEM      :
IP Address Source       : Static Address
IP Address              : nodename-bmc.company.com
Subnet Mask             : 255.255.0.0
MAC Address             : 00:04:23:d5:af:3c
SNMP Community String   :
IP Header               : TTL=0x40 Flags=0x40 Precedence=0x00 TOS=0x10
BMC ARP Control         : ARP Responses Enabled, Gratuitous ARP Enabled
Gratituous ARP Intrvl   : 5.0 seconds
Default Gateway IP      : 0.0.0.0
Default Gateway MAC     : 00:00:00:00:00:00
Backup Gateway IP       : 0.0.0.0
Backup Gateway MAC      : 00:00:00:00:00:00
RMCP+ Cipher Suites     : 0,1,2,3,4,5,6,7,8,9,10,11,12,13,14
Cipher Suite Priv Max   : XXXXXXXXXXXXXXX
                        :     X=Cipher Suite Unused
                        :     c=CALLBACK
                        :     u=USER
                        :     o=OPERATOR
                        :     a=ADMIN
                        :     O=OEM
Note: The ipmi_si module may fail to load and
display an error message such as the following
This is a known bug in which the pnpacpi layer has claimed the I/O ports on behalf of the IPMI driver, but the IPMI driver does not know about it. The workaround is to disable pnpacpi using the kernel command line (grub) parameter pnpacpi=off . This is fixed in 2.6.17-rc5-mm1 and later kernels. |
For more information, see the ipmitool(1) man page, Guide to Programming Environments and Tools Available on SGI Altix XE System, and the user guide or quick start guide for your system.
The L2 system controller and the required USB cables are optional equipment available for purchase. The L2 method is recommended when available.
| Note: You should use a separate L2 for each node to avoid unnecessary
reboots.
You can use network reset if you have an L2 on a network. For details, see the information about reset_comms in “Create or Modify a Node with cxfs_admin” in Chapter 11. |
The L2 controller must not be on the primary CXFS private network. Ideally, the L2 controller should be on a different private network and must be reachable by all server-capable administration nodes in the cluster. A public network is not ideal for security reasons, but is acceptable. The number of network connections allowed depends upon the L2 version; contact your SGI support person for assistance.
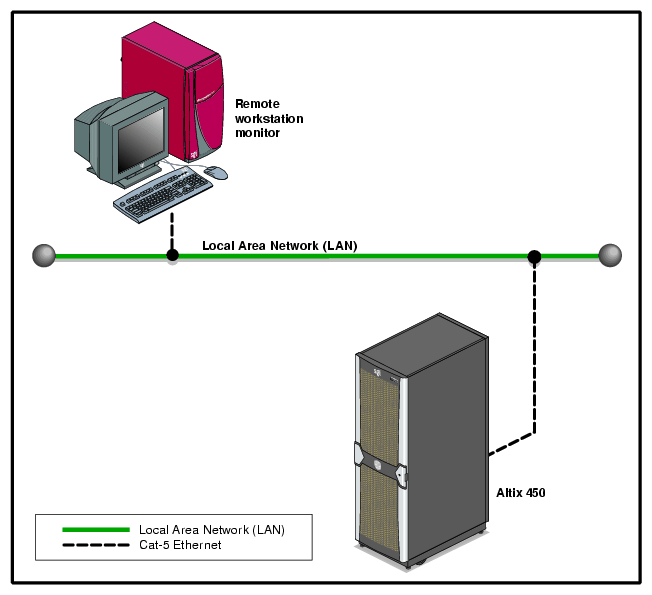
Altix systems with an integrated L2 (such as a NUMAlink 4 R-brick), Altix 3000 Bx2 systems, Altix 450 systems and Altix 4700 systems use the L2 over Ethernet. See Figure D-2.
In Altix 350, use IO10 and a multiport serial adapter cable, which is a device that provides four DB9 serial ports from a 36-pin connector; see Figure D-3.
Use the modem port on the L2 system controller as shown in Figure D-4. Use DB9 serial ports on an IX-brick on Altix 3000 and Origin 3000. Connect the serial cable to the modem port on one end and the serial port on the IX-brick (for example, serial port connector 0), as shown in Figure D-5.
Figure D-1 shows the L2 access via the Ethernet port on an A450.

Figure D-6, Figure D-7, and Figure D-8 show serial connections for two machines with an L2 system controller. (These figure shows direct attached storage. Serial connections for other storage configurations will be the same.)


L1 system controller can be used for reset, however, SGI recommends the use of L2 when available.

Connect the serial cable to the console port (port labeled CONSOLE) on one end and the serial port of other node on the other end. The serial ports on Origin 350 are labeled as 1 , 2, 3, and 4; see Figure D-9.
| Note: The USB port on the Origin 350 is labeled L1 PORT . Do not use this port for system reset. Use the port labeled CONSOLE as shown in Figure D-9. |
On Origin 300, Origin 350, Origin 3200C, Onyx 300, Onyx 350, and Onyx 3200C systems, there is only one serial/USB port that provides both L1 system controller and console support for the machine. In a CXFS configuration, this port (the DB9 connector) is used for system reset. It is connected to a serial port in another node or to the Ethernet multiplexer.
To get access to console input and output, you must redirect the console to another serial port in the machine.
Use the following procedure to redirect the console:
Edit the /etc/inittab file to use an alternate serial port.
Either issue an init q command or reboot.
For example, suppose you had the following in the /etc/inittab file (line breaks added for readability):
# on-board ports or on Challenge/Onyx MP machines, first IO4 board ports t1:23:respawn:/sbin/suattr -C CAP_FOWNER,CAP_DEVICE_MGT,CAP_DAC_WRITE+ip -c "exec /sbin/getty ttyd1 console" # alt console t2:23:off:/sbin/suattr -C CAP_FOWNER,CAP_DEVICE_MGT,CAP_DAC_WRITE+ip -c "exec /sbin/getty -N ttyd2 co_9600" # port 2 |
You could change it to the following:
# on-board ports or on Challenge/Onyx MP machines, first IO4 board ports t1:23:off:/sbin/suattr -C CAP_FOWNER,CAP_DEVICE_MGT,CAP_DAC_WRITE+ip -c "exec /sbin/getty ttyd1 co_9600" # port 1 t2:23:respawn:/sbin/suattr -C CAP_FOWNER,CAP_DEVICE_MGT,CAP_DAC_WRITE+ip -c "exec /sbin/getty -N ttyd2 console" # alt console |
| Caution: Redirecting the console by using the above method works only when the IRIX operating system is running. To access the console when the operating system is not running (miniroot) , you must physically reconnect the machine: unplug the serial hardware reset cable from the console/L1 port and then connect the console cable. |


Figure D-12 shows the MMSC. The alternate console port should be connected to the serial port on another machine using a serial cable.
