Each XG2N graphics module provides two graphics pipes to the Silicon Graphics Prism Visualization System, as well as providing up to two additional CPUs and additional memory.
The CPU expansion module has the same 2U form-factor as the XG2N module, but adds CPUs and memory without graphics pipes.
The XG2N graphics module (see Figure 5-1) is a 2U AC-powered device that consists of the following:
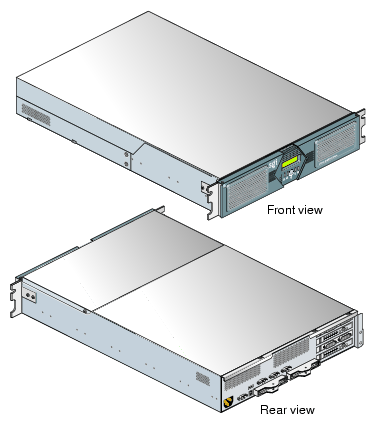
The XG2N module is a 2U rack-mountable enclosure which, in addition to the two high-performance graphics pipes, adds to the host system a node board with two CPUs and four, eight, or twelve memory DIMMs. This module connects as an integral part of the system's compute/memory fabric. Though it contains CPUs and memory, the XG2N module does not have boot I/O functionality, and therefore may not be used as a standalone system.
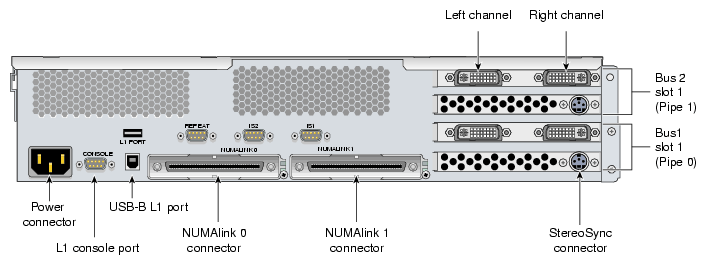
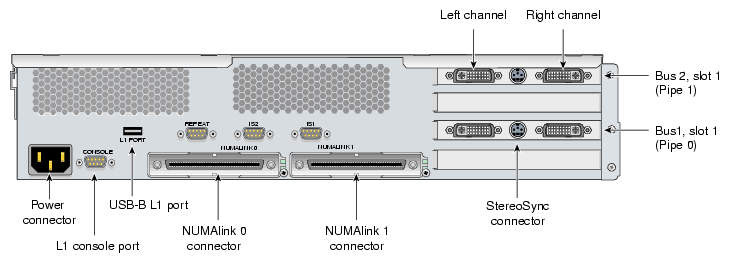
The rear panel of the XG2N module with FireGL X2PRO-256 is shown in Figure 5-2. The rear panel of the XG2N module with FireGL X3-256 is shown in Figure 5-4.
The XG2N module is a node-connected module, and therefore connects to the host system using NUMAlink. This way the XG2N module becomes an integral part of the system, and can contain both CPUs and memory, in addition to graphics output capabilities.
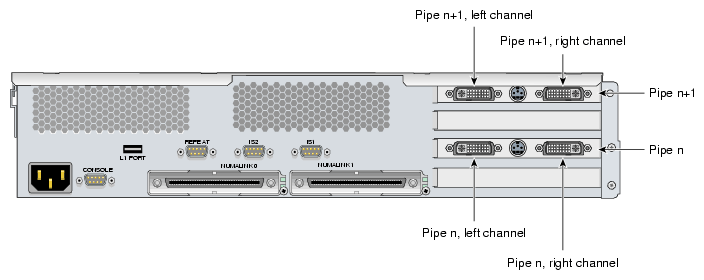
Each XG2N module contains two graphics pipes, each capable of supporting two display devices. In systems with only two pipes, the pipe and channel designations are defined as in Figure 5-2 and Figure 5-4. In systems with more than one XG2N graphics module the pipes are numbered as shown in Figure 5-3 and Figure 5-5.
Figure 5-2. XG2N Graphics Module Rear View with FireGL X2PRO-256 (Showing First Module Pipe Numbering)
 |

This section describes the front panel controls and indicators of the XG2N module as shown in Figure 5-6.
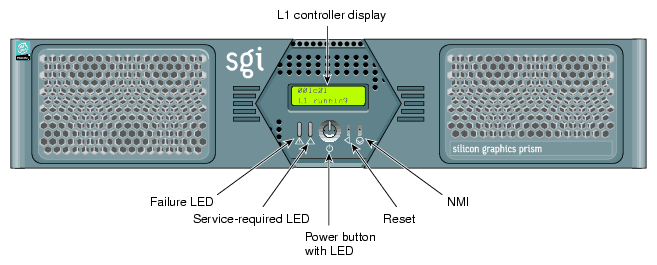
The front panels of the modules have the following controls:
L1 controller display. A liquid crystal display (LCD) that shows status and error messages generated by the L1 controller.

Note: Refer to the SGI L1 and L2 Controller Software User's Guide (007-3938-00x) for more information on the L1 controller. Status LEDs. The front panel has the following LEDs:
Power-button LED. This green LED illuminates when the internal components are on.
Service-required LED. This amber LED illuminates to indicate that an item is not functioning properly (for example, a fan is off), but the system is still operating.
Failure LED. This red LED illuminates to indicate that a failure has occurred and the system or module has shut down.
Power button. Press this button to power on the individual module. Alternatively, you can power on all the system modules at once from an optional system console.
Reset button. Press this button to reset the internal processors and ASICs. The reset will cause a memory loss.
NMI button. Pressing this button issues a non-maskable interrupt command to a module. When the system hangs, you can send the affected module an NMI interrupt. The interrupt goes to PROM and causes the CPU state to be captured for that module. This information is saved in flash PROM and in the system log, and can assist SGI technicians in debugging system hangs and customer problems.
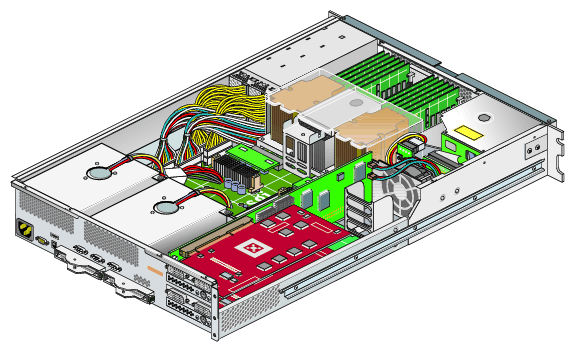
Figure 5-7 shows an internal view of the XG2N module.
The CPU expansion module is a 2U AC-powered device that consists of the following:
Zero, one, or two Intel Itanium 2 processors (each with integrated L1, L2, and L3 caches)
Between 2 GB and 24 GB of local DIMM memory (4, 8, or 12 DIMMs)
One L1 controller that provides the following services:
Controls and sequences power
Controls and monitors the environment
Initiates a reset
Stores identification and configuration information
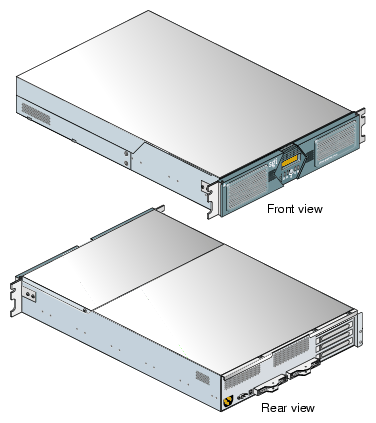
Figure 5-8 shows the front and rear views of a CPU expansion module.
The front panel controls of the CPU expansion module are the same as those for the XG2N graphics module, shown in Figure 5-6.
Two types of cabling are unique to the XG2N graphics module and are described in this section. These are:
If your system was shipped from SGI with the SGI ImageSync (IS) cables pre-installed, you should proceed to the next section, “Connecting a Monitor”, and continue with the setup.
| Note: When using an ImageSync card a monitor must be connected to the left channel of the first pipe to which the ImageSync card is cabled. |
If your system did not come with SGI ImageSync cables pre-installed, use the following steps to install them:
Connect the DB9 connector on the IS card in your base compute module to the SGI ImageSync DB9 connector (labeled IS1) located above the NUMAlink 1 connector on the back of the XG2N using an SGI ImageSync DB9-to-DB9 cable.
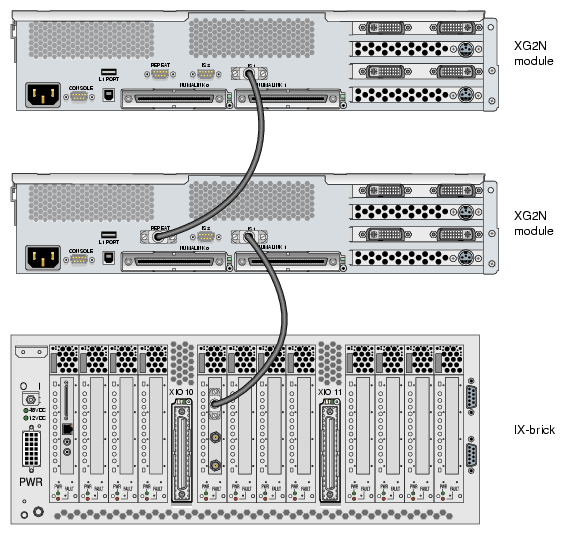
Daisy-chain the SGI ImageSync cable from this first XG2N to any additional graphics modules in your system by connecting an ImageSync DB9-to-DB9 cable from the Repeat connector (located above the NUMAlink 0 connector) and routing it to the ImageSync connector (labeled IS1) on the back of the next XG2N graphics module, as shown in Figure 5-9.

Caution: Although the image sync subsystem uses DB-9 connectors, these connectors, whether on the ImageSync card or on the XG2N modules, are not serial ports. Connecting a serial device to these connectors may cause damage to both the ImageSync devices and the serial devices. Note: Figure 5-9 is intended only to show an example of how the ImageSync cables connect. Your system may be configured differently.
Select the monitor on which you want the Linux OS console to appear, and connect this monitor to the left channel of pipe 0 on your graphics module. The connector for the left channel of pipe 0 is located in the lower left section of the PCI graphics area on the back of your primary system graphics module. See Figure 5-2 for reference.
If you have a single XG2N graphics module, pipe 0 will be located in that module.
If you have multiple XG2N graphics modules, pipe 0 will typically be in the XG2N module located closest to the bottom of the first rack. The Silicon Graphics Prism platform comes with a choice of optional monitor types and sizes.
| Caution: Ensure that the electrical rating on the monitor label matches the outlet voltage range (100–120 VAC or 220–240 VAC) before you plug in the monitor. |
If you use a monitor in locations that do not have the appropriate outlets, contact your SGI system support engineer (SSE) before plugging in the monitor power cable.
Plug in and turn on your monitor or display as described in the documentation that accompanies your monitor.