In addition to IRIS IM widgets and IRIS ViewKit components, RapidApp also supports components from various Silicon Graphics libraries such as Open Inventor. This chapter shows examples of building applications with RapidApp using these libraries.
This section shows how to use an Open Inventor component in an application. It demonstrates using both a text editor and the Debugger's Fix and Continue feature to add functionality to the code. In practice, you can use whichever method you prefer.
 | Note: Open Inventor is an optional product. You can't build this example if you don't have the inventor_dev package installed on your system. |
The following example creates a simple interface with the Examiner Viewer to display a scene:
Create a Simple Window.
Create a Bulletin Board within the Simple Window.
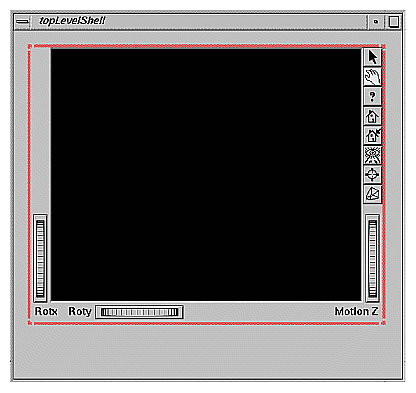
Create an Examiner Viewer within the Bulletin Board. Make sure that the Instance Name of the component is “viewer.”
At this point, your window should look like the one shown in Figure 9-1.
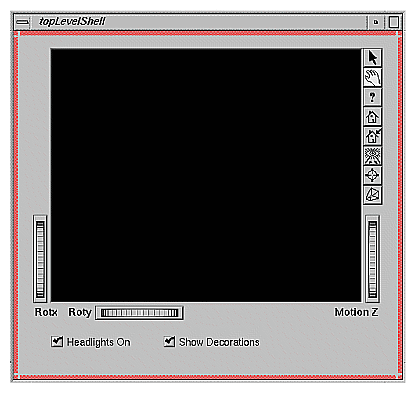
Complete the interface by adding two Toggle Buttons below the viewer.
Create a Toggle Button and place it below and at the left side of the viewer. Change the label of the toggle to read “Headlights On.” Set the set resource to True so that the toggle is on by default.
Create another Toggle Button and place it to the right of the first toggle. Change the label of the toggle to read “Show Decorations.” Set the set resource to True so that the toggle is on by default.
Select the Bulletin Board and choose “Make Class” from the Classes menu. Name the class “ConePanel.” Figure 9-2 shows the completed interface.
From the File menu, choose “Preferences.”
In the Project card of the Preferences dialog, change the Application name to “cone.”
Go to the Desktop or a shell window and create a directory. Select “Save As” from the File menu and save the interface to cone.uil in the directory you created.
Note: If you provide a directory name in the Project card on the Preferences dialog, RapidApp creates the directory for you automatically if it doesn't already exist. Select “Generate C++” from the Project menu to generate code. Then selection “Build Application” from the Project menu to build the application.
Edit the ConePanel component to display the cone:
Select “Edit File” from the Project menu and in the select the file ConePanel.C.
Scroll down until you see a code segment that looks like this:
//---- ConePanel Constructor

ConePanel::ConePanel(const char *name, Widget parent) :
                   ConePanelUI(name, parent)
{
    // This constructor calls ConePanelUI(parent, name)
    // which calls ConePanelUI::create() to create
    // the widgets for this component. Any code added here
    // is called after the component's interface has been built

    //--- Add application code here:


} // End Constructor
Go to the line after the “Add application code here” comment and type:
_viewer->setSceneGraph(new SoCone);
Save the file and exit the editor.
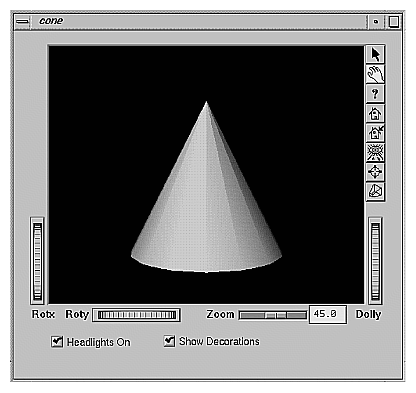
Select “Build Application” from the Project menu. When the compilation has finished, select “Run Application” from the project menu. The window should look like Figure 9-3.
Associate actions with the toggle buttons. Because you didn't assign any callbacks to the toggle buttons when you created the interface, you need to go back and add them. To do so:
Toggle on “Edit Classes” from the Classes menu.
Select the headlights toggle button and change its valueChangedCallback resource to “headlight().”
Select the decorations toggle and change its valueChangedCallback resource to “toggleDecorations().”
Toggle off “Edit Classes” from the Classes menu.
Select “Save” from the File menu to save the interface, and select “Generate C++” from the Project menu to generate code.
Select “Debug Application” from the Project menu to start the Debugger.
Click the Debugger's Run button to start your program.
Click on the Headlights On toggle button. The Debugger stops in the VkUnimplemented() function.
Click the Debugger's Return button to go up one level to the callback function that invoked VkUnimplemented(). You'll see a function that looks like this:
void ConePanel::headlight ( Widget w, XtPointer callData )
{
    XmToggleButtonCallbackStruct *cbs = (XmToggleButtonCallbackStruct*) callData;

    //--- Comment out the following line when ConePanel::headlight is implemented:

    ::VkUnimplemented ( w, "ConePanel::headlight" );


    //--- Add application code for ConePanel::headlight here:


} // End ConePanel::headlight()
Select “Edit” from the Debugger's Fix+Continue menu and edit the function to look like this:
void ConePanel::headlight ( Widget w, XtPointer callData )
{
    XmToggleButtonCallbackStruct *cbs = (XmToggleButtonCallbackStruct*) callData;

    //--- Comment out the following line when ConePanel::headlight is implemented:

    //::VkUnimplemented ( w, "ConePanel::headlight" );


    //--- Add application code for ConePanel::headlight here:

    _viewer->setHeadlight(cbs->set);

} // End ConePanel::headlight()
Note: Remember to comment out the VkUnimplemented() call. Select “Parse And Load” from the Debugger's Fix+Continue menu.
Click the Debugger's Continue button to continue the program. Try out the changes by clicking the program's Headlights On button.
Click on the Show Decorations toggle button. The Debugger stops in the VkUnimplemented() function.
Click the Debugger's Return button to go up one level to the callback function that invoked VkUnimplemented(). You'll see a function that looks like this:
void ConePanel::toggleDecorations ( Widget w, XtPointer callData )
{
    XmToggleButtonCallbackStruct *cbs = (XmToggleButtonCallbackStruct*) callData;

    //--- Comment out the following line when ConePanel::toggleDecorations is implemented:

    ::VkUnimplemented ( w, "ConePanel::toggleDecorations" );


    //--- Add application code for ConePanel::toggleDecorations here:


} // End ConePanel::toggleDecorations()
Select “Edit” from the Debugger's Fix+Continue menu and edit the function to look like this:
void ConePanel::toggleDecorations ( Widget w, XtPointer callData )
{
    XmToggleButtonCallbackStruct *cbs = (XmToggleButtonCallbackStruct*) callData;

    //--- Comment out the following line when ConePanel::toggleDecorations is implemented:

    //::VkUnimplemented ( w, "ConePanel::toggleDecorations" );


    //--- Add application code for ConePanel::toggleDecorations here:

    _viewer->setDecoration(cbs->set);

} // End ConePanel::toggleDecorations()
Click the Debugger's Continue button to continue the program. Try out the changes by clicking the program's Show Decorations button.
Save the changes and rebuild the application.
If you install the RapidApp.sw.examples subsystem, the directory /usr/share/src/RapidApp contains several example programs created using RapidApp. You can build the programs by entering “make” in the desired directory. You can also load any example in RapidApp. If you use the Indigo Magic Desktop, you can open a window in the example directory and simply double click on the file with the “.uil” suffix (the file with the RapidApp icon).
To run the programs, either run then from RapidApp, or be sure to set the XUSERFILESEARCHPATH environment variable to include “%N%S” so that you pick up the application resource files from the current directory.
To identify which code was created using RapidApp and which was added by hand, choose “View Changes...” from the Project menu and select a file. RapidApp displays a windows showing the differences (if any) between the current file and what RapidApp originally created. In general, the only files that have changes are subclasses, which you can identify by the existence of a similar file with a “UI” appended to the name. For example, FooUI.C is a base class generated by RapidApp, while Foo.C is a subclass that is likely to be modified from the original.
You might also want to explore the source code using the Developer Magic Static Analyzer and Class Browser. If so, be sure you have installed the RapidApp.sw.examples_sadb subsystem. Then start RapidApp, load the desired example, and toggle on “Create Static Analysis Database” in the Application Preference dialog. Then select “Browse Source” from the Project menu to launch the Static Analyzer on the example program.
The examples in /usr/share/src/RapidApp include:
| Calculator | A very simple calculator that adds two numbers and reports the result. This example was taken from a Visual C++ manual. There are two versions of this program, one that demonstrates the VkEZ interface and another that shows the equivalent IRIS IM version. You may find it interesting to view the differences using xdiff, as follows:
| ||
| DialCalc | A program that is similar to Calculator, but that uses two Dial widgets to enter numbers. A third dial shows the sum of the first two. This example creates each labeled dial element as a class, and shows how you can nest and connect components. In this case the program uses the IRIS ViewKit callback mechanism. Like Calculator, there are two versions of this program, one that uses the VkEZ interface, while the other uses the IRIS IM interface. | ||
| Dialogs/PhoneDialog |
| ||
| Dialogs/Question |
| ||
| Rectangle | An example of using an IRIS IM DrawingArea widget. The program creates a class that handles its own rendering, in this case simply drawing a large rectangle in the window. | ||
| OpenGL/Simple |
| ||
| Stopwatch | A simple stopwatch program. This example is based on the stopwatch example in Object-Oriented Programming with C++ and OSF/Motif, but rewritten for IRIS ViewKit using RapidApp. The program provides an example of using multiple components and defining connections between them. | ||
| Convert | A program that converts between various number formats. | ||
| AppClass | A trivial example that creates its own subclass of VkApp. | ||
| Component | An example of creating a C++ class that can be imported back onto RapidApp's palettes. This component is a simple combination of a label and a text input field. It has member functions that support changing the label, setting the text field to read only, and setting a “mask” that determines what input is allowed. This component can be added to the RapidApp palettes using “Install Class” from the RapidApp Classes menu, or by creating an installable image from the files in this directory. | ||
| ComponentTester |
|
The following examples require the Inventor Development option:
| HelloCone | An example of using RapidApp and IRIS ViewKit with Open Inventor. This example is based on the HelloCone example in The Inventor Mentor. | |
| IvViewer | Another IRIS ViewKit/Open Inventor example. This program allows you to open an Open Inventor data file and view it. | |
| MiniSim | A very simple “flight simulator”, that shows a plane in flight, and allows you to control some aspects of its movement. Based on an Inventor scene viewer, this program demonstrates how to connect an Inventor database and user interface controls. |