This chapter provides an overview of the following:
The DMF HA implementation uses the following structure:
A group resource (using an example ID name of DMF-GROUP) that contains resources that are colocated on the same node and ordered to start and stop serially. The resources in a resource group will all fail over together. The DMF group resource (DMF-GROUP) contains all of the required resources that must be started/stopped in a specific order so that HA processes can coherently control the DMF HA service.
A resource set that consists of optional resources that must started after DMF-GROUP and stopped before DMF-GROUP. The start/stop order among the optional resources within the resource set is not significant. (For simplicity, the resources associated with Samba are also housed within a subgroup, SAMBA-GROUP .)
Figure 6-1 shows the overall DMF HA implementation, using the names of the template files (and resource types) found in /usr/share/doc/sgi-ha/templates. This map also describes the required start/stop order for the resources within DMF-GROUP : the cxfs resource or lxvm resource must be started first and stopped last.
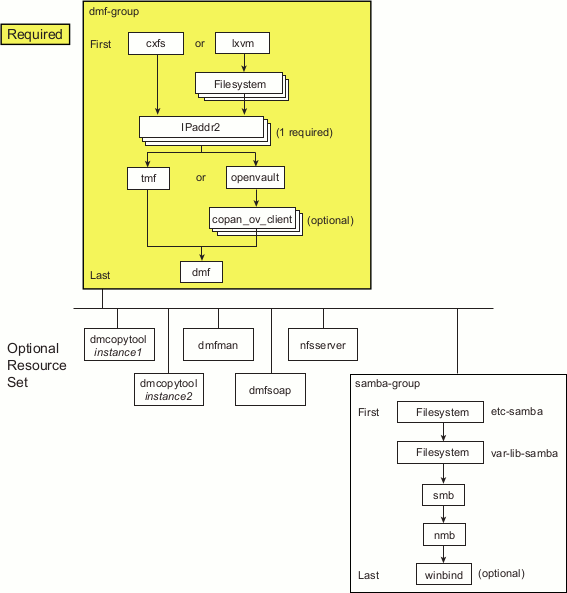
The optional resources in the resource set must be colocated with DMF-GROUP so that the failure of any resource within DMF-GROUP will cause the entire DMF HA service (all required and optional resources) to fail over. However, the failure of a given optional resource within the resource set may or may not impact the rest of the DMF HA service; the failed resource may restart locally or may cause a failover of all resources, depending upon how it is configured (see “Additional Attributes for Optional DMF HA Resource Set” in Appendix A).
You should add and test the required DMF-GROUP and its component resources first, building the group up one resource at a time. You should then add and test each individual optional resource, building the resource set one resource at a time. For simplicity, the resources associated with Samba are structured in a subgroup within the resource set (SAMBA-GROUP). You can use the files in /usr/share/doc/sgi-ha/templates as building blocks to create the HA service.
Table 6-1 and Table 6-2 list the resource-specific sections that provide the details.
Table 6-1. Required Resources Used in the DMF Group for the DMF HA Service
Purpose | Resource Type and Template Name | Example ID | Instructions |
|---|---|---|---|
Group name and Filesystem
| cxfs | DMF-GROUP and CXFS | |
|
| -- or -- |
|
| lxvm and Filesystem | DMF-GROUP and LXVM plus FILESYSTEM-n (one or more) | |
IP alias | IPaddr2 | IP | |
Mounting service
| tmf | TMF
| |
| -- or -- |
| |
| openvault | OV plus | |
| copan_ov_client | C0n (one or more) | |
DMF | dmf | DMF |
Table 6-2. Optional Resources Used in the Resource Set for the DMF HA Service
Purpose | Resource Type and Template Name | Example ID | Instructions |
|---|---|---|---|
DMF copytool | dmcopytool | DMCOPYTOOL1 (one per Lustre filesystem) | “Add the dmcopytool Resources (Optional)” (one resource for each instance of the DMF copytool, so one per Lustre filesystem) |
NFS | nfsserver | NFS | |
DMF Manager | dmfman | DMFMAN | |
DMF SOAP | dmfsoap | DMFSOAP | |
Samba | samba-group Filesystem Filesystem smb nmb winbind | SAMBA-GROUP etc-samba var-lib-samba SMB NMB WINBIND |
Before applying an HA environment, you must understand the requirements of the individual components:
The cxfs resource agent allows you to associate the location of the CXFS metadata server with other products, such as DMF. This section discusses the following:
An HA cluster using the cxfs resource agent must include the server-capable administration nodes that are potential metadata servers for every filesystem that is controlled by the cxfs resource agent.
Certain resources (such as DMF) require that the CXFS metadata server and the HA resource be provided by the same node. Other resources (such as NFS and Samba) do not have this requirement, but it may be desirable to enforce it in order to ensure that these resources provide the best performance possible. (Some workloads can cause significant performance problems when the NFS or Samba resource is located on a node that is not the CXFS metadata server.)
Unless otherwise directed by this guide, you should configure the CXFS cluster, nodes, and filesystems according to the instructions in the following:
| CXFS 7 Administrator Guide for SGI InfiniteStorage |
| CXFS 7 Client-Only Guide for SGI InfiniteStorage |
CXFS relocation is provided automatically by the cxfs resource agent. In a CXFS cluster running HA software, relocation should only be started by using the tools provided with HA software and not by any other method.
If an application uses a CXFS filesystem that is controlled by HA software, that application must also be controlled by HA software. You must set colocation and start-ordering constraints or ordered resource groups such that:
The application can only run on the server-capable administration node that is the active CXFS metadata server for the filesystem.
The CXFS metadata server will start before the application starts and stop after the application stops
Use a single resource group and configure in the correct order to ensure the proper colocation.
CXFS server-capable administration nodes must use some sort of system reset in order to prevent conflicts with CXFS I/O fencing methods. In an HA environment, the HA process must control the reset functionality for CXFS. You must use STONITH for system reset and specify the following fail policy in the CXFS configuration (set via the CXFS Manager interface or the cxfs_admin command ):
fence,shutdown |
For more information, see:
CXFS 7 Administrator Guide for SGI InfiniteStorage chapters about CXFS Manager and cxfs_admin For the cxfs_admin(8) man page and help text
You must start the CXFS cluster cxfs_cluster service and CXFS filesystem cxfs service before starting the appropriate underlying HA control services (cman and pacemaker for RHEL nodes, openais for SLES nodes). The cxfs resource agent will wait for all of the CXFS filesystems to be mounted by CXFS before attempting any relocation. You must adjust the start operation timeout for the cxfs resource agent accordingly.
During failover, resources that colocate with the CXFS metadata server must be stopped before the CXFS resource. If a resource fails to shut down completely, any files left open on the metadata server will prevent relocation. Therefore, the HA fail policy for any resource that could prevent relocation by holding files open must be fence and you must configure a STONITH facility according to the requirements for your site, as directed later in this procedure (Chapter 8, “Create the Fencing Capability and Put Into Production Mode”).
In this case, the offending CXFS metadata server will be reset, causing recovery to an alternate node.
The CXFS volumes specified for the cxfs resource must be the following:
All CXFS filesystems that are not managed by DMF
DMF administrative filesystems specified by the following parameters in the DMF configuration file, including those that are DMAPI-mounted:
| Note: Do not include any volumes that represent filesystems managed by DMF. If MOVE_FS is configured as a managed filesystem, do not include it in the cxfs resource. |
All local XVM volumes that are controlled by HA software must have unique volname values.
All local XVM physical volumes (physvols) that are controlled by HA software must have unique Disk Name values in their XVM label when compared to all other XVM volumes on the SAN. For example, you cannot have two physvols on the same SAN with the Disk Name of spool, even if one is foreign.
If you do not have unique values, the following are potential problems:
HA software may steal the wrong physvol from a system outside of the cluster while I/O is ongoing. This may result in losing data from that system while corrupting the filesystem from the node within the cluster by whom it is stolen.
General confusion, resulting in node reset.
For DMF HA purposes, filesystems used by the Filesystem resource should use a filesystem type of xfs.
The filesystem must not be listed in /etc/fstab.
The Filesystem resources used with Samba require fstype="none", which differs from the template below, and options="bind".
DMF HA service (in either a CXFS environment or a local XVM environment) requires at least one IPaddr2 resource for the DMF and OpenVault server. You must allocate an IP address alias on the subnet used for DMF and OpenVault communication. The address must be a virtual address controlled by an IPaddr2 resource within the same resource group as the openvault resource. You must also add an associated virtual hostname to your local DNS and to the /etc/hosts file on all hosts in the cluster that could be used as a DMF server or as an OpenVault client node.
You may need other aliases, depending on your configuration, such as for accessing DMF Manager or serving NFS. However, if DMF and OpenVault are configured to use a dedicated subnet, you should instead define a second IPaddr2 address on an appropriate subnet for accessing these services.
To use TMF as the mounting service, all tape devices should be configured as DOWN in the TMF configuration file on all nodes. The loaders should be configured as UP.
During HA operation, the HA software will control this service.
| Note: If tape drives are defined and used outside of DMF, you must manually start TMF on the inactive server. |
To use OpenVault as the mounting service, you must do the following:
Provide a directory for OpenVault's use within an HA filesystem in the DMF resource group. This is known as the serverdir directory. The directory will hold OpenVault's database and logs. The directory can be either of the following:
Within the root of an HA filesystem dedicated to OpenVault use
Within another HA filesystem, such as the filesystem specified by the HOME_DIR parameter in the DMF configuration file (/etc/dmf/dmf.conf)
In non-HA environments, the OpenVault server's files reside in /var/opt/openvault/server. During the conversion to an HA environment, OpenVault will move its databases and logs into the specified directory within an HA filesystem and change /var/opt/openvault/server to be a symbolic link to that directory.
Ensure that the OpenVault server is the same node as the DMF server. (Therefore, you will not have the OV_SERVER parameter set in the base object.)
Configure the DMF application instances in OpenVault to use a wildcard ("*") for the hostname and instance name. For more information, see the chapter about mounting service configuration tasks in the DMF 6 Administrator Guide.
During HA operation, the HA software will control the openvault service.
Using COPAN MAID shelves in an active/passive DMF HA cluster consisting of potential DMF servers also requires the following:
OpenVault must be configured to manage the RAID sets
In an implementation using local XVM, OpenVault must be configured to manage the RAID sets, lxvm volumes, and xfs filesystems for each shelf
At any time, only one node (the owner node ) can manage activity to a given shelf
Activity to all shelves controlled by a given node must be stopped before moving the control of any one of those shelves to another node
All potential DMF server nodes in the HA cluster must have physical connectivity to the shelves
The active DMF server must be the owner node of all of the shelves
The OpenVault server resource must be started before the COPAN OpenVault client resource is started
The COPAN OpenVault client resource must be stopped before the OpenVault server resource is stopped
For suggested resource start/stop order, see Figure 6-1.
This section discusses the following:
Each potential DMF server must:
Be a member of the DMF HA cluster.
Run the required product and HA software.
Have the ident service started and configured to restart on reboot, as documented in the DMF 6 Administrator Guide.
Have connectivity to the same set of libraries and drives as every other potential DMF server. (If one node has access to only a subset of the drives when the DMF server is failed over to that node, at that point DMF would lose access to data on volumes that are mounted in inaccessible drives.)
Have connectivity to all of the CXFS and XFS® filesystems that DMF either depends upon or manages:
Each of the local XVM volumes that make up those filesystems must be managed by an lxvm resource within the same resource group as the dmf resource. Each of the XFS filesystems must be managed by a Filesystem resource in that resource group.
Each of the CXFS filesystems (other than managed user filesystems) must be managed by the cxfs resource in that resource group.
The DMF filesystems to be HA-controlled are as follows:
The managed user filesystems (do not include these in the volnames attribute list for the cxfs resource)
DMF administrative filesystems specified by the following parameters in the DMF configuration file:
DMF requires independent paths to drives so that they are not fenced by CXFS. The ports for the drive paths on the switch should be masked from I/O fencing in a CXFS configuration.
The SAN must be zoned so that XVM does not move CXFS filesystem I/O to the paths visible through the HBA ports when Fibre Channel port fencing occurs. Therefore, you should use either independent switches or independent switch zones for CXFS/XVM volume paths and DMF drive paths.
For more information about DMF filesystems, see the DMF 6 Administrator Guide.
The ordering of resources within a resource group containing a dmf resource must be such that the dmf resource starts after any filesystems it uses are mounted and volume resources it uses are available (and the dmf resource must be stopped before those resources are stopped). See Figure 6-1.
DMF requires a virtual hostname for the DMF server. See “IP Address Alias Requirements”.
If you are using the DMF Parallel Data-Mover Option (known as Parallel DMF), you must define a node object in the DMF configuration file for each potential DMF server. Set the INTERFACE parameter in the node object for each potential DMF server to the same virtual hostname used for SERVER_NAME in the base object.
The /etc/samba and /var/lib/samba directories must be on shared storage and must use bind mounts.
The Filesystem resources for /etc/samba and /var/lib/samba require fstype="none" , and options="bind". See “Filesystem for Samba Directories” in Appendix A.
Using the DMF copytool for Lustre (lhsmtool_dmf) in an HA environment requires the following:
You must use dmcopytool-1.0.17 or later for proper execution of the dmcopytool resource agent.
There must be a two mount points for the Lustre filesystem on both nodes in the HA cluster:
MOUNTPOINT-1 is used strictly by the DMF copytool . For example, /hsm-lustre1.
MOUNTPOINT-2 is used for regular Lustre activities, including file access from the server/mover and explicit dmarchive(8) commands issued from other Lustre clients. For example, /lustre1.
Both of the above mount points must be defined n the DMF configuration file as a filesystem objects containing a MIGRATION_LEVEL parameter set to archive.
There must be a directory in a DMF-managed filesystem that is used to archive or restore Lustre files (for example, /DMFfs/lustre1. This filesystem must be mounted and the directory must exist prior to executing the lhsmtool_dmf(8) command.
For more information, see Lustre HSM with DMF Best Practices Guide.
During HA operation, the HA software will control the dmfman service. See “Stop Services Related to DMF Before Applying an HA Environment ”.
During HA operation, the HA software must control the dmfsoap service. See “Stop Services Related to DMF Before Applying an HA Environment ”.
Configure and test the service components before applying an HA environment , as described in the following:
Filesystem, one of the following:
Mounting service, one of the following:
“Configure and Test the NFS Service for DMF Use Before Applying an HA Environment” (Optional)
“Configure and Test the DMF Copytool before Applying an HA Environment ” (Optional)
“Test DMF Manager Before Applying an HA Environment” (Optional)
“Test the DMF Client SOAP Service Before Applying an HA Environment ” (Optional)
“Configure and Test Samba Before Applying an HA Environment” (Optional)
Before applying an HA environment, configure CXFS on node1 (which must be a CXFS server-capable administration node), according to the instructions in the following:
CXFS 7 Administrator Guide for SGI InfiniteStorage
Start the CXFS filesystem service ( cxfs) and CXFS cluster service (cxfs_cluster). For more information, see CXFS 7 Administrator Guide for SGI InfiniteStorage.
Verify that the filesystem in question mounts on all applicable nodes. For example, use the cxfs_admin command:
node1# cxfs_admin -c status

Note: If you have multiple clusters on the same network, add the -i clustername option to identify the cluster name. For more information, see the cxfs_admin(8) man page.
Before applying an HA environment, use the instructions in the XVM Volume Manager Administrator Guide to do the following on node1 for each of the local XVM filesystems that you want to later make highly available:
Configure the filesystem. Make a note of the name of each physvol that is part of each volume and save it for later.
Construct the filesystem using mkfs .
Mount the filesystem.
To test the local XVM service before applying HA, ensure that you can create and delete files in each of the mounted filesystems.
Before applying an HA environment, configure TMF on node1 according to the instructions in the TMF 6 Administrator Guide for SGI InfiniteStorage and run the following on node1:
node1# chkconfig tmf on |
| Note: In the /etc/tmf.config file, drives in drive groups managed by HA software should have access configured as EXCLUSIVE and should have status configured as DOWN when TMF starts. Loaders in the /etc/tmf.config file should have status configured as UP when TMF starts. |
To test the TMF service before applying HA, do the following:
Use tmstat to verify that all of the tape drives have a status of idle or assn :
node1# tmstat
Use tmmls to verify that all of the loaders have a status of UP:
node1# tmmls
Before applying an HA environment, configure OpenVault on node1 according to the instructions in the OpenVault Administrator Guide for SGI InfiniteStorage and, if using Parallel DMF, the DMF 6 Administrator Guide. This means that you will use the actual hostname as reported by the hostname(1) command when using ov_admin . For the potential DMF servers and any parallel data-mover nodes, configure OpenVault library control programs (LCPs) and drive control programs (DCPs) for all local libraries and drives.
| Note: Configuration of OpenVault on the alternate DMF server ( node2) will be done when the conversion to an HA environment is performed. |
To test the OpenVault service before applying HA, verify that you can perform operational tasks documented in the OpenVault guide, such as mounting and unmounting of cartridges using the ov_mount and ov_unmount commands.
For example, in an OpenVault configuration using tapes with two drives (drive0 and drive1) where you have configured a volume named DMF105 for use by DMF, the following sequence of commands will verify that drive drive0 and the library are working correctly:
node1# ov_mount -A dmf -V DMF105 -d drive0
Mounted DMF105 on /var/opt/openvault/clients/handles/An96H0uA3xr0
node1# tsmt status
        Controller: SCSI
        Device: SONY: SDZ-130         0202
        Status: 0x20262
        Drive type: Sony SAIT
        Media : READY, writable, at BOT
node1# ov_stat -d | grep DMF105
drive0     drives     true   true   false     inuse     loaded    true     DMF105

node1# ov_unmount -A dmf -V DMF105 -d drive0
Unmounted DMF105
node1# exit |
Repeat the sequence for drive1.
| Note: The tsmt step is only useful when using tapes. |
Before applying an HA environment, configure the following OpenVault components for each COPAN MAID shelf by executing the ov_shelf(8) command on node1 (or mover1 ), making node1 the owner node for that shelf, according to the instructions in the COPAN MAID for DMF Quick Start Guide:
One library control program (LCP)
Up to 16 drive control programs (DCPs)
One OpenVault drive group
If you are using Parallel DMF, also see the instructions in DMF 6 Administrator Guide.
| Note: You will not run ov_shelf on node2 at this point. You will create the OpenVault components on the alternate node later, using the instructions in this guide. |
To test the service before applying HA, follow the instructions to test that OpenVault can mount a migration volume, as described in the COPAN MAID for DMF Quick Start Guide.
Before applying an HA environment, configure DMF according to the instructions in the DMF 6 Administrator Guide.
To test the DMF service before applying HA, do the following:
Migrate a few test files:
node1# dmput -r files_to_test
Force volumes to be immediately written:
node1# dmdidle
Wait a bit to allow time for the volume to be written and unmounted.
Verify that the volumes are mounted and written successfully.
Verify that the volumes can be read and the data can be retrieved:
node1# dmget files_to_test
Before applying an HA environment, set up the NFS exports in the /etc/exports file on both CXFS nodes as you would normally. The /etc/exports file should be identical on both nodes.
| Note: Be sure to include the fsid=uniquenumber export option in order to prevent stale file handles after failover. |
To test the NFS service before applying HA, do the following:
Verify that the NFS-exported filesystems are mounted. For example:
node1# df
Ensure that the NFS service is running on the CXFS metadata server:
RHEL:
rhel# service nfs status
If it is not running, start it:
rhel# service nfs start
SLES:
sles# service nfsserver status
If it is not running, start it:
sles# service nfsserver start
Export the filesystem from node1:
Configure /etc/exports .
Export the CXFS filesystems:
node1# exportfs -a
Run the following command on node1 to verify that the filesystems are exported:
node1# exportfs -v
/nfsexportedfilesystem   <world>(rw,wdelay,root_squash,no_subtree_check,fsid=xxx)
NFS-mount and test the filesystem from node1:
Mount the filesystems on a node that will not be a member of the HA cluster (otherhost):
NFS v3:
otherhost# mount -t nfs -o vers=3 node1:/nfsexportedfilesystem /mnt/test
NFS v4:
otherhost# mount -t nfs -o vers=4 node1:/nfsexportedfilesystem /mnt/test
Read and write to the NFS-mounted filesystems:
otherhost# echo "test data for a test file" > /mnt/test/testFile1A
otherhost# cat /mnt/test/testFile1A
test data for a test file
Repeat steps 3 and 4, exporting and then mounting the filesystem from node2.
Before applying an HA environment, you must configure Lustre for the SGI DMF Copytool according to the instructions in the Lustre HSM with DMF Best Practices Guide and test it to ensure that the basic Lustre HSM commands operate normally. For example, perform the following sanity test:
Mount the Lustre filesystem to the two required mount points, as specified in Lustre HSM with DMF Best Practices Guide:
MOUNTPOINT-1: used strictly by the DMF copytool. (This maps to the dmctmount parameter in a dmcopytool resource primitive, described later in this chapter.) For example:
/hsm-lustre1
MOUNTPOINT-2: used for regular Lustre activities, including file access from the server/mover and explicit dmarchive(8) commands issued from other Lustre clients. (This maps to the dmfmount parameter in a dmcopytool resource primitive .) For example:
/lustre1
Manually start the DMF copytool on node1, as described in Lustre HSM with DMF Best Practices Guide. For example:
node1# lhsmtool_dmf --daemon --hsm-root=/DMFfs/lustre1 --archive1 /hsm-lustre1
Archive and release files using the Tier-1 storage (t1), which will be the XFS or CXFS filesystem managed by DMF, periodically checking the state:
node1# dd if=/dev/urandom of=/lustre1/test_t1 bs=1M count=1
node1# md5sum /lustre1/test_t1          (record this value for later comparison)

node1# lfs hsm_archive -Dt1 /lustre1/test_t1
node1# lfs hsm_state /lustre1/test_t1   (after a few seconds, this should be "exists archived")

node1# lfs hsm_release /lustre1/test_t1
node1# lfs hsm_state /lustre1/test_t1   (after a few seconds, this should be "released exists archived")

node1# md5sum /lustre1/test_t1          (implicitly recalls the file, value should match above value)
node1# lfs hsm_state /lustre1/test_t1   (should be "exists archived)

node1# lfs hsm_remove /lustre1/test_t1
node1# lfs hsm_state /lustre1/test_t1   (no archive state)

node1# rm /lustre1/test_t1
For example:
node1# dd if=/dev/urandom of=/lustre1/test_t1 bs=1M count=1
1+0 records in
1+0 records out
1048576 bytes (1.0 MB) copied, 0.114834 s, 9.1 MB/s
node1# md5sum /lustre1/test_t1
701e3c19baea92096004ff94c6695d46  /lustre1/test_t1

node1# lfs hsm_archive -Dt1 /lustre1/test_t1
node1# lfs hsm_state /lustre1/test_t1
/lustre1/test_t1: (0x00000009) exists archived, archive_id:1

node1# lfs hsm_release /lustre1/test_t1
node1# lfs hsm_state /lustre1/test_t1
/lustre1/test_t1: (0x0000000d) released exists archived, archive_id:1

node1# md5sum /lustre1/test_t1
701e3c19baea92096004ff94c6695d46  /lustre1/test_t1
node1# lfs hsm_state /lustre1/test_t1
/lustre1/test_t1: (0x00000009) exists archived, archive_id:1

node1# lfs hsm_remove /lustre1/test_t1
node1# lfs hsm_state /lustre1/test_t1
/lustre1/test_t1: (0x00000000), archive_id:1

node1# rm /lustre1/test_t1
rm: remove regular file `/lustre1/test_t1'? y
node1# lfs hsm_state /lustre1/test_t1
can't get hsm state for /lustre1/test_t1: No such file or directory
Archive and release a file using the Tier-2 storage (t2), which will be archived directly to the storage on disk/tape:
Note: This test will take longer to complete than the Tier-1 (t1) case (perhaps several minutes). node1# dd if=/dev/urandom of=/lustre1/test_t2 bs=1M count=1 node1# md5sum /lustre1/test_t2 (record this value for later comparison) node1# lfs hsm_archive -Dt2 /lustre1/test_t2 node1# dmdidle (force the data out to tape) node1# lfs hsm_state /lustre1/test_t2 (after a few minutes, this should be "exists archived") node1# lfs hsm_release /lustre1/test_t2 node1# lfs hsm_state /lustre1/test_t2 (after a few minutes, this should be "released exists archived") node1# md5sum /lustre1/test_t2 (implicitly recalls the file, value should match above value) node1# lfs hsm_state /lustre1/test_t2 (should be "exists archived) node1# lfs hsm_remove /lustre1/test_t2 node1# lfs hsm_state /lustre1/test_t2 (no archive state) node1# rm /lustre1/test_t2
For example:
node1# dd if=/dev/urandom of=/lustre1/test_t2 bs=1M count=1
1+0 records in
1+0 records out
1048576 bytes (1.0 MB) copied, 0.114834 s, 9.1 MB/s
node1# md5sum /lustre1/test_t2
2cd70bb4e9ec10de116c9d1937f58d22  /lustre1/test_t2

node1# lfs hsm_archive -Dt2 /lustre1/test_t2
node1# dmdidle
node1# lfs hsm_state /lustre1/test_t2
/lustre1/test_t2: (0x00000009) exists archived, archive_id:1

node1# lfs hsm_release /lustre1/test_t2
node1# lfs hsm_state /lustre1/test_t2
/lustre1/test_t2: (0x0000000d) released exists archived, archive_id:1

node1# md5sum /lustre1/test_t2
2cd70bb4e9ec10de116c9d1937f58d22  /lustre1/test_t2
node1# lfs hsm_state /lustre1/test_t2
/lustre1/test_t2: (0x00000009) exists archived, archive_id:1

node1# lfs hsm_remove /lustre1/test_t2
node1# lfs hsm_state /lustre1/test_t2
/lustre1/test_t2: (0x00000000), archive_id:1

node1# rm /lustre1/test_t2
rm: remove regular file `/lustre1/test_t2'? y
node1# lfs hsm_state /lustre1/test_t2
can't get hsm state for /lustre1/test_t2: No such file or directory
Before applying an HA environment, do the following:
Start the DMF Manager service:
dmf# service dmfman start
Point your browser to the following address:
https://YOUR_DMF_SERVER:11109
Verify that you can log in and use DMF Manager, such as by viewing the Overview panel.
Before applying an HA environment, do the following:
Start the DMF SOAP service:
dmf# service dmfsoap start
Point your browser to the following address:
https://YOUR_DMF_SERVER:11110/server.php
Verify that you can access the DMF client SOAP GUI and view the WSDL for one of the DMF client functions.
Before applying an HA environment, set up the Samba service on node1 as you would normally (before applying HA), but place the Samba configuration files and directories on shared storage.
In particular, do the following:
Ensure that /etc/samba and /var/lib/samba and all of the underlying files and directories are configured to match site requirements.
Start the services required for Samba use:
node1# service smb start
node1# service nmbd start
To test the Samba service before applying HA, see the following information:
http://www.samba.org/samba/docs/man/Samba-HOWTO-Collection/install.html
In particular, see the information about the following topics:
Listing shares available on the server
Connecting with a UNIX client
Connecting from a remote SMB client (but not the information about printing)
Verify the Winbind configuration (optional):
Start the Winbind service:
node1# service winbind start
List the users of the domain:
node1# wbinfo -u
List the groups:
node1# wbinfo -g
Verify the nsswitch module:
Verify the password:
node1# sudo getent passwd
Verify the groups:
node1# sudo getent group
Ensure that the base HA cluster is operational, as described in “Test the Base HA Cluster” in Chapter 4.
This section discusses the following:
Do the following on both RHEL nodes to ensure that the services will be controlled by the DMF HA service (not all services may apply):
RHEL node1:
node1# chkconfig winbind off
node1# chkconfig nmbd off
node1# chkconfig smb off
node1# chkconfig nfs off
node1# chkconfig dmfsoap off
node1# chkconfig dmfman off
node1# chkconfig dmf off
node1# chkconfig openvault off

node1# service winbind stop
node1# service nmbd stop
node1# service smb stop
node1# service nfs stop
node1# service dmfsoap stop
node1# service dmfman stop
node1# service dmf stop
node1# service openvault stop

node1# killall lhsmtool_dmf
RHEL node2:
node2# chkconfig winbind off
node2# chkconfig nmbd off
node2# chkconfig smb off
node2# chkconfig nfs off
node2# chkconfig dmfsoap off
node2# chkconfig dmfman off
node2# chkconfig dmf off
node2# chkconfig openvault off

node2# service winbind stop
node2# service nmbd stop
node2# service smb stop
node2# service nfs stop
node2# service dmfsoap stop
node2# service dmfman stop
node2# service dmf stop
node2# service openvault stop

node2# killall lhsmtool_dmf
| Note: Do not disable the cxfs and cxfs_cluster services. Unlike other services, these services will not be controlled by HA software in an HA cluster. |
Do the following on both SLES nodes to ensure that the services will be controlled by the DMF HA service (not all services may apply):
SLES node1:
node1# chkconfig winbind off
node1# chkconfig nmbd off
node1# chkconfig smb off
node1# chkconfig nfsserver off
node1# chkconfig dmfsoap off
node1# chkconfig dmfman off
node1# chkconfig dmf off
node1# chkconfig openvault off
node1# chkconfig tmf off (optional)

node1# service winbind stop
node1# service nmbd stop
node1# service smb stop
node1# service nfsserver stop
node1# service dmfsoap stop
node1# service dmfman stop
node1# service dmf stop
node1# service openvault stop
node1# service tmf stop  (optional)

node1# killall lhsmtool_dmf
SLES node2:
node2# chkconfig winbind off
node2# chkconfig nmbd off
node2# chkconfig smb off
node2# chkconfig nfsserver off
node2# chkconfig dmfsoap off
node2# chkconfig dmfman off
node2# chkconfig dmf off
node2# chkconfig openvault off
node2# chkconfig tmf off (optional)

node2# service winbind stop
node2# service nmbd stop
node2# service smb stop
node2# service nfsserver stop
node2# service dmfsoap stop
node2# service dmfman stop
node2# service dmf stop
node2# service openvault stop
node2# service tmf stop  (optional)

node2# killall lhsmtool_dmf
| Note: Do not disable the cxfs and cxfs_cluster services. Unlike other services, these services will not be controlled by HA software in an HA cluster. |
This section discusses the following required resources:
Figure 6-2 shows the step to add the DMF group for the DMF HA service and the choice between a CXFS environment or a local XVM environment.
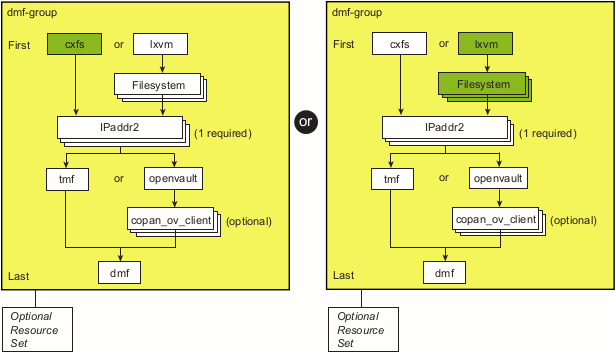
Choose one of the following:
The purpose of this resource is to ensure that the defined filesystems run on the DMF server in a CXFS environment. This resource controls the location of the CXFS metadata server for CXFS filesystems that must be run on the DMF server, such as most DMF administrative filesystems, filesystems holding OpenVault server configuration, and filesystems for NFS/Samba configuration. This resource must not include any filesystems managed by DMF.
| Note: If you are using DMF integrated backups, you must not include the DUMP_DESTINATION backup filesystem (such as /dmf/backups), because if it is a managed filesystem. |
See the DMF 6 Administrator Guide for filesystem requirements, such as mount options.
Do the following:
Create a new partial configuration file (workfile) that contains the following:
group DMF-GROUP CXFS
Copy the primitive text from the cxfs template into workfile. Template location:
/usr/share/doc/sgi-ha/templates/cxfs
Replace the site-specific variables:
primitive CXFS ocf:sgi:cxfs \
   op monitor interval="120s" timeout="180s" on-fail="restart" \
   op monitor interval="0" timeout="180s" \
   op start interval="0" timeout="600s" on-fail="restart" \
   op stop interval="0" timeout="60s" on-fail="fence" \
   params volnames="VOLUME-LIST" \
   meta resource-stickiness="1" migration-threshold="1"
Variable Description
CXFS Name of this resource instance, such as CXFS
VOLUME-LIST Comma-separated list of volumes under the /dev/cxvm directory, such as:
cxfsvol1,cxfsvol2,home,journal,spool,tmp,move,cache
See “CXFS Volumes and the cxfs Resource”.
Note: Do not include any links or volumes that are filesystems managed by DMF.
For example:
primitive CXFS ocf:sgi:cxfs \
   op monitor interval="120s" timeout="180s" on-fail="restart" \
   op monitor interval="0" timeout="180s" \
   op start interval="0" timeout="600s" on-fail="restart" \
   op stop interval="0" timeout="60s" on-fail="fence" \
   params volnames="cxfsvol1,cxfsvol2,home,journal,spool,tmp,move,cache" \
   meta resource-stickiness="1" migration-threshold="1"
Verify that the timeout values are appropriate for your site.
Verify that there are no comments in workfile.
Save workfile.
Update the database:
node1# crm configure load update workfile
Note: As a best practice, you should also run the following command to verify changes you make to the CIB (for testing purposes, ignore any stonith errors at this point): node1# crm_verify -LV
For brevity, this step is not shown in the following procedures but is recommended. For more information, see “Use the crm_verify Command to Verify Configuration ” in Chapter 2.
Verify that CXFS is working on node1. For example:
Verify that all of the CXFS filesystems are mounted and accessible:
node1# df -lh
Display the current metadata server for the filesystems:
Note: If you have multiple clusters on the same network, add the -i clustername option to identify the cluster name. For more information, see the cxfs_admin(8) man page. node1# /usr/cluster/bin/cxfs_admin -c "show server"
Move the DMF resource group (which contains the cxfs resource) to node2:
node1# crm resource move DMF-GROUP node2
Verify the status:
node1# crm status inactive
Verify that CXFS is working on node2 :
node2# df -lh
node2# /usr/cluster/bin/cxfs_admin -c "show server"
Note: Only those volumes in /dev/cxvm that are not managed by DMF will now be served on node2 instead of node1. Move the DMF resource group back to node1:
node1# crm resource move DMF-GROUP node1
Verify the status:
node1# crm status inactive
Verify that CXFS is working again on node1:
node1# df -lh
node1# /usr/cluster/bin/cxfs_admin -c "show server"
Remove the implicit location constraints imposed by the administrative move command above:
node1# crm resource unmove DMF-GROUP
| Note: See the DMF 6 Administrator Guide for filesystem requirements, such as mount options. |
The DMF HA service in a local XVM environment requires the lxvm and several Filesystem resources:
Do the following:
Make sure that none of the filesystems to be controlled are mounted on either node.
Make sure that none of the filesystems to be controlled are present in /etc/fstab on either node.
Make sure that the local XVM volumes are visible and online on node1.
Create a new partial configuration file ( workfile) that contains the following:
group DMF-GROUP LXVM
Copy the primitive text from the lxvm template into workfile. Template location:
/usr/share/doc/sgi-ha/templates/lxvm
Replace the site-specific variables:
primitive LXVM ocf:sgi:lxvm \
   op monitor interval="120s" timeout="180s" on-fail="restart" \
   op monitor interval="0" timeout="180s" \
   op start interval="0" timeout="900s" on-fail="restart" \
   op stop interval="0" timeout="900s" on-fail="fence" \
   params physvols="PHYSVOL-LIST" volnames="VOLUME-LIST" \
   meta resource-stickiness="1" migration-threshold="1"
Variable Description
LXVM Name of this resource instance, such as LXVM
PHYSVOL-LIST Comma-separated list of the physical volumes for the resource agent to steal, such as:
myCluster,myClusterStripe1,myClusterStripe2
Note: PHYSVOL-LIST must contain all of the physical volumes for every logical volume listed in VOLUME-LIST. All physical disks that belong to a logical volume in an HA cluster must be completely dedicated to that logical volume and no other.
VOLUME-LIST Comma-separated list of volume names under /dev/lxvm to monitor, such as the following (line break shown for readability):
openvault,home,journals,spool,movefs,tmp, \
diskmsp,dmfusr1,dmfusr2
Note: A 900-second start timeout should be sufficient in most cases, but sites with large disk configurations may need to adjust this value. You should usually use the same timeout value for start and stop. For example:
primitive LXVM ocf:sgi:lxvm \
   op monitor interval="120s" timeout="180s" on-fail="restart" \
   op monitor interval="0" timeout="180s" \
   op start interval="0" timeout="900s" on-fail="restart" \
   op stop interval="0" timeout="900s" on-fail="fence" \
   params physvols="myCluster,myClusterStripe1,myClusterStripe2" volnames="openvault,home,\
                    journals,spool,movefs,tmp,diskmsp,dmfusr1,dmfusr2" \
   meta resource-stickiness="1" migration-threshold="1"
Verify that the timeout values are appropriate for your site.
Verify that there are no comments in workfile.
Save workfile.
Update the database:
node1# crm configure load update workfile
Note: As a best practice, you should also run the following command to verify changes you make to the CIB (for testing purposes, ignore any stonith errors at this point): node1# crm_verify -LV
For brevity, this step is not shown in the following procedures but is recommended. For more information, see “Use the crm_verify Command to Verify Configuration ” in Chapter 2.Move the DMF resource group (which now contains the lxvm resource) from node1 to node2 :
node1# crm resource move DMF-GROUP node2
Verify the status:
node1# crm status inactive
Note: If the timeout is too short for a start operation, thecrm output and the log files will have an entry that refers to the action being “Timed Out” (see “Examine Log Files” in Chapter 2). For example (line breaks shown here for readability): node1# crm status inactive | grep Timed lxvm_start_0 (node=node1, call=222, rc=-2): Timed Out node1# crm_verify -LV 2>&1 | grep Timed crm_verify[147386]: 2008/07/23_14:36:34 WARN: unpack_rsc_op: Processing failed op lxvm_start_0 on node1: Timed Out
Move the DMF resource group back to node1:
node1# crm resource move DMF-GROUP node1
Verify the status:
node1# crm status inactive
Verify that the local XVM volumes are visible and online on node1:
node1# xvm -d local show vol
Remove the implicit location constraints generated by the administrative move command above:
node1# crm resource unmove DMF-GROUP
A Filesystem resource implements the mount control for a single filesystem. It is used in a local XVM environment for the following:
DMF-managed filesystems
Most DMF administrative filesystems
The OpenVault serverdir directory (if used)
Any other filesystem that must be mounted on the DMF server (optional)
| Note: Filesystem resources for the Samba directories will optionally be created later, in “Add the Samba Resources (Optional)”. |
Do the following:
Create another workfile that contains the following, where FILESYSTEM is one of the filesystems to be controlled by HA processes (use a unique ID for each Filesystem instance):
group DMF-GROUP LXVM FILESYSTEM
See below for FILESYSTEM values.
Copy the appropriate primitive from the Filesystem template into workfile. Template location:
/usr/share/doc/sgi-ha/templates/Filesystem
Copy the primitive for local XVM filesystems and replace the site-specific variables:
Note: The Filesystem template contains two primitive sections, one for local XVM filesystems and one for Samba directories. These sections require different fstype= and options= values. For this step, delete the Samba primitive. primitive XFS-FILESYSTEM ocf:heartbeat:Filesystem \ op monitor interval="120s" timeout="60s" on-fail="restart" \ op monitor interval="0" timeout="60s" \ op start interval="0" timeout="600s" on-fail="restart" \ op stop interval="0" timeout="120s" on-fail="fence" \ params device="LXVM-DEVICE-FILE" directory="XFS-MOUNT-POINT" \ fstype="xfs" options="MOUNT-OPTIONS" \ meta resource-stickiness="1" migration-threshold="1"The following is an example for a managed filesystem:
primitive dmfusr1 ocf:heartbeat:Filesystem \
   op monitor interval="120s" timeout="60s" on-fail="restart" \
   op monitor interval="0" timeout="60s" \
   op start interval="0" timeout="600s" on-fail="restart" \
   op stop interval="0" timeout="120s" on-fail="fence" \
   params device="/dev/lxvm/dmfusr1" directory="/dmfusr1" fstype="xfs" options="rw" \
   meta resource-stickiness="1" migration-threshold="1"
Verify that the timeout values are appropriate for your site.
Verify that you have removed the unused section and that there are no comments in workfile.
Save workfile.
Update the database with the new resource:
node1# crm configure load update workfile
Ensure that all of the mount points required to mount all Filesystem resources exist on both nodes.
Note: After a Filesystem primitive has been added to a resource group's configuration, moving that resource group will unmount the filesystem defined in the primitive. This will result in killing any process that has that filesystem in the path of its current working directory. Verify that the filesystems are online on node1:
node1# df -hl
Move the DMF resource group (which now contains the new Filesystem resource) from node1 to node2:
node1# crm resource move DMF-GROUP node2
Verify the status:
node1# crm status
Verify that the filesystems are correctly mounted on node2 only:
On node1, check the mount table and verify that none of the filesystems are mounted.
On node2, check the mount table and verify that the filesystems are mounted and have the correct mount options. Use the ls and df -lh commands on the mount point to verify that the filesystem is functional.
Move the DMF resource group back to node1:
node1# crm resource move DMF-GROUP node1
Verify the status:
node1# crm status
Verify that the filesystems are correctly mounted on node1 only:
On node1, check the mount table and verify that the filesystems are mounted and have the correct mount options. Use the ls and df -lh commands on the mount point to verify that the filesystem is functional.
On node2, check the mount table and verify that none of the filesystems are mounted.
Remove the implicit location constraints imposed by the administrative move command above:
node1# crm resource unmove DMF-GROUP
Repeat steps 1-7 for each filesystem to be managed by HA in a local XVM environment. Use a unique instance ID for each filesystem.
After you have added all of the filesystems, the DMF-GROUP definition could appear something like the following:
group DMF-GROUP LXVM home spool movefs journals \
tmp dmfusr1 dmfusr2 |
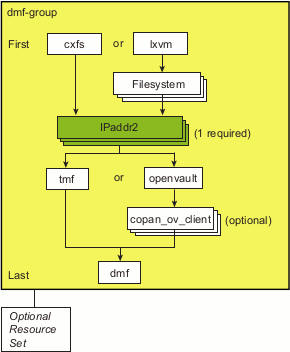
An IPaddr2 resource controls the addition/deletion of an IP address alias on a network interface. Figure 6-3 shows the step to add one or more IPaddr2 resources. At least one resource is required for the IP alias that will be used for the active DMF server in an HA configuration; additional IP aliases may be desired for DMF Manager, NFS, or Samba use.
Do the following to add the IP address alias (IPaddr2) resource:
Create another workfile that contains the following, where Previously_Added_Resources are all of the resources added to this point in the procedure. For example:
group DMF-GROUP Previously_Added_Resources IP
Copy the primitive in the IPaddr2 template into workfile. Template location:
/usr/share/doc/sgi-ha/templates/IPaddr2
Replace the site-specific variables:
primitive IP ocf:heartbeat:IPaddr2 \
   op monitor interval="0" timeout="30s" \
   op start interval="0" timeout="90s" on-fail="restart" \
   op stop interval="0" timeout="100s" on-fail="fence" \
   params ip="IP-ADDRESS" \
   meta resource-stickiness="1" migration-threshold="1"
Variable Description
IP Name of this resource instance, which must match the named used to define it in the associated group resource, such as IP-DMF
IP-ADDRESS IP address of the virtual channel, such as 128.162.244.240
For example, for the required IP alias to be used by the DMF server:
primitive IP-DMF ocf:heartbeat:IPaddr2 \
   op monitor interval="0" timeout="30s" \
   op start interval="0" timeout="90s" on-fail="restart" \
   op stop interval="0" timeout="100s" on-fail="fence" \
   params ip="128.162.244.240" \
   meta resource-stickiness="1" migration-threshold="1"
Verify that the timeout values are appropriate for your site.
Verify that there are no comments in workfile.
Update the database with the new resource:
node1# crm configure load update workfile
-
Verify that the IP address is configured correctly on node1. For example, for the ip value 128.162.244.240 :
node1# ip -o addr show | grep "128.162.244.240/"
4: eth2    inet 128.162.244.240/24 brd 128.162.244.255 scope global secondary eth2
Verify that node2 does not accept the IP address packets by running the following command on node2 (there should be no output):
node2# ip -o addr show | grep "128.162.244.240/"
node2#
Connect to the virtual address using ssh or telnet and verify that the IP address is being served by the correct system. For example, for the IP address 128.162.244.240 and the machine named node1:
remote# ssh [email protected]
Last login: Mon Jul 14 10:34:58 2008 from mynode.mycompany.com
remote# uname -n
node1
Move the DMF resource group (which now contains the IPaddr2 resource) from node1 to node2:
node1# crm resource move DMF-GROUP node2
Verify the status:
node1# crm status inactive
Verify that the IP address is configured correctly on node2:
node2# ip -o addr show | grep "128.162.244.240/"
4: eth2    inet 128.162.244.240/24 brd 128.162.244.255 scope global secondary eth2
Verify that node1 does not accept the IP address packets by running the following command on node1 (there should be no output):
node1# ip -o addr show | grep  "128.162.244.240/"
node1#
Connect to the virtual address using ssh or telnet and verify that the IP address is being served by the correct system. For example, for the IP address 128.162.244.240 and the machine named node2:
ha# ssh [email protected]
Last login: Mon Jul 14 10:34:58 2008 from mynode.mycompany.com
ha# uname -n
node2
Move the DMF resource group back to node1:
node1# crm resource move DMF-GROUP node1
Verify the status:
node1# crm status inactive
Remove the implicit location constraints imposed by the administrative move command above:
node1# crm resource unmove DMF-GROUP
Repeat steps 1--7 if you require additional IP aliases for DMF Manager, NFS, or Samba use.
For example, to add a second IP alias for Samba use, you could create another resource named IP-SAMBA with a unique IP address:
group DMF-GROUP Previously_Added_Resources IP-DMF IP-SAMBA

primitive IP-SAMBA ocf:heartbeat:IPaddr2 \
   op monitor interval="0" timeout="30s" \
   op start interval="0" timeout="90s" on-fail="restart" \
   op stop interval="0" timeout="100s" on-fail="fence" \
   params ip="128.162.244.244" \
   meta resource-stickiness="1" migration-threshold="1"
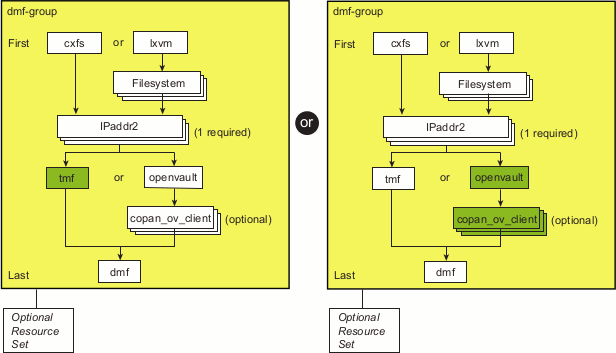
Figure 6-4 shows the step to add the resource for the mounting service, which is either the TMF mounting service or the OpenVault mounting service. OpenVault may optionally use COPAN OpenVault client resources.
This section discusses the following:
The tmf resource controls the start/stop of TMF. To configure TMF for an HA environment, do the following:
Modify the /etc/tmf/tmf.config file so that all tape devices belonging to device groups that are managed by HA are configured DOWN in the status parameter in the DEVICE definition.
Copy the following file from node1 to node2:
/etc/tmf/tmf.config
On node2, if the tape drive pathname (the FILE parameter in the DEVICE definition) for a given drive is not the same as the pathname for the same drive on node1, modify the pathname in the /etc/tmf.config file on node2 so that it points to the appropriate pathname.
Create another workfile that contains the following:
group DMF-GROUP Previously_Added_Resources TMF
Copy the primitive in the tmf template into workfile. Template location:
/usr/share/doc/sgi-ha/templates/tmf
Replace the site-specific variables:A
primitive TMF ocf:sgi:tmf \
   op monitor interval="120s" timeout="60s" on-fail="restart" \
   op monitor interval="0" timeout="60s" \
   op start interval="0" timeout="600s" on-fail="restart" \
   op stop interval="0" timeout="600s" on-fail="fence" \
   params devgrpnames="DEVGRPNAME-LIST" mindevsup="MINDEVSUP-LIST" \
          devtimeout="DEVTIMEOUT-LIST" loader_names="LOADERNAME-LIST" \
          loader_hosts="HOST-LIST" loader_users="USER-LIST" \
          loader_passwords="PASSWORD-LIST" admin_emails="EMAIL-ADDRESS-LIST" \
   meta resource-stickiness="1" migration-threshold="1"
Variable Description
TMF Name of this resource instance, such as TMF.
DEVGRPNAME-LIST Comma-separated list of TMF device groups defined in the tmf.config file that are to be managed by HA software, such as:
ibm3592,t10ka
MINDEVSUP-LIST Comma-separated list of the minimum number of devices, one entry per device group, that must be configured up successfully within the corresponding device group in order to count the group as being highly available, such as:
1,0
Note: A value of 0 indicates that failover will never be initiated, even if all the devices in that device group are unavailable. This value is supported for all device groups; however, in order for TMF to be considered up, at least one tape device in some device group must be up. If there are no devices up in all defined device groups, then the resource agent will be considered to be in a stopped state, which will impact the resource monitor and the resource start actions.
DEVTIMEOUT-LIST Comma-separated list of device timeouts in seconds, one entry per device group, that are used to decide how long to wait for a device in that device group to finish configuring up or down, such as:
120,240
Changing the up/down state of a device may require rewinding and unloading a tape left in the drive by a previous host. Different tape device types have different maximum rewind and unload times, which can be obtained from the vendor's product literature. To calculate the timeout value for a particular device group, add the maximum rewind time for a device in that group to the device's unload time plus add an additional 10 seconds to allow for any required robot hand movement.
For example, 3592 tape drives with a maximum rewind time of 78 seconds and an unload time of 21 seconds require a value of 78+21+10=109 seconds. 9940B tape drives with a maximum rewind time of 90 seconds and an unload time of 18 seconds require a value of 90+18+10=118.
Note: The tmf resource agent will try twice to configure each drive up before considering it unusable, so the start timeout value should therefore be at least twice the greatest value in DEVTIMEOUT-LIST. For example, 2*118=236. You should usually use the same timeout value for start and stop.
LOADERNAME-LIST Comma-separated list of loader names configured in DEVGRPNAME-LIST tmf.config that correspond to the device groups listed in DEVGRPNAME-LIST, such as:
ibm3494,l700a
HOST-LIST Comma-separated list of hosts through which the corresponding loaders listed in LOADERNAME-LIST are controlled, such as:
ibm3494cps,stkacsls
USER-LIST Comma-separated list of user names that are used to log in to the corresponding hosts listed in HOST-LIST, such as:
root,acssa
PASSWORD-LIST Comma-separated list of passwords corresponding to the user names listed in USER-LIST, such as:
passwd1,passwd2
EMAIL-ADDRESS-LIST (Optional) Comma-separated list of administrator email addresses corresponding to the device groups listed in DEVGRPNAME-LIST , such as:
root,admin1
Note: You can use the same email address for more than one device group (such as admin1,admin1). The email address will be used to send a message whenever tape drives that were previously available become unavailable, so that the administrator can take action to repair the drives in a timely fashion.
For example:
primitive TMF ocf:sgi:tmf \
   op monitor interval="120s" timeout="60s" on-fail="restart" \
   op monitor interval="0" timeout="60s" \
   op start interval="0" timeout="600s" on-fail="restart" \
   op stop interval="0" timeout="600s" on-fail="fence" \
   params devgrpnames="ibm3592,t10ka" mindevsup="1,0" devtimeout="120,240" \
          loader_names="ibm3494,l700a" loader_hosts="ibm3494cps,stkacsls" \
          loader_users="root,acssa" loader_passwords="passwd1,passwd2" \
          admin_emails="root,admin1" \
   meta resource-stickiness="1" migration-threshold="1"
Verify that the timeout values are appropriate for your site.
Verify that there are no comments in workfile.
Save workfile.
Update the database with the new resource:
node1# crm configure load update workfile
-
Use tmmls to show the loader status.
Use tmstat to show the drive status. Verify that all of the tape drives in all HA device groups are in assn or idle status on node1.
Move the DMF resource group (which now contains the TMF resource) to node2:
node1# crm resource move DMF-GROUP node2
Verify the status:
node1# crm status inactive
Verify that the state is correct:
Use tmstat to verify that the tape drives all have a status of down or sdwn on node1 and that they have a status of idle or assn on node2
Use tmmls to verify that all of the loaders on node1 still have a status of UP
Verify that the timeout values for the start, stop, and monitor operations are appropriate. Use the following guidelines:
On node2, look in the log files (see “Examine Log Files” in Chapter 2) for the time when the resource start operation started and ended. Also capture the start and end times of the monitor operation.
On node1, look in the log files to find the start and stop times for the stop operation.
Subtract the ending time from the starting time in each case to get the required time for each operation.
Based on the above, choose values that you estimate will be acceptable timeouts that are sufficiently long so that you do not risk unnecessary failovers. In general, start with a longer timeout and shorten as required.
Following are examples of finding the start, stop, and monitor operation durations on a SLES system (line breaks shown here for readability):
node1 -> egrep "do_lrm_rsc_op.*Performing.*tmf_start|process_lrm_event.*tmf_start" /var/log/messages
May 11 08:20:53 node1 crmd: [6498]: info: do_lrm_rsc_op: Performing
  key=47:81:0:562726de-a397-4c6c-8501-b273c214eb3f op=tmf_start_0 )
May 11 08:21:10 node1 crmd: [6498]: info: process_lrm_event: LRM operation tmf_start_0 (call=90, rc=0,
  cib-update=88, confirmed=true) ok

node1 -> egrep "do_lrm_rsc_op.*Performing.*tmf_stop|process_lrm_event.*tmf_stop" /var/log/messages
May 11 08:27:39 node1 crmd: [6498]: info: do_lrm_rsc_op: Performing
  key=46:82:0:562726de-a397-4c6c-8501-b273c214eb3f op=tmf_stop_0 )
May 11 08:27:40 node1 crmd: [6498]: info: process_lrm_event: LRM operation tmf_stop_0 (call=92, rc=0,
  cib-update=100, confirmed=true) ok

node1 -> egrep "do_lrm_rsc_op.*Performing.*tmf_monitor|process_lrm_event.*tmf_monitor" /var/log/messages
May 11 08:08:21 node1 crmd: [6498]: info: do_lrm_rsc_op: Performing
  key=16:78:7:562726de-a397-4c6c-8501-b273c214eb3f op=tmf_monitor_0 )
May 11 08:08:21 node1 crmd: [6498]: info: process_lrm_event: LRM operation tmf_monitor_0 (call=69, rc=7,
  cib-update=77, confirmed=true) not running
May 11 08:21:10 node1 crmd: [6498]: info: do_lrm_rsc_op: Performing
  key=48:81:0:562726de-a397-4c6c-8501-b273c214eb3f op=tmf_monitor_30000 )
May 11 08:21:11 node1 crmd: [6498]: info: process_lrm_event: LRM operation tmf_monitor_30000 (call=91,
  rc=0, cib-update=89, confirmed=false) ok
May 11 08:27:39 node1 crmd: [6498]: info: process_lrm_event: LRM operation tmf_monitor_30000 (call=91,
  status=1, cib-update=0, confirmed=true) Cancelled
Modify values in the primitive definition as needed.
Move the DMF group resource back to node1:
node1# crm resource move DMF-GROUP node1
Verify the status:
node1# crm status inactive
Verify that the state is correct:
Use tmstat to verify that the tape drives all have a status of down or sdwn on node2 and that they have a status of idle or assn on node1
Use tmmls to verify that all of the loaders on node2 still have a status of UP
Remove the implicit location constraints imposed by the administrative move command above:
node1# crm resource unmove DMF-GROUP
The openvault resource controls the start/stop of all OpenVault processes. Do the following to configure OpenVault for an HA environment:
Ensure that all of the resources within the resource group are moved back to node1 (if not already there).
Create another workfile that contains the following:
group DMF-GROUP Previously_Added_Resources OV
Copy the primitive in the openvault template into workfile. Template location:
/usr/share/doc/sgi-ha/templates/openvault
Replace the site-specific variables:
primitive OV ocf:sgi:openvault \
   op monitor interval="120s" timeout="60s" on-fail="restart" \
   op monitor interval="0" timeout="60s" \
   op start interval="0" timeout="300s" on-fail="restart" \
   op stop interval="0" timeout="90s" on-fail="fence" \
   params virtualhost="VIRTUALHOST" serverdir="SERVERDIR" \
   meta resource-stickiness="1" migration-threshold="1" is-managed="false"
Variable Description
OV Name of this resource instance, such as OV.
VIRTUALHOST Hostname where the OpenVault server will be listening (which must also have its own IPaddr2 resource instance, see “IPaddr2” in Appendix A).
SERVERDIR The directory that will eventually contain the OpenVault server configuration. SERVERDIR could be a directory that will be dedicated for OpenVault use (such as /dmf/openvault) or it could be an HA filesystem in the same resource group that has sufficient space (such as /dmf/home) to contain the subdirectory (such as /dmf/home/openvault) and its contents. The filesystem must be either:
A directory that will become a mountable CXFS filesystem managed by a cxfs resource
A directory that will become a mountable XFS filesystem managed by a Filesystem resource in the same resource group as the openvault resource
Note: As part of the conversion to an HA environment, OpenVault will create this directory and move its database and logs into the directory; OpenVault will fail if the directory already exists.
For example, if you define SERVERDIR as /dmf/home/openvault, the parent directory /dmf/home directory can exist but the entire path /dmf/home/openvault must not exist.
For example:
primitive OV ocf:sgi:openvault \
   op monitor interval="120s" timeout="60s" on-fail="restart" \
   op monitor interval="0" timeout="60s" \
   op start interval="0" timeout="300s" on-fail="restart" \
   op stop interval="0" timeout="90s" on-fail="fence" \
   params virtualhost="myvirtualhost" serverdir="/dmf/home/openvault" \
   meta resource-stickiness="1" migration-threshold="1" is-managed="false"
Note: For the initial configuration process, the setting for the is-managed attribute must be false as shown above. The step in section “Make the openvault Resource HA-Managed” will reset this attribute to true so that the resource will run under HA control. Verify that the timeout values are appropriate for your site.
Verify that there are no comments in workfile.
Save workfile.
Update the database with the new resource:
node1# crm configure load update workfile
Run ov_admin on node1 in order to convert the OpenVault server into an HA configuration:
node1# ov_admin
...
This moves the OpenVault database to the directory specified for the serverdir parameter specified above in step 3. Verify that the server hostname matches the virtualhost value you specified in step 3 above. If the server name matches, then the OpenVault server is properly configured for HA.
Exit ov_admin.
Note: From here forward, whenever ov_admin asks for the server hostname, you must use VIRTUALHOST. After allowing a few moments for the OpenVault server conversion to complete, verify that there are no unusable libraries or drives on node1 by executing the ov_stat(8) command with the -ldxy options (the -y option restricts the output to unusable LCPs and DCPs). If everything is operating normally at this point, there should be no output. For example:
node1# ov_stat -ldxy
node1#
However, if there are DCPs listed, it may be that the DCPs have not yet connected to the new OpenVault server configured above. (This is particularly likely if you have parallel data-mover nodes, which may take more time to reconnect.) Wait a few moments and then reissue the ov_stat -ldxy command until there is no output.
Enable the passive server (node2) as a potential OpenVault server:
-
To allow node2 to access the OpenVault server, run ov_admin and select the step to activate a client machine:
node1# ov_admin
...
22 - Manage OpenVault Client Machines
        1 - Activate an OpenVault Client Machine
Answer the questions as following, optionally supplying a security key:
Which Client Machine do you want to activate? [] node2
What security key would you like the Client Machine node2 to use? [none] mykey
Will DCPs and/or LCPs also be configured to run on "node2"? [Yes] yes
Note: If you originally entered the server name when activating the dmf application instances on node1 (rather than the wildcard * character, which allows the dmf application to be used from any host, as suggested in the DMF 6 Administrator Guide), you must also create a privileged and an unprivileged dmf application instance for node2. On node2, use ov_admin to enable the node to issue administrative commands by using VIRTUALHOST (the default) and entering mykey if you specified the key in step 11a:
node2# ov_admin
...
Name where the OpenVault server is listening? [VIRTUALHOST]
What port number is the OpenVault server on VIRTUALHOST using? [695]
What security key would you like the admin commands to use? [none] mykey
-
Define DCPs and LCPs on the passive node (node2).
Note: If your site contains COPAN native MAID shelves, you will create their OpenVault components later in “Create the OpenVault Components on the Passive Node (COPAN MAID Only)”. Therefore, you can skip this step if your site contains only COPAN native MAID shelves (and no physical tape library or COPAN VTL). Configure drives by selecting the following:
2 - Manage DCPs for locally attached Drives
...
1 - Create a new SCSI DCP
You must specify the drive for which would you like to add a DCP and the DCP name.
On node2, you must configure at least one DCP for each drive that is already configured on node1.
Configure libraries by selecting the following:
1 - Manage LCPs for locally attached Libraries
On node2, you must configure at least one LCP for each library that is already configured on node1:
When asked for the name of the device, use the same library name that was used on node1. The LCP instance name will automatically reflect the node2 name (for example, for the l700a library, the LCP instance name on node1 is l700a@node1 and the LCP instance name on node2 will be l700a@node2).
When prompted with Library 'libname' already exists in OpenVault catalog; create LCP anyway?, respond yes.
When prompted for the drive name at a given element address, use the ov_drive(8) command to the determine the drive name that corresponds to serial number provided in the prompt. For example 80300189-D00:
For the drive at location "drive 0 VENDOR='' PRODUCT='' SERIAL='80900229-D00'
    Enter a drive name for the element address "256":
In the above, the serial number is 80900229-D00, which corresponds to C16d00 in the following ov_drive(8) output (truncated):
node2# ov_drive
Drives:
Drive           Drive Group     Disabled     Vendor          Product         Serial Number
sl48_1          lto3            false        HP              Ultrium 3-SCSI  80900229-D0
All DCPs and LCPs have now been configured and started on node2.
On node1:
Verify that the DCPs are running successfully by using the -dx options to ov_stat. For example, the following output shows that the DCPs are usable and ready for the OpenVault server on the active HA node (node1) and running in disconnected mode (unusable and inactive) on the passive node ( node2):
node1# ov_stat -dx
DCPName       DriveName Usable SoftState    Disabled MsgLevel
sl48_1a@node1 sl48_1    true   disconnected false    debug
sl48_1a@node2 sl48_1    true   disconnected false    debug
sl48_1b@node1 sl48_1    true   ready        false    debug
sl48_1b@node2 sl48_1    true   disconnected false    debug
Note: All of the alternate DCPs should transition to disconnected state, meaning that they have successfully contacted the server. Do not proceed until they all transition to disconnected. A state of inactive means that the DCP has not contacted the server, so if the state remains inactive for more than a few minutes, the DCP may be having problems connecting to the server. Verify that the LCPs are running. For example, the following output shows that the LCPs are usable and ready for the OpenVault server on the active HA node (node1) and running in disconnected mode (unusable and inactive) on the passive node (node2):
node1# ov_stat -lx
LCPName     LibraryName Usable SoftState    Disabled MsgLevel
sl48a@node1 sl48        true   disconnected false    debug
sl48a@node2 sl48        true   disconnected false    debug
sl48b@node1 sl48        true   ready        false    debug
sl48b@node2 sl48        true   disconnected false    debug
Note: It may take a minute or two for the LCPs to notice that they are able to connect to the server and activate themselves. All of the alternate LCPs should transition to disconnected state, meaning that they have successfully contacted the server. Do not proceed until they all transition to disconnected. A state of inactive means that the LCP has not contacted the server, so if the state remains inactive for more than a couple of minutes, the LCP may be having problems connecting to the server.
Exit ov_admin.
Stop all DCPs and LCPs on node2:
node2# ov_stop
Run ov_admin on each parallel data-mover node:
Enter VIRTUALHOST and the port number (and security key mykey, if needed):
mover# ov_admin
...
Name where the OpenVault server is listening?  [servername] VIRTUALHOST
What port number is the OpenVault server on VIRTUALHOST using? [695]
What security key would you like the admin commands to use? [none] mykey
Update the server name for each DCP using item 6 in the OpenVault DCP Configuration menu:
2 - Manage DCPs for locally attached Drives
  6 - Change Server Used by DCPs
    a - Change server for all DCPs.
Update the server name for each LCP using item 8 in the OpenVault DCP Configuration menu:
1 - Manage LCPs for locally attached Libraries
  8 - Change Server Used by LCPs
    a - Change server for all LCPs.
Exit ov_admin.
Restart the OpenVault client components (DCPs and any LCPs) to connect to the OpenVault server using the virtual server name:
mover# service openvault stop
mover# service openvault start
This step may generate errors for COPAN MAID shelf DCPs and LCPs whose default host is not on this host. You can ignore errors such as the following:
shelf C00 is owned by owner_nodename
On node1, stop the OpenVault server and any DCPs and LCPs:
node1# ov_stop
| Note: This step only applies if you have COPAN MAID connected to the active DMF server and passive DMF server. If you do not, skip to “Make the openvault Resource HA-Managed”. |
When you configured the services according to the information in COPAN MAID for DMF Quick Start Guide before applying HA, you executed an ov_shelf(8) command for each shelf in order to create the required OpenVault components (see “Configure and Test the COPAN MAID OpenVault Client Before Applying a DMF HA Environment”).
In this step, you will create corresponding OpenVault components for the passive node so that it is ready to resume control of OpenVault in case of failover, using the following information for shelf 0 as an example:
Shelf identifier: C00 (indicating cabinet 0, shelf 0)
Active node: node1
Passive node: node2
| Note: For more information about the shelf ID, see COPAN MAID for DMF Quick Start Guide. |
Do the following:
Stop all of the shelf's OpenVault clients:
node1# ov_stop C00*
Export the OCF shelf, hostname, and root environment variables for use by the copan_ov_client script:
node1# export OCF_RESKEY_shelf_name=C00
node1# export OCF_RESKEY_give_host=node2
node1# export OCF_ROOT=/usr/lib/ocf
Transfer ownership of the shelf from node1 to node2:
node1# /usr/lib/ocf/resource.d/sgi/copan_ov_client give
On node2:
Verify that node2 now owns the shelf's XVM volumes (C00A through C00Z, although not necessarily listed in alphabetical order):
node2# xvm -d local probe | grep C00
phys/copan_C00M
phys/copan_C00B
phys/copan_C00G
...
Create the OpenVault components for node2:
node2# ov_shelf create C00
This automatically starts all of the shelf's OpenVault components.
For more information, see COPAN MAID for DMF Quick Start Guide.
Stop all of the shelf's OpenVault clients:
node2# ov_stop C00*
Export the shelf, hostname, and OCF root environment variables for use by the copan_ov_client script:
node2# export OCF_RESKEY_shelf_name=C00
node2# export OCF_RESKEY_give_host=node1
node2# export OCF_ROOT=/usr/lib/ocf
Transfer ownership of the shelf from node2 back to node1:
node2# /usr/lib/ocf/resource.d/sgi/copan_ov_client give
-
Verify that node1 once again owns the shelf's XVM volumes (C00A through C00Z, although not necessarily listed in alphabetical order):
node1# xvm -d local probe | grep C00
phys/copan_C00M
phys/copan_C00B
phys/copan_C00G
...
Restart all of the shelf's OpenVault clients:
node1# ov_start C00*
Update the openvault resource so that it is managed by HA software:
node1# crm resource manage OV |
The conversion is now complete (the is-managed attribute for the openvault primitive is now set to true).
Do the following to add copan_ov_client resources
Create another workfile that contains the following, where Cxx is the COPAN MAID shelf ID:
group DMF-GROUP Previously_Added_Resources Cxx
For example, using C00 for cabinet 0 shelf 0:
group DMF-GROUP Previously_Added_Resources C00
Copy the primitive for the shelf connected to the potential DMF servers in the copan_ov_client template into workfile and replace the site-specific variables for the appropriate section as directed. The template is located in:
/usr/share/doc/sgi-ha/templates/copan_ov_client
Replace the site-specific variables:
A copan_ov_client resource defines a COPAN MAID shelf to be used by an OpenVault client. Each shelf requires its own primitive instance:
primitive SHELF ocf:sgi:copan_ov_client \
   op monitor interval="120s" timeout="60s" on-fail="restart" \
   op monitor interval="0" timeout="60s" \
   op start interval="0" timeout="120s" on-fail="restart" \
   op stop interval="0" timeout="120s" on-fail="fence" \
   params shelf_name="SHELF" \
   meta resource-stickiness="1" migration-threshold="1"
Note: The template contains two primitive sections. You must choose the template for a shelf connected to the potential DMF server nodes and delete the other template. Variable Description
SHELF Name of this resource instance, normally the three-character COPAN shelf ID, using the naming convention described in the COPAN MAID for DMF Quick Start Guide, such as C00 for cabinet 0, shelf 0 (the bottom shelf)
For example:
primitive C16 ocf:sgi:copan_ov_client \
   op monitor interval="0" timeout="60s" \
   op monitor interval="120s" timeout="60s" on-fail="restart" \
   op start interval="0" timeout="120s" on-fail="restart" \
   op stop interval="0" timeout="120s" on-fail="fence" \
   params shelf_name="C16" \
   meta resource-stickiness="1" migration-threshold="1"
You should configure an instance of this resource for each shelf that will be owned by the active DMF server. (Shelves that are owned by a parallel data-mover node are not included in the DMF HA service; see Chapter 7, “Create the COPAN MAID OpenVault Client HA Service for Mover Nodes ”.)
Verify that the timeout values are appropriate for your site.
Delete the section of the template that does not apply to your configuration.
Verify that there are no comments in workfile.
Save workfile.
Update the database with the new resource:
node1# crm configure load update workfile
Test the new resource. For example, using shelf ID C00:
Verify that shelf C00 becomes available after a few minutes on node1:
node1# ov_stat -L C00 -D 'C00.*'
Library Name   Broken   Disabled   State     LCP State
C00            false    false      ready     ready


DriveName Group      Usable Access Disabled  SoftState HardState Occupied PCL
C00d00    dg_c00     true   true   false     ready     unloaded   false
C00d01    dg_c00     true   true   false     ready     unloaded   false
C00d02    dg_c00     true   true   false     ready     unloaded   false
C00d03    dg_c00     true   true   false     ready     unloaded   false
C00d04    dg_c00     true   true   false     ready     unloaded   false
C00d05    dg_c00     true   true   false     ready     unloaded   false
C00d06    dg_c00     true   true   false     ready     unloaded   false
Move the DMF resource group (which now contains the copan_ov_client resource) from node1 to node2:
node1# crm resource move DMF-GROUP node2
Verify the status:
node1# crm status inactive
Verify that shelf C00 becomes available after a few minutes on node2:
node2# ov_stat -L C00 -D 'C00.*'
Library Name         Broken   Disabled   State     LCP State
C00                  false    false      ready     ready

DriveName Group      Usable Access Disabled  SoftState HardState Occupied PCL
C00d00    dg_c00     true   true   false     ready     unloaded  false
C00d01    dg_c00     true   true   false     ready     unloaded  false
C00d02    dg_c00     true   true   false     ready     unloaded  false
C00d03    dg_c00     true   true   false     ready     unloaded  false
C00d04    dg_c00     true   true   false     ready     unloaded  false
C00d05    dg_c00     true   true   false     ready     unloaded  false
C00d06    dg_c00     true   true   false     ready     unloaded  false
Move the DMF resource group back to node1:
node1# crm resource move DMF-GROUP node1
Verify the status:
node1# crm status inactive
Verify that shelf C00 becomes available after a few minutes on node1:
node1# ov_stat -L C00 -D 'C00.*'
Library Name         Broken   Disabled   State     LCP State
C00                  false    false      ready     ready


DriveName Group      Usable Access Disabled  SoftState HardState Occupied PCL
C00d00    dg_c00     true   true   false     ready     unloaded  false
C00d01    dg_c00     true   true   false     ready     unloaded  false
C00d02    dg_c00     true   true   false     ready     unloaded  false
C00d03    dg_c00     true   true   false     ready     unloaded  false
C00d04    dg_c00     true   true   false     ready     unloaded  false
C00d05    dg_c00     true   true   false     ready     unloaded  false
C00d06    dg_c00     true   true   false     ready     unloaded  false
Remove the implicit location constraints imposed by the administrative move command above:
node1# crm resource unmove DMF-GROUP
If you want to have additional OpenVault clients that are not DMF servers, such as for running administrative commands, install the OpenVault software on those clients and run ov_admin as shown below. When asked the server hostname, specify the virtualhost value from the workfile in step 3 above.
| Note: You may wish to set the environment variable OVSERVER to the virtual hostname so that you can use the OpenVault administrative commands without having to specify the -S parameter on each command. |
Do the following for each OpenVault client:
On node1:
To allow node2 to act as an administrative client, run ov_admin and select the following menus, answering the questions when prompted:
node1# ov_admin
...
22 - Manage OpenVault Client Machines
        1 - Activate an OpenVault Client Machine
On the OpenVault client node, use ov_admin to enable the node to issue administrative commands by entering the virtualhost value in workfile, the port number, and security key as needed:
node2# ov_admin
...
Name where the OpenVault server is listening? [VIRTUALHOST]
What port number is the OpenVault server on VIRTUALHOST using? [695]
What security key is used for admin commands on the HA OpenVault servers? [none]
Test the new openvault resource:
Verify that the OpenVault libraries and drives become available after a few minutes on node1. Using the -ldxy options to the ov_stat command, the only output you should see is that of the inactive LCPs and DCPs that apply to the passive server. For example:
node1# ov_stat -ldxy
LCPName     LibraryName Usable SoftState Disabled MsgLevel
sl48a@node2 sl48        false  inactive  false    debug
sl48b@node2 sl48        false  inactive  false    debug

DCPName       DriveName Usable SoftState Disabled MsgLevel
sl48_1a@node2 sl48_1    false  inactive  false    debug
sl48_1b@node2 sl48_1    false  inactive  false    debug
In the above output, the LCPs and DCPs for node2 are expected to be inactive because node2 is the passive server. Therefore, the above output indicates that all is well.
If you prefer to see all of the LCPs and DCPs regardless of state, do not include the -y option. For example:
node1# ov_stat -ldxy
LCPName     LibraryName Usable SoftState    Disabled MsgLevel
sl48a@node1 sl48        true   ready        false    debug
sl48a@node2 sl48        false  inactive     false    debug
sl48b@node1 sl48        true   disconnected false    debug
sl48b@node2 sl48        false  inactive     false    debug

DCPName       DriveName Usable SoftState    Disabled MsgLevel
sl48_1a@node1 sl48_1    true   ready        false    debug
sl48_1a@node2 sl48_1    false  inactive     false    debug
sl48_1b@node1 sl48_1    true   disconnected false    debug
sl48_1b@node2 sl48_1    false  inactive     false    debug
Note: If multiple instances of an LCP/DCP exist on the active server, exactly one will be listed with a SoftState of ready and the others will be listed as disconnected. The particular instance listed as ready may change over time and is not important. Move the DMF resource group (which now contains the openvault resource) from node1 to node2:
node1# crm resource move DMF-GROUP node2
Verify the status:
node1# crm status inactive
Verify that all of the drives become available after a few moments on node2. Using the -ldxy options to the ov_stat command, the only output you should see is that of the inactive LCPs and DCPs that apply to the passive server (now node1). For example:
node2# ov_stat -ldxy
LCPName     LibraryName Usable SoftState Disabled MsgLevel
sl48a@node1 sl48        false  inactive  false    debug
sl48b@node1 sl48        false  inactive  false    debug

DCPName       DriveName Usable SoftState Disabled MsgLevel
sl48_1a@node1 sl48_1    false  inactive  false    debug
sl48_1b@node1 sl48_1    false  inactive  false    debug
In the above output, all is well because the only output displayed are the inactive LCPs and DCPs that are connected to what is now the passive DMF server (node1).
Move the DMF resource group (which now contains the openvault resource) back to node1:
node1# crm resource move DMF-GROUP node1
Verify the status:
node1# crm status inactive
Verify that all of the drives become available after a few moments on node1. Using the -ldxy options to the ov_stat command, the only output you should see is that of the inactive LCPs and DCPs that apply to the passive server (now back to node2). For example:
node1# ov_stat -ldxy
LCPName     LibraryName Usable SoftState Disabled MsgLevel
sl48a@node2 sl48        false  inactive  false    debug
sl48b@node2 sl48        false  inactive  false    debug

DCPName       DriveName Usable SoftState Disabled MsgLevel
sl48_1a@node2 sl48_1    false  inactive  false    debug
sl48_1b@node2 sl48_1    false  inactive  false    debug
Remove the implicit location constraints imposed by the administrative move command above:
node1# crm resource unmove DMF-GROUP
Figure 6-5 shows the step to add the resource for DMF.
| Note: The following procedure requires that the DMF application instances in OpenVault are configured to use a wildcard ("*") for the hostname and instance name. For more information, see the chapter about mounting service configuration tasks in the DMF 6 Administrator Guide. |
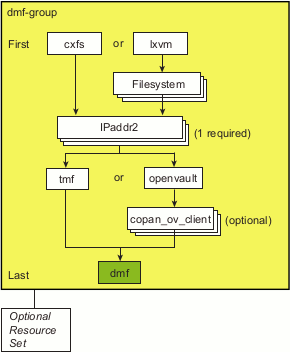
Make the filesystem backup inventory accessible from all DMF servers in the HA cluster.
The backup of managed user filesystems and DMF administrative filesystems is always performed on the active DMF server based upon parameters in the DMF configuration file. The xfsdump command maintains an inventory of all backups performed within the directory /var/lib/xfsdump . In an HA environment, the active DMF server node can change over time; therefore (in order for xfsdump to maintain a consistent inventory) it must be able to access the inventory for all past backups, even if those backups were created on another node.
SGI recommends that you make the inventory accessible to all DMF server nodes by relocating it into an HA-managed DMF administrative filesystem within the same resource group as DMF. For example, create a site-specific directory in the directory specified by the DMF HOME_DIR configuration parameter, such as /dmf/home/site_specific:
On node1 (which currently contains the inventory), enter the following:
node1# cd /var/lib
node1# cp -r xfsdump /dmf/home/site_specific/xfsdump
node1# mv xfsdump xfsdump.bak
node1# ln -s /dmf/home/site_specific/xfsdump xfsdump
Note: In a brand-new DMF installation, the /var/lib/xfsdump directory will not exist until after a backup has been performed. On node2, enter the following:
node2# cd /var/lib
node2# mv xfsdump xfsdump.bak
node2# ln -s /dmf/home/site_specific/xfsdump xfsdump
Note: It is the /var/lib/xfsdump directory that should be shared, rather than the /var/lib/xfsdump/inventory directory. If there are inventories stored on various nodes, you can use xfsinvutil to merge them into a single common inventory, prior to sharing the inventory among the nodes in the cluster. On node1, modify the DMF configuration file as follows:
Set the MAX_MS_RESTARTS parameter in the appropriate drivegroup objects to 0 so that DMF will not restart the mounting service.
(tape backups only) Set the DUMP_INVENTORY_COPY parameter so that it uses a DMF HA administrative filesystem that is on a different disk from the live inventory created above in step 1. If the live inventory in /dmf/home/site_specific/xfsdump is lost, you can then recreate it from the inventory backup in DUMP_INVENTORY_COPY. For example, you could create the directory /dmf/journal/site_specific/inventory_copy for use in DUMP_INVENTORY_COPY.
(OpenVault only) Set the MSG_DELAY parameter in the drivegroup objects to a value of slightly more than 2 minutes.
Set the SERVER_NAME parameter for the base object to the HA virtual hostname of the DMF server.
Note: If you change this parameter, you must copy the DMF configuration file manually to each parallel data-mover node and then restart the services related to DMF. Do not change this parameter while DMF is running. Set the INTERFACE parameter in the node object for each potential DMF server node to the same virtual hostname used for SERVER_NAME in the base object.
(Parallel DMF only) Create node objects for each potential DMF server and set the INTERFACE parameter in those node objects to the same virtual hostname used for SERVER_NAME in the base object.
Note: If you are not using Parallel DMF, then no node objects are needed.
For more information, see the dmf.conf(5) man page and the DMF 6 Administrator Guide.
Copy the DMF configuration file from node1 to node2 and to any parallel data-mover nodes in the DMF configuration. You may wish to use a symbolic link on node1 and on node2 that points to a shared location specified by the HOME_DIR parameter in the DMF configuration file. For example:
ha# ln -s /dmf/home/dmf.conf /etc/dmf/dmf.conf
Note: You cannot use a symbolic link for parallel data-mover nodes because DMF itself keeps the dmf.conf file synchronized with the server node. If you are using OpenVault and you explicitly set hostnames when you defined the ov_keys file during initial OpenVault setup, edit the ov_keys file and replace the hostname in the first field of the lines containing “dmf” with the OpenVault virtual hostname. For example, if the virtualhost value in the workfile is myvirtualhost, the result would be:
myvirtualhost   dmf   *  CAPI none
myvirtualhost   dmf   *  AAPI none
Note: If you used a wildcard hostname (*) when you defined the ov_keys file during initial OpenVault setup, there is no need to edit this file. Create another workfile that contains the following:
group DMF-GROUP Previously_Added_Resources DMF
Copy the primitive in the dmf template into workfile. Template location:
/usr/share/doc/sgi-ha/templates/dmf
Replace the site-specific variables:
primitive DMF ocf:sgi:dmf \
   op monitor interval="120s" timeout="60s" on-fail="restart" \
   op monitor interval="0" timeout="60s" \
   op start interval="0" timeout="600s" on-fail="restart" \
   op stop interval="0" timeout="120s" on-fail="fence" \
   params monitor_level="0" \
   meta resource-stickiness="1" migration-threshold="1"
Variable Description
DMF Name of this resource instance, such as DMF
Note: In a CXFS environment, ensure that the timeout values are appropriate for your site; you must account for the time required to relocate the CXFS metadata server for the managed filesystems. For example:
primitive DMF ocf:sgi:dmf \
   op monitor interval="120s" timeout="60s" on-fail="restart" \
   op monitor interval="0" timeout="60s" \
   op start interval="0" timeout="600s" on-fail="restart" \
   op stop interval="0" timeout="120s" on-fail="fence" \
   params monitor_level="0" \
   meta resource-stickiness="1" migration-threshold="1"
Verify that the timeout values are appropriate for your site.
Verify that there are no comments in workfile.
Save workfile.
Update the database with the new resource:
node1# crm configure load update workfile
Verify that DMF has started by using the dmdstat -v command and manual dmput and dmget commands on node1 :
node1# dmdstat -v
node1# xfs_mkfile size test_file
node1# dmput -r test_file
node1# dmdidle
(wait a bit to allow time for the volume to be written and unmounted)
node1# dmget test_file
node1# rm test_file
Move the DMF resource group (which now contains the dmf resource) to node2:
node1# crm resource move DMF-GROUP node2
Verify the status:
node1# crm status inactive
Verify that DMF has started on the new node by using the dmdstat -v command and manual dmput and dmget commands on node2:
node2# dmdstat -v
node2# xfs_mkfile size another_test_file
node2# dmput -r another_test_file
node2# dmdidle
(wait a bit to allow time for the volume to be written and unmounted)
node2# dmget another_test_file
node2# rm another_test_file
Move the DMF resource group back to node1:
node1# crm resource move DMF-GROUP node1
Verify the status:
node1# crm status inactive
Verify that DMF has started by using the dmdstat -v command and manual dmput and dmget commands on node1:
node1# dmdstat -v
node1# xfs_mkfile size test_file
node1# dmput -r test_file
node1# dmdidle
(wait a bit to allow time for the volume to be written and unmounted)
node1# dmget test_file
node1# rm test_file
Remove the implicit location constraints imposed by the administrative move command above:
node1# crm resource unmove DMF-GROUP
This section discusses the following:
A dmcopytool resource controls one instance of the SGI DMF copytool lhsmtool_dmf . The primary function of the DMF copytool is to copy files between the Lustre filesystem and the DMF archive system. For each Lustre filesystem, there must be a DMF copytool instance running as a daemon on the DMF server and a corresponding dmcopytool primitive.
Figure 6-6 shows the step to add optional dmcopytool resources.
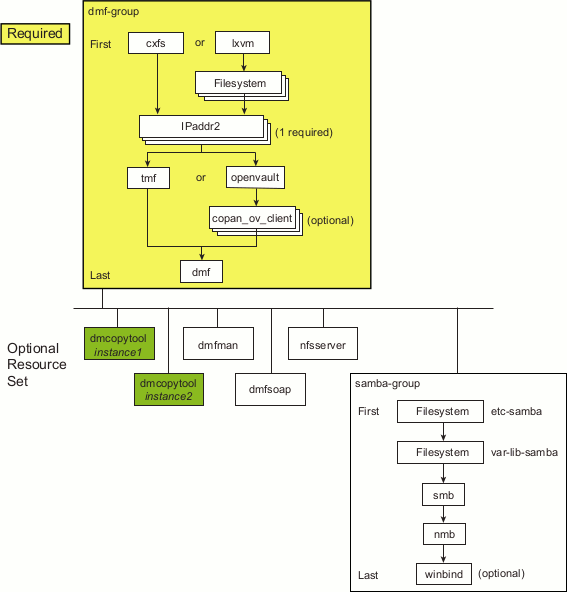
To configure a DMF copytool resource for an HA environment, do the following:
Copy the primitive in the dmcopytool template into another workfile. Template location:
/usr/share/doc/sgi-ha/templates/dmcopytool
Replace the site-specific variables:
primitive DMCOPYTOOL ocf:sgi:dmcopytool \
  op monitor interval="0" timeout="60s" \
  op monitor interval="120s" timeout="60s" on-fail="restart" \
  op start interval="0" timeout="600s" on-fail="restart" \
  op stop interval="0" timeout="600s" on-fail="fence" \
  params archive="NUM" hsmroot="DMF-PATH" lustredevice="DEVICE" \
   dmctmount="MOUNTPOINT-1" dmfmount="MOUNTPOINT-2" \
colocation DMF-COLOCATION inf: ( RESOURCE-SET ) DMF-GROUP
order DMF-ORDER inf: DMF-GROUP ( RESOURCE-SET )
Variable Description
DMCOPYTOOL Name of this resource instance. Each DMF copytool must have a corresponding unique resource. For example, DMCOPYTOOL1 for the first instance.
NUM The archive ID number registered with the Lustre HSM coordinator for this instance of the DMF copytool. Each Lustre filesystem has its own unique archive ID number. For example, 1 for the first instance.
DMF-PATH Path of a directory within a DMF-managed filesystem that is used for archiving or restoring Lustre files. This directory must already exist. For example, /DMFfs/lustre1.
DEVICE The Lustre filesystem device to be mounted for use by the DMF copytool. For example, 128.162.245.79@tcp0:/lustrefs1 .
MOUNTPOINT-1 The Lustre mount point on the DMF server (and on any DMF parallel data-mover nodes) that will be used strictly by the DMF copytool for archiving from the Lustre filesystem. (For example, /hsm-lustre1.) This mount point must match the name of a filesystem object defined in the DMF configuration file with a MIGRATION_LEVEL parameter set to archive. For more information, see Lustre HSM with DMF Best Practices Guide.
MOUNTPOINT-2 The Lustre mount point on the DMF server (and on any DMF parallel data-mover nodes) that will be used for regular Lustre activities including file access from the DMF server or mover nodes and explicit dmarchive(8) commands from other Lustre clients. (For example, /lustre1.) This mount point must match the name of a filesystem object defined in the DMF configuration file with a MIGRATION_LEVEL parameter set to archive.
DMF-COLOCATION Name of this colocation constraint, such as DMF-COLOCATION.
RESOURCE-SET List of the resources in this set, such as DMCOPYTOOL1 plus any other optional resources that should fail over with DMF-GROUP.
DMF-GROUP Name of the resource group by which this resource is constrained, such as DMF-GROUP (defined in “Add the DMF Group and Clustered/Local Filesystems Resources”).
DMF-ORDER Name of this order constraint, such as DMF-ORDER.
For additional parameters that correspond to options on the lhsmtool_dmf(8) man page, see “dmcopytool” in Appendix A.
For example:
primitive DMCOPYTOOL1 ocf:sgi:dmcopytool \
  op monitor interval="0" timeout="60s" \
  op monitor interval="120s" timeout="60s" on-fail="restart" \
  op start interval="0" timeout="600s" on-fail="restart" \
  op stop interval="0" timeout="600s" on-fail="fence" \
  params archive="1" hsmroot="/DMFfs/lustre1" lustredevice="128.162.245.79@tcp0:/lustrefs1" \
  dmctmount="/hsm-lustre1" dmfmount="/lustre1" \
colocation DMF-COLOCATION inf: ( DMCOPYTOOL1 ) DMF-GROUP
order DMF-ORDER inf: DMF-GROUP ( DMCOPYTOOL1 )
Verify that the timeout values are appropriate for your site.
Add any other parameters as required by your site (see below).
Verify that there are no comments in workfile.
Save workfile.
Update the database with the new resource:
node1# crm configure load update workfile
Verify that the DMF copytool instance archive number and parameters match those defined for the dmcopytool resource definition:
# ps -ef | grep lhsmtool_dmf
Move the colocated DMF resource group from node1 to node2:
node1# crm resource move DMF-GROUP node2
Verify the status:
node1# crm status inactive
Repeat step 7a to verify that the DMF copytool is still available.
Move the DMF resource group back to node1:
node1# crm resource move DMF-GROUP node1
Verify the status:
node1# crm status inactive
Remove the implicit location constraints imposed by the administrative move command above:
node1# crm resource unmove DMF-GROUP
Repeat step 1 through step 7 for each remaining DMF copytool instance. For example, the second primitive could be:
primitive DMCOPYTOOL2 ocf:sgi:dmcopytool \
  op monitor interval="0" timeout="60s" \
  op monitor interval="120s" timeout="60s" on-fail="restart" \
  op start interval="0" timeout="600s" on-fail="restart" \
  op stop interval="0" timeout="600s" on-fail="fence" \
  params archive="2" hsmroot="/DMFfs/lustre2" lustredevice="128.162.245.80@tcp0:/lustrefs2" \
  dmctmount="/hsm-lustre2" dmfmount="/lustre2" \
colocation DMF-COLOCATION inf: ( DMCOPYTOOL1 DMCOPYTOOL2 ) DMF-GROUP
order DMF-ORDER inf: DMF-GROUP ( DMCOPYTOOL1 DMCOPYTOOL2 )
The dmfman resource controls DMF Manager. Figure 6-7 shows the step to add the optional dmfman resource.
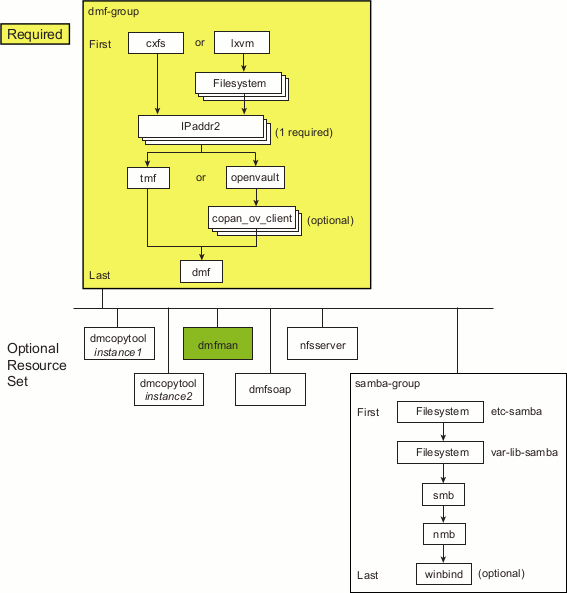
| Note: You may wish to add another IPaddr2 resource if you require a separate IP alias for DMF Manager use. See “Add the IPaddr2 Resources”. |
To configure DMF Manager for an HA environment, do the following:
Run the dmfman_setup_ha script to create the required links and directories in a commonly accessible filesystem (such as the directory specified by the HOME_DIR parameter in the DMF configuration file) that will allow DMF statistics archives to be accessible across the HA cluster. Instructions differ between the CXFS environment and the local XVM environment:
CXFS environment:
On node1:
node1# /usr/lib/dmf/dmfman_setup_ha -d HOME_DIR
On node2:
node2# /usr/lib/dmf/dmfman_setup_ha -d HOME_DIR
For example, if the HOME_DIR parameter is set to /dmf/home in /etc/dmf/dmf.conf, you would enter the following:
node1# /usr/lib/dmf/dmfman_setup_ha -d /dmf/home
node2# /usr/lib/dmf/dmfman_setup_ha -d /dmf/home
Local XVM environment:
Run dmfman_setup_ha on node1 :
node1# /usr/lib/dmf/dmfman_setup_ha -d HOME_DIR
For example, if the HOME_DIR parameter is set to /dmf/home in /etc/dmf/dmf.conf, you would enter the following:
node1# /usr/lib/dmf/dmfman_setup_ha -d /dmf/home
Move DMF-GROUP to node2:
node1# crm resource move DMF-GROUP node2
Verify that HOME_DIR is mounted on node2.
Run dmfman_setup_ha on node2:
node2# /usr/lib/dmf/dmfman_setup_ha -d HOME_DIR
For example:
node2# /usr/lib/dmf/dmfman_setup_ha -d /dmf/home
Move DMF-GROUP back to node1:
node2# crm resource move DMF-GROUP node1
Remove implicit constraints caused by the above crm commands:
node1# crm resource unmove DMF-GROUP
Copy the primitive in the dmfman template to another workfile. Template location:
/usr/share/doc/sgi-ha/templates/dmfman
Replace the site-specific variables:
primitive DMFMAN ocf:sgi:dmfman \
   op monitor interval="0" timeout="60s" \
   op start interval="0" timeout="120s" on-fail="restart" \
   op stop interval="0" timeout="120s" on-fail="fence" \
colocation DMF-COLOCATION inf: ( RESOURCE-SET ) DMF-GROUP
order DMF-ORDER inf: DMF-GROUP ( RESOURCE-SET )
Variable Description
DMFMAN Name of this resource instance, such as DMFMAN
DMF-COLOCATION Name of this colocation constraint, such as DMF-COLOCATION
RESOURCE-SET List of the resources in this set, such as DMFMAN plus any other optional resources that should fail over with DMF-GROUP
DMF-GROUP Name of the resource group by which this resource is constrained, such as DMF-GROUP (defined in “Add the DMF Group and Clustered/Local Filesystems Resources”)
DMF-ORDER Name of this order constraint, such as DMF-ORDER
For example, adding DMFMAN to the resource set:
primitive DMFMAN ocf:sgi:dmfman \
   op monitor interval="0" timeout="60s" \
   op start interval="0" timeout="120s" on-fail="restart" \
   op stop interval="0" timeout="120s" on-fail="fence" \
colocation DMF-COLOCATION inf: ( DMCOPYTOOL1 DMCOPYTOOL2 DMFMAN ) DMF-GROUP
order DMF-ORDER inf: DMF-GROUP ( DMCOPYTOOL1 DMCOPYTOOL2 DMFMAN)
Verify that the timeout values are appropriate for your site.
Verify that there are no comments in workfile.
Save workfile.
Update the database with the new resource:
node1# crm configure load update workfile
Point your browser at https://virtualIPaddress :11109 and verify that you can log in and use DMF Manager, such as viewing the Overview panel. For more information about using DMF Manager, see DMF 6 Administrator Guide.
Move the colocated DMF resource group from node1 to node2:
node1# crm resource move DMF-GROUP node2
Verify the status:
node1# crm status inactive
Repeat step 7a to verify that DMF Manager is still available.
Move the DMF resource group back to node1:
node1# crm resource move DMF-GROUP node1
Verify the status:
node1# crm status inactive
Remove the implicit location constraints imposed by the administrative move command executed above:
node1# crm resource unmove DMF-GROUP
The dmfsoap resource controls the DMF client Simple Object Access Protocol (SOAP) service. Figure 6-8 shows the step to add the optional dmfsoap resource.
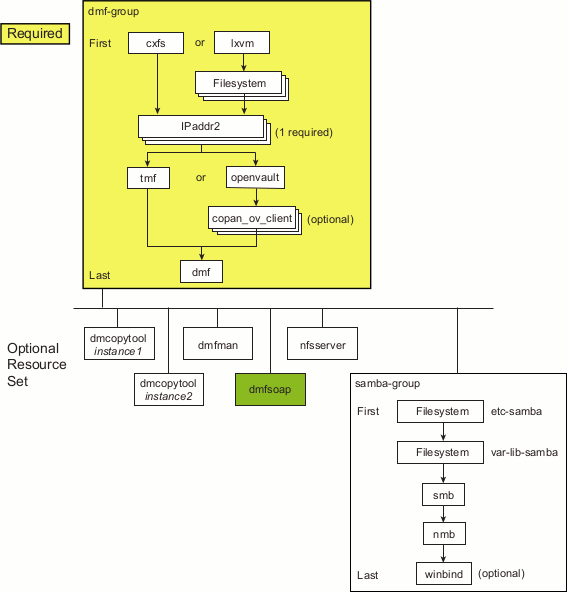
To configure the DMF client SOAP service for an HA environment, do the following:
Copy the primitive in the dmfsoap template into another workfile . Template location:
/usr/share/doc/sgi-ha/templates/dmfsoap
Replace the site-specific variables:
primitive DMFSOAP ocf:sgi:dmfsoap \
   op monitor interval="0" timeout="60s" \
   op start interval="0" timeout="120s" on-fail="restart" \
   op stop interval="0" timeout="120s" on-fail="fence" \
colocation DMF-COLOCATION inf: ( RESOURCE-SET ) DMF-GROUP
order DMF-ORDER inf: DMF-GROUP ( RESOURCE-SET )
Variable Description
DMFSOAP Name of this resource instance, such as DMFSOAP
DMF-COLOCATION Name of this colocation constraint, such as DMF-COLOCATION
RESOURCE-SET List of the resources in this set, such as DMFSOAP plus any other optional resources that should fail over with DMF-GROUP
DMF-GROUP Name of the resource group by which this resource is constrained, such as DMF-GROUP (defined in “Add the DMF Group and Clustered/Local Filesystems Resources”)
DMF-ORDER Name of this order constraint, such as DMF-ORDER
For example:
primitive DMFSOAP ocf:sgi:dmfsoap \
   op monitor interval="0" timeout="60s" \
   op start interval="0" timeout="120s" on-fail="restart" \
   op stop interval="0" timeout="120s" on-fail="fence" \
colocation DMF-COLOCATION inf: ( DMCOPYTOOL1 DMCOPYTOOL2 DMFMAN DMFSOAP ) DMF-GROUP
order DMF-ORDER inf: DMF-GROUP ( DMCOPYTOOL1 DMCOPYTOOL2 DMFMAN DMFSOAP )
Verify that the timeout values are appropriate for your site.
Verify that there are no comments in workfile.
Save workfile.
Update the database with the new resource:
node1# crm configure load update workfile
Point your browser at https://virtualIPaddress:11110/server.php and verify that you can access the GUI and view the WSDL for one of the DMF client functions. For more information, see DMF 6 Administrator Guide.
Move the colocated DMF resource group from node1 to node2:
node1# crm resource move DMF-GROUP node2
Verify the status:
node1# crm status inactive
Repeat step 6a to verify that the DMF client SOAP service is still available.
Move the DMF resource group back to node1:
node1# crm resource move DMF-GROUP node1
Verify the status:
node1# crm status inactive
Remove the implicit location constraints imposed by the administrative move command above:
node1# crm resource unmove DMF-GROUP
The nfsserver resource controls the start/stop of NFS. Figure 6-9 shows the step to add the optional resource for the NFS server.
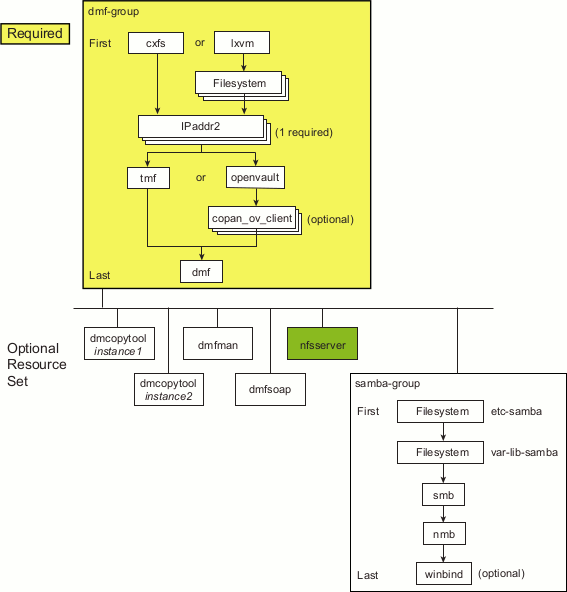
| Note: You may wish to add another IPaddr2 resource if you require a separate IP alias for NFS use. See “Add the IPaddr2 Resources”. |
To configure NFS for an HA environment, do the following:
Copy the /etc/exports entries that you would like to make highly available from node1 to the /etc/exports file on node2.
Note: Be sure to include the fsid=uniquenumber export option in order to prevent stale file handles after failover. (RHEL only) On both RHEL nodes, do the following:
Set the following in the /etc/sysconfig/nfs file:
START_SMNOTIFY="no"
Ensure that NFS lock services are started at boot time:
On RHEL node1:
node1# chkconfig nfslock on
On RHEL node2:
node2# chkconfig nfslock on
Copy the primitive in the nfsserver template into another workfile. Template location:
/usr/share/doc/sgi-ha/templates/nfsserver
Replace the site-specific variables:
primitive NFS ocf:heartbeat:nfsserver \
   op monitor interval="120s" timeout="60s" on-fail="restart" \
   op monitor interval="0" timeout="60s" \
   op start interval="0" timeout="120s" on-fail="restart" \
   op stop interval="0" timeout="120s" on-fail="fence" \
   params nfs_shared_infodir="STATEDIR" nfs_ip="IP-ADDRESS-ALIAS" \
colocation DMF-COLOCATION inf: ( RESOURCE-SET ) DMF-GROUP
order DMF-ORDER inf: DMF-GROUP ( RESOURCE-SET )
Variable Description
NFS Name of this resource instance, such as NFS.
STATEDIR Directory in the NFS filesystem that will be used to store NFS file-lock state for this HA cluster, such as the /mnt/cxfsvol1/.nfs subdirectory in the exported filesystem.
IP-ADDRESS-ALIAS IP address alias associated with the NFS client lock state (which is reclaimed by the NFS client from the NFS server when it receives the NSM reboot notification that is initiated by this nfsserver resource), for example 128.162.244.244. This IP address alias will be the same IP address specified for IP-ADDRESS in one of the IPaddr2 resources (see “Add the IPaddr2 Resources”).
DMF-COLOCATION Name of this colocation constraint, such as DMF-COLOCATION
RESOURCE-SET List of the resources in this set, such as NFS plus any other optional resources that should fail over with DMF-GROUP
DMF-GROUP Name of the resource group by which this resource is constrained, such as DMF-GROUP (defined in “Add the DMF Group and Clustered/Local Filesystems Resources”)
DMF-ORDER Name of this order constraint, such as DMF-ORDER
For example:
primitive NFS ocf:heartbeat:nfsserver \
   op monitor interval="120s" timeout="60s" on-fail="restart" \
   op monitor interval="0" timeout="60s" \
   op start interval="0" timeout="120s" on-fail="restart" \
   op stop interval="0" timeout="120s" on-fail="fence" \
   params nfs_shared_infodir="/mnt/cxfsvol1/.nfs" nfs_ip="128.162.232.79" \
colocation DMF-COLOCATION inf: ( DMCOPYTOOL1 DMCOPYTOOL2 DMFMAN DMFSOAP NFS ) DMF-GROUP
order DMF-ORDER inf: DMF-GROUP ( DMCOPYTOOL1 DMCOPYTOOL2 DMFMAN DMFSOAP NFS )
Verify that the timeout values are appropriate for your site.
Verify that there are no comments in workfile.
Save workfile.
Update the database with the new resource:
node1# crm configure load update workfile
Run the following command on node1 to verify that the NFS filesystems are exported:
node1# exportfs -v
/work.mynode1   <world>(rw,wdelay,root_squash,no_subtree_check,fsid=8001)
/work.mynode2   <world>(rw,wdelay,root_squash,no_subtree_check,fsid=8002)
/work.mynode3   <world>(rw,wdelay,root_squash,no_subtree_check,fsid=8003)
/work.mynode4   <world>(rw,wdelay,root_squash,no_subtree_check,fsid=8004)
/mirrors        <world>(ro,wdelay,root_squash,no_subtree_check,fsid=8005)
/               <world>(ro,wdelay,root_squash,no_subtree_check,fsid=8006)
Mount the filesystems on a node that will not be a member of the HA cluster (otherhost):
otherhost# mount node1:/nfsexportedfilesystem /mnt/test
Read and write to the NFS-mounted filesystems:
otherhost# echo "test data" > /mnt/test/testFile1A
otherhost# cat /mnt/test/testFile1A
test data
Move the colocated DMF resource group from node1 to node2:
node1# crm resource move DMF-GROUP node2
Verify the status:
node1# crm status inactive
Run the following command on node2 to verify that the NFS filesystems are exported:
node2# exportfs -v
/work.mynode1   <world>(rw,wdelay,root_squash,no_subtree_check,fsid=8001)
/work.mynode2   <world>(rw,wdelay,root_squash,no_subtree_check,fsid=8002)
/work.mynode3   <world>(rw,wdelay,root_squash,no_subtree_check,fsid=8003)
/work.mynode4   <world>(rw,wdelay,root_squash,no_subtree_check,fsid=8004)
/mirrors        <world>(ro,wdelay,root_squash,no_subtree_check,fsid=8005)
/               <world>(ro,wdelay,root_squash,no_subtree_check,fsid=8006)
Read and write to the NFS-mounted filesystems:
otherhost# echo "more test data" > /mnt/test/testFile1B
otherhost# cat /mnt/test/testFile1B
more test data
Move the DMF resource group back to node1:
node1# crm resource move DMF-GROUP node1
Verify the status:
node1# crm status inactive
Remove the implicit location constraints imposed by the administrative move command executed above:
node1# crm resource unmove DMF-GROUP
Figure 6-10 shows the steps to add the optional resources associated with Samba.
This section discusses the following:
| Note: You may wish to add another IPaddr2 resource if you require a separate IP aliases for Samba use. See “Add the IPaddr2 Resources”. |
Copy the Samba configuration files from their normal location to the shared-storage location. For example:
node1# mkdir /mnt/data/.ha/ node1# cp -r /etc/samba /mnt/data/.ha/etc-samba node1# cp -r /var/lib/samba /mnt/data/.ha/var-lib-samba |
Do the following to add the Samba Filesystem resources:
Create another workfile that contains the following:
group SAMBA-GROUP etc-samba var-lib-samba
colocation DMF-COLOCATION inf: ( RESOURCE-SET ) DMF-GROUP
order DMF-ORDER inf: DMF-GROUP ( RESOURCE-SET )
Variable Description
DMF-COLOCATION Name of this colocation constraint, such as DMF-COLOCATION
RESOURCE-SET List of the resources in this set, such as NMB plus any other optional resources that should fail over with DMF-GROUP
DMF-ORDER Name of this order constraint, such as DMF-ORDER
DMF-GROUP Name of the resource group by which this resource is constrained, such as DMF-GROUP (defined in “Add the DMF Group and Clustered/Local Filesystems Resources”)
For example:
group SAMBA-GROUP etc-samba var-lib-samba
colocation DMF-COLOCATION inf: ( DMCOPYTOOL1 DMCOPYTOOL2 DMFMAN DMFSOAP NFS SAMBA-GROUP ) DMF-GROUP
order DMF-ORDER inf: DMF-GROUP ( DMCOPYTOOL1 DMCOPYTOOL2 DMFMAN DMFSOAP NFS SAMBA-GROUP )
Copy the primitive from the Filesystem template into workfile . Template location:
/usr/share/doc/sgi-ha/templates/Filesystem
Make two copies of the Samba primitive, one for /etc/samba and another for /var/lib/samba , and replace the site-specific variables:
Note: The Filesystem template contains two primitive sections. These sections require different fstype= and options= values. For this step, delete the local XVM primitive. Template for Samba directories:
primitive SAMBA-FILESYSTEM ocf:heartbeat:Filesystem \
   op monitor interval="120s" timeout="60s" on-fail="restart" \
   op monitor interval="0" timeout="60s" \
   op start interval="0" timeout="600s" on-fail="restart" \
   op stop interval="0" timeout="120s" on-fail="fence" \
   params device="DEVICE-FILE" directory="SAMBA-MOUNT-POINT" \
          fstype="none"  options="bind" \
   meta resource-stickiness="1" migration-threshold="1"
Variable Description
SAMBA-FILESYSTEM Name of this resource instance:
DEVICE-FILE The /dev/lxvm volume name of the filesystem device. For example:
/mnt/data/.ha/etc-samba for /etc/samba
/mnt/data/.ha/var-lib-samba for /var/lib/samba
SAMBA-MOUNT-POINT The mount points, which must already exist on all nodes in the HA cluster before you load this text into the CIB:
/etc/samba
/var/lib/samba
For example, for the Samba directories that are bind-mounted on /etc/samba and /var/lib/samba:
primitive etc-samba ocf:heartbeat:Filesystem \
   op monitor interval="120s" timeout="60s" on-fail="restart" \
   op monitor interval="0" timeout="60s" \
   op start interval="0" timeout="600s" on-fail="restart" \
   op stop interval="0" timeout="120s" on-fail="fence" \
   params device="/mnt/data/.ha/etc-samba" directory="/etc/samba" fstype="none" options="bind"\
   meta resource-stickiness="1" migration-threshold="1"
primitive var-lib-samba ocf:heartbeat:Filesystem \
   op monitor interval="120s" timeout="60s" on-fail="restart" \
   op monitor interval="0" timeout="60s" \
   op start interval="0" timeout="600s" on-fail="restart" \
   op stop interval="0" timeout="120s" on-fail="fence" \
   params device="/mnt/data/.ha/var-lib-samba" directory="/var/lib/samba" fstype="none" options="bind"\
   meta resource-stickiness="1" migration-threshold="1"
Verify that the timeout values are appropriate for your site.
Verify that you have removed the unused section and that there are no comments in workfile.
Save workfile.
Update the database with the new resource:
node1# crm configure load update workfile
Ensure that both of the Samba mount points exist on both nodes.
Note: After a Filesystem primitive has been added to a resource group's configuration, moving that resource group will unmount the filesystem defined in the primitive. This will result in killing any process that has that filesystem in the path of its current working directory. Verify that the filesystems are online on node1:
node1# df -hl
Move the DMF resource group (which is colocated with the new Filesystem resources in the new SAMBA-GROUP) from node1 to node2 :
node1# crm resource move DMF-GROUP node2
Verify the status:
node1# crm status
Verify that the filesystems are correctly mounted on node2 only:
On node1, check the mount table and verify that none of the filesystems are mounted.
On node2, check the mount table and verify that the filesystems are mounted and have the correct mount options. Use the ls and df -lh commands on the mount point to verify that the filesystem is functional.
Move the DMF resource group back to node1:
node1# crm resource move DMF-GROUP node1
Verify the status:
node1# crm status
Verify that the filesystems are correctly mounted on node1 only:
On node1, check the mount table and verify that the filesystems are mounted and have the correct mount options. Use the ls and df -lh commands on the mount point to verify that the filesystem is functional.
On node2, check the mount table and verify that none of the filesystems are mounted.
Remove the implicit location constraints imposed by the administrative move command above:
node1# crm resource unmove DMF-GROUP
The smb resource controls the smb service for Samba. Do the following to add the smb resource:
Create another workfile that contains the following:
group SAMBA-GROUP etc-samba var-lib-samba SMB
colocation DMF-COLOCATION inf: ( RESOURCE-SET ) DMF-GROUP
order DMF-ORDER inf: DMF-GROUP ( RESOURCE-SET )
For example:
group SAMBA-GROUP etc-samba var-lib-samba SMB
colocation DMF-COLOCATION inf: ( DMCOPYTOOL1 DMCOPYTOOL2 DMFMAN DMFSOAP NFS SAMBA-GROUP ) DMF-GROUP
order DMF-ORDER inf: DMF-GROUP ( DMCOPYTOOL1 DMCOPYTOOL2 DMFMAN DMFSOAP NFS SAMBA-GROUP )
Copy the primitive from the smb template into workfile. Template location:
/usr/share/doc/sgi-ha/templates/smb
Replace the site-specific variables as directed:
primitive SMB lsb:smb \
   op monitor interval="120s" timeout="60s" on-fail="restart" \
   op monitor interval="0" timeout="60s" \
   op start interval="0" timeout="60s" on-fail="restart" \
   op stop interval="0" timeout="60s" on-fail="fence" \
Variable Description
SMB Name of this resource instance, such as SMB.
For example:
primitive SMB lsb:smb \
   op monitor interval="120s" timeout="60s" on-fail="restart" \
   op monitor interval="0" timeout="60s" \
   op start interval="0" timeout="60s" on-fail="restart" \
   op stop interval="0" timeout="60s" on-fail="fence"
Verify that the timeout values are appropriate for your site.
Verify that there are no comments in workfile.
Save workfile.
Update the database with the new resources:
node1# crm configure load update workfile
You will test this resource after adding all of the Samba resources.
The nmb resource controls the nmbd service for Samba. Do the following to add the nmb resource:
Create another workfile that contains the following:
group SAMBA-GROUP etc-samba var-lib-samba SMB NMB
colocation DMF-COLOCATION inf: ( RESOURCE-SET ) DMF-GROUP
order DMF-ORDER inf: DMF-GROUP ( RESOURCE-SET )
For example:
group SAMBA-GROUP etc-samba var-lib-samba  SMB NMB
colocation DMF-COLOCATION inf: ( DMCOPYTOOL1 DMCOPYTOOL2 DMFMAN DMFSOAP NFS SAMBA-GROUP ) DMF-GROUP
order DMF-ORDER inf: DMF-GROUP ( DMCOPYTOOL1 DMCOPYTOOL2 DMFMAN DMFSOAP NFS SAMBA-GROUP )
Copy the primitive from the nmb template into workfile. Template location:
/usr/share/doc/sgi-ha/templates/nmb
Replace the site-specific variables as directed:
primitive NMB lsb:nmb \
   op monitor interval="120s" timeout="60s" on-fail="restart" \
   op monitor interval="0" timeout="60s" \
   op start interval="0" timeout="60s" on-fail="restart" \
   op stop interval="0" timeout="60s" on-fail="fence"
Variable Description
NMB Name of this resource instance, such as NMB.
For example:
primitive NMB lsb:nmb \
   op monitor interval="120s" timeout="60s" on-fail="restart" \
   op monitor interval="0" timeout="60s" \
   op start interval="0" timeout="60s" on-fail="restart" \
   op stop interval="0" timeout="60s" on-fail="fence"
Verify that the timeout values are appropriate for your site.
Verify that there are no comments in workfile.
Save workfile.
Update the database with the new resources:
node1# crm configure load update workfile
You will test this resource after adding all of the Samba resources.
| Note: Not all configurations with winbind will work in an HA cluster. |
If your Samba implementation uses an authentication type that requires the winbind daemon, you can use a winbind resource to control it:
Ensure that the HA nodes do not use pluggable authentication modules (PAM) or name service switch (NSS) that could have dependencies on winbind. That is, there must not be dependencies on winbind in the files in the /etc/pam.d directory or the files listed in the /etc/nsswitch.conf file.
Create another workfile that contains the following:
group SAMBA-GROUP etc-samba var-lib-samba SMB NMB WINBIND
colocation DMF-COLOCATION inf: ( RESOURCE-SET ) DMF-GROUP
order DMF-ORDER inf: DMF-GROUP ( RESOURCE-SET )
For example:
group SAMBA-GROUP etc-samba var-lib-samba SMB NMB WINBIND
colocation DMF-COLOCATION inf: ( DMCOPYTOOL1 DMCOPYTOOL2 DMFMAN DMFSOAP NFS SAMBA-GROUP ) DMF-GROUP
order DMF-ORDER inf: DMF-GROUP ( DMCOPYTOOL1 DMCOPYTOOL2 DMFMAN DMFSOAP NFS SAMBA-GROUP )
Copy the primitive from the winbind template into workfile.Template location:
/usr/share/doc/sgi-ha/templates/winbind
Replace the site-specific variables as directed:
primitive WINBIND lsb:winbind \
   op monitor interval="0" timeout="60s" \
   op monitor interval="120s" timeout="60s" on-fail="restart" \
   op start interval="0" timeout="60s" on-fail="restart" \
   op stop interval="0" timeout="60s" on-fail="fence" \
Variable Description
WINBIND Name of this resource instance, such as WINBIND
For example:
primitive WINBIND lsb:winbind \
   op monitor interval="0" timeout="60s" \
   op monitor interval="120s" timeout="60s" on-fail="restart" \
   op start interval="0" timeout="60s" on-fail="restart" \
   op stop interval="0" timeout="60s" on-fail="fence"
Verify that the timeout values are appropriate for your site.
Verify that there are no comments in workfile.
Save workfile.
Update the database with the new resources:
node1# crm configure load update workfile
Test the Samba resources in SAMBA-GROUP:
Ensure that SAMBA-GROUP (which must be colocated with DMF-GROUP) is on node1:
node1# crm resource move DMF-GROUP node1
Verify the status:
node1# crm status inactive
Use smbclient from a machine outside of the HA cluster to connect to the Samba server on node1 and copy a file. For example, to log in to node1 as admin (assuming that admin is a valid login name in the homes section of the smb.conf file) copy origfileA to remotefileA on the remote host:
otherhost# smbclient //node1/admin
smb:\> get origfileA remotefileA
Note: Depending upon the setting of the security parameter in the smb.conf file, this may involve using a Samba account that already exists. Move the colocated DMF resource group from node1 to node2:
node1# crm resource move DMF-GROUP node2
Verify the status:
node1# crm status inactive
Use smbclient from a machine outside of the HA cluster to connect to the Samba server on node2 and copy a file. For example, to log in to node2 as admin (assuming that admin is a valid login name in the homes section of the smb.conf file) and copy origfileB to remotefileB on the remote host:
otherhost# smbclient //node2/admin
smb:\> get origfileB remotefileB
Move the DMF resource group back to node1:
node1# crm resource move DMF-GROUP node1
Verify the status:
node1# crm status inactive
Remove the implicit location constraints imposed by the administrative move command executed above:
node1# crm resource unmove DMF-GROUP
See Chapter 8, “Create the Fencing Capability and Put Into Production Mode” to complete the process.