This book guides a knowledgeable user through the installation, setup, and simple configuration of most Silicon Graphics Onyx4 UltimateVision systems.
For more detailed information, or for setup instructions for more complex Onyx4 systems, please refer to the Silicon Graphics Onyx4 UltimateVision User's Guide.
Depending on the system ordered, your Onyx4 system may have been shipped as a number of individual chassis or mounted in a rack. This section describes positioning and powering your system in either of these instances.
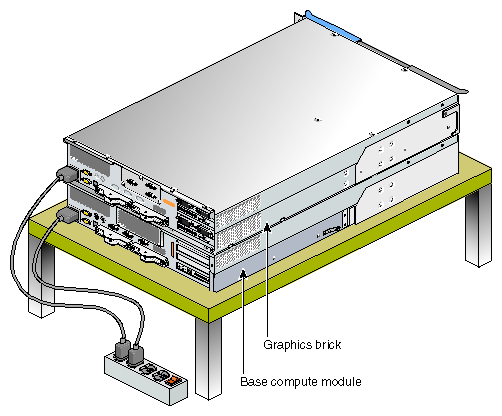
If your Onyx4 system was shipped as a number of individual chassis, they may be placed on a flat surface, as shown in Figure 1-1, or placed in a rack. For instructions on mounting Onyx4 chassis in a rack, and for information about rack positioning, refer to the Silicon Graphics Onyx4 UltimateVision User's Guide.
Plug your Onyx4 system into a suitable power outlet, as shown in Figure 1-1 (for non-racked chassis) or Figure 1-2 (for racked chassis). Refer to the Silicon Graphics Onyx4 UltimateVision User's Guide for detailed power requirements.
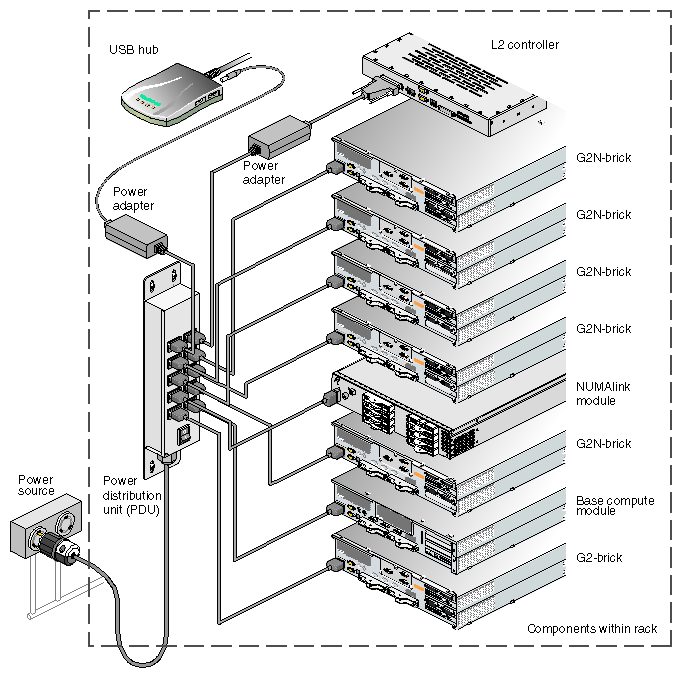
If your system was shipped from SGI® with the bricks already mounted in a rack and the NUMAlink, XIO, and SGI ImageSync™ cables preinstalled, you should proceed to “Connecting a Monitor to an Onyx4 System”.
This section describes the NUMAlink and XIO cabling for some simple configurations. For instructions to cable more complex systems, see the Silicon Graphics Onyx4 UltimateVision User's Guide.
Onyx4 G2N-bricks attach to a NUMAlink port on a host system or router. Onyx4 G2-bricks attach to an XIO port on a host system.
Figure 1-3 shows a system with a base compute module and one G2-brick.

Figure 1-4 shows a system with a base compute module, one G2-brick, and one G2N-brick.
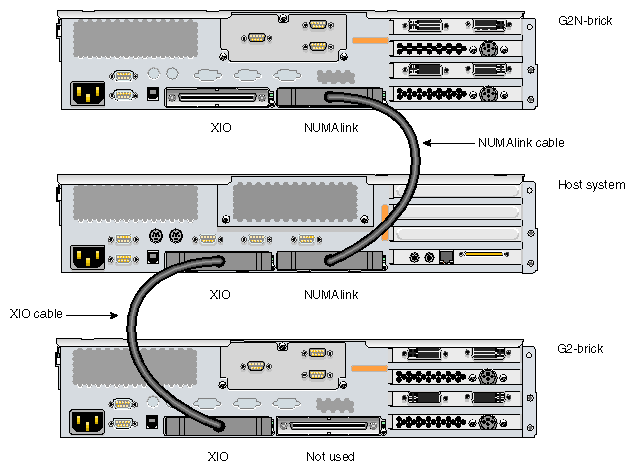
If your system was shipped from SGI with the bricks already mounted in a rack and the SGI ImageSync (IS) cables preinstalled, you should proceed to “Connecting a Monitor to an Onyx4 System”.
If your system did not come with SGI ImageSync cables preinstalled, follow these steps to install them:
Connect the DB9 connector on the IS card in your host system to the upper right SGI ImageSync DB9 connector on one of the graphics bricks using an SGI ImageSync DB9-to-DB9 cable.
Daisy-chain the SGI ImageSync cables from this first graphics brick to any additional graphics bricks in your system, as shown in Figure 1-5 (that is, from the left DB9 IS connector on one graphics brick to the upper right DB9 IS connector on the next).

Note: There is no required order for the SGI ImageSync cabling.
Figure 1-5 shows an SGI ImageSync card installed in a host system with SGI ImageSync cables connected to three graphics bricks. For further information about SGI ImageSync cabling, refer to the Silicon Graphics Onyx4 UltimateVision User's Guide.
| Note: Figure 1-5 does not show a complete system, and should not be used as a guide for brick placement. It is intended only to show how the SGI ImageSync cables connect. |

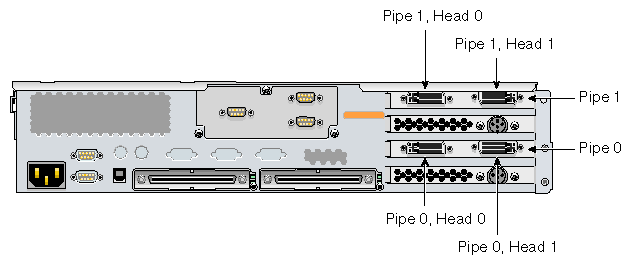
Select the monitor on which you want the IRIX® OS console to appear, and connect this monitor to the pipe 0, head 0 connector on your Onyx4 system.
If you have a single graphics brick, pipe 0 will be located in that brick.
If you have multiple graphics bricks, pipe 0 will be located in the G2-brick connected to the host system master CPU (refer to the Silicon Graphics Onyx4 UltimateVision User's Guide for details about how to locate this brick).
Once you have located the correct brick, pipe 0, head 0 will be the lower left DVI-I port on that brick, as shown in Figure 1-6.
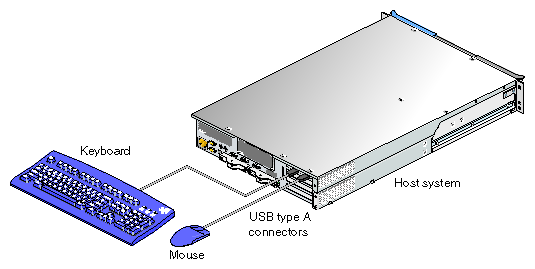
Connect a USB keyboard and a USB mouse to your Onyx4 system, as shown in Figure 1-7. Each keyboard and mouse pair must be connected to either the odd-numbered USB ports (ports 1 and 3, as shown in Figure 1-7) or the even-numbered ports (ports 2 and 4). The USB port closest to the side of the chassis is port 1.
Figure 1-7 shows the USB PCI card in bus 2, slot 2 (the top PCI slot) of a host system chassis, which is the preferred location for this card. Some configurations may have the USB card in a different PCI slot in the host system.
| Note: If you will be connecting more than a total of four USB devices (for example, more than two keyboards and two mice), or if one or more of your keyboard/mouse pairs will be further than 10 feet (3 meters) away from the USB ports on the host system, please refer to the Silicon Graphics Onyx4 UltimateVision User's Guide for details about how to connect these devices through a USB hub or a USB extender. |
If your Onyx4 system was shipped in a rack with a Level 2 controller, you should connect a serial terminal to that Level 2 controller, which is located in the top of the rack as shown in Figure 1-8 (this view shows the back of the rack).
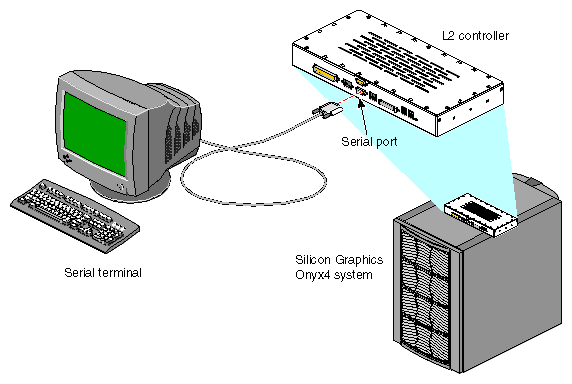
If your Onyx4 system was shipped in a rack without a Level 2 controller, or was shipped as individual chassis, you should connect a serial terminal to the Level 1 controller contained in the host system master CPU brick as shown in Figure 1-9.

The power up procedure varies, depending on whether your serial terminal is connected to an L1 system controller or an L2 system controller. Refer to the appropriate section below.
Power up your Onyx4 system from a serial terminal connected to the L1 system controller on the master CPU as follows:
At the system controller prompt, type:
003c01-L1> * l1 pwr u
To see the IRIX OS console output, type Control-D:
003c01-L1> <ctrl>-D
If these commands result in an error message, reset the system:
003c01-L1> reset
Once the system is powered up, it will automatically boot to the IRIX OS and a login screen will appear on the attached graphics monitor(s).
Power up your Onyx4 system from the serial terminal connected to an L2 system controller as follows:
At the system controller prompt, type:
001-10.17.168.102-L2> pwr u
To see the IRIX OS console output, type Control-D:
001-10.17.168.102-L2> <ctrl>-D
Once the system is powered up, it will automatically boot to the IRIX OS and a login screen will appear on the attached graphics monitor(s).
If you are experiencing problems with your Onyx4 system, you can follow the steps detailed in the Silicon Graphics Onyx4 UltimateVision User's Guide to help isolate and correct the problem.
If the problems are with your host system you should refer to the user's manual for that host system.
For problems not addressed in the above locations, please contact your SGI authorized support representative.
You can obtain SGI documentation in the following ways:
See the SGI Technical Publications Library at http://docs.sgi.com . Various formats are available. This library contains the most recent and most comprehensive set of online books, release notes, man pages, and other information.
If it is installed on your SGI system, you can use InfoSearch, an online tool that provides a more limited set of online books, release notes, and man pages. With an IRIX OS based system, select Help from the Toolchest, and then select InfoSearch. Or you can type infosearch on a command line.
You can also view release notes by typing either grelnotes or relnotes on a command line.
You can also view man pages by typing man <title> on a command line.