If you have not already done so, go to Chapter 1, “Installing Dual Head Graphics In An Octane2”, and follow the instructions for installing the Dual Head XIO module before you begin setting up the monitors.
On a Dual Head system, one of the monitors is considered the “primary” head (head 0), and the other the “secondary” head (head 1).
You can place the secondary monitor next to your current monitor (a “side by side” configuration) or you can place the secondary monitor above or below your current monitor (a “stacked” configuration). After unpacking the monitor, follow the instructions in either “Connecting Cables to the Monitors in a Side-by-Side Configuration” or “Connecting Cables to the Monitors in a Stacked Configuration”, depending on your desired configuration.
Unpack the secondary monitor from its box.
 | Caution: The monitor is very heavy. Have someone help you lift it out of the box. |
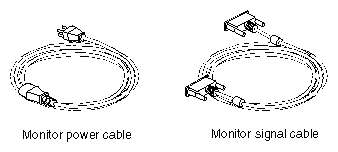
The monitor ships with two cables, as shown in Figure 2-1: a monitor power cable and a monitor signal cable (to connect the monitor to the workstation).
Follow the steps in this section to connect the monitors in a side-by-side configuration. If you want to configure the monitors in a stacked configuration, see “Connecting Cables to the Monitors in a Stacked Configuration”.
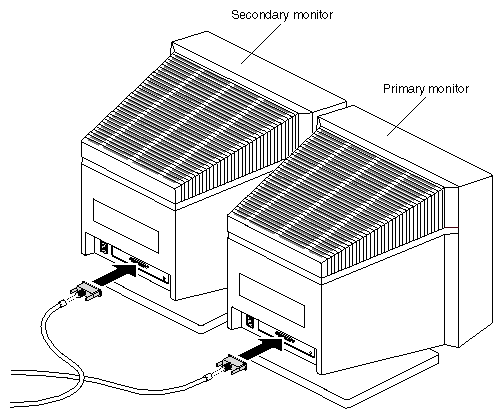
Facing the front of the monitors, place the primary monitor on the left and the secondary monitor on the right. The secondary monitor is the monitor that is part of the Dual Head shipment.
Connect one end of each monitor signal cable to the connector on the back of each monitor, as shown in Figure 2-2. Connect and tighten the thumbscrews on both sides of the connector.
Connect the primary monitor signal cable to the primary graphics board set (in slots A and B), as shown in Figure 2-3. The primary graphics board set is toward the top of the Silicon Graphics Octane2 workstation.
Connect the secondary monitor signal cable to the secondary graphics board set (in slots C and D), as shown in Figure 2-3. The secondary graphics board set is toward the bottom of the Octane2 workstation.
Tighten the thumbscrews on both sides of the connectors.

Note: It is important that you connect the monitor cables to the correct monitor connectors (that is, primary and secondary) on the Octane2 workstation. Otherwise your cursor movements between monitors will be confusing.

You are finished connecting the monitor signal cables. Go to “Connecting the Power Cables”.
Follow the steps in this section to connect the monitors in a stacked configuration.
| Note: If you use the stacked configuration, you must reconfigure the software. See Chapter 3, “Installing the Software and Using the Dual Head System”, for instructions on reconfiguring the software. |
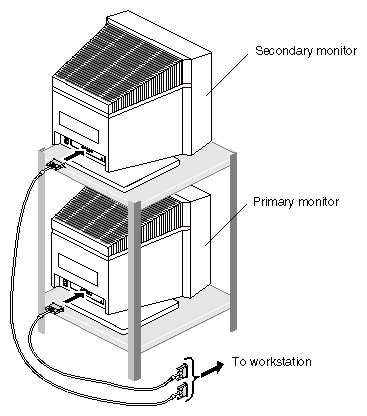
Place the secondary monitor on a surface above the primary monitor. The secondary monitor is the monitor that is part of the dual head shipment.
Caution: Do not rest the secondary monitor on the primary monitor. Place it instead on a bookshelf or similar structure above the primary monitor. Connect one end of each monitor signal cable to the connector on the back of each monitor, as shown in Figure 2-4. Connect and tighten the thumbscrews on both sides of the connectors.
Connect the primary monitor signal cable to the primary graphics board set in slots A and B, as shown in Figure 2-5. The primary graphics board set is toward the top of the Octane2 workstation.
Connect the secondary monitor signal cable to the secondary graphics board set in slots C and D, as shown in Figure 2-5. The secondary graphics board set is toward the bottom of the Octane2 workstation.
Tighten the thumbscrews on both sides of the connectors.
Note: It is important that you connect the monitor cables to the correct monitor connectors (that is, primary and secondary) on the Octane2 workstation. Otherwise your cursor movements between monitors will be confusing.
You are finished connecting the monitor signal cables. Go to “Connecting the Power Cables”.
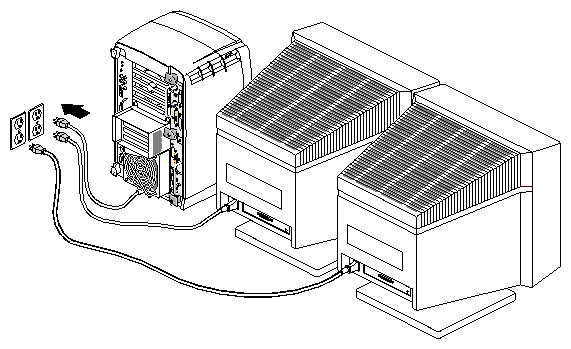
Connect the power cable for each monitor as follows:
Connect the female end of the power cable to the power connector on the back of the monitor, as shown in Figure 2-6.
Plug the male end into a three-prong grounded electrical outlet.
Turn on the primary monitor and then the secondary monitor. The power switches are located on the front of each monitor in the lower right corner. The LED on the switch lights up when the monitor is powered on.
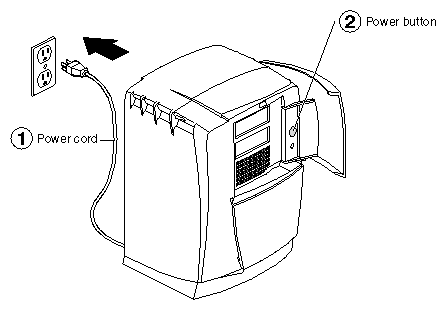
Note: Be sure to turn both monitors on before turning on the Octane2 workstation. Plug the Octane2 power cord into an electrical outlet, as shown in Figure 2-7.
Push the power button on the front of the Octane2 workstation, as shown in Figure 2-7.
You are finished connecting the monitors and are ready to install the software.
If you have a problem with your system, see Chapter 4, “Troubleshooting”.