This chapter describes how to set up and operate your SGI TP900 storage system in the following sections:
Remove the storage system from the packaging container and check that all accessories are included. Inspect the packaging container for evidence of mishandling during transit. If the packaging container is damaged, photograph it for reference. After removing the contents, keep the damaged container and the packing materials.
Inspect the storage system and accessories for damage. If the contents appear damaged, file a damage claim with the carrier immediately. For installations under U.S. auspices, notify the Customer Support Call Center (CSCC) for any missing, incorrect, or damaged items. Elsewhere, follow local policies.
To connect a power cord to power supply modules, follow these steps:
For redundant configurations, attach the bifurcated power cord to the power supply modules.
Attach the power cord to the in-line IEC connector.

Note: These power-splitting cables are provided so that the system is operated from a single power source, thus providing a single point of disconnect.
A standby LED on the ESI/Ops panel indicates whether AC power is present.
For non-redundant systems using one power supply module, connect the power cord to the power supply module and to the power source.
Perform these checks to ensure that a safe grounding system is provided:
If a rack distribution system is being used, perform these tasks:
Ensure power is removed from the rack.
Connect the supplied power cord to the rack distribution and the enclosure.
If a direct connection is made with the power cord, ensure that it is connected to the enclosure.

Caution: Some electrical circuits could be damaged if external signal cables or power control cables are present during the grounding checks. Check for continuity between the earth pin of the power cord on one of the power supply modules (or rack inlet) and any exposed metal surface of the SGI TP900 enclosure.
This section explains which of the connectors on the I/O modules should be used to connect external Ultra-3 SCSI-compatible cables.
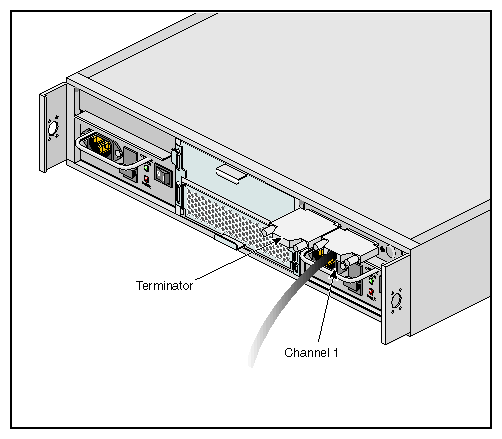
As seen from the rear of an I/O module, the connector on the right-hand side connects to channel 1 (device bays 1/1, 2/1, 1/2, 2/2). The connector on the left-hand side connects to channel 2 (device bays 1/3, 2/3, 1/4, 2/4). This applies to I/O modules installed in either location (1/1 or 1/3).
Connect the interface cable to the channel 1 connector and attach a terminator to the other I/O connector, as shown in Figure 2-1.
| Caution: External termination must be fitted to the unused I/O connector to ensure termination of the SCSI bus. I/O modules do not contain any bus termination. |
Connect an interface cable to the channel 1 connector on I/O module 1/1, and then connect another interface cable to the channel 2 connector on I/O module 1/3, as shown in Figure 2-2. Attach terminators to the two unused I/O connectors.
| Caution: External termination must be fitted to all unused I/O connectors to ensure termination of the SCSI bus. I/O modules do not contain any bus termination. If you are using only one of the two I/O modules, a termination is required only on the connector that corresponds to the channel being used, as shown in Figure 2-2. |
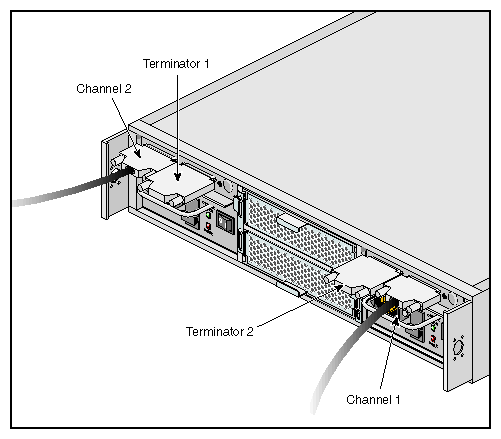
 | Important: In a 2 x 4 configuration, the termination for each channel is located on the other I/O module from where the interface cable is connected. For example, the terminator for channel 1 is located on the left I/O module (1/3), whereas the interface cable is connected to the right I/O module (1/1). See Figure 2-2 for an illustration of the proper cable and terminator configuration. |
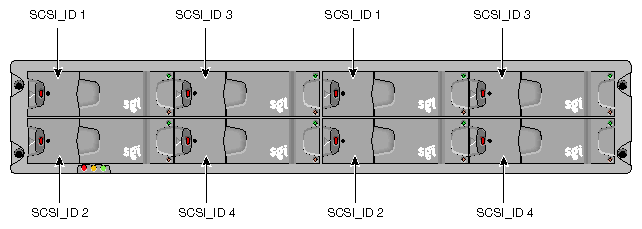
This section shows the SCSI_ID base address for each drive in 1 x 8 and 2 x 4 configurations. See “Storage System Bay Numbering Convention” in Chapter 1 for the drive module numbering convention.
In a 1 x 8 configuration with a loopback module installed, the single I/O module (1/1) controls the range of all the drives. Figure 2-3 shows the SCSI_ID base address for each drive.

In a 2 x 4 configuration, the range defined by I/O module 1/3 controls the IDs of the right 4 drives (1/3, 1/ 4, 2/3, 2/4), and I/O module 1/1 controls the IDs of the left 4 drives (1/1, 1/2, 2/1, 2/2). Figure 2-4 shows the SCSI_ID base address for each drive.
Follow these steps to power on the enclosure:
| Caution: Before powering on the enclosure, ensure that all the modules are firmly seated in their correct bays. Do not operate the subsystem until the ambient temperature is within the specified operating range. If the drives have been recently installed, ensure they have had time to acclimatize before operating them. |
Apply AC power to the enclosure. Turn the power supply module(s) switch to the ON position. The green Power Output LED should be lit and the red Fault LED should be off.
Note: In a dual-PSU system, it does not matter which PSU is powered on first. All LEDs on the ESI/Ops Panel should be lit green, and the disk drive motors should start when the enclosure power is activated.
Note: All LEDs on the ESI/Ops panel should be lit green when power is applied, which indicates that the system is functioning correctly. If any show amber, then a problem exists. See Chapter 4, “Troubleshooting” for troubleshooting information.
All drives in the enclosure should automatically start their motors after power is applied. If this has not occurred, there may be a power problem (a power fault indication would normally be active).
To power off the enclosure, switch off the power supply modules installed in the enclosure.
Each drive carrier handle has an anti-tamper lock, which is accessed through the small cutout in the latch section of the handle. Drives are supplied with the locks set in the unlocked position. A lock key is provided with the system.
Follow these steps to activate the locks:
Carefully insert the lock key into the lock in the handle. See Figure 2-5 for the location of the anti-tamper lock.
Rotate the key in a clockwise direction until the indicator is visible in the aperture beside the key.
Remove the key.
Repeat this procedure for each lock that you want to activate.

To de-activate a lock, carefully insert the lock key into the lock in the handle, and rotate the key in a counter-clockwise direction until the indicator is no longer visible in the aperture beside the key.
| Note: A drive carrier cannot be installed if its anti-tamper lock is activated outside of the enclosure. |