This chapter explains how to use TPM to configure and monitor your external RAID disk subsystems.
| Note: The GUI screens vary according to TP9100 model (1Gb FFX RAID Controller or 2Gb FFX2 RAID Controller) and the firmware level installed on the RAID controller. Where the screens are different, both are presented and explained. |
After you successfully log on to TPM, the main menu is presented (see Figure 3-1).
| Note: In many of the menus and screens shown in this document and presented by the software, additional information in the menu or screen is shown that may not appear in the body of the document. Be sure to read all information in each menu or screen before taking action on a particular menu. |

Figure 3-1 shows a portion of the main menu window that appears once you log on. The main menu windows are different for firmware. The differences will be explained as each menu item is explained in subsequent sections of this chapter.
It is a good idea to disable the browser menu buttons when you run TPM because the Back, Reload (Netscape Navigator), and Refresh (Internet Explorer) buttons do not work with TPM. In fact, using these buttons may put the TPM application in an undesired state. Instead, use the buttons and links that TPM presents at the bottom of each screen.
The main menu window has the following principal areas, with the associated explanations on the indicated pages:
This section lists the new firmware and TPM features.
The following lists features for the 9.03 firmware release.
SMART 6 Support/Disk Drive Predictive Failure Analysis
This firmware feature allows users to enable or disable reporting of Predictive Failure Analysis (PFA) events by disk drives, set the frequency of the interval used to poll individual drives for PFA events, instruct the controller as to what action should be taken regarding a disk that reports a PFA event, and scan all drives as a one-time maintenance check.
Rolling Upgrade
Starting with the 9.03 firmware release, controller firmware may be upgraded to later firmware releases without interruption on duplex RAID configurations. This scheme utilizes the failover/failback capability of the TP9100 to upgrade the controller firmware of one of the two controllers. Once failback has occurred, “Autoflash” is utilized to upgrade the firmware of the second controller. Performance can be affected during a rolling upgrade.
New drive sizing algorithm
A new drive sizing algorithm reduces the maximum amount of capacity that the RAID controller truncates from disk drives larger than 80GB. Note: The new drive sizing algorithm is used only on new configurations where there is no previous configuration data (no logical units created).
The following lists features for the 8.40 and 8.50 firmware releases.
AutoFlash
If a replacement controller (in a duplex configuration) has a different firmware image than the replaced (failed) controller, the replacement controller is automatically reflashed to match the firmware level of the surviving controller.
F_Port
Pre-8.x firmware supports controller attachment to an FL_port on a switch (a server or switch port that implements a FC-AL). With 8.x and later firmware, a point-to-point connection to an F_port on a switch and an N_Port on a server is supported. Point-to-point connections are higher performance connections than FC-AL connections.
SANmapping-256
SANmapping will now support up to 256 host nodes (was 64 host nodes). The number of LUNs supported (across multiple controller pairs) remains unchanged.
Selectable LUN deletion
Any LUN within an array can be deleted regardless of the order in which it was created.

Note: Selectable LUN deletion requires TPM 1.4 and 8.40 or later RAID controller firmware.
The following lists features for the 7.78 firmware release on the FFx Controller.
Reboot On Crash
This parameter controls the behavior of the Automatic Restart on Failure feature, and sets the following values:
Maximum number of times a controller attempts automatic restart to recover from firmware detected errors
Minimum time interval that the controller must operate before refreshing the number of restart attempts
When a controller reaches the maximum restart attempts, the automatic restart feature becomes disabled until the value is refreshed. Any subsequent firmware detected errors require manual intervention to recover the controller. Possible values for the maximum automatic restart attempts are 0 to 15 attempts (the default setting is 3). Possible values for the time interval between refreshing the number of restart attempts are DISABLED (never reset automatically) to 7 days.
Debug Dump
Debug Dump is enabled by default. When enabled, this feature records controller state information when an abort occurs. After the abort has completed, the abort information can be retrieved and analyzed to help determine why the abort occurred. The information is generated while a controller abort is in progress and recorded to NVRAM and a disk drive. TPM would then be used to retrieve the debug dump.
Hot Spare Polling
To increase data availability, the controller periodically reads and writes to online spare drives to make sure they are operational. The polling period is not user definable and is set to once per 24 hours.
Instant RAID Availability (Background Initialization)
Background initialization makes the system drive instantly available for host read and write access. This parameter is enabled by default.
SAN Mapping Enhancement
SAN mapping tables store up to 64 host WWNs. With 7.75 firmware, the WWN table was modified to enable the user to remove or delete unused host WWNs. The user can determine which host WWNs are obsolete and need to be removed from the WWN table. As WWNs are removed and the WWN table updated, any WWNs following those deleted are moved up to fill the vacancies in the WWN table.
No Controller Reset Requirement on LUN Addition or Deletion
Controller reset is no longer required when deleting or creating new system drives or configurations.
No Controller Reset Requirement on Enclosure Addition
This feature allows users to add disk enclosures (one or more) to a configured system while the system continues to operate. After the enclosure or enclosures have been added to the system, this feature starts the SES monitoring process for the new enclosure. The user can then configure the additional disk capacity without restarting the system.
The Configuration Function menu has the following selections, with the associated explanations on the indicated pages:
“Create/Destroy/Expand Logical Drives (Configuration Function Menu)”
“Initialize LUN(s) in Foreground (Configuration Function Menu)”
“Initialize LUNs in Background (Configuration Function Menu)”
“Configure Host-to-LUN Mapping (Configuration Function Menu)”
“Installing Device Drivers for New LUNS (Configuration Function Menu)”
To view a table of all devices and RAID subsystems, click the Select physical devices link under Configuration Functions in the main menu. The dialog box shown in Figure 3-2 appears.

By activating the desired checkbox under the Select column and clicking the Select button, you can select which RAID subsystem you wish to configure or monitor. You make your selection by choosing the physical device path associated with any ID/LUN combination displayed.
If you are running in a dual-controller configuration (in redundant mode), make sure to select controller 0 (C0). An example of this is DAC960FFx(0).
| Note: All configuration and monitor operations must be through controller 0. |
It is important for the administrator to know how physical device selection works, because it can serve as a good general debugging tool in the event that your computer does not “see” a specific LUN. The algorithm is the same, regardless of the operating system. In summary, TPM executes the following steps:
Creates a list of all SCSI and FC device drivers.
Issues a standard SCSI inquiry command to report the drive Vendor ID and Product ID fields. If the inquiry fails, TPM assumes the device driver is no good, and skips to the next driver in the list.
Issues the vendor-specific Inquiry command to determine if the device is a logical drive within a RAID subsystem. If so, it issues additional commands to report which controller and World Wide Name (WWN) is associated with that LUN.
Builds the record and reports what it has discovered if either the Vendor or Product fields are not blank.
If a device does not display, it is probably because the device driver is either missing or incorrect. A device may be missing, depending on what OS you have, and what you did to create drivers in the first place. Assuming your FC host adapter is properly installed and operational, and you have exclusive access to your host server, choose from the following:
If running IRIX, issue the scsiha -p bus# command, followed by the ioconfig -f /hw command. For more information, see the scsiha(1m) and ioconfig(1m) man pages.
If these remedies fail, a device might be masked because the controller is doing it intentionally. This occurs if the Affinity, LUN, or SAN mapping is used to make one or more LUNs invisible to a particular host adapter or controller. If you can, go to the main TPM menu (see Figure 3-1) and use the Configure Host-to-LUN Mapping selection under Configuration Functions to see if that is the problem. Otherwise, you may have to contact your SGI customer support representative to resolve the problem.
The definition of each field in the Select Physical Device dialog box is given in Table 3-1.
Table 3-1. Select Physical Device Field Definitions
Field | Definition |
|---|---|
Select | Selects which RAID subsystem you wish to configure or monitor. |
Physical Device Path | The physical device path is the pass-through device driver name (/hw/scsi/) for that particular device. |
Controller, Channel, ID, LUN | These are additional fields reported by the OS that help identify the device driver. |
Type | TPM reports all TP9100 RAID devices. |
Vendor ID Product ID | The Vendor ID and Product ID parameters are returned by a standard SCSI Inquiry. On TP9100 1Gb/sec FC RAID Controllers with 7.75 firmware: The first field of the Product ID typically starts with DACAMRB. The second field describes the type and size of RAID LUN you have. For example, the selected LUN at /hw/scsi/sc2d0l0 (first row of Figure 3-2 ) points to a 102,996MB RAID-0+1 system disk. The digits before the “B” indicate the number of MB, and the character after the “B” indicates the type of RAID. RAID types of 0,1,3, and 5 indicate RAID-0, RAID-1, RAID-3, and RAID-5, respectively. A RAID type of 6 indicates RAID 0+1, and a RAID type of 7 indicates JBOD. On TP9100 2Gb/sec FC RAID Controllers: The Vendor ID will be SGI and The Product ID field will be TP9100 FFX2. Logical Unit 0 information for RAID type and size of LUN are not provided. |
Controller (Slots) Address | This parameter shows the model of the controller, followed by the slot number in the subsystem in parentheses, followed by the unique MAC address for that controller, which is assigned by the controller manufacturer. |
| Note: The Linux select device screen will differ from the IRIX select device screen. Some of the above fields will differ and others are not available and will contain N/A. |
To view or change the status of the drives, select Modify Disk Device Status under the Configuration Function menu. The dialog box shown in Figure 3-3 appears.
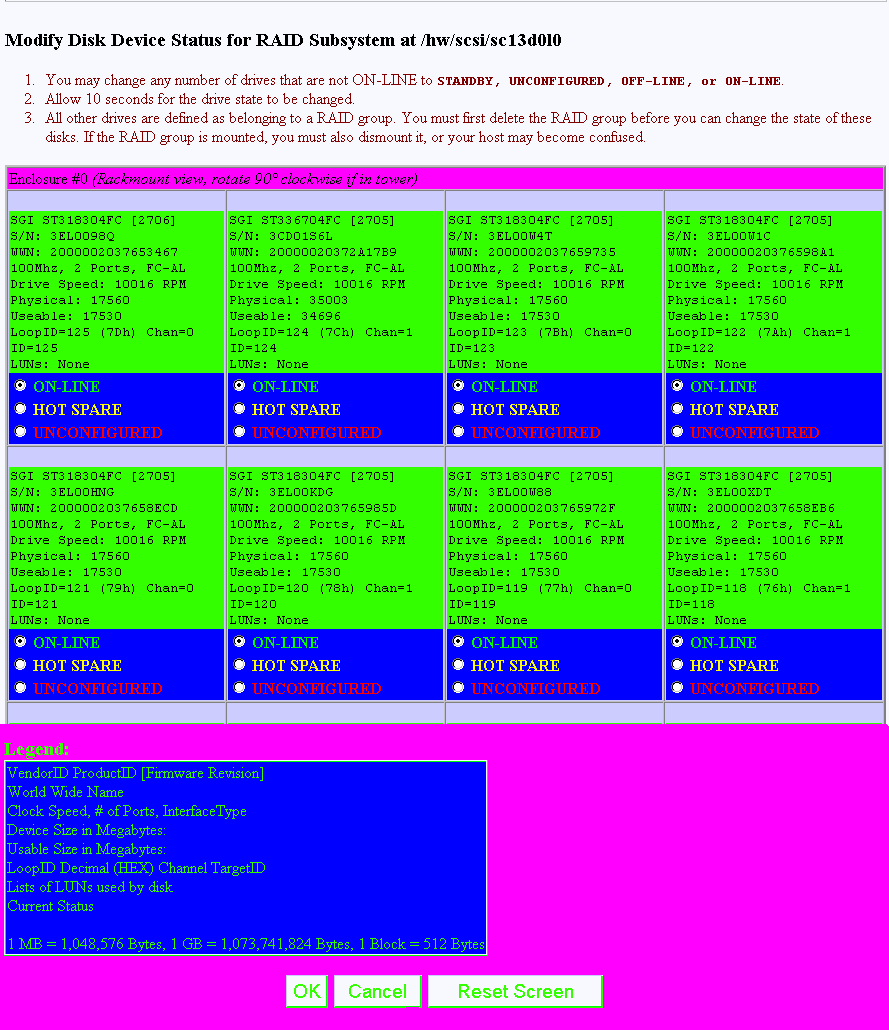
The Modify Disk Device Status dialog box allows you to not only quickly view status of the drives, but also to define hot spares. Each drive in Figure 3-3 maps to the same physical row and column of the disk drive chassis. If you are also using expansion enclosures, additional drive matrices are displayed for each chassis attached to the RAID enclosure.
Click on a button (or buttons) to change the drive state, then click OK at the bottom of the screen to activate the changes. You would typically use the buttons as follows:
Click ON-LINE to put a drive into the online state.
Click HOT SPARE to turn one or more drives into hot spares.
Click UNCONFIGURED to change the state of a drive from online to dead (a dead UNCONFIGURED drive acts as though it is not even plugged in). This option is valid for TPM 1.0 to TPM 1.4; the UNCON FIGURED radio button has been removed in TPM 1.5 and later releases.
Changes are effective immediately, and no reboot is required. It is safe to perform these changes at any time (providing you are not taking a mounted LUN offline by marking its drives as UNCONFIGURED, of course).
When you click OK after having made your selections, you are returned to the main menu. If you click Reset Screen, all radio buttons that you have changed are set back to their previous states.
The definition of each field in the Modify Disk Device Status dialog box is given in Table 3-2.
Table 3-2. Modify Disk Device Status Field Definitions
Field | Definition |
|---|---|
Make/Model/ [Firmware] | This field returns the SCSI vendor ID, product ID, and firmware revision for each drive. For proper operation, it is strongly recommended that each drive in a LUN have the same make, model, and firmware release. |
Serial Number | The drive serial number. |
Worldwide Name | A 64-bit identifier assigned to a particular drive. It is used to distinguish one drive from another. The WWN may be used for network management purposes or whenever drive identification is needed. |
Fibre Channel Interface Speed | The drive Fibre Channel interface speed in gigabits per second. |
Number of Ports | The number of ports used by each disk. The number should normally be 2 for FC and 1 for SCSI. |
Interface | The drive controller interface. FC-AL = Fibre Channel Arbitrated Loop. |
Drive Speed | The spindle speed in RPM of the hard disk drive. |
Physical | The physical number of blocks and megabytes on the disk. 1 MB = 1024 * 1024 bytes, and one block = 512 bytes. |
Usable | The usable number of blocks and megabytes on the disk. These numbers are always less than the physical numbers because the RAID controller allocates a portion of disk space for its configuration on disk (COD). Usable sizes vary, based on the version controller firmware and COD versions. |
LoopID | A unique hexadecimal number for a particular disk drive. The LoopID is basically the equivalent of a SCSI ID. |
Channel/TargetID | The channel number and target ID for a drive. |
List of LUNS | A list of the logical drives that are using some or all of the space on a disk drive. |
Status | The Status area is color-coded. In addition to HOT SPARE and ON-LINE, it is possible that the drive could be in another state, such as UNCONFIGURED, OFFLINE, ONLINE, REBUILD, and EMPTY. |
Finally, TPM does not care to which state you change a drive, so use common sense. If the Modify Disk Device Status screen shows that a drive is used within a LUN, and you change the drive from ON-LINE to some other state, data loss could result.
To set up new drive configurations or to add, delete, or expand drives in an existing configuration, select Create/Destroy/Expand Logical Drives under the Configuration Function menu. The dialog box shown in Figure 3-4 appears.
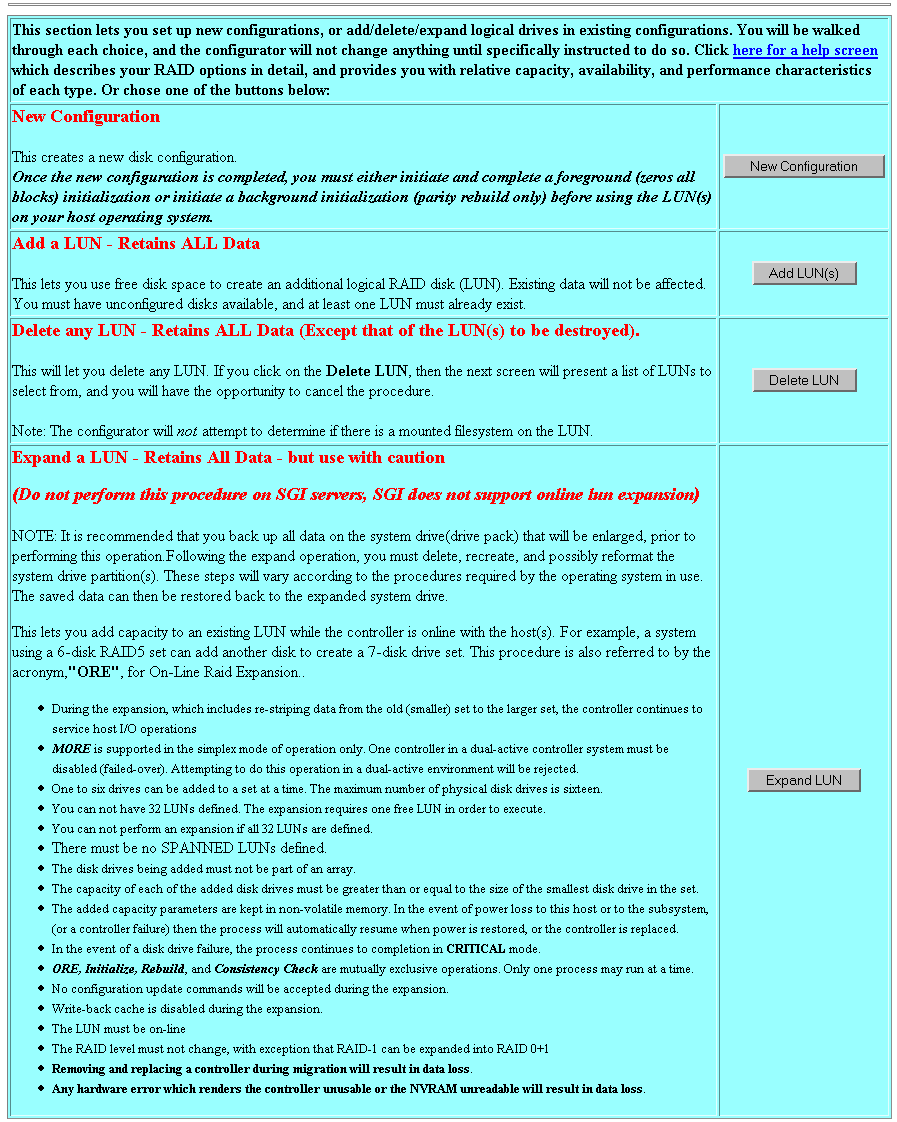
The Create/Destroy/Expand Logical Drives dialog box contains the following buttons:
New Configuration Allows you to create a new disk configuration. If LUNs have already been defined, they must be deleted.
Add a LUN Allows you to use free disk space to create one or more additional LUN(s).
Delete Last LUN Allows you to delete the last LUN that was defined.
Expand a LUN Allows you to add capacity to an existing LUN.
Note: At the top of the screen is a link marked Click here. Clicking this link opens a window that provides detailed information on each type of RAID, along with performance characteristics and data reliability considerations. If you have not had factory training on the controllers, this information will probably be quite useful.
The following sections explain how to use these buttons in more detail.
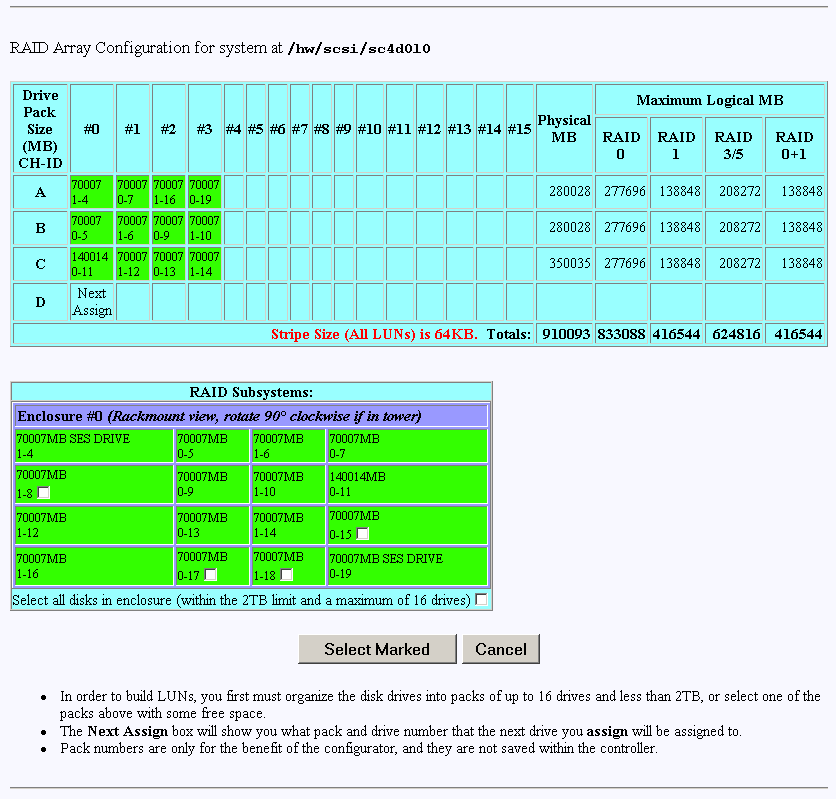
When you click New Configuration, the screen appears as shown in Figure 3-5.

You may create a new LUN configuration if presently there are no configured LUNs in your array. Drive packs can be spanned, which provides the ability to configure multiple or parts of multiple drive packs as one system drive. This allows 16 physical disk drives to be configured as a system drive. A system drive can span up to 16 drive packs. The controller creates the spanned system drive during the array configuration process. Data is striped across the drive packs of the spanned system drive. See the section titled “Creating and Defining New LUNs” for more information.
Creating Drive Packs
The primary rules for creating packs are listed below. More details on how to do this are found in subsequent sections of this document.
The maximum number of packs that can be combined into a LUN is 16.
1 to 16 disk drives can be combined into a pack.
The number of drives in a pack determines the possible RAID levels.
If spanning packs into a LUN, all packs must have the same number of disks.
Any drive of any size may be used in a pack, but the amount of usable storage will be computed as the smallest disk times the number of drives in the pack.
Note: Do not mix RAID 0 (non-redundant) and RAID 1,3,5, and 0+1 (redundant) LUNs within a pack (system drive).
Creating and Defining New LUNs
System drives are the logical devices (storage volumes) that are presented to the operating system. During the configuration process, after physical disk drive packs are defined, one or more system drives must be created from the drive packs. System drives have the following properties:
More than one system drive can be defined on a single drive pack. Or, a system drive can span 16 packs.
The minimum size of a system drive is 8 MB. The maximum size is 2 TB (see the note on the next page).
Up to 32 system drives can be created.
Each system drive has a RAID level which is selectable (subject to the number of disk drives in the system drive's pack).
Each system drive has its own write policy (write-back or write-through).
Each system drive has its own affinity or LUN mapping.
Note: SGI does not support MORE operations on the IRIX operating system. SGI does not support spanning of non-redundant (RAID 0) and redundant (RAID 1,3,5, and 0+1) LUNs together within a drive pack (system drive). Redundant (fault tolerant) RAID levels may be spanned. Note: TPM will allow a LUN capacity to be created of 2 terabytes.
On SGI IRIX operating system levels prior to 6.5.15, the disk utility fx has limited support of up to 1 terabyte for a single LUN, or volume (.999 terabyte (2147483647 blocks [1099511627264 bytes])).
SGI IRIX levels 6.5.15 and later have the required fx and IRIX infrastructure changes (for example, prtvtoc, and so on) to support a 2 terabyte LUN (1.999 terabytes (4294967295 blocks [2199023255040 bytes])).
Please take this into account ahead of time and do not create and initialize system drives (LUNs) that will exceed the fx support level of your system.
Follow this procedure to create and define new LUNs. More details on how to do this are found starting in Figure 3-6 of this manual.
| Note: The RAID Subsystems enclosure view will differ depending on the TP9100 system that TPM is configuring. TP9100 (1Gb TP9100) will contain checkboxes for 12 drives. TP9100 (2Gb TP9100) will contain checkboxes for 16 drives. Most figures used in this manual are 2Gb TP9100 based. |
Activate the desired checkboxes in the RAID Subsystems area of the screen shown in Figure 3-5 and click Select Marked to group the desired drives into a pack.
The packs exist only for configuration purposes, and are used to group drives together for easier configuration.
To continue assigning drives into packs, repeat step 1 until all desired drives are assigned into packs.
After at least one pack has been created, you can use the Select Previous Pack button to reconfigure a previously configured pack.
After you have finished creating the desired drive packs, use the Define LUNs button to create a system disk (LUN).
Select the drive pack(s) that you want to define as the new LUN and click Configure New.
Select the desired RAID level for the LUN you are creating and click Apply.
To continue building LUNs that incorporate drives in other packs, click Select Pack(s) and repeat the process of defining LUNs and their corresponding RAID levels and usable MB.
Update the RAID controller with the new LUN information.
The next sections explain how to execute these steps.
Group the First Set of Drives into a Pack
To group the first set of drives into a pack, follow these directions:
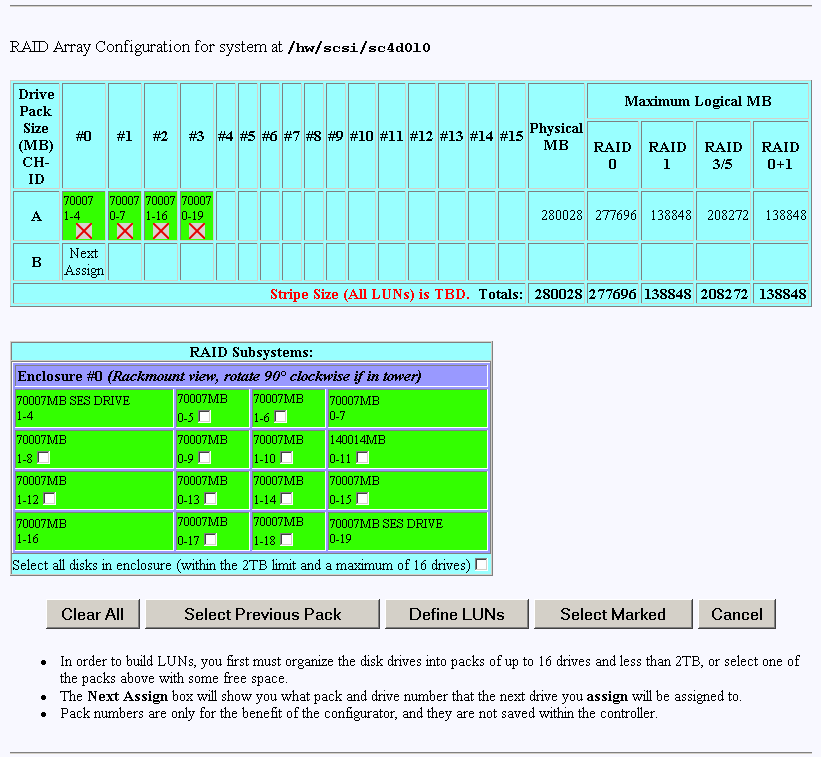
Activate the desired checkboxes in the RAID Subsystems area of the dialog box (see Figure 3-5) and click Select Marked to move drives from the map shown in the RAID Subsystems area of the screen into Pack A.
The top area of the screen contains a table that shows the drives assigned to drive pack A. Next Assign now appears in a new row to indicate that drives can now be selected and assigned to drive pack B through a similar process.
As you assign drives to the pack, the screen changes to the example shown in Figure 3-6.
Figure 3-6 shows that four drives have been assigned into drive pack A, which could become a RAID set. Every time a set of drives is assigned, the table cell labeled Next Assign moves to the next row down, where a new drive pack can be created.
To remove a drive from a pack, click the undo box , and the remaining drives in the pack shift to the left, while the removed drive reappears with a cleared checkbox in the RAID Subsystem table. Use the Select Previous Pack button to reconfigure the drive arrangement in an earlier drive pack.
Nothing is saved for several more screens, and you may cancel at any time by pressing the Cancel button. Use the Clear All button to unassign all drives from the drive packs.
Note: You do not have to allocate all the drives to packs (or LUNs). If you choose not to configure certain drives, they may be used at any time when you click Add LUN(s) (see Figure 3-4).
Group the Remaining Drives Into Packs
To create remaining drive packs, continue activating drive checkboxes in the RAID Subsystem area of the dialog box and using the Select Next Pack button as necessary until the drives are grouped as desired into separate drive packs.
When you are finished, the screen looks similar to the one pictured in Figure 3-7. The drives have been grouped into three separate drive packs.

Defining a LUN Using the Drive Packs
To define a LUN, follow these steps:
Click Define LUNs.
The screen shown in Figure 3-8 appears.
Check the boxes at the left (A, B, or C) to select one or more packs to combine into a LUN.
To create a LUN from drive pack A, for example, activate the A box and click Configure New at the bottom of the screen.
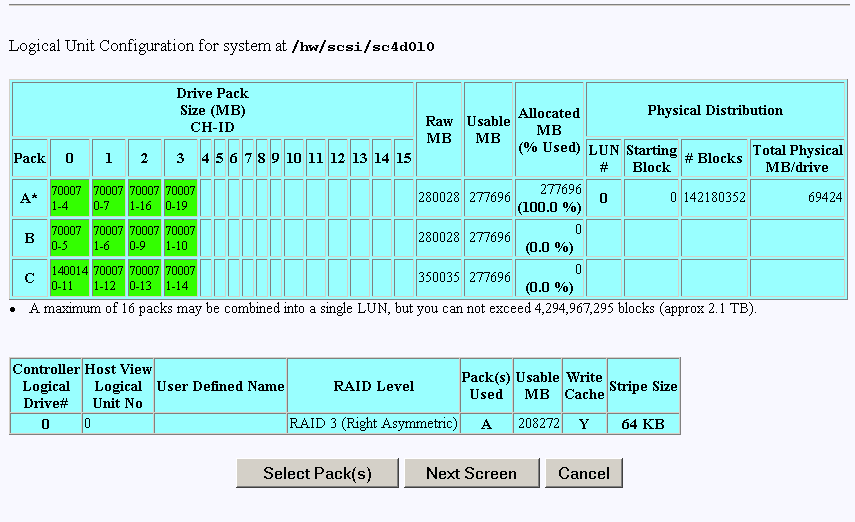
The screen in Figure 3-9 appears.
These dialog boxes show that a Logical Drive #0 (LUN 0) is being created that allows you to select the RAID level and usable megabytes.
Enter a name for the LUN in the User Defined Name field.
Select the desired RAID level from the dropdown box shown.
In this example, leave All in the Usable MB field, and click Apply to actually create the LUN.
The screen shown in Figure 3-10 appears.
The right-hand side of the table shows how the LUN is physically arranged on each disk drive.
To continue building LUNs that incorporate drives in other packs, click Select Pack(s) and repeat the process of defining LUNs and their corresponding RAID levels and usable MB.
Figure 3-11 shows how the screen appears after using all the drive packs to define three separate LUNS.


At this point, all the LUNs have been defined. Next, the RAID controller must be updated with the new configuration.
Updating the RAID Controller
To update the RAID controller with the new LUN configuration, follow these steps:
Press the Next Screen button.
Select a default mode of host access for all new LUNs being created. Do not set No Host Access, as this would make the LUN unavailable to the current host.
After selecting the default host access mode, Click YES to save the LUN configuration; otherwise click NO.
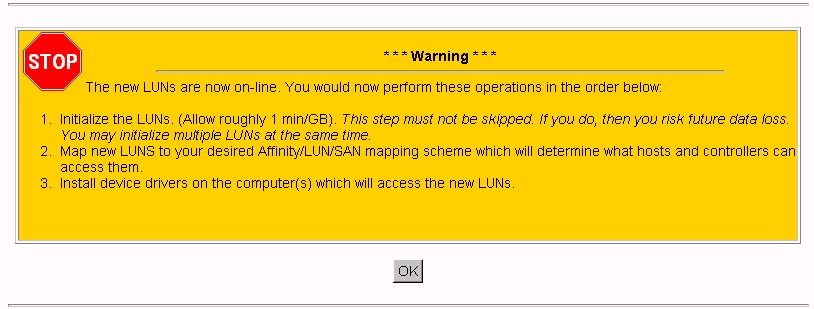
If all goes well, the screen shown in Figure 3-13 appears indicating that the new LUN(s) are online.
After you click OK on the screen shown in Figure 3-13, you are returned back to the main page. You must then follow these steps:
Install the device driver for the new LUN (see “Installing Device Drivers for New LUNS (Configuration Function Menu)”).
Initialize the LUNs (see “Initialize LUN(s) in Foreground (Configuration Function Menu)”).

Back at the main menu, select Create/Destroy/Expand Logical Drives under the Configuration Function menu. The screen shown in Figure 3-14 appears.
To add one or more LUNs, follow these directions:
Click Add LUN(s).
A screen similar to the one in Figure 3-15 appears.
To add a LUN to an existing configuration, at least one LUN must already exist. In addition, unconfigured disks must be available with enough disk space to create an additional LUN.
Follow essentially the same procedures as before listed under “New Configuration”.
The procedure that is followed and the screens that appear are similar to adding a new configuration to an unconfigured controller. The differences are as follows:
All previously defined LUNs and packs (which are actually used in LUNs) are displayed when selecting drives for packs. The allocated drives, however, do not have an empty checkbox in them (only unused disks have an empty checkbox).
You may not add a drive to an existing pack.
Note: SGI does not support LUN Expansion and MORE operations.
When you have finished defining the new LUN, click Next Screen.
The warning screen shown in Figure 3-16 appears.
Select a default mode of host access for all new LUNs being created. Do not set No Host Access, as this would make the LUN unavailable to the current host.
After selecting the default mode, click YES to add the LUN, or NO to cancel and go back to the main menu.
If you select YES, the confirmation screen in Figure 3-17 appears after a brief waiting period.
After you click OK on the screen shown in Figure 3-17, you are returned back to the main page. You may then follow the steps shown in the screen of Figure 3-17.
Use the Delete LUN button on the Create/Destroy/Expand Logical Drives screen (see Figure 3-14) to delete a LUN.
| Note: Any LUN can be deleted. |
To delete a LUN, follow these directions:
| Note: The following LUN deletion directions are valid for users using TPM 1.4 or later with 8.40 or later firmware only. Users with TPM 1.3 or firmware releases that do not support selective LUN deletion should refer to prior versions of this manual. |
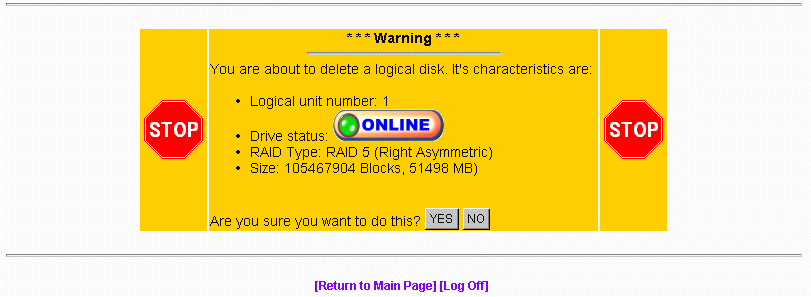
Select the LUN that you want to delete.
Click Delete LUN.
The warning screen shown in Figure 3-19 is displayed. This screen shows the size and characteristics of the last LUN that was created.
Click YES to delete the LUN immediately.
Click NO to return to the main menu.
The LUNs must be initialized before the operating system can use them. The LUNs can be initialized in the foreground or background. The TPM application automatically selects uninitialized LUNs for you and displays their status (INITIALIZED, UNINITIALIZED, or INITIALIZING).
To initialize one or more LUNs, follow these steps:
To initialize LUNS in the foreground, click Initialize LUNs on the main menu.
The screen shown in Figure 3-20 appears.
To initialize LUNS in the background (instant LUN availability), click Initialize LUNs in the background from the main menu.
As shown in Figure 3-20, several LUNs are shown as UNINITIALIZED.
Type YES in the boxes corresponding to the devices to initialize, and click Initialize at the bottom of the screen.
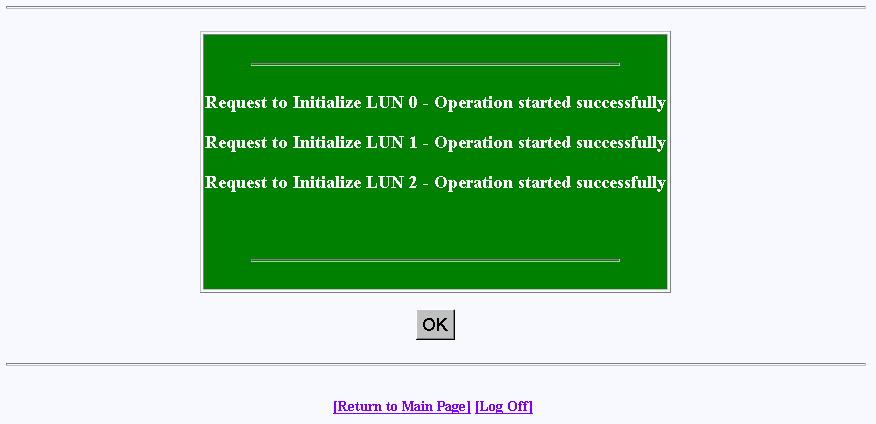
The initialization confirmation screen shown in Figure 3-21 appears.
To continue with the initialization of the LUNs shown on the screen, click OK.
A status screen similar to the one shown in Figure 3-22 displays how the procedure is progressing, and updates every 10 seconds.
The initialization procedure can be done at any time, and the controller(s) will service I/Os for other LUNs while this is in process. There is also a configurable parameter in the controller configuration that allows you to adjust how much controller CPU time to allow for background operations such as this.

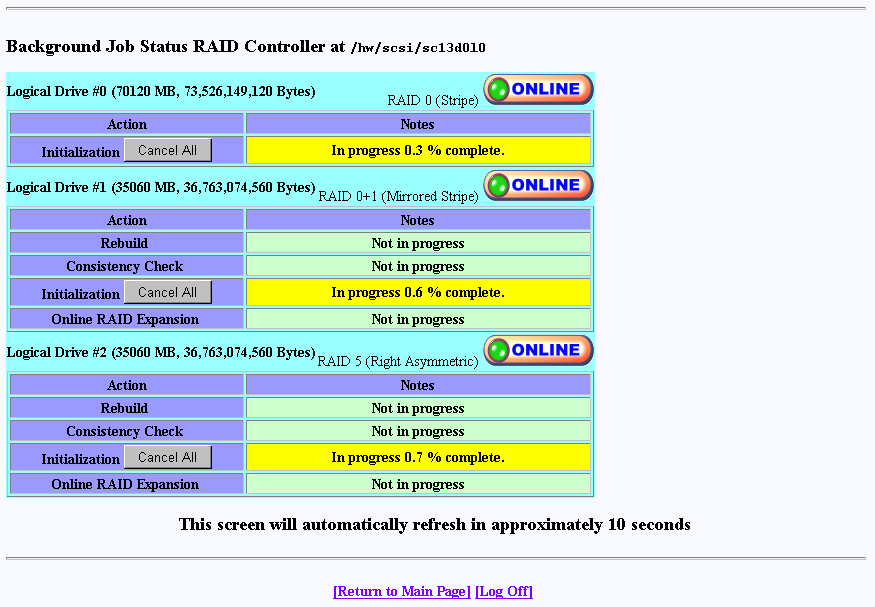
Background initialization makes uninitialized system drives consistent by setting the parity while allowing the host to have instantly available read and write access to the system drive.
| Note: Background initialization can only be performed on valid RAID levels (RAID levels 1, 3, 5, and 0 +1). |
To initialize LUNs in the background, follow these steps:
Click Initialize LUNs in Background on the main menu.
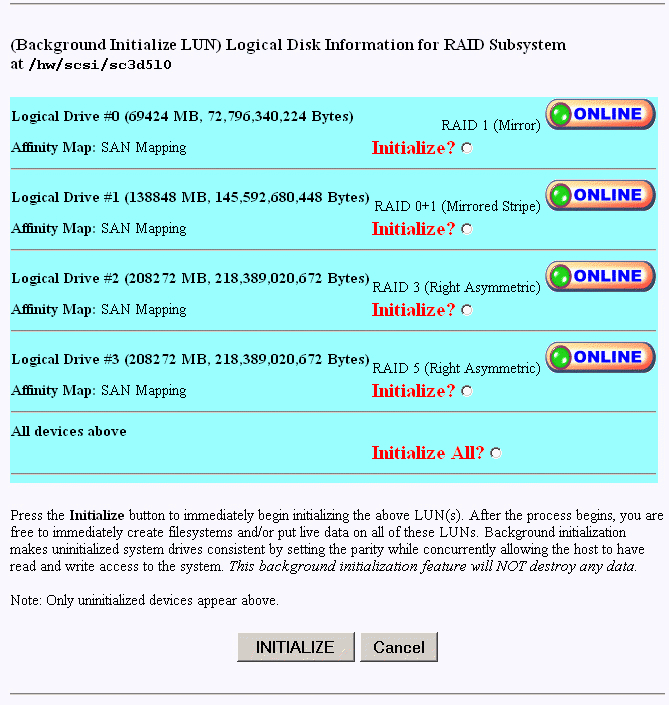
The screen shown in Figure 3-23 appears.
To select an individual Logical Drive to be initialized, select the Initialize radio button next to the desired Logical Drive.
To select all Logical Drives created to be initialized, select the Initialize All radio button.Once the Logical Drive or all Logical Drives are selected, click INITIALIZE.
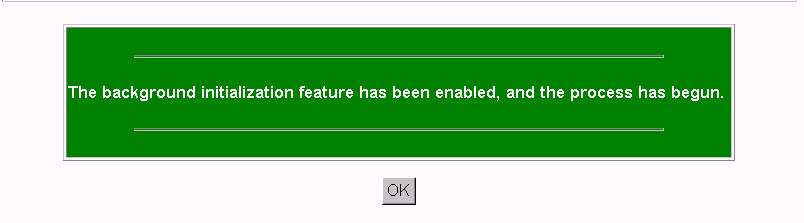
The screen shown in Figure 3-24 appears.
Click OK.
Background initialization now begins and initializes any uninitialized system drives one at a time, and is paused by any of the following operations:
Foreground Initialization
Consistency Check and Restore
Rebuild
If one of these operations is started while background initialization is executing, background initialization is paused until the interrupting operation is complete. Once paused, background initialization will only continue after a write operation to the LUN. The same is true of a controller reset. To avoid this, let the background initialization process complete on all logical drives created, prior to putting the RAID array online.
| Note: Performance is degraded during background initialization because every write requires access to all drives in the RAID group. Sites requiring optimal performance when running acceptance tests or running performances tests should take this into account and initialize LUNs in the foreground. Published performance levels are not guaranteed when background initialization are in process. |
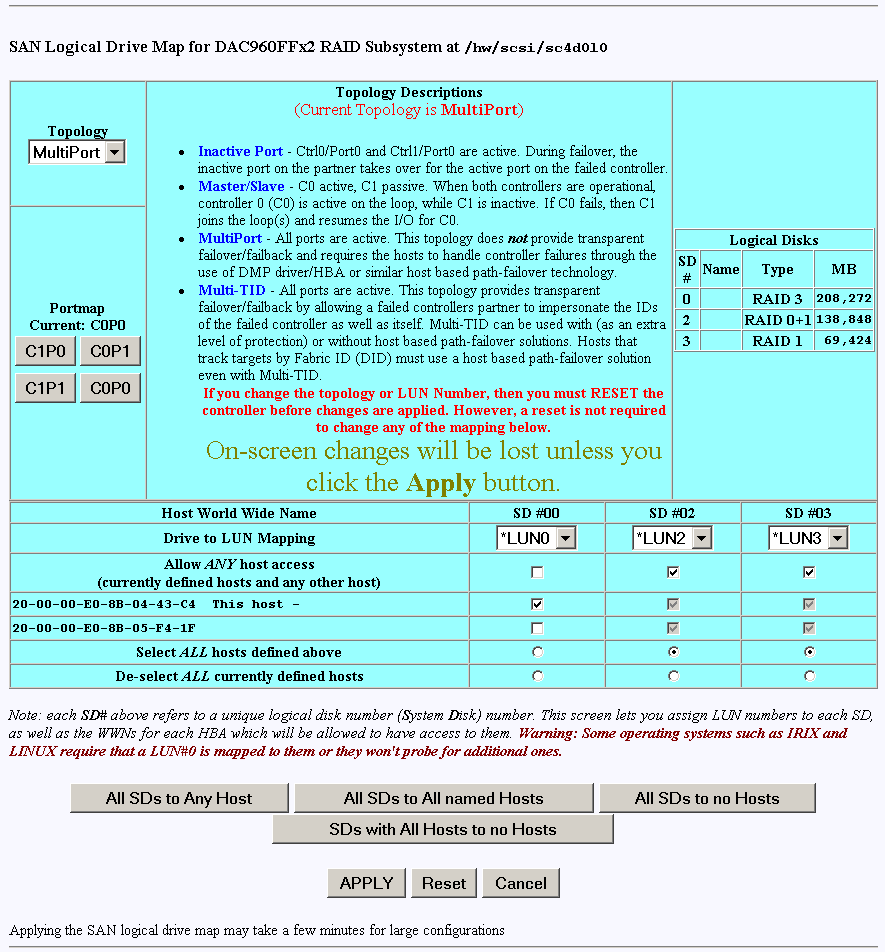
The Configure Host -to-LUN item on the Configuration Functions portion of the main menu (see Figure 3-1) allows logical drives to be made available or invisible to selected Fibre Channel host adapters.
RAID controllers offer several drive mapping techniques and configuration modes for many different environments. These configuration modes define which hosts see the logical disks, and the effects of a hardware failure. When you select Configure Host-to-LUN Mapping from the main menu, the dialog box shown in Figure 3-26 appears.
The mapping strategy currently used by the controller is indicated with (CURRENT). In the example of Figure 3-26, the SAN Map is the current mapping strategy.
| Note: SAN MAP is the only mapping strategy supported by the TP9100 RAID system. On FFX2 RAID Controllers, TPM 1.4 will not by default set the LUN affinity to all (allow all hosts), as prior releases of TPM did. |
Click SAN MAP to make any modifications to the mapping strategy. No changes are made until you complete the subsequent dialog boxes.
Heed these important warnings:
| Note: A RAID controller reset is required if you change the mapping type (for example, from SAN to Affinity), or the topology type within SAN mapping. You can, however, set mappings for one port, then select Apply. After you select OK and go back to the main page, select Configure Host to LUN Mapping again and set mapping for the next port. This will allow you to postpone the controller reset until you have all mapping configured. |
| Note: If you make a change to the mapping, be sure to consider how the new mapping might affect device drivers on attached systems. Depending on what you are changing, you might make the controller invisible to TPM. You also might make one of your host device drivers now point to the wrong LUN, which could result in data loss if the LUN is in use. In other words, TPM will not stand in your way if you do something to configure the system in an undesirable manner. |
| Note: Only the most experienced administrators should make changes in an online environment. |
The Storage Area Network (SAN) Mapping feature, also known as Host-to-LUN Mapping feature, restricts host access to logical drives. Each drive is granted only to a single host or group of hosts, providing limited security control of data in an environment where multiple hosts are connected to the controller.
The SAN mapping feature is intended for use in configurations in which multiple host computers attach to one or more controllers. This is also referred to as a SAN configuration. The host computers are attached to the controller(s) through a fibre channel arbitrated loop, FC hub, or FC switch. An example of fibre channel arbitrated loop configuration is shown in Figure 3-25.

Without host to LUN mapping, each host computer (1 through 3) has complete access to all four system drives. When a host system boots, IRIX operating systems might not automatically attempt to mount all of these system drives, but you still have a security risk, and the possibility that a user with root privilege will mount one of these disks, or attempt to create a file system on one of these disks.
By utilizing SAN mapping, however, each logical drive can be configured to be visible to a single host computer only. If you are using a volume mapping tool such as Veritas' Volume Manager, or Tivoli's (previously Mercury's) SANergy product, then you can safely concurrently mount file systems on these LUNs to any number of these three hosts.
The controller uses the World Wide Name (WWN) to uniquely identify host computers that have logged in to the controller. A list of valid hosts and their corresponding WWNs, is provided to external configurators in order to configure the mapping.
After logical drives are configured, the controller maintains a table of WWNs for each one. This table defines the hosts that are granted access to each system drive and the controller port and the LUN number. The controller uses the table of WWNs to determine access to a specific system drive. If a host sends a new command to the controller, the controller validates the WWN, LUN, and controller port prior to servicing the command. If the WWN, LUN, and port information are valid for the system drive, the requested command is completed normally. If the WWN, LUN, and port combination are not valid for the system drive, the command is completed with SCSI Check Condition status, with the sense key set to Illegal Request (05h) and the sense code set to Logical Unit Not Supported (25h).
There are three exceptions to the response to commands when the WWN, LUN, and port combination are not valid:
If the request is an Inquiry command, the controller returns the Inquiry data with the peripheral qualifier set to indicate that the target is capable of supporting the specified device type on this LUN, but no device is currently connected to that LUN.
If the request is a Report LUNs command, and the addressed LUN is 0, the controller completes the command normally, reporting only the LUNs accessible by the host requesting the command.
If the request comes from TPM, however, the command is processed normally by the controller. This allows a controller that is not configured to be reconfigured to operate correctly with the attached hosts.
SAN Mapping Topologies
The model of controller you use dictates what SAN Mapping topologies are supported. This manual covers all three possibilities (Inactive Port, MultiPort, and Multi-TID). Only one type of SAN topology can be active, and any changes to a topology requires a reboot for it to become effective. The topologies are:
Inactive Port. In this topology, Controller0/Port0 and Controller1/Port1 are active. During failover, the inactive port on the partner takes over for the active port on the failed controller.
MultiPort. In this topology, all ports are active. This topology does not provide transparent failover or failback and requires an alternate path driver to the host.
Note: The SGI supported topology for multi-path failover is Multi-Port. Use TPM software to set the topology. Multi-TID. In this topology, all ports are active. This topology provides transparent failover and failback, but should not be used in conjunction with an alternate path driver.

Caution: If two systems independently access the same volume of data and the operating system does not support file locking, data corruption may occur. To avoid this, create two or more volumes (or LUNs) and configure each volume to be accessed by only one system.
This manual is not designed to be a tutorial on the strengths, weaknesses, and required external hardware configuration to use for each topology for the various operating systems. The documentation here merely covers how to configure each of them.
| Note: Reset button is not a controller reset button. It is used if you make a mistake and need to reset all select buttons. |
Regardless of the topology, the bottom portion of the screen shown in Figure 3-26 will be the same. Administrators must first choose the topology that best matches the SAN environment, then configure the mapping. To change the topology, click the Topology drop down box, then press the Select button. The screen is then changed to contain the appropriate values for the selected topology and controller/port combination.
| Note: Your subsystem will probably have multiple controllers and ports. If this is the case, use the buttons in the Portmap area of the screen to configure the map for each of them (the topology type is the same for all ports). |
There are four buttons at the bottom of this screen that you can use when configuring SAN mapping. Instead of manually configuring the allowable host access for each logical unit individually, you can use these buttons to configure all the logical units at once. These buttons provide the following functions:
| All SDs to Any Host | This button selects the setting for all the logical units to allow any host access. | |
| All SDs to All named Hosts | Selecting this button allows access to all the logical units from any hosts that are listed in the SAN mapping screen. You can modify the list of named host ports through the Administrative Function “Modify/Purge Non-Volatile WWN Tables”, as described in “Modify/Purge Non-Volatile WWN Tables”. Host entries that appear in red are not valid. To purge these entries you use the Administrative Function “Modify/Purge Non-Volatile WWN Tables”, as described in “Modify/Purge Non-Volatile WWN Tables”. | |
| All SDs to no Hosts | This button clears the host settings for all of the logical units. | |
| SDs with All Hosts to no Hosts | This button clears the host settings for all of the logical units that are currently set to allow access to all hosts. |
You may find it useful to use the buttons to configure the settings of all of the SDs at once and then modify the settings of individual SDs as needed.
After all the changes have been made, click APPLY at the bottom of the screen.
The warnings given earlier in this section are repeated here:
| Note: A RAID controller reset is required if you change the mapping type (for example, from SAN to Affinity), or the topology type within SAN mapping. You can, however, set mappings for one port, then select Apply. After you select OK and go back to the main page, select Configure Host to LUN Mapping again and set mapping for the next port. This will allow you to postpone the controller reset until you have all mapping configured. |
| Note: If you make a change to the mapping, be sure to consider how the new mapping might affect device drivers on attached systems. Depending on what you are changing, you might make the controller invisible to TPM. You also might make the device drivers now point to the wrong LUN, which could result in data loss if the LUN is in use. In other words, TPM will not stand in your way if you do something to configure the system in an undesirable manner. |
| Note: Only the most experienced administrators should make changes in an online environment. |
Selecting this item on the main menu (see “Main Menu”) instructs TPM to tell the host computer to scan for new devices and update device drivers. To initiate this process, click Install device drivers for new LUNS on the main menu. The warning screen shown in Figure 3-27 appears.
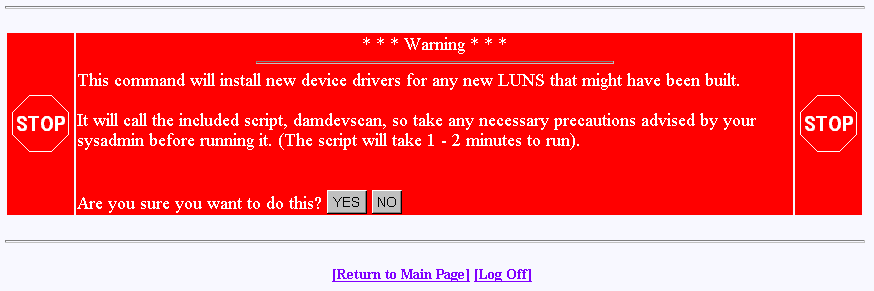
If you are running in a live environment with mounted LUNs, you need to be careful about executing this feature. For example, if you changed SAN mapping so logical drive #3 is mapped to LUN 0 instead of LUN 4, then you will make file systems disappear, and confuse your device drivers. This should be expected, of course. As stated earlier, TPM is not going to prevent you from doing something that would be detrimental to the system configuration.
Also, if you have cross-linked or improperly defined device drivers, running this function corrects the problem, but it also properly redefines drivers. This could also have an effect on mounted devices. Below are some operating system-specific comments:
IRIX: TPM calls the $DAM_HOME/damdevscan shell script.
If the new LUNs have not been discovered, a system reboot may be required in order to have the host recognize the new devices.
The Administrative Functions menu is located on the main screen and is shown in Figure 3-28.
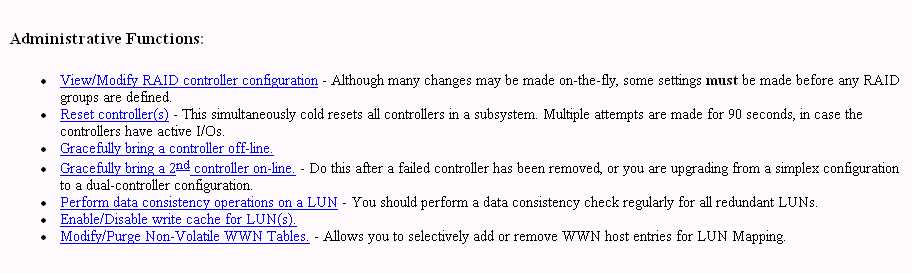
This menu has the following selections, with the associated explanations on the indicated pages:
The View/Modify RAID controller configuration menu selection lets you make changes to your controller. The most important thing to know is that changes labeled On-the-fly are immediate. Those marked Reset require a controller reset to become effective. The two choices labeled New Config can only be made when there are no defined LUNs, as they are data-destructive. When you click View/Modify RAID controller configuration, the dialog boxes appear as shown in Figure 3-29 through Figure 3-31. A partial dialog box is shown in each figure.
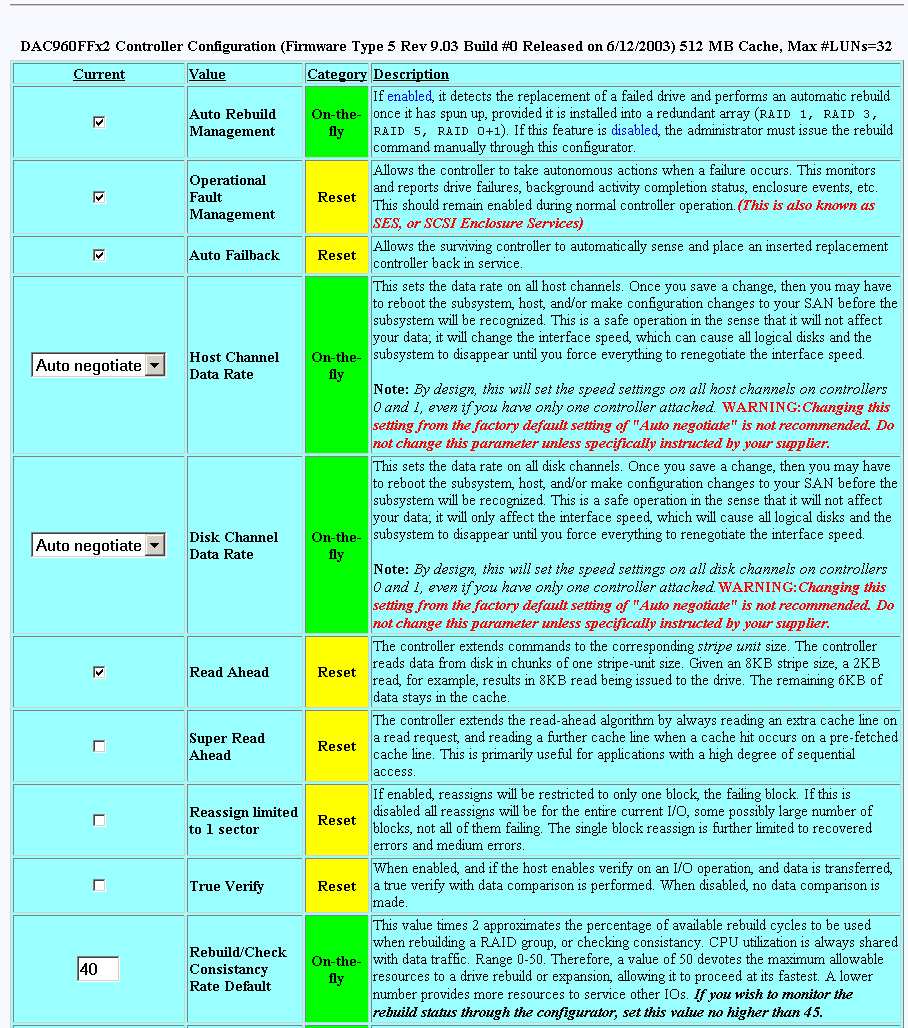
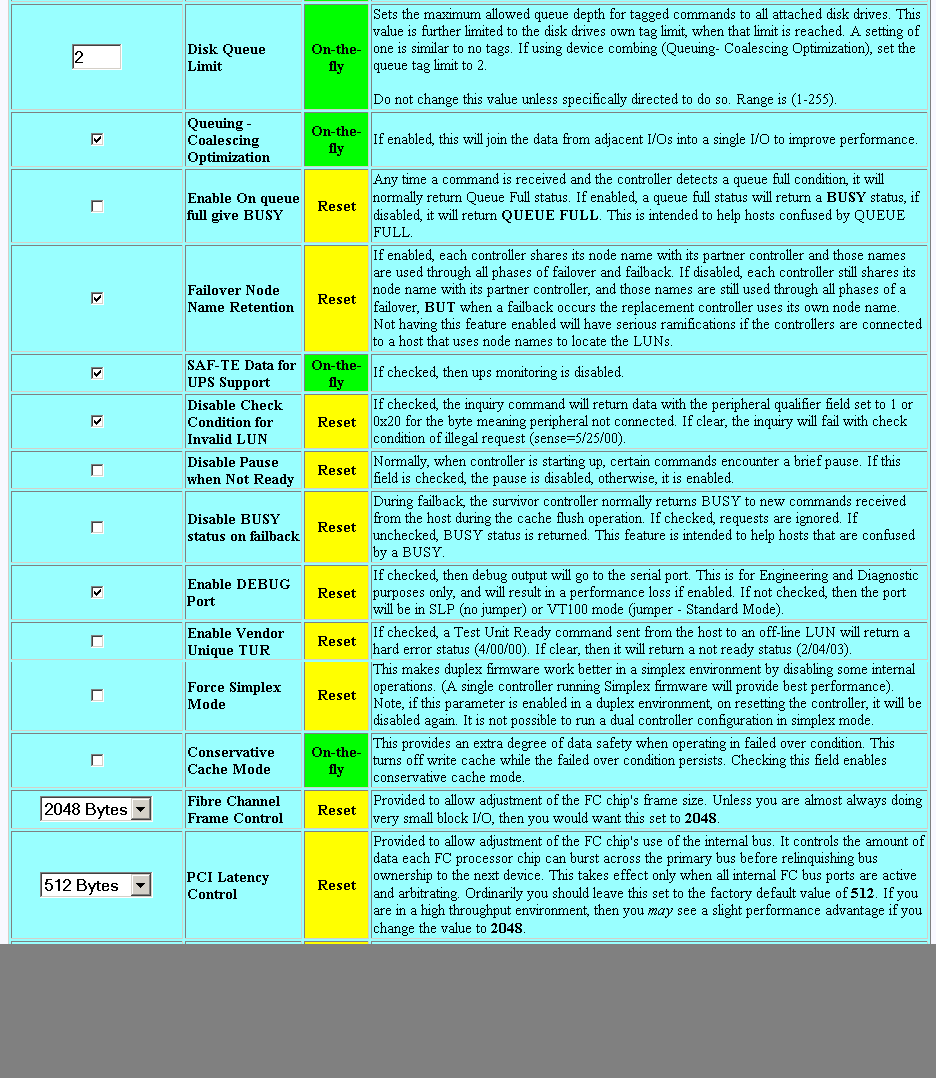
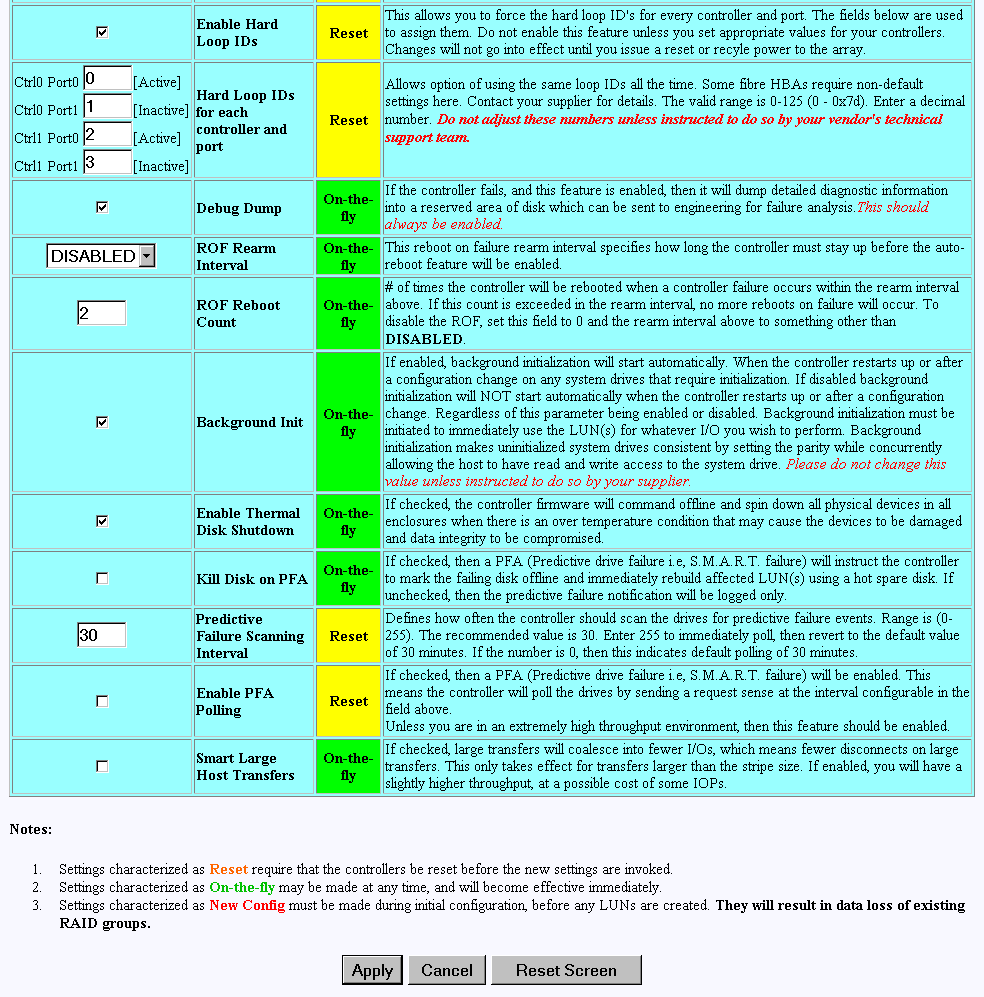
Note that the default unit for the Predictive Failure Scanning interval that can be set on this screen is minutes.
Make as many changes as you desire on the screen, then click the Apply button, which saves the new configuration on all controllers, as well as the COD area on your RAID subsystem's disk drives. The Reset Screen button changes the settings to the default values (the ones appearing when the screen was first selected).
When the Reset Controller(s) menu selection is made, the screen shown in Figure 3-32 appears.
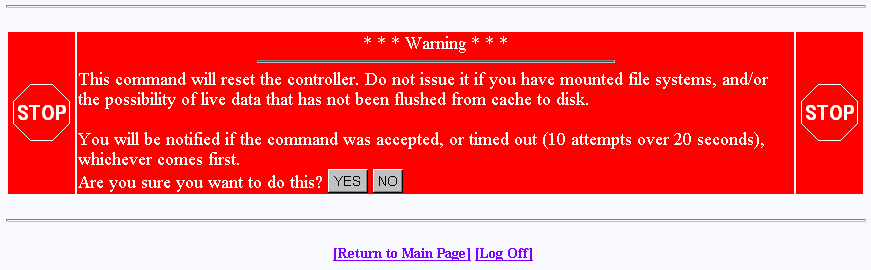
Click YES if you wish to reset your controller. If the system is a dual-controller configuration, clicking YES resets both controllers. Otherwise, click NO or the [Return to Main Page] link.
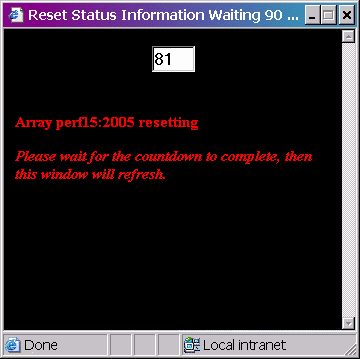
You will see the screens shown in Figure 3-33 and Figure 3-34. These screens indicate when the controllers are back on-line. Click the close button (X) or press the Close This Window button after the controllers have reset.
As a protective measure, if the controllers are busy servicing I/Os, the Reset command will not be accepted.
When the Gracefully Bring a Controller Off Line menu selection is made, the screen shown in Figure 3-35 appears.

Click the YES button to initiate a controller failover. This is typically done for disaster recovery testing. You could also do the testing by physically removing a controller, but this lets you accomplish the same thing without touching the disk array.
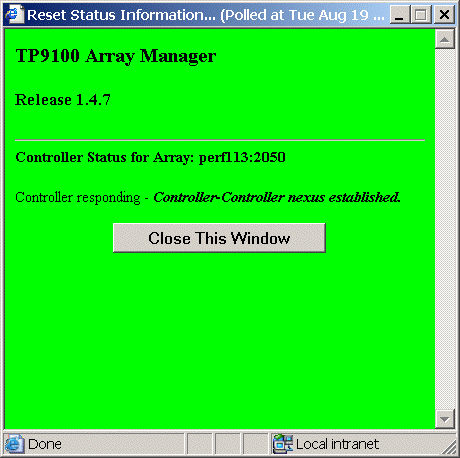
When the Gracefully Bring a 2nd Controller On Line menu selection is made, the screen shown in Figure 3-36 appears.
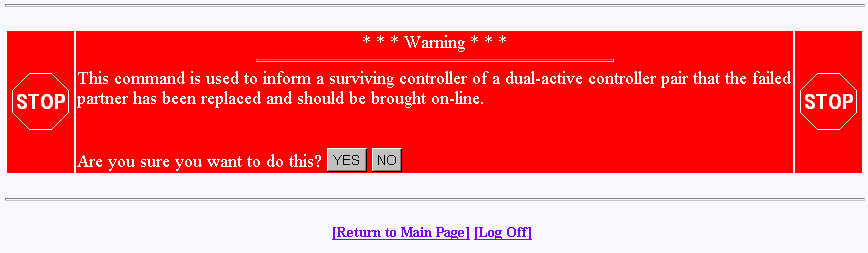
When a failed controller is replaced, the system either automatically detects the replacement (if configured for automatic failback), or is informed of the replacement by issuing this command. The following steps outline the failback process executed by the surviving controller:
A replacement controller is detected.
The surviving controller releases its partner from reset.
Once the replacement controller completes initialization and is ready to resume I/O requests, the surviving controller quiesces both ports by responding with BUSY status to new I/O requests.
The surviving controller disables the failover port or secondary ID.
The surviving controller enables its primary ports.
The replacement controller enables its primary ports.
Both controllers disable conservative cache (if enabled) for write-back system drives and resume normal dual-active controller operation.
Click YES to force the failback.
| Note: A replacement controller is held reset if a consistency check is in progress. |
When the Perform Data Consistency Check/Restore LUN menu selection is made, the screen shown in Figure 3-37 appears.
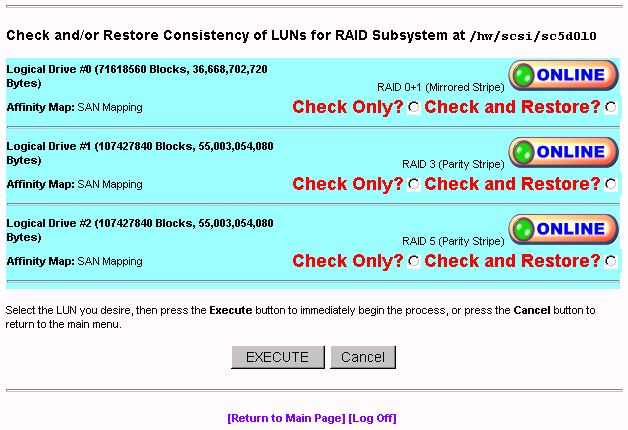
| Note: A check consistency will pause any background initialization process. Background initialization will not restart until a write is sent to the LUN against which background initialization was paused. |
Use this screen to initiate a check and/or repair on a logical drive. To execute this process, the logical drive must be configured for high-availability RAID.
There are several reasons why the check or restore could be denied, and TPM reports the reasons if the request is rejected. The most common reasons are that there is no on-line spare disk to be used to repair the LUN, or more than one rebuild at a time is being attempted.
If you click EXECUTE to begin executing any of the check or restore actions, the dialog box of Figure 3-38 appears, indicating that the process has started.
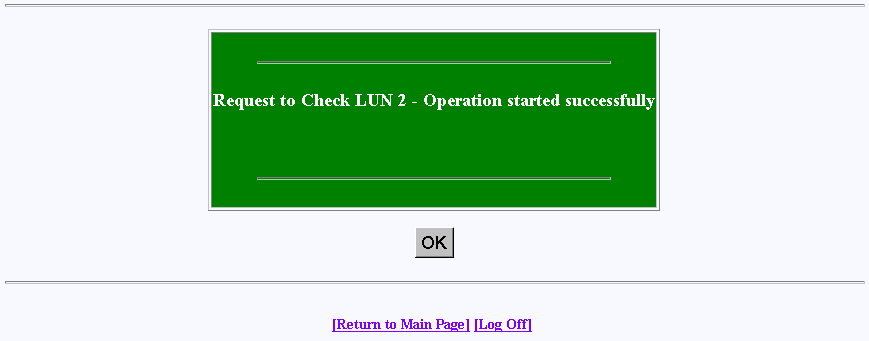
Click OK to proceed.
The window shown in Figure 3-39 shows the progress a few minutes after initiating a Check and Restore for Logical Drive #0, and 15 minutes after starting a LUN Initialization (format).
When the Enable/Disable Write Cache for LUN(s) menu selection is made, the dialog box shown in Figure 3-40 appears.
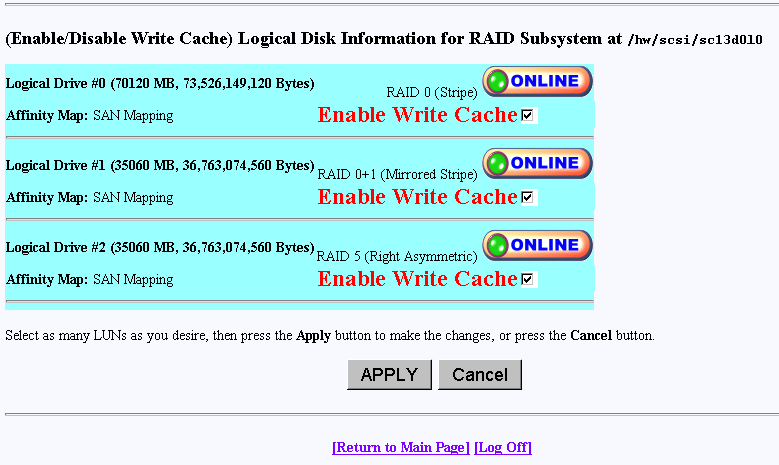
Select the LUNs where you want the cache enabled or disabled and click Apply at the bottom of the screen.
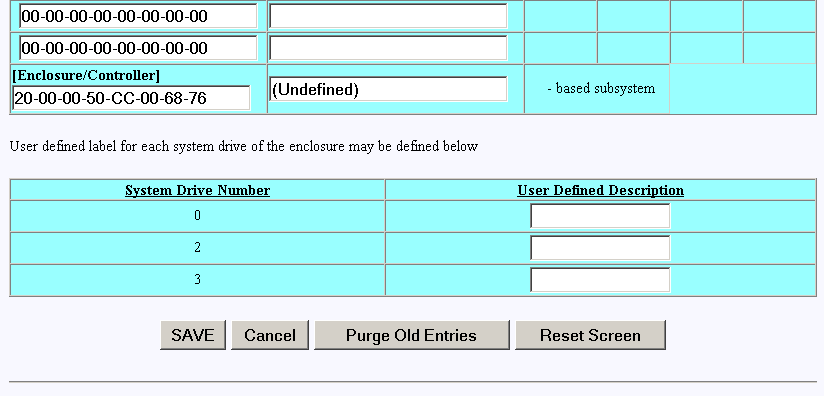
When the Modify/Purge Non-Volatile WWN Tables menu selection is made, the dialog box shown in Figure 3-41 and Figure 3-42 appears.
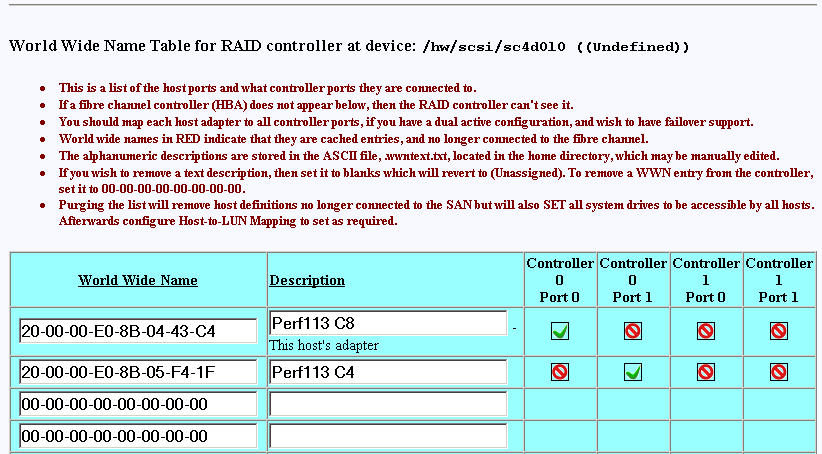
The World Wide Name (WWN) table includes a delete WWN from WWN table and a purge old entries option.
1Gb TP9100 RAID controllers support a maximum of 64 host WWNs.
2Gb TP9100 RAID controllers support a maximum of 256 host WWNs.
Note: All SAN mapping assignments created using firmware version 7.75 or later are lost if the firmware is downgraded to previous firmware version.
You can name your system drives with a user-defined description. This name appears when LUN information is displayed for this server, such as when you display the logical subsystem information as described in “Display Logical Subsystem Information”.
A controller currently maintains a host WWN table until the configuration is cleared. As WWNs are removed and the WWN table updated, any WWNs following those deleted are moved up to fill the vacancies in the WWN table. The SAN map uses the indices of the WWN table entries to specify hosts that have access to a specific system drive. When the WWN table entries are deleted, the indices change for any entries following those WWNs that were deleted.
The Reporting Functions menu is located on the main screen and is shown in Figure 3-43.
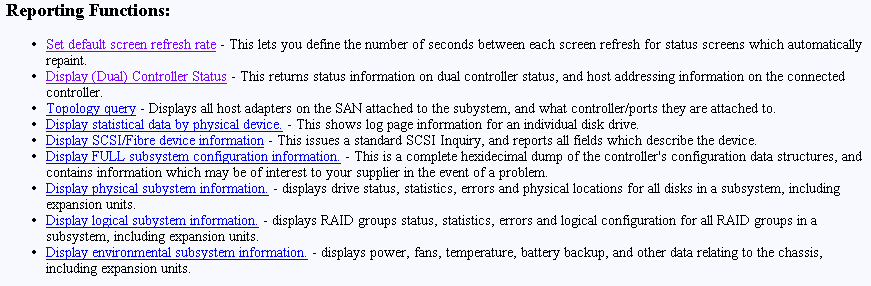
The Reporting Functions menu has the following selections, with the associated explanations on the indicated pages:
When the Set Default Screen Refresh Rate menu selection is made, the screen shown in Figure 3-44 appears.
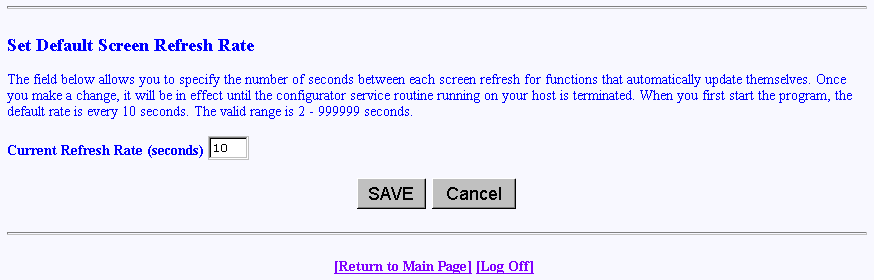
Enter the desired screen refresh rate in seconds and click SAVE.
When the Display (Dual) Controller Status menu selection is made, the screen shown in Figure 3-45 appears.
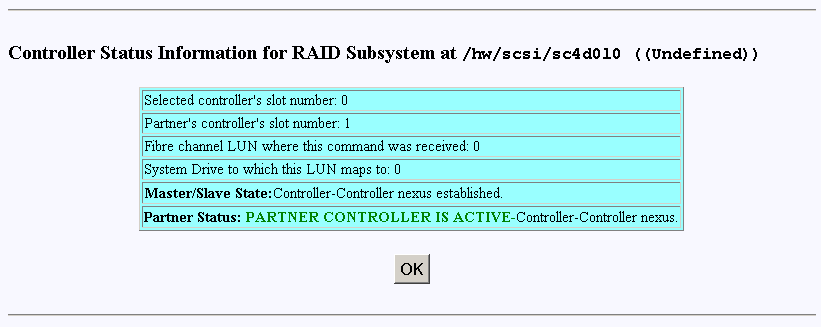
This Screen displays information about the controller(s), their slot numbers, and whether or not they are working together. There are nearly 100 different error or warning messages that can be returned, and this could be quite useful in the event you have a controller failure.
You should also periodically check this screen during normal operations to make sure that all is well. In some cases you may have a controller failure which does NOT result in an audible or visual alarm.
When the Topology Query menu selection is made, the screen shown in Figure 3-46 appears.
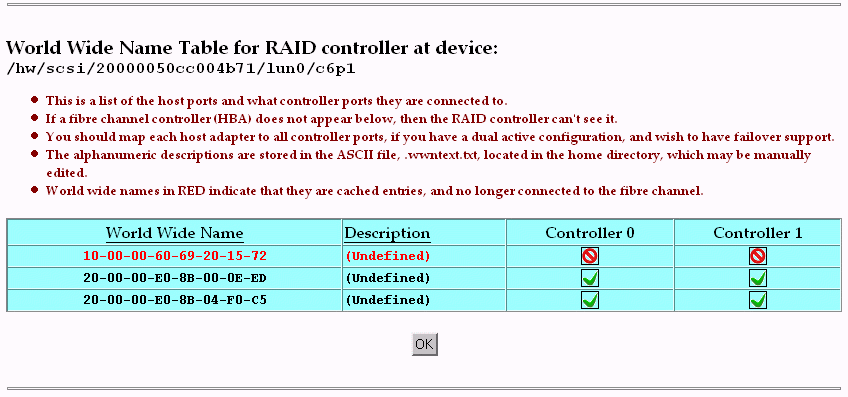
This screen displays a list of Fibre Channel host adapters that are (or were) attached to the RAID controller. Use this screen to view limited topology information.
| Note: This is a read-only display. No parameters can be changed. |
When the Display SCSI/Fibre Device Information menu selection is made, the screen shown in Figure 3-47 appears.
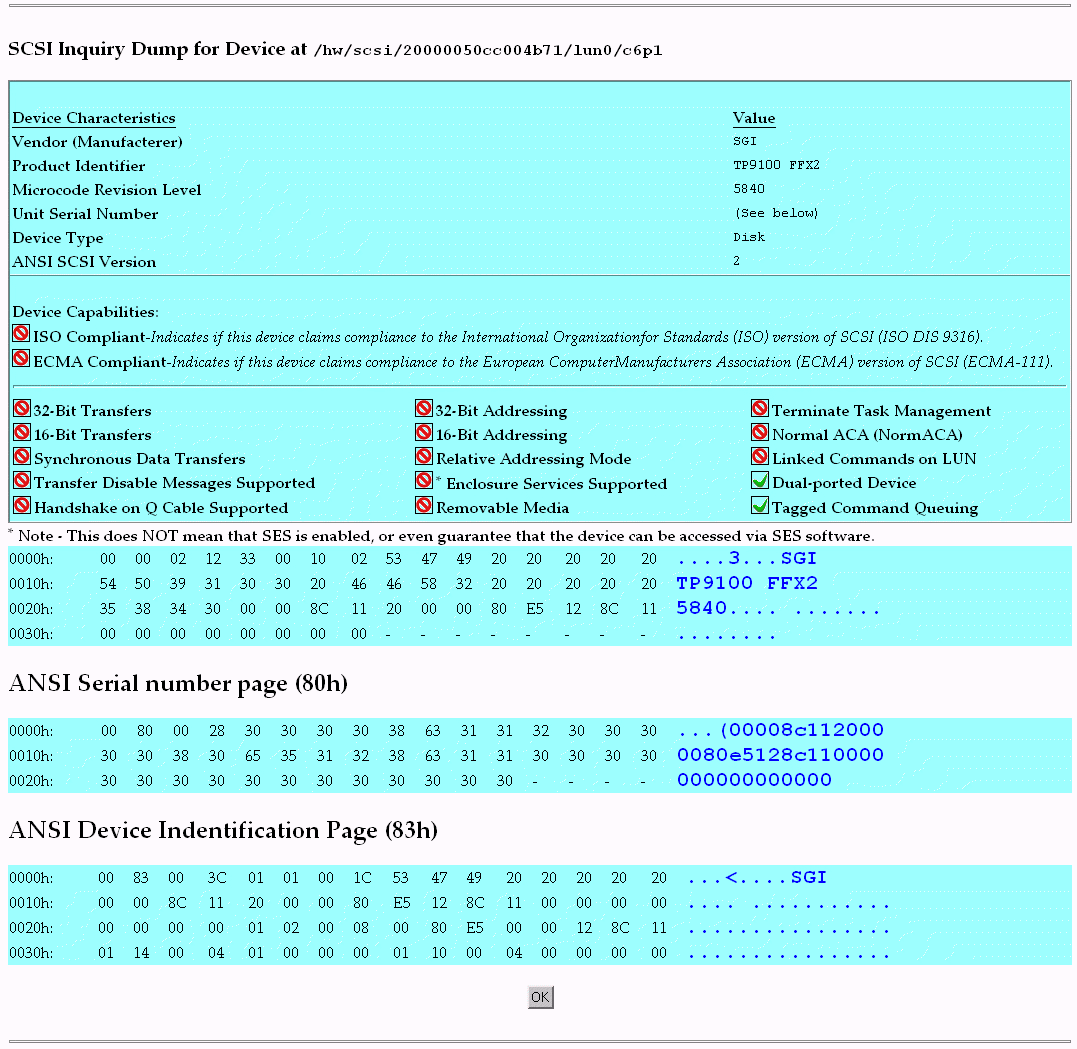
The screen shows what the standard SCSI inquiry returns for a device or LUN. Use it for diagnostic reasons, or to help analyze any SCSI or Fibre Channel device attached to your computer.
When the Display FULL Subsystem Configuration Information menu selection is made, the Controller Information Values (see Figure 3-48), Controller Tunable Parameters (see Figure 3-49), and GroupConfig Structure (see Figure 3-50) screens appear.
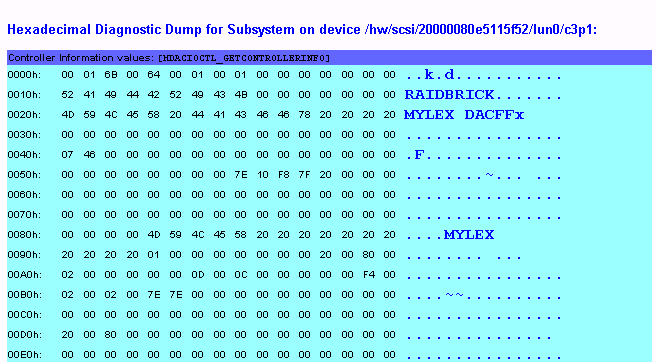
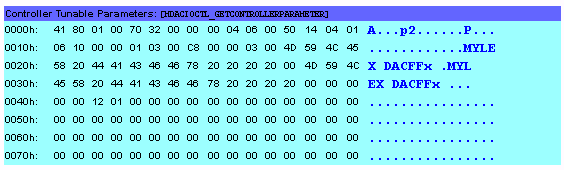
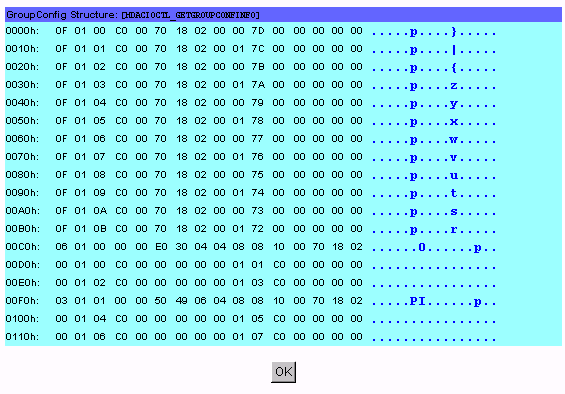
These screens contain hexadecimal dump information from the controller configuration file. This would be of interest to the technical support group in the event of a problem, or would prove helpful to verify that several subsystem configurations have properly been cloned.
When the Display Physical Subsystem Information menu selection is made, the screen shown in Figure 3-51 and Figure 3-52 appear.
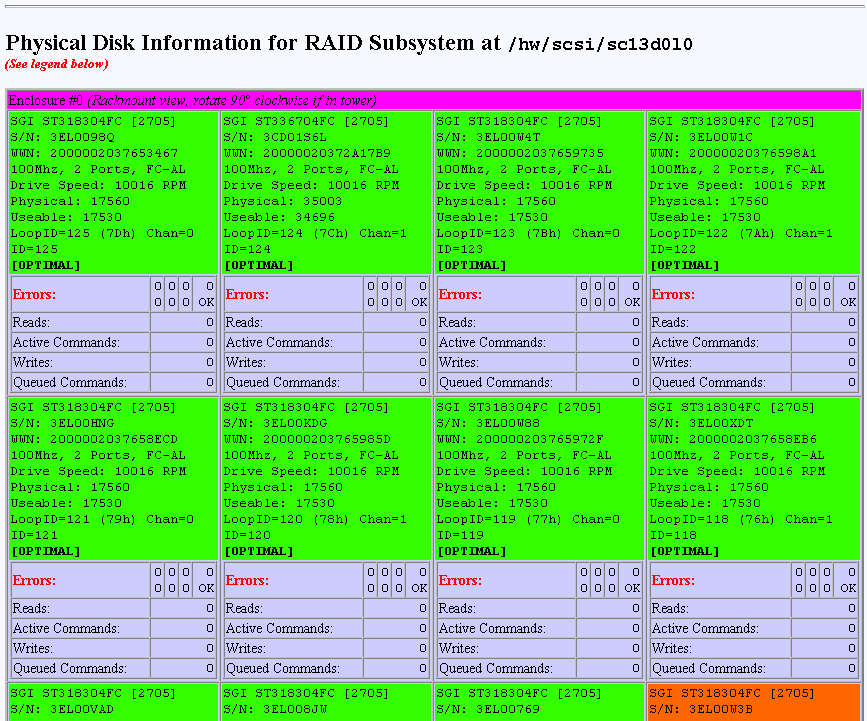
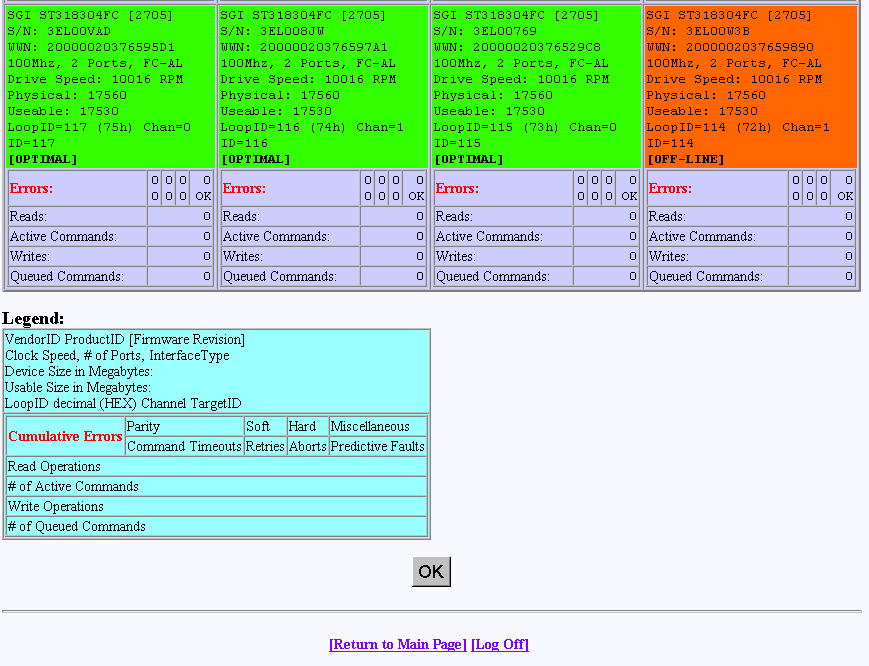
These screens show statistical data, drive status, and errors for all drives in all subsystems. It also correctly displays the enclosure number, row, and column of each disk drive. All numbers are cumulative, starting from zero when the subsystem is powered on. Under normal operation you should rarely see any errors.
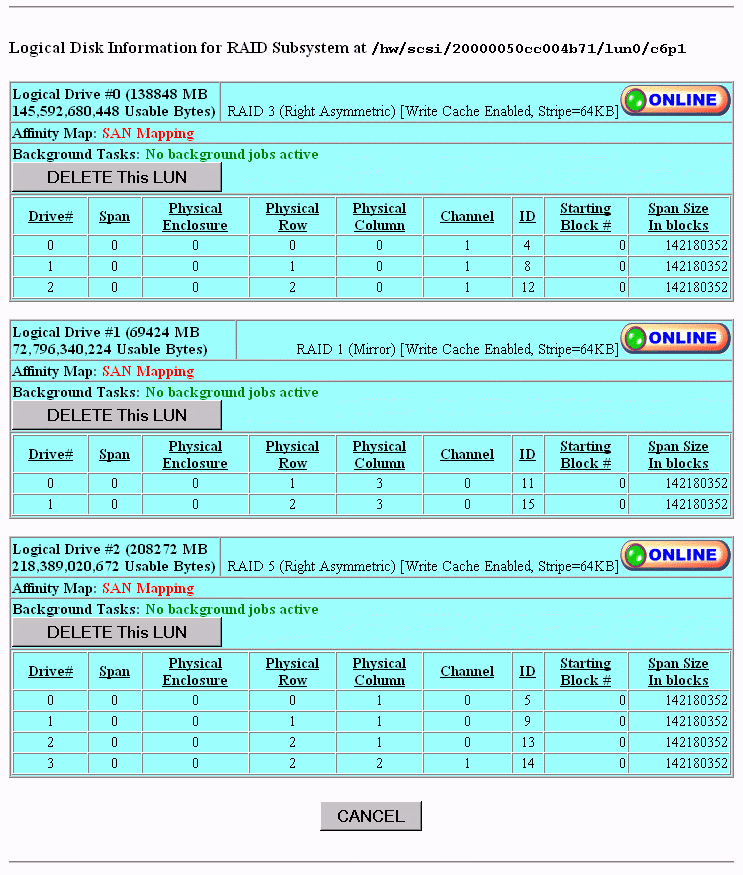
When the Display Logical Subsystem Information menu selection is made, the windows shown in Figure 3-53 appear.
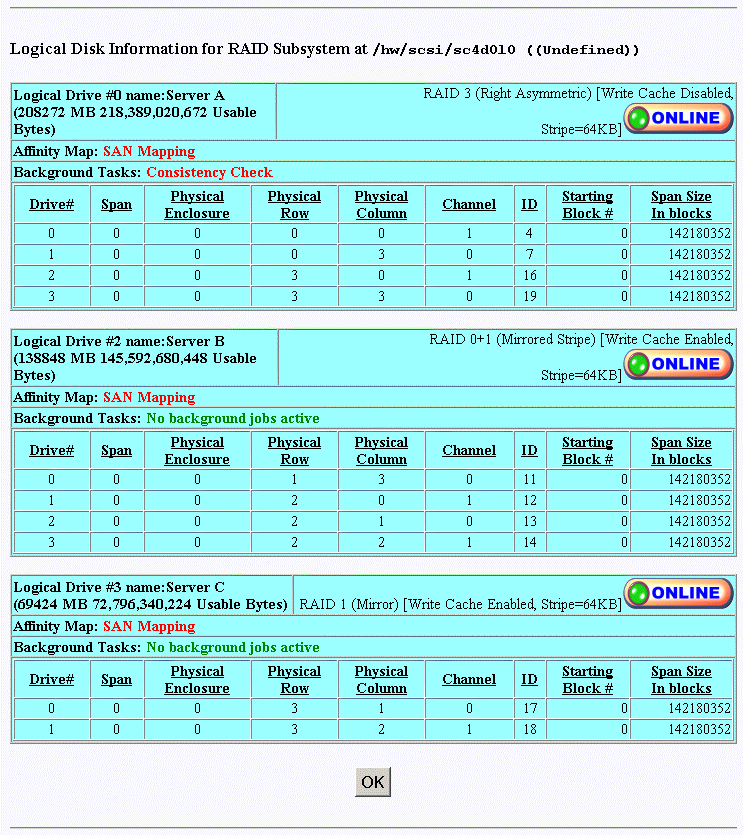
The screen shows all configured LUNs, their status, mapping information, and how they are laid out. If one of the drives were removed, you would see the ONLINE indicator change to CRITICAL. If you were to view the screen shown in Figure 3-54 under this condition, you would see the disk being rebuilt only if an action was taken (for example, if a disk had failed and was replaced). In that case, a rebuild operation should be in progress. If this was not a test, the information in that screen would show that the drive is either off-line or the slot is empty, depending on how damaged the disk drive is.
When the Display Environmental Subsystem Information menu selection is made, the screen shown in Figure 3-54 appears.
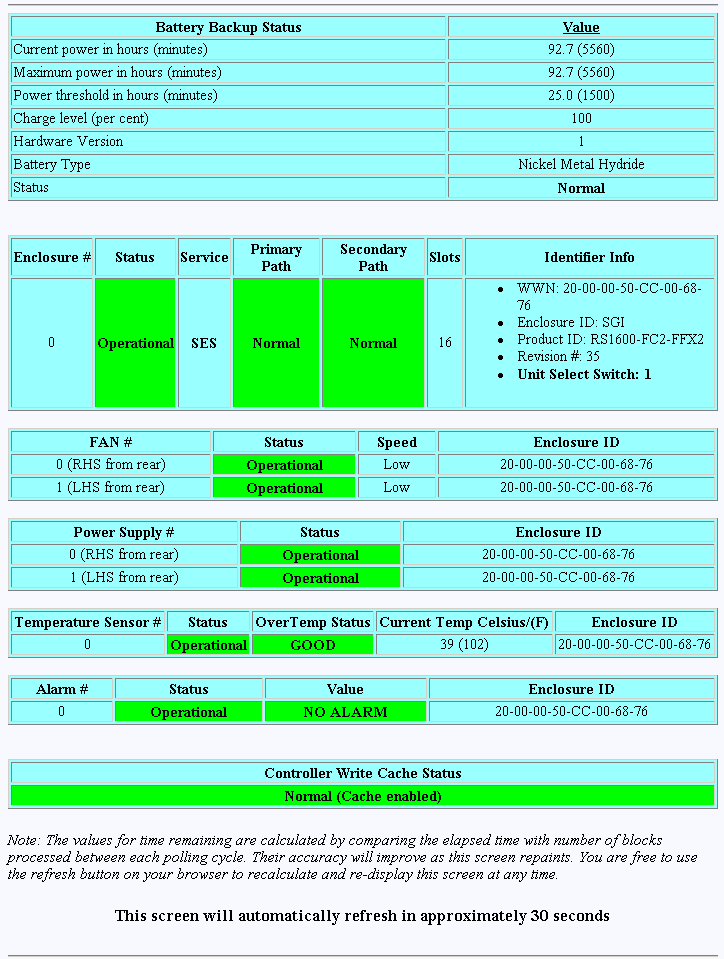
The windows display status information results of polling the enclosure (and all expansion enclosures) every 10 seconds.
| Note: If expansion enclosures are attached, all of the same information would be reported for them as well, only with a different Enclosure ID. |
The Miscellaneous Functions menu is located on the main screen and is shown in Figure 3-55.
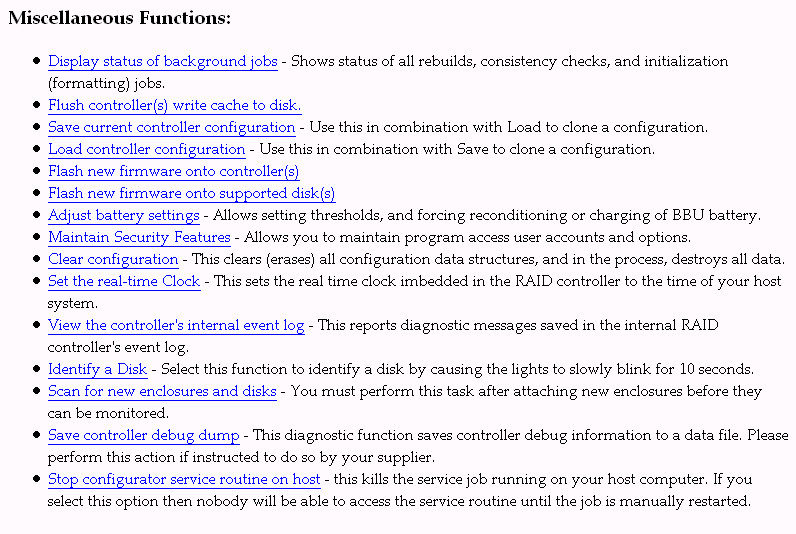
The Miscellaneous Functions menu has the following selections, with the associated explanations on the indicated pages:
“Maintain Security Features” on 9
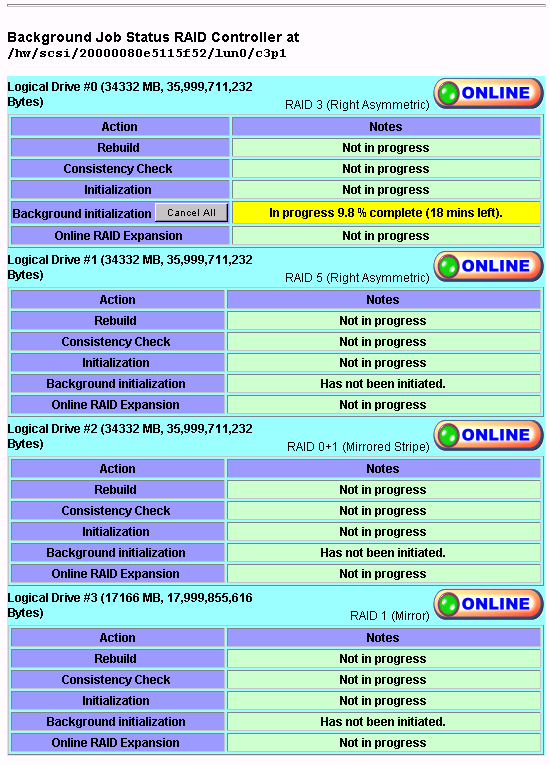
When the Display Status of Background Jobs menu selection is made, the windows appear as shown in Figure 3-56.
These windows show you how initialization, rebuilds, or checks are progressing. The browser title bar (not shown in Figure 3-56) displays the date and time of the last poll. Press the [Return to Main Page] link to exit.
When the Flush Controller(s) Write Cache to Disk menu selection is made, the screen shown in Figure 3-57 appears.
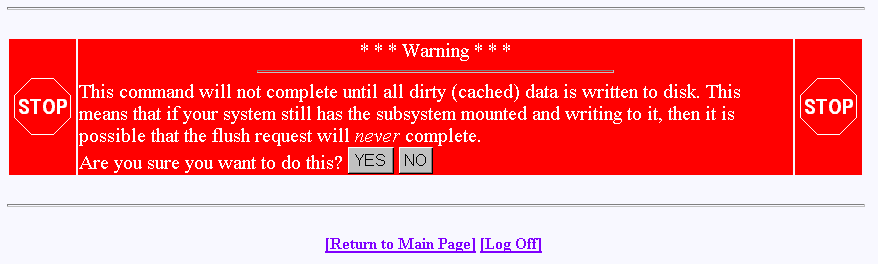
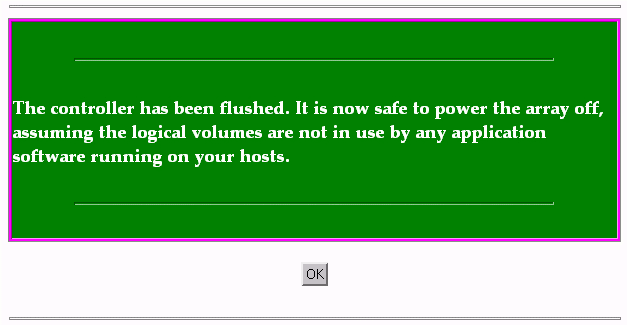
Click YES to force a cache flush. You would ordinarily perform this after all LUNs are unmounted, and before a power down. If you were to do a cache flush on mounted file systems that are servicing write requests, there would be a small risk that this request would never complete. However, it would be pointless to flush the cache in this situation, as the cache would instantly be dirty after the controller receives the next write command. If the cache flush is successful, the window shown in Figure 3-57 appears.
When the Save Current Controller Configuration menu selection is made, the screen shown in Figure 3-59 appears.
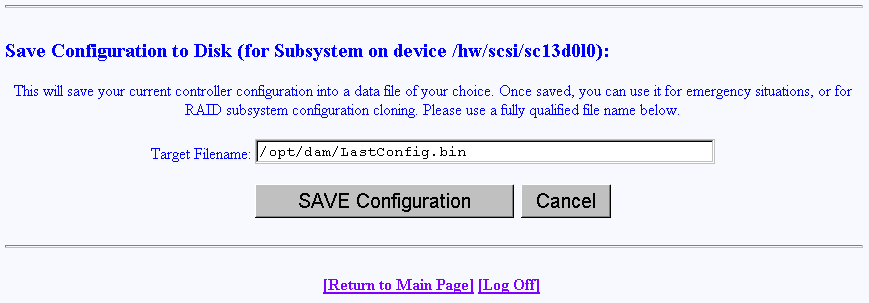
| Note: It is highly recommended that users save the configuration at the following times: After initial install, once all system drives are created. After any LUN additions. Prior to and after any LUN deletions. Prior to any major service operations. |
To save the current controller configuration to a file, type the name of the file in the area provided on the screen and click SAVE Configuration. The file is saved locally on the server that launched TPM, not the client machine running the web browser. The file may be used later to restore or clone a RAID configuration.
When the Load Controller Configuration menu selection is made, the screen shown in Figure 3-61 appears.
This screen allows you to load the controller configuration file into another RAID array. You can use this feature to clone a RAID configuration. To clone a configuration this way, the two RAID subsystems must be exactly the same, including the disk drives.
The file is loaded from the server that launched TPM, not the client machine running the web browser.
When the Flash New Firmware Onto Controller(s) menu selection is made, the screen shown in Figure 3-62 appears.
This screen provides the options of flashing new firmware and of performing rolling upgrades (starting with firmware release 9.03). These options are described below.
| Caution: If you attempt to flash new firmware to the disk drive or controller while background jobs are running (the drive is transferring data), drive operation could become unpredictable and the drive may even become inoperable. In this event, drive data recovery may have to be performed by a professional data recovery lab. |
| Note: The RAID controller firmware to be flashed must be placed in the /opt/dam directory. |
Before flashing controller firmware, perform the following steps:
Back up all data files.
Save the current configuration using TPM, prior to any flashing of controller firmware. See “Save Current Controller Configuration” for more information.
Stop all I/O traffic on the controller(s).
Make sure that no background operations such as consistency checks are running.
Flush the controller's cache.
Unmount all logical disks from the host computer.
Copy the firmware to the /opt/dam directory on the host computer with the RAID array attached.
To flash new firmware, Enter the filename of the image, then click FLASH. TPM verifies the image size and type for your subsystem. If verification fails, a report is made.
Flashing the firmware takes a few seconds, following which TPM immediately jumps to the Reset Controller screen. Allow the reset to proceed.
Be sure you are aware of all the information that you need before upgrading (or downgrading) to certain firmware revisions.
Starting with firmware release 9.03, you will be able to upgrade to later releases without resetting the controllers. You cannot use this option to upgrade from firmware releases earlier than 9.03.
| Warning: Before selecting this option, you must ensure that the original and target firmware releases are compatible and support this process. |
When the Flash New Firmware Onto Supported Disk(s) menu selection is made, the screen shown in Figure 3-63 appears (provided that the Operational Fault Management and Auto Rebuild Management functions on the View/Modify RAID Controller Configuration dialog box are not disabled—see Figure 3-29). If the functions are already disabled when you click the Flash New Firmware Onto Supported Disk(s) menu selection, the dialog box shown in Figure 3-64 appears.
| Caution: The TPMWatch application must be terminated prior to updating disk drive firmware. Failure to do so may cause one or more disk drives to become inoperable. |
| Caution: If you attempt to flash new firmware to the disk drive or controller while background jobs are running (the drive is transferring data), drive operation could become unpredictable and the drive may even become inoperable. In this event, drive data recovery may have to be performed by a professional data recovery lab. |
| Note: The disk drive firmware to be flashed must be placed in the /opt/dam directory. |
Before flashing the disk firmware perform the following steps:
Back up all data files.
Save the current configuration using TPM, prior to any flashing of controller firmware. See “Save Current Controller Configuration” for more information.
Stop all I/O traffic on the controller(s).
Make sure that no background operations such as consistency checks are running.
Flush the controller's cache.
Unmount all logical disks from the host computer.
Copy the firmware to the /opt/dam directory on the host computer with the RAID array attached.
When you click OK, the View/Modify RAID Controller Configuration dialog box appears (see Figure 3-29). Make sure you disable the Operational Fault Management and Auto Rebuild Management functions on this dialog box, then click Apply. You are returned to the main TPM menu.
Go to the Administrative Functions menu and click Reset Controllers (see Figure 3-32). After the reset is complete, click the Flash New Firmware Onto Supported Disk(s) menu selection.
The dialog box shown in Figure 3-64 appears.

Read all the instructions on the dialog box, select one or more devices to flash, then click FLASH to flash the firmware. When the process is complete, the screen shown in Figure 3-65 appears.
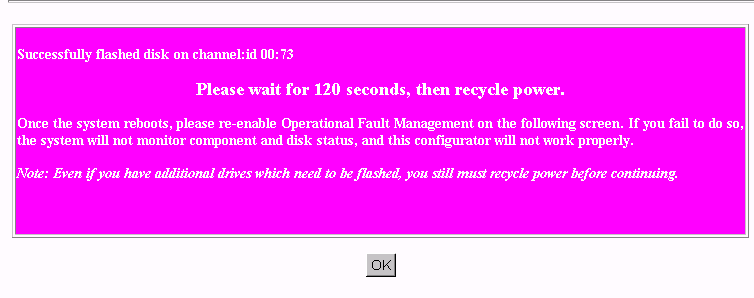
Wait 120 seconds, as the screen instructs, then cycle the power. After power up and reboot are complete, enable the Operational Fault Management and Auto Rebuild Management functions on the View/Modify RAID Controller Configuration dialog box.
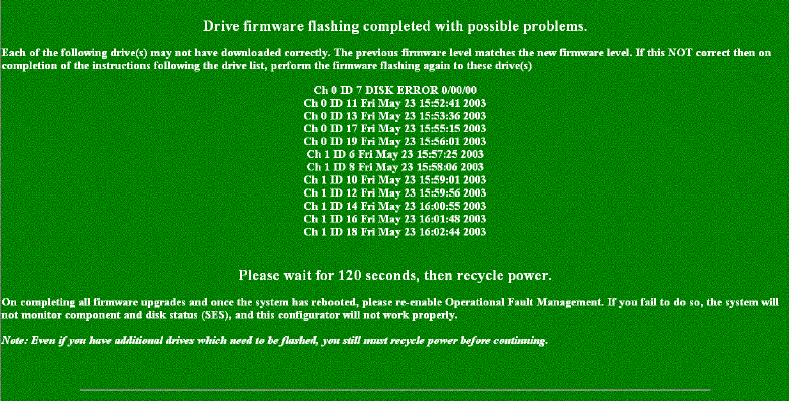
If an error occurs while this process is completing, Figure 3-66 appears. Follow the instructions on the screen to address the errors.
When the Adjust Battery Settings menu selection is made, the screen shown in Figure 3-67 appears.
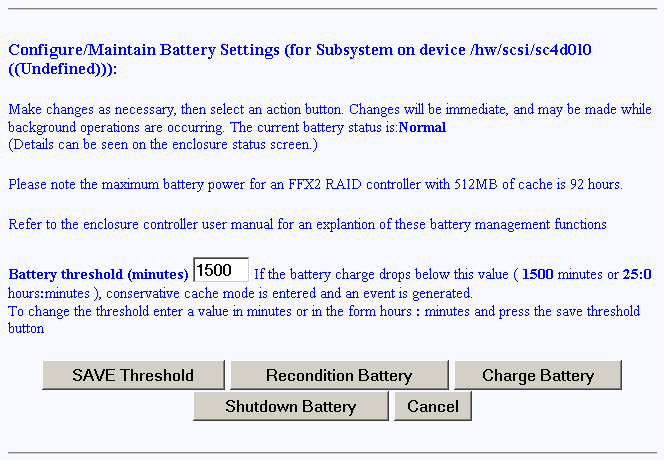
When the remaining battery power (in minutes) falls below the Battery Threshold (minutes) value entered, a low battery power alarm is triggered and is displayed in the Battery Backup Status portion of the Display Environmental Subsystem Information window (see Figure 3-54).
The buttons at the bottom of the screen operate as follows:
SAVE Threshold Saves the battery threshold value entered in the textbox.
Note: The specified threshold value entered must not exceed the battery's maximum power value in minutes. Recondition Battery Conditions the battery so that it can achieve maximum life. Conditioning involves fully discharging the battery, then recharging it.
Note: While the battery is being reconditioned, the system cache operates in the conservative cache mode (write-through) for the duration of the reconditioning process. Charge Battery Initiates a battery charge cycle.
Shutdown Battery Shuts down charging to the battery. The Battery Backup Unit (BBU) maintains memory content in the presence of AC power failures, AC power glitches, and short power outages. This protection is important when the write-back cache is enabled, and data is waiting to be flushed to the disk drive. Therefore SGI does not recommend or support use of the Shutdown Battery option provided in TPM 1.2 with 7.75 or later firmware. If a shutdown of the battery is performed, memory retention is not guaranteed if power loss occurs. Any data in the controller's on-board cache memory will be lost.
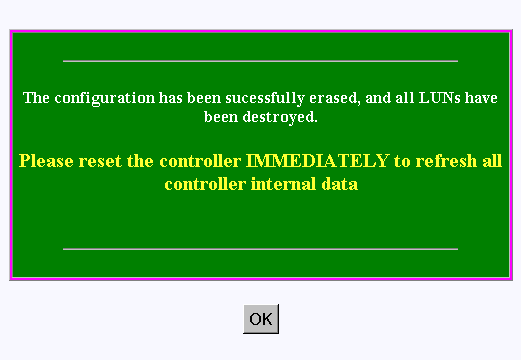
When the Clear Configuration menu selection is made, the screen shown in Figure 3-68 appears.
| Warning: Read the information in the screen before you take any action. |
You must be logged in as superuser to execute this operation. This requires that you enter the TPM password, as defined in /opt/password.bin or /opt/password.text.
The confirmation message shown in Figure 3-69 appears.
| Caution: When using firmware release 9.03, a controller reset must be performed after the Clear Configuration action is done. Do not skip this step. |
When the Set Real Time Clock menu selection is made, the dialog box shown in Figure 3-70 appears.
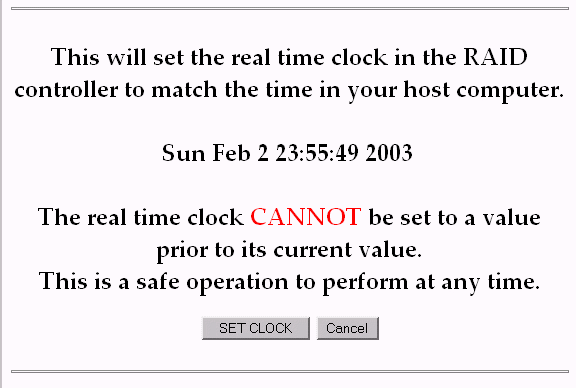
Click SET CLOCK to synchronize the controller clock with the host computer.
The confirmation screen shown in Figure 3-71 appears.

When the View the Controller's Internal Event Log menu selection is made, the dialog box shown in Figure 3-72 and Figure 3-73 appears.
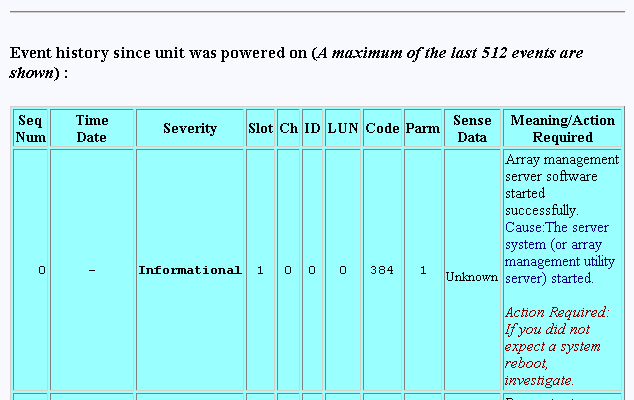
Each time you bring up this dialog box, it displays the events that occurred since the last time the dialog box was brought up.
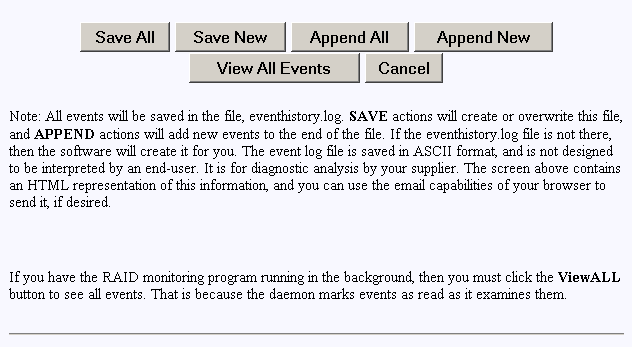
The buttons at the bottom of the dialog box provide these functions:
Save All saves all events to a raw data text file named eventhistory.log.
Save New saves the new events to a raw data text file named eventhistory.log.
Note: A Save New operation overwrites the current eventhistory.log file. If you do not want to overwrite it, it must be renamed before you perform the operation. Append All appends all events to the raw data text file named eventhistory.log file.
Append New appends new events to the raw data text file named eventhistory.log file.
View All Events displays all events, including old and new events.
In addition to the eventhistory.log, a save operation also writes to a textfile named eventlog.txt and a textfile named eventhistory.txt. These files allow you to read the event log information directly. The eventhistory.txt file is not time-stamped and is not formatted. The eventlog.txt file is sequenced, time-stamped, and formatted.
The following is an example of an eventlog.txt file.
Seq No:  0  Timestamp : 01Jan70 00:00:00 - Severity: Informational
            Event Code: 384 - Address: Slot: 1 Ch: 0 Tgt:   0 LUN   0
            Parameter : 0x001 (Unknown)
            Descriptn : Array management server software started successfully.
            Cause     : The server system (or array management utility server) started
            Action    : If you did not expect a system reboot, investigate.

Seq No:  1  Timestamp : 01Jan70 00:00:00 - Severity: Informational
            Event Code: 518 - Address: Slot: 1 Ch: 0 Tgt:   0 LUN   0
            Descriptn : Parameter type value is the reboot count.
            Cause     : Automatic reboot count has changed.
            Controller has rebooted.
            Automatic reboot has rearmed itself or wareconfigured.
            Action    : None

Seq No:  2  Timestamp : 01Jan70 00:00:00 - Severity: Warning
            Event Code: 422 - Address: Slot: 1 Ch: 0 Tgt:   0 LUN   0
            Descriptn : Dual controllers enabled.
            Cause     : -
            Action    : None

Seq No:  3  Timestamp : 01Jan70 00:00:00 - Severity: Informational
            Event Code: 13 - Address: Slot: 1 Ch: 1 Tgt:   4 LUN   0
            Descriptn : A new hard disk has been found.
            Cause     : A physical device has been powered on.
            A new physical device has been added.
            Controller was powered on.
            Controller was added.
            System has rebooted.
            Action    : None

Seq No:  4  Timestamp : 01Jan70 00:00:00 - Severity: Informational
            Event Code: 13 - Address: Slot: 1 Ch: 0 Tgt:   5 LUN   0
            Descriptn : A new hard disk has been found.
            Cause     : A physical device has been powered on.
            A new physical device has been added.
            Controller was powered on.
            Controller was added.
            System has rebooted.
            Action    : None
|
For the Identify a Disk menu selection to work properly, Operational Fault Management (OFM) must be enabled. Also, at least one of the SES disk drives must be present and operational. When the Identify a Disk menu selection is made, the dialog box shown in Figure 3-74 appears.
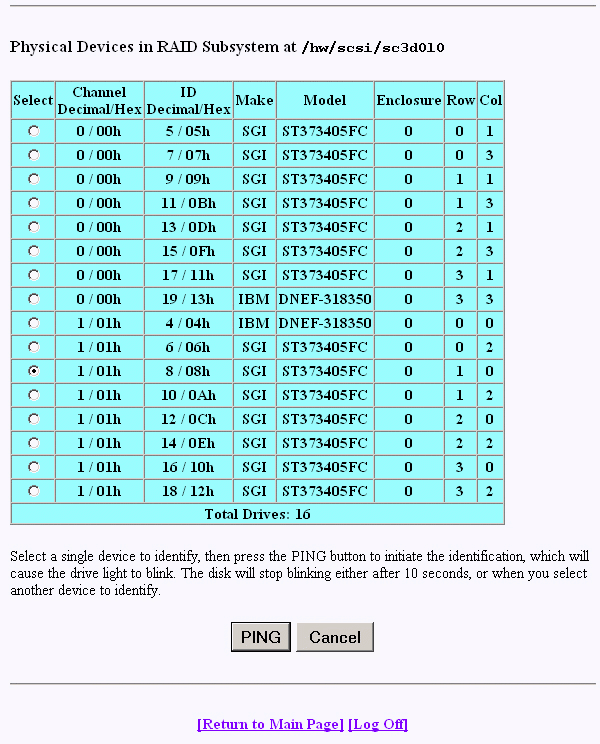
Click PING to identify a selected drive.
When the Scan for New Enclosures and Disks menu selection is made, the dialog box shown in Figure 3-75 appears.
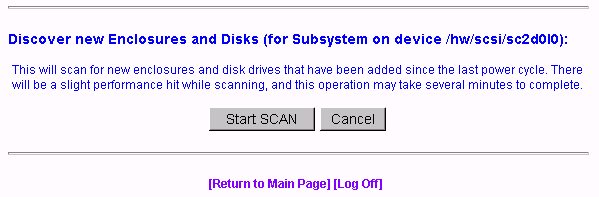
This feature allows users to add one or more disk enclosures to a configured system while the system continues to operate. After the enclosure or enclosures have been added to the system, clicking Start SCAN on the screen shown in Figure 3-75 starts the SES monitoring process for the new enclosure. The user can then configure the additional disk capacity without restarting the system.
Additional enclosures are added to the configured system using the following procedure. (Refer to the SGI Total Performance 9100 Storage System Owner's Guide for additional information).
Check for and resolve any ID conflicts. Each enclosure must have a unique enclosure ID.
Cable expansion ports from the existing configuration to the added enclosure expansion port(s).
Supply power to the new enclosure(s) and wait for the RAID controller to spin-up all the drives. (All disk drives must have completed the spin-up process before scanning for the new devices).
Use TPM to scan for new devices. Select Scan for new enclosures and disks from the Miscellaneous Functions menu item on the main page, as described in “Scan for New Enclosures and Disks”.
Use TPM to display the added enclosure(s) and verify that the new enclosure(s) scanned for were discovered. Select Display physical subsystem information from the Reporting Functions menu item on the Main Menu.
If the new devices are not detected, use TPM and re-select Scan for new enclosures and disks.
If the new drives are not detected after following this procedure, do the following:
Check and resolve any ID conflicts (each enclosure and disk drive must have a unique ID).
Check expansion cabling.
Power Cycle the enclosure.
Repeat steps 1 through 6.
When the Save Controller Debug Dump menu selection is made, the dialog box shown in Figure 3-76 appears.

This feature records controller state information when an abort occurs. After the abort has completed, you can click SAVE Debug Dump to retrieve and analyze the abort information to help determine why the abort occurred. The information is generated while a controller abort is in progress and recorded to NVRAM and a disk drive, if enabled. The aborting controller blocks requests from the partner controller so that the dump can be generated. The debug dump is written to a reserved disk area (RDA) on one selected disk drive. The contents of the dump are not user configurable.
The default operation is that when the dump is complete, status information is written to the Debug Dump header.
The Debug Dump data entry consists of an abort code, an error code, and an event flag, and is overwritten by each successive abort. The abort code specifies where in the firmware image the abort occurred. The abort code is written to NVRAM when the controller is aborting and generates an event. The abort code takes up two bytes of data.
Debug Dump data can be retrieved by going to Miscellaneous Functions and clicking on Save Controller Debug Dump after an abort has completed and the controller is back online.
When the Stop Configurator Service Routine on Host menu selection is made, the password screen shown in appears.
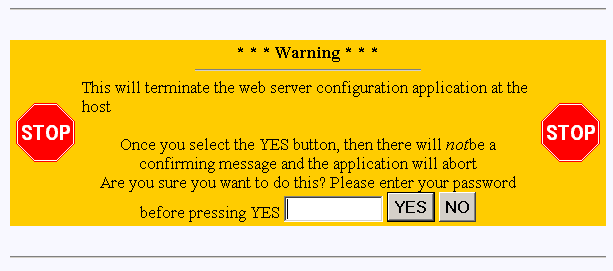 |
You must be logged in as superuser to execute this operation. This requires that you enter the TPM password, as defined in /opt/password.bin or /opt/password.text.
After entering the TPM password, an emergency shutdown routine is initiated for TPM. You are not prompted with an “Are-You-Sure” message. Once the TPM service routine has been killed, no commands can be issued, and anyone with a web browser receives the standard error message indicating the host is not found. After TPM is shut down, the message shown in Figure 3-77 appears.

Controller parameters implemented in firmware version 7.75 and later only control the behavior of the Automatic Restart on Failure (ROF) feature. These parameters are:
ROF Reboot Count This parameter specifies the maximum number of times a controller attempts automatic restart to recover from firmware detected errors (see the ROF Reboot Count parameter in Figure 3-31).
ROF Rearm Interval This parameter specifies the minimum time interval that the controller must operate before refreshing the number of restart attempts (see the ROF Rearm Interval parameter in Figure 3-31).
When a controller reaches the maximum restart attempts, the automatic restart feature becomes disabled until the value is refreshed. Any subsequent firmware detected errors require manual intervention to recover the controller.
The possible values for the time interval between refreshing the number of restart attempts range from DISABLED to seven days. The values are displayed when you click the ROF Rearm Interval dropdown box. To select a particular value, press the right mouse button while scrolling to the desired time interval and then release the button to select the value.
To disable ROF, set the ROF Reboot Count to 0 and the ROF Rearm Interval to something other than DISABLED. When the automatic restart feature is disabled, manual intervention is required to recover from fatal firmware detected errors. Manual intervention may involve physically removing and replacing the failed controller.
The ROF parameters take effect immediately, without resetting the controllers.