This chapter explains how to install and configure the TPM application on the IRIX operating system. You may install TPM with other active users on the system if you wish. The entire process takes little time and no reboot is required.
The host server where the TPM application is installed must have the following prerequisites:
TCP/IP access. This access must exist between the host system and the machine with the web browser. This can be over any medium, including Ethernet, token ring, ATM, or dial-up SLIP/PPP.
A specific IP port or socket number. The software must communicate with a specific IP port or socket number. If there is a firewall or router, ensure the administrator does not restrict traffic over that socket (normally, the socket used is 2002).
A compatible web browser. HTML-compatible web browsers with JavaScript support, such as Microsoft's Internet Explorer (IE) version 5.0, Netscape's 4.x, and Netscape's Mozilla 1.0 browsers have been tested. The browser can execute on any machine. The operating system of the client machine is not important.
Your Fibre Channel host adapter and drivers must be properly configured.
Operating system. TPM supports the following IRIX versions:
IRIX 6.5.8 or later for the 1Gb/s TP9100 (FFX) RAID Controllers
IRIX 6.5.16 or later for the 2Gb/s TP9100 (FFX-2) RAID Controllers
Operating system. TPM supports the following Linux versions:
Linux 7.75 firmware only for the 1Gb/s TP9100 (FFX) RAID Controllers
Linux, SGI environment 7.2 or later with SGI ProPack SGI Altix 3000 series servers using only TPM 1.4 or later
2Gb/s TP9100 (FFX-2) RAID Controllers
Please note the following information on operating system support:
TP9100 support for IA32 Linux has been frozen at Red Hat release 6.2 with ProPack 1.3, using TPM 1.0 with controller firmware 6.14 and 7.03. Support for the TP9100 on newer releases of Linux will not be developed.
TP9100 support for Windows has been frozen at Windows 2000 Advance Server and NT 4.0 with service pack 6, using TPM 1.0 and controller firmware 6.14 and 7.03. Support for the TP9100 on newer releases of Windows will not be developed.
TPM version 1.4 supports Single Port Controllers. TPM 1.3 and earlier cannot be used on Single Port Controllers.
TP9100 support for IA64 Linux is only provided when using SGI Altix 3000 series servers running SGI Linux environment 7.2 or later with SGI ProPack 2.1 or later.
TPM 1.4 or later supports SGI Linux environment 7.2 or later with SGI ProPack 2.1 or later.
This section describes how to install and uninstall the TPM software on the IRIX platform.
 | Note: Prior to removing or upgrading the software, TPM and TPMWatch must first be terminated. |
Follow this procedure to install TPM on IRIX platforms:
Log in as root.
Insert the TPM CD-ROM into the CD-ROM drive.
Note: If the CD-ROM does not mount, refer to the appropriate IRIX operating system manual for instructions. Enter the following command to launch the IRIX installation tool (inst) to install the sgi_tpm software image:
inst -f /CDROM/irix/dist/sgi_tpm
To specify the package, enter:
list
To install the software, enter:
install
At the Install subsystem prompt, enter:
sgi_tpm
To complete the installation, enter:
go
Enter the following command to exit the install program:
quit
The exit operation is automatically performed.
Enter the following command to unmount the CD-ROM:
umount /CDROM
Remove the CD-ROM from the CD-ROM drive.
Use the following procedure to install TPM 1.4 on SGI Altix 3000 series servers running SGI Linux environment 7.2 or later with SGI ProPack 2.1 or later:
Log in as root.
Insert the TPM 1.4 or later CD-ROM into the CD-ROM drive.
Enter the following command to mount the CD-ROM:
mount /dev/cdrom/mnt/cdrom
To launch the Red Hat Package Manager (rpm), which installs the TPM 1.4 or later software, enter the following command followed by ther rpm package filename. The command below is valid for the TPM 1.4 release only and the filename will change on later releases:
rpm -iv /mnt/cdrom/linux/rpm/SGItpm_linux_ia64_tpm1.4.rpm
Note: In certain instances, a --force flag may have to be used in the rpm. Enter the following command to unmount the CD-ROM:
umount /mnt/cdrom
Remove the CD-ROM from the CD-ROM drive.
Use the following procedure to uninstall TPM on IRIX platforms:
Log in as root.
Enter the IRIX versions -remove command as follows to remove TPM software:
versions remove sgi_tpm
Note: IRIX users, if you are removing an TPM 1.3 or earlier release, the uninstall will remove your existing passwd.txt file. If you have entries in your passwd.txt file and are planning on installing TPM again at a later date it is recommended that you save your passwd.txt file to another directory.
TPM's security mechanism has been modified on releases 1.4 and later. This was done for the following reasons:
Tighten control of what users are provided access to the configurator and attached storage.
Reduce the possibility of several users configuring the same RAID controller configuration at the same time and then causing potential problems.
TPM 1.4 and later releases now provide the following options: use an encrypted password file, allow only one user to be logged in at one time, restrict client access at IP level by blocking out a specific IP address or a group of IP addresses.
The TPM software by default will now bounce the user logged in to TPM, once another user (from another server IP address) does a log in to TPM. TPM will allow multiple users to log in from the same server without a bounce occurring.
New installations of TPM 1.4 or later now require that a default username admin and password sgi be used after installation in order to log in to TPM. TPM options can be viewed by entering the following command when in the /opt/dam directory ./tpm -/. The following is only the security part of this option:
#./tpm -/ |
Usage: tpm [-B] [-E “123.*.*.*”] [-I “123.1.2.3”]
Where:
-B mode where incoming user cannot bounce off current user
-E ip excludes access to given range of ip addresses (for example, “100.*.*.*”)
-I ip includes access to given range of ip addresses (for example, “100.10.50.*”)
For current TPM 1.3 and earlier users doing an upgrade installation to TPM 1.4 or later, the upgrade installation will not modify your current passwd.txt file.
New users installing TPM 1.4 or later will be provided default security using the passwd.txt file.
The system administrator can modify the passwd.txt file as necessary. In the passwd.txt file, each line serves as new username and password combination. The username and password are separated with a single colon (username:password). The colon character is not allowed in either the username or password and everything is case-sensitive. The username, password, or both fields can be blank. By default, the passwd.txt file has a default username of admin and a default password of sgi designated.
| Note: If you do not have any username(s) or password(s) setup, it is recommended that upon installation of TPM 1.4 or later, you take advantage of the new enhanced security option. See the “Enhanced Security (Encrypted)” section below. |
The Enhanced Security method in TPM 1.4 and later releases provides the option of using password encryption. This is implemented by adding the provided passwd.bin file to the /opt/dam (DAM HOME directory).
| Note: The passwd.bin file is not created on installation of TPM and must be copied from the security directory on the TPM CD (TPM 1.4 or later CDs only). |
Once the passwd.bin file is placed into the /opt/dam directory, upon the next start of TPM, the default username admin and password sgi must be used to log in to TPM. Once logged in to TPM, the capability of adding in multiple users, each with their own unique username and password is provided in the Maintain Security Features menu. The Maintain Security Features menu is listed under Miscellaneous Functions on the TPM main page as shown in Figure 2-1.

| Note: If you do not have the Enhanced Security passwd.bin file in the /opt/dam directory and you try to select Maintain Security Features from the main page, the screen shown in Figure 2-2 will appear indicating that you only have the passwd.txt file in the /opt/dam directory. |

When using the passwd.bin file, the maximum number of user accounts is 10. If the User Name field is blank, then the entry will be ignored. A blank password is acceptable, but not advisable for security reasons. Administrator accounts should be the only ones set with the ability to maintain this screen.
| Note: If you are upgrading from a previous release of TPM, once you move the passwd.bin file into your DAM_HOME directory, the passwd.bin file will override all usernames and passwords defined in the passwd.txt file. The default username and password must then be used to log in to TPM. Once logged in to TPM, all username(s) and password(s) that were set up in your passwd.txt file can be added to the Maintain Security Features window as shown in Figure 2-3. After you select update, all entries made will be saved and encrypted into the passwd.bin file. After this is done and verified, it is recommended that you delete the passwd.txt file or at a minimum its contents. |

| Note: If you delete all of the accounts, you will not be able to log back in until you remove the passwd.bin file from the DAM_HOME (/opt/dam) directory. |
| Note: If you wish to go back to the default passwd.txt password scheme, delete (or move) the passwd.bin file from the /opt/dam (DAM HOME directory). If you moved the passwd.txt file you will need to move it back to the /opt/dam (DAM HOME directory). The passwd.txt file will then be read and used. |
| Note: When TPM is started with the -B option (recommended), only one user at a time will be allowed to log in and use TPM. Users who try to log in when another user is already logged in will get the following message returned: Only one user allowed at a time currently user username logged in at server IP address on date, time. See Figure 2-4. |

| Note: When using the -B flag, the following conditions may result in a user not being able to log in to TPM: A user just kills the browser window and does not properly log out from tpm. The browser crashes during a tpm session. The browser process gets killed. Workaround: The system administrator must kill the tpm process and restart tpm. |
| Note: When TPM is started without the -B option, the second (incoming) user logging in to TPM will bounce off the first (current) user. This will result in any uncommitted changes that the first user was in the process of doing getting terminated. SGI recommends using the -B option to avoid this situation from occurring. |
This section explains how to invoke TPM after installing it.
To set the environment variable for IRIX and Linux, follow these steps:
Log on as root (or have root access).
For csh, or tcsh shell, enter:
setenv DAM_HOME /opt/dam
For sh, bash, or ksh shell, enter:
DAM_HOME=/opt/dam
export DAM_HOME
| Note: Only users with root permissions are allowed to run TPM. |
To start TPM, enter the following command:
/opt/dam/tpm [-D][-W port_number]
where port_number is the IP socket/port number required to access the program. This not only hides TPM from standard web surfers, but also prevents it from interfering with a system that happens to function as a web server. Because normal web traffic uses TCP/IP port number 80, the TPM server is invisible to client browsers unless the browsers are instructed to use a specific port.
By default, TPM interacts with port number 2002. If that port is busy, the program just initializes the service at the next available port number. It is also recommended that you run the service routine in the background to avoid tying up a terminal session. To do this, enter the following command:
# /opt/dam/tpm & |
The -B flag is recommended to use on startup of TPM to limit only one user at a time.
The flag -D can be added to display debug information on the terminal. Only do this if so instructed by SGI technical support.
| Note: When enabled, debug mode may cause the application to run more slowly and is not supported for non-debug useage. |
Now that TPM has been invoked, you must set up a browser to run the TPM GUI.
Assume, for example, that the TCP/IP number of your host is 192.200.200.7, and its name is server1.sgi.com. To interact with the TPM software, set the address (URL) of your browser to one of the following:
http://server1.sgi.com:2002, or
http://192.200.200.7:2002
If you have another server running the TPM application, and the IP name/number combination is 192.200.200.10, server2.sgi.com, and you started the program with tpm -W 1234, then you may access the software from either another system, or an additional browser window, with:
http://server2.sgi.com:1234, or
http://192.200.200.10:1234
After you invoke TPM, the logon screen appears in the browser window, as shown in Figure 2-5.
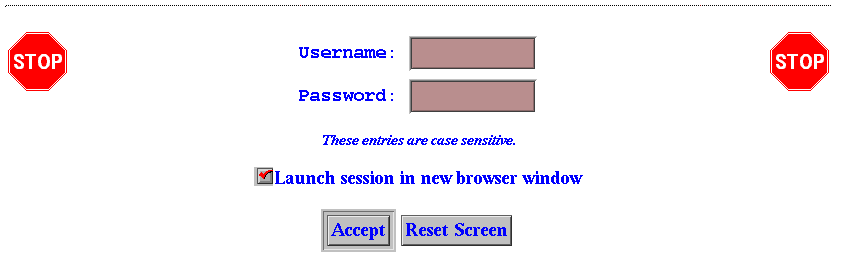
Follow these steps to log on:
Enter your username.
Enter your password.
Click Accept.
The username and password entered are validated against the file $DAM_HOME/passwd.txt or passwd.bin. If the username and passwords match the file contents, the main window screen appears (see Figure 3-1). Otherwise, the logon dialog box is redisplayed. TPM does not support multiple concurrent users. If another user (or specifically, another browser session from any IP number) invokes TPM by setting his or her browser to the appropriate URL, TPM logs off the original user.
If you do not have networking installed, you can still access the GUI by using Netscape or Internet Explorer. Set the browser to http://localhost:2002, or the appropriate port number.
Below is a list of additional considerations.
Firewall administrators may block traffic on undefined port numbers such as 2002. Please talk with your security administrator to make sure you agree on what ports are acceptable for running TPM.
Once the TPM job ends, it typically takes a minute or so for the port to automatically free up on your operating system. That means if you start another session of TPM before the port is free, you will see a message saying your default port is busy, and it will use the next available one.
TPM is not designed to be a multiuser program. Only one web browser at a time should attempt to interact with it.
If you have an enterprise with multiple hosts and subsystems, you can open multiple windows as necessary with your browser to interact with an unlimited number of subsystems concurrently.
Each record must be a fixed length (16 + 18 + 1) bytes long. The last byte is the new line character, which will be added by your text editor. Do not edit this file on a PC. Be careful when using FTP, as well.