This document describes how to install or reinstall the SGI L3 controller software and the Linux Red Hat 6.2 operating system on your Silicon Graphics 230 visual workstation. It also describes how to connect the workstation to a server in the Origin 3000 server series.
The L3 controller software consists of the following components:
Kernel software
L3 driver
L1 and L2 firmware utilities
L3 installation tool
See Silicon Graphics 230 Visual Workstation User's Guide, publication number 007-4263-001, for information specific to the workstation. To adjust monitor settings on the workstation, see the book that ships with the monitor.
To install an SGI Origin 3000 series L3 controller, you must do the following:
Read the software installation requirements so that you have all the items and information that you need to complete the installation.
Configure and install the Red Hat Linux 6.2 operating system and auxiliary Linux software components (via a CD-ROM or download) on the Silicon Graphics 230 visual workstation.
Install the L3 controller software (via CD-ROM or download) on the Silicon Graphics 230 visual workstation.
Connect the Silicon Graphics 230 visual workstation to an SGI Origin 3000 series server that runs the IRIX 6.5.10 operating system or newer.
These procedures are explained in the following sections:
Make sure that you have received or can download the software listed in Table 1 from the workstation before you install the software. If you do not have the CD–ROMs with the software and cannot download the software, order the software on CD–ROM from the locations listed in Table 1.
| Note: Your Silicon Graphics 230 visual workstation must have Internet and network access if you want to download software directly to the workstation. |
Table 1. Required Installation Software
Software Installations Required | Software Download Location | Software Purchase Location (CD-ROM) |
|---|---|---|
Red Hat Linux 6.2 | Not applicable | Contact your SGI account representative to obtain Red Hat Linux 6.2 operating system (P/N SC5-REDHAT-6.2) |
Origin 3000 series L3 controller 1.x software | http://www.sgi.com/ | Origin 3000 series L3 controller 1.2 (P/N SC4-3000SUPPT-1.2) |
See Red Hat Linux 6.2 Installation Guide for detailed information on the Red Hat installation process.
Before you install Red Hat 6.2, have the following information available:
Monitor type, video card type, and video memory size
IP address, netmask, network and broadcast addresses
Formatted floppy disk (DOS format)
This section covers the following topics:
Starting the configuration
Configuring the keyboard and mouse
Creating partitions and configuring the workstation
Configuring network settings
Configuring the account
Selecting the X configuration settings
To start installing and configuring Red Hat Linux 6.2, follow these steps:
Power on the Silicon Graphics 230 visual workstation.
When the SGI title screen appears, press the F12 key, which brings up the Boot menu.
Insert the Red Hat Linux 6.2 CD-ROM into the workstation drive bay.
Using the arrow keys, select CD–ROM from the Boot menu.
Press the Enter key to bring up the Red Hat menu.
At the boot prompt, press the Enter key to boot the workstation from CD-ROM.
Press the Enter key when the Welcome to Red Hat Linux 6.2 screen displays.
Configure the keyboard and the mouse as explained in the next section.
To configure the keyboard and the mouse, follow these steps:
Select a language for your system by using the up and down arrow keys. Press Next to continue.
Use your arrow keys to select the keyboard configuration for your system.

Note: Standard Silicon Graphics 230 visual workstation users should select the Generic 101-Key PC keyboard configuration. Click the keyboard layout option button that matches your system.
Click the Enable Dead Keys option button to enable non-English keyboard characters such as umlauts. Click Next to continue.
Use the arrow keys to select the mouse type for your system. Click Next to continue.
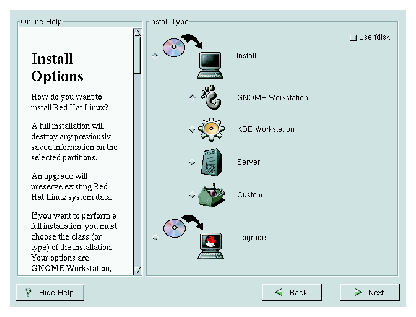
Note: Standard Silicon Graphics 230 visual workstation users should select the (3 Button Mouse (PS/2)) mouse configuration. Click Next in the Red Hat 6.2 Linux System Installer window to continue. The Install Type window shown in Figure 1 appears.
Select the installation type, as explained in the following section.
To select the installation type, follow these steps:
Click the Install and GNOME workstation option buttons (if not already selected by default) in the Install Type window shown in Figure 1. Click Next to continue.
Note: Click Initialize to format the workstation drive if the following message appears: The partition table on device hda is corrupted. To create new partitions it must be initialized, causing the loss of ALL DATA on this drive.
Note: Do not select the Use fdisk option on the Install Options menu. Create partitions and configure the workstation, as explained in the next section.
To create partitions and configure the workstation, follow these steps:
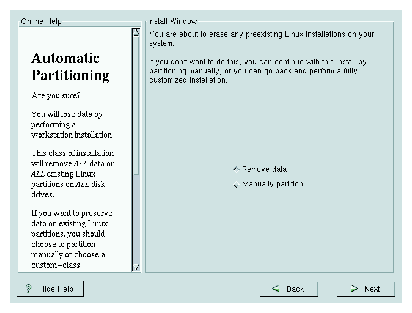
Click the Manually partition option button in the Install window. Click Next to continue (see Figure 2).
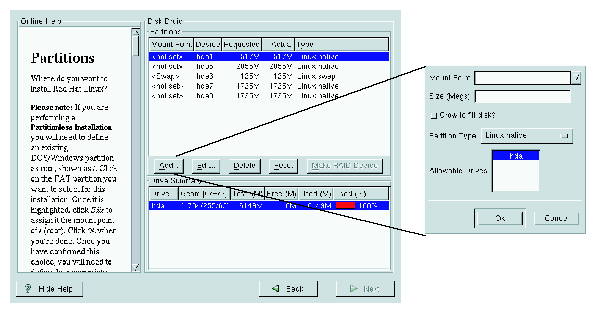
To configure a workstation drive partition (three are required), begin by clicking Add in the Disk Druid Partitions window, which brings up a popup window (see Figure 3).
Select a partition type listed in Table 2 from the pull-down menu.
In the Mount Point field, type the mount point information from Table 2 for the partition selected.
Note: If you selected a Linux swap partition type, the mount point value is automatically entered in the Mount Point field. In the Size (Megs) field in the popup window, type the partition size from Table 2 for the partition selected.
Note: Be sure to select the Grow to fill disk? option button when you create the root (/) partition. Click OK.
Table 2. Disk Partition Configuration Settings
Mount Point
Size (MB)[a]
Partition Type
/boot
50 MB
Linux native
<Swap Partition>
512 MB
Linux swap
/
1 MB (Grow to fill)
Linux native
[a] The Linux <Swap Partition> size should be set to a value that is at least equal to the amount of available workstation memory. If you choose to in crease the Linux <Swap Partition> partition size, increase it by multiples of the available workstation memory. For example, a workstation with 512 MB of available memory should have a Linux <Swap Partition> size of 512 MB, 1024 MB, 1536 MB, and so forth.
Repeat steps 2 through 6 to configure the remaining two disk partitions that are listed in Table 2.
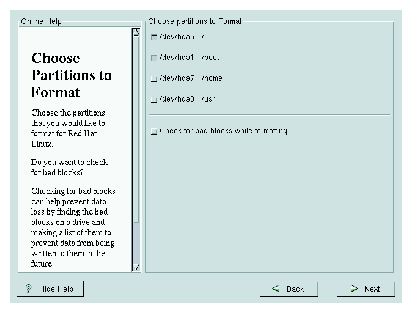
Click Next to continue; the Choose partitions to Format window displays.
Click the option button that precedes each partition that you configured in step 1 (see Figure 4).
Note: <Swap Partition> is automatically prepared for use; therefore, you are not offered the option to select this partition. Click Next to format the selected partitions.
Note: Click the Check for bad blocks while formatting option button if you want to scan the workstation drive for bad memory blocks during the Red Hat Linux 6.2 installation. Checking for bad blocks while you format the partitions increases the amount of time required to install the operating system. Configure the network settings, as explained in the next section.
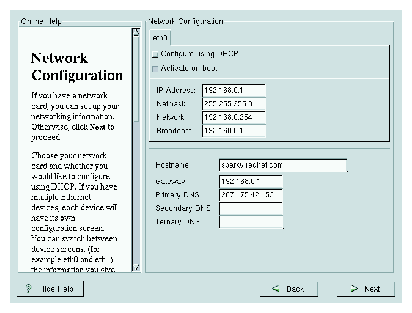
Standard Silicon Graphics 230 visual workstations have an single-port Ethernet interface card; this single-port card connects to the system L2 controllers via DHCP protocol. An optional 4-port Ethernet interface card is also available from SGI. You must configure these additional ports via DHCP protocol. If your workstation contains multiple Ethernet cards or ports that do not use DHCP protocol, you must manually configure these additional network interfaces. Ensure that you have IP, netmask, network, and broadcast addresses for these interfaces.
To configure network settings, follow these steps:
To configure the Ethernet card or port that connects to the L2 controllers via DHCP protocol (see Figure 5), begin by clicking the tab that corresponds to the Ethernet card or port in the Network Configuration window.
Note: This tab is typically labeled eth0. Click the Configure using DHCP option.
Click the Activate on boot option.
If you have no additional Ethernet cards or ports of this type to configure, skip to Step 13.
To configure an optional Ethernet card or port that connects to the L2 controllers via DHCP protocol, begin by clicking the tab that corresponds to the Ethernet card or port in the Network Configuration window.
Click the Activate on boot option.
Click the Configure using DHCP option.
Repeat steps 5 through 7 if you want to configure additional Ethernet cards or ports of this type. If you have no additional Ethernet cards or ports of this type to configure, skip to step 13.
To configure an optional Ethernet card or port that connects to the L2 controllers via non-DHCP protocol, begin by clicking the tab that corresponds to the Ethernet card or port in the Network Configuration window.
Click the Activate on boot option.
Type your site-specific information (for example, IP address, Netmask) in the appropriate fields in the Network Configuration window.
Repeat steps 9 through 11 if you want to configure additional Ethernet cards or ports of this type.
Click Next to continue.
Configure the account, as explained in the next section.
To configure the account, follow these steps:
Use the scroll bar to locate your time zone in the available list. Click Next to continue.
Note: You may also use your mouse to double-click an area on the map that corresponds to your time zone. Type the root password, configure your account, and then click Add.
Create and configure each additional user account. Click Add when you complete each account.
Click Next to continue, which brings up the first X Configuration windows.
Select the X configuration settings, as explained in the next section.
To select the X configuration settings, follow these steps:
| Note: The settings suggested in this section are typically used to configure the operating system to operate with a standard Silicon Graphics 230 visual workstation and SGI monitor; your workstation and monitor configuration may require other settings. You may manually input these settings if the option you require is not displayed. |
Select the monitor configuration; click Next to install the Red Hat Linux 6.2 operating system.
Note: Most monitors use the DDC Probed Monitor-->(YOUR MONITOR TYPE) option. Select the video card that is installed in your workstation, and then click Next.
Note: Standard Silicon Graphics 230 visual workstation users should select the NVIDIA GeForce DDR Generic video card. Select the memory requirement, and then click Next.
Note: Standard Silicon Graphics 230 visual workstation users should select 16384k as the memory requirement. Select the preferred user interface.
Note: Most users prefer to use the Graphical Login interface option. Click the Test this Configuration button to verify that your X configuration settings are correct. If no image displays on the monitor, repeat the steps in this section until the X configuration test displays an image on the monitor.
Click Next to continue.
Install Red Hat Linux 6.2, as explained in the next section.
To install Red Hat Linux 6.2, follow these steps:
Click Next in the About to install window to begin the Red Hat Linux 6.2 installation.
Note: Allow 15 to 60 minutes for the Red Hat Linux 6.2 installation to complete. If you do not want to create an optional Red Hat Linux 6.2 boot disk, click the Skip boot disk creation option and proceed to step 6. If you want to create a boot disk, complete the procedure in steps 3 through 5.
Note: The boot disk is optional because you can boot the workstation from the Red Hat Linux 6.2 CD-ROM. To create the optional Red Hat Linux 6.2 boot disk, begin by clicking the option button to deselect the Skip boot disk creation option.
Insert a blank, DOS-formatted floppy disk into the workstation floppy disk drive.
Click Next to create the boot disk.
Click Exit to reboot the workstation.
Remove the Red Hat Linux 6.2 CD-ROM and the optional boot disk when the workstation automatically ejects them from their respective drives.
Install the auxiliary Linux software components on the workstation, as explained in the next section.
To enable the L3 controller solution to function, you must install the following auxiliary Linux software components on the Silicon Graphics 230 visual workstation: pdksh, uucp, inetd, and telnet-server.
To install these packages, follow these steps:
Boot the workstation from the hard disk.
Log on to the workstation as root.
Insert the Red Hat Linux 6.2 CD-ROM into the CD-ROM drive.
Note: Click No if a Question dialog box appears that asks, “Do you wish to run /mnt/cdrom/autorun?” Double-click the Red Hat Linux 6.2 CD-ROM desktop icon to access the CD-ROM software.
Double-click the Red Hat folder icon to open the Red Hat directory.
Double-click the RPMS folder icon to open the RPMS directory.
To install the pdksh, uucp, inetd, and telnet-server software components, locate and double-click the names of each of the component files listed above in the RPMS directory until they all have been installed.
Remove the CD-ROM from the workstation drive.
Install the L3 controller software as described in the next section.
The L3 controller software consists of the following components:
Kernel software
L3 driver
L1/L2 firmware utilities
L3 installation tool
This section describes the following:
Installing the software from the CD-ROM.
Installing the software from the network.
To install the L3 controller software from the CD-ROM, follow these steps:
Log on to the Silicon Graphics 230 workstation as root.
Insert the SGI Origin 3000 series L3 controller CD-ROM into the CD-ROM drive.
Type the following at the superuser prompt to change the directory:
# cd /mnt/cdrom/RPMS
Enter the following command to load the diagnostic software:
# l3_install
Remove the SGI Origin 3000 series L3 controller CD-ROM.
Reboot the system.
To install the L3 controller software from the network, follow these steps:
Go to the following website:
http://www.sgi.com/products/evaluation/
Scroll down the page and click on Origin 3000 Series L3 Controller 1.2.
Note: The release number may vary as new releases of the software are released. Follow the website instructions until you have completed the installation.
This section describes the following ways to connect a Silicon Graphics 230 visual workstation running L3 controller software and Red Hat 6.2 operating system software to an SGI Origin 3000 series server:
Connecting the workstation to an SGI Origin 3200 server without L2 controller hardware.
Connecting the workstation to an SGI Origin 3000 series server that has L2 controller hardware.
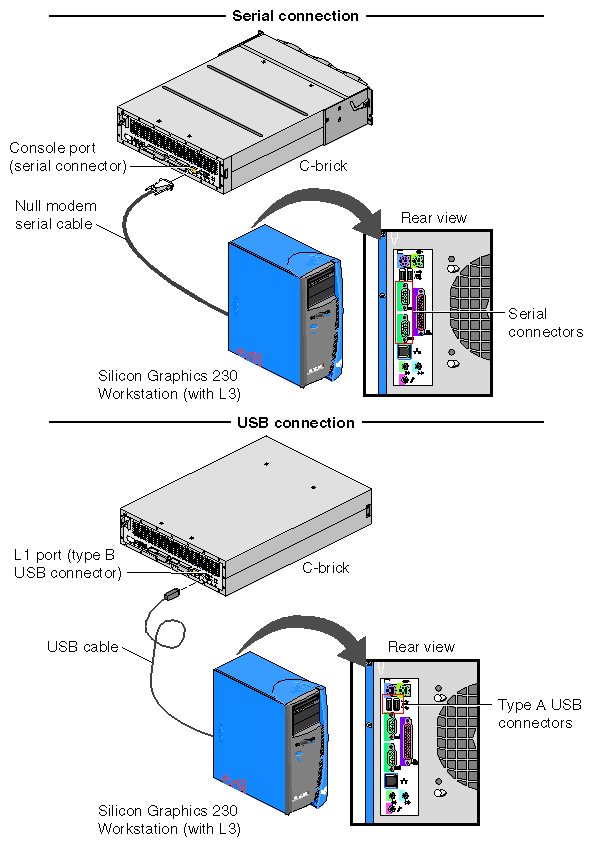
You can connect a Silicon Graphics 230 visual workstation to an SGI Origin 3200 server without an L2 controller hardware system by connecting to the console port (serial port) or the L1 port (USB port) on the SGI Origin 3200 server C–brick. (See Figure 6.)
The L1 controller on the C–brick has one USB channel, which can be directed to the C–brick external USB port (L1 port) or to the C–brick link (NI) (network interface) port. To direct the USB channel to the C-brick external USB port and make it active, you must use the L1 network command and set the C-brick network interface (NI) port from USB to 422.
This section covers the following topics:
Connecting the workstation to a C–brick console port.
Connecting the workstation to a C–brick L1 port.
To connect the Silicon Graphics 230 visual workstation to the console port on the SGI Origin 3200 server C–brick, follow these steps (see Figure 6):
Make sure the network settings are set to the following values:
vt100
Baud 38400
No parity
8 data bits
1 stop bit
Hardware flow control on (rts/cts)
Power off the workstation and the SGI Origin 3200 server.
Connect a null modem serial cable from the workstation to the console port on the C-brick (see Figure 6).
Power on the workstation.
Note: Ensure that you have write access to the ttyS0 device before you complete the next step. Type cu -l ttyS0 -s 38400 at the Linux prompt. The L1 responds with “Connected” as shown:
$ cu -l ttyS0 -s 38400
Connected.
Press the Enter key to display the L1 prompt.
001c04>
To connect a Silicon Graphics 230 visual workstation to the L1 port (USB port) on the SGI Origin 3200 server C–brick, follow these steps (see Figure 6):
Power off the workstation and the SGI Origin 3200 server.
Connect a USB cable from the workstation to the L1 port (USB port) on the C–brick.
Ensure that you are in the /stand/sysco/bin directory.
Type the following at the Linux prompt to establish a connection:
$ ./l2
Note: Ensure that the L1 network auto-detect is enabled or ensure that the C–brick network interface ports are set to 422 protocol.
This section describes how to connect a Silicon Graphics 230 visual workstation to the Ethernet port (ENET port) of the SGI Origin 3000 series server L2 controller. If you have a server system with multiple L2 controllers, you can connect the workstation to an Ethernet hub to which the multiple L2 controllers are connected.
To connect the workstation to an L2 controller, follow these steps:
Make sure that the SGI Origin 3000 series server, the L2 controller, and the workstation are powered off.
If your server does not have an Ethernet hub, connect the workstation to the ENET connector on the L2 controller with a crossover Ethernet cable (see Figure 7).
If your server has an Ethernet hub, connect the workstation to the leftmost port on the Ethernet hub. Connect one end of standard Ethernet cable to the ENET port on the L2 controller and connect the other end to a port on the Ethernet hub (see Figure 7).
Reboot or restart the L3 network by entering the following at the Linux prompt:
/etc/rc.d/init.d/network stop
/etc/rc.d/init.d/network start
Be sure that you are in the /stand/sysco/bin directory.
To establish a connection, type ./l2term at the Linux prompt:
$ ./l2term
