This chapter guides you through the steps for setting up and configuring SGIconsole hardware and software. The sections in this chapter include:
To set up and configure your SGIconsole 2.1 system, follow the procedures described in these subsections:
 | Note: The SGIconsole reinstallation procedure is the same as the installation procedure after you have removed the SGIconsole rpms. |
| Note: If your SGIconsole machine has a blank disk, then you will need to go through all the procedures in the order described in this section. |
To determine which hardware platforms and multiplexers that can be used with SGIconsole and to cable and configure SGIconsole hardware, read and follow the instructions in the SGIconsole Hardware Connectivity Guide . This guide is delivered with your SGIconsole system and is available online at http://docs.sgi.com .
This section contains procedures to follow if you are updating your system from SGIconsole 1.1 or 2.0 to SGIconsole 2.1. The SGIconsole 2.1 release requires that you update to the Red Hat Enterprise Linux ES 3.0 or Red Hat Enterprise Linux WS 3.0 release.
To upgrade your system from SGIconsole 1.1 or 2.0 to SGIconsole 2.1, perform these steps:
Back up your SGIconsole 1.1 or 2.0 configuration data by following the steps in “Backing up SGIconsole 1.1 or 2.0 Configuration Data”.
Reconfigure the flash BIOS on your SGI 1100 server as described in the Procedure 3-3. Follow the Redhat Enterprise manual to install the distribution on your SGIconsole server or laptop.
Install the Red Hat Enterprise Linux ES 3.0 or WS 3.0 release as described in “Installing Red Hat Enterprise Linux ES 3.0 or WS 3.0 Release”.
Configure the Red Hat Enterprise Linux ES 3.0 or WS 3.0 server installation as described in “Configuring Red Hat Enterprise Linux ES 3.0 or WS 3.0 Linux Server Installation”.
Install the SGIconsole 2.1 release as described in “Installing SGIconsole 2.1”.
Configure the SGIconsole 2.1 release as described in “Configuring SGIconsole 2.1”.
Restore SGIconsole 1.1 or 2.0 data as described in “Restoring SGIconsole 1.1 or 2.0 Data”.
This section describes the steps you need to take to back SGIconsole 1.1 or 2.0 configuration data.
To back up SGIconsole 1.1 or 2.0 configuration data, perform the following procedure:
Insert and mount an empty DOS formatted floppy using the mount command, as follows:
[root@linux3 sysadm]# mount /dev/fd0
Use the copy command to save the dhcpd configuration file that contains needed hardware and device address information for the L2 system controllers and Digi EL-16 multiplexers used by SGIconsole, as follows:
[root@linux3 sysadm]# cp /etc/dhcpd.conf /mnt/floppy/dhcpd.conf
Use the cat(1) command to view an example of the /etc/dhcpd.conf file, as follows:[root@linux3 /root]# cat /etc/dhcpd.conf # Created by SGIconsole_startup. Do not remove this line. # Define subnet subnet 192.12.1.0 netmask 255.255.255.0 { } # Begin group options group { option subnet-mask 255.255.255.0; option broadcast-address 192.12.1.255; # Device information host dino-l2 { hardware Ethernet 08:00:69:11:81:18; fixed-address 192.12.1.10; } # Device information host el-16 { hardware Ethernet 00:a0:e7:21:88:f9; fixed-address 192.12.1.20; } host el-16-2 { hardware Ethernet 00:a0:e7:21:c7:e3; fixed-address 192.12.1.21; } } # End group options
For SGIconsole 1.1, use the copy command to save Digi configuration file that contains additional information from the Etherlite driver, as follows:
[root@linux3 sysadm]# cp /etc/els.conf /mnt/floppy/els.conf
Use the cat(1) command to view an example of an els.conf file, as follows:
[root@linux3 /root]# cat /etc/els.conf
#elsnn  EL-type IP-address options( e.g. -t 600)
els0 EL-16 192.12.1.20 -t=120
els1 EL-16 192.12.1.21 -t=120
For SGIconsole 2.0, use the copy command to save Digi configuration file that contains additional information from the Realport driver (see the dgrp_cfg_node(8) man page for more information), as follows:
[root@linux3 etc]# cp /etc/dgrp.backing.store /mnt/floppy/dgrp.backing.store
Use the cat(1) command to view dgrp.backing.store file, as shown in the example that follows:
root@linux3 root]# cat /etc/dgrp.backing.store
#
# Format:
#
#   ID  IP  PortCount  SpeedString  IPPort Mode Owner Group
#
# If any of the last five options should use the default, the
# string "default" appears instead.
#

N0 192.12.1.20 16 auto default default default default
N1 192.12.1.21 16 auto default default default default
Use the copy command to save the VACM configuration file, as follows:
cp /usr/lib/vacm/vacm_configuration /mnt/floppy/vacm_configuration
Use the cat(1) command to view an example of the vacm_configuration file, as follows:
[root@linux3 /root]# cat /usr/lib/vacm/vacm_configuration
# VACM Configuration file
# Autogenerated by Nexxus - Thu Jun  5 17:23:19 2003

GROUP:default
#Definition for node 'O3000_dino_L2'
NODE:O3000_dino_L2
VAR:L2:L2_NODE:192.12.1.10
VAR:GLOBAL:IP_ADDRESS:dino.engr.sgi.com
END_NODE

#Definition for node 'O300_skinwalker_L1'
NODE:O300_skinwalker_L1
VAR:L1:L1_SERIAL_PORT:/dev/ttyN001
VAR:GLOBAL:IP_ADDRESS:skinwalker.engr.sgi.com
END_NODE

#Definition for node 'O200_lightning1_MSC'
NODE:O200_lightning1_MSC
VAR:MSC:USER:root
VAR:MSC:(M)MSC_SERIAL_PORT:/dev/ttyN012
VAR:MSC:CONSOLE_SERIAL_PORT:/dev/ttyN011
VAR:MSC:CONSOLE_SERIAL_PORT_SPEED:9600
VAR:GLOBAL:IP_ADDRESS:lightning1.engr.sgi.com
VAR:MSC:MSC_PASSWORD:none
END_NODE

#Definition for node 'O2000_espanola_MMSC'
NODE:O2000_espanola_MMSC
VAR:MMSC:USER:root
VAR:MMSC:(M)MSC_SERIAL_PORT:/dev/ttyN007
VAR:GLOBAL:IP_ADDRESS:espanola.engr.sgi.com
VAR:MMSC:MMSC_SUPERVISOR_PASSWORD:
VAR:MMSC:MMSC_SERVICE_PASSWORD:
END_NODE

#Definition for node 'sgi550_scar_SCO'
NODE:sgi550_scar_SCO
VAR:SCO:SCO_SERIAL_PORT:/dev/ttyN010
VAR:SCO:SCO_SERIAL_PORT_SPEED:9600
VAR:SCO:SCO_SERIAL_PORT_PARITY:NONE
VAR:SCO:SCO_SERIAL_PORT_HANDSHAKING:NONE
VAR:GLOBAL:IP_ADDRESS:scar.engr.sgi.com
END_NODE
GROUP_END

#End of node definitions

#Definition for user 'blum'
USER:blum
PASSWORD:HIDm9A.QjlDz2
GROUP:default
DEFAULT_MODULE_POLICY:ALLOW
DEFAULT_ADDRESS_POLICY:DENY
ADDR_ACL:ALLOW:127.0.0.1:32
END_USER

#Definition for user 'root'
USER:root
PASSWORD:HIX6StIDsOMvU
GROUP:default
DEFAULT_MODULE_POLICY:ALLOW
DEFAULT_ADDRESS_POLICY:DENY
ADDR_ACL:ALLOW:127.0.0.1:32
END_USER

#Definition for user 'nisuser'
USER:nisuser
PASSWORD:HIX6StIDsOMvU
GROUP:default
DEFAULT_MODULE_POLICY:ALLOW
DEFAULT_ADDRESS_POLICY:DENY
ADDR_ACL:ALLOW:127.0.0.1:32
END_USER

#Definition for user 'testuser'
USER:testuser
PASSWORD:HIX6StIDsOMvU
GROUP:default
DEFAULT_MODULE_POLICY:ALLOW
DEFAULT_ADDRESS_POLICY:DENY
ADDR_ACL:ALLOW:127.0.0.1:32
END_USER
Use the copy command to save the SGIconsole data directory that contains all group, user, and node information, as follows:
cp -R /var/lib/SGIconsole/ /mnt/floppy/
Use the ls(1) command to view the contents of SGIconsole directory, as follows:
[root@linux3]# ls -R SGIconsole/
SGIconsole/:
group  groups  nodes  users

SGIconsole/group:

SGIconsole/groups:
alltasks_all_nodes  sometasks

SGIconsole/nodes:
O2000_espanola_MMSC  O3000_dino_L2       sgi550_scar_SCO
O200_lightning1_MSC  O300_skinwalker_L1

SGIconsole/users:
nisuser  root  testuser
Use the copy command to save system password file that contains local user information, as follows:
[root@linux3 sysadm]# cp /etc/passwd /mnt/floppy/passwd
Use the cat(1) command to view an example of the /etc/passwd file, as follows:
[root@linux3 SGIconsole-logs]# cat /etc/passwd
root:x:0:0:root:/root:/bin/bash
bin:x:1:1:bin:/bin:
daemon:x:2:2:daemon:/sbin:
adm:x:3:4:adm:/var/adm:
lp:x:4:7:lp:/var/spool/lpd:
sync:x:5:0:sync:/sbin:/bin/sync
shutdown:x:6:0:shutdown:/sbin:/sbin/shutdown
halt:x:7:0:halt:/sbin:/sbin/halt
mail:x:8:12:mail:/var/spool/mail:
news:x:9:13:news:/var/spool/news:
uucp:x:10:14:uucp:/var/spool/uucp:
operator:x:11:0:operator:/root:
games:x:12:100:games:/usr/games:
gopher:x:13:30:gopher:/usr/lib/gopher-data:
ftp:x:14:50:FTP User:/home/ftp:
nobody:x:99:99:Nobody:/:
xfs:x:43:43:X Font Server:/etc/X11/fs:/bin/false
named:x:25:25:Named:/var/named:/bin/false
gdm:x:42:42::/home/gdm:/bin/bash
piranha:x:60:60::/home/httpd/html/piranha:/dev/null
postgres:x:26:26:PostgreSQL Server:/var/lib/pgsql:/bin/bash
pvm:x:24:24::/usr/share/pvm3:/bin/bash
squid:x:23:23::/var/spool/squid:/dev/null
testuser:x:54580:31::/home/testuser:/bin/bash
Use the copy command to save shadow password file, if enabled, that contains additional local user information, as follows:
[root@linux3 sysadm]# cp /etc/shadow /mnt/floppy/shadow
Use the cat(1) command to view an example of the /etc/shadow file, as follows:[root@linux3 SGIconsole-logs]# cat /etc/shadow root:$1$H8q0Kzaf$ZWksDiHzk1LDtCdK3N7tt1:12194:0:99999:7:-1:-1:134539228 bin:*:12194:0:99999:7::: daemon:*:12194:0:99999:7::: adm:*:12194:0:99999:7::: lp:*:12194:0:99999:7::: sync:*:12194:0:99999:7::: shutdown:*:12194:0:99999:7::: halt:*:12194:0:99999:7::: mail:*:12194:0:99999:7::: news:*:12194:0:99999:7::: uucp:*:12194:0:99999:7::: operator:*:12194:0:99999:7::: games:*:12194:0:99999:7::: gopher:*:12194:0:99999:7::: ftp:*:12194:0:99999:7::: nobody:*:12194:0:99999:7::: xfs:!!:12194:0:99999:7::: named:!!:12194:0:99999:7::: gdm:!!:12194:0:99999:7::: piranha:!!:12194:0:99999:7::: postgres:!!:12194:0:99999:7::: pvm:!!:12194:0:99999:7::: squid:!!:12194:0:99999:7::: testuser:xWMVKkegTeXxg:12209:0:99999:7:::
Use the copy command to save the sysadm user file that contains all SGIconsole usernames, as follows:
[root@linux3 sysadm]# cp /var/lib/sysadm/privilegedUsers /mnt/floppy/privilegedUsers
Use the cat(1) command to view an example of privilegedUsers file, as follows:
[root@linux3 sysadm]# cat privilegedUsers
nisuser testuser
Console log files are most likely to large to fit on the floppy disk. They should be saved to another system if necessary. The Console log files are located in the following directory:
/home/httpd/html/SGIconsole-logs/
Unmount and remove the floppy, as follows:
[root@linux3 sysadm]# umount /mnt/floppy
| Note: This procedure is only required if you are using SGI 1100 as your SGIconsole server. |
The SGI 1100 server provided with SGIconsole 1.1 is single processor. There is a basic input/output system (BIOS) change that you must perform before installing Red Hat Enterprise Linux ES 3.0 or WS 3.0 described in the following procedure:
To reconfigure the flash BIOS on your SGIconsole 1.1 platform, perform the following procedure:
At the SGI logo screen press Ctrl-Alt-ESC to enter Setup.
Select Load Default Settings from the menu and press Enter.
Press F8 to enable advanced options.
Select Advanced Options from the menu.
Select CPU Frequency from the Advanced Options menu.
Go to the Single Processor MP Table and use the left/right arrow to select Disabled.
Use the ESC key to exit out of Setup.
Boot the system.
This section describes file location changes from the SGIconsole 1.1 release to the SGIconsole 2.1 release.
The following file locations have changed:
In Red Hat Enterprise Linux ES 3.0 or WS 3.0 releases, the default document root for Apache web server is /var/www/html . In the Red Hat 6.2 Base Linux release, it is located in /home/httpd/html.
In the Red Hat Enterprise Linux ES 3.0 or WS 3.0 releases, the xinetd(8) extended Internet services daemon replaces the inetd(8) daemon.
In the Red Hat Enterprise Linux ES 3.0 or WS 3.0 releases, the /etc/xinetd.conf configuration file replaces the /etc/inetd.conf configuration file with additional configuration files for Red Hat Enterprise Linux ES 3.0 or WS 3.0 in the /etc/xinetd/xinetd.d directory.
The location of the SGIconsole log files has changed from /home/httpd/html/SGIconsole_logs to /var/www/html/SGIconsole_logs .
The /tmp/els00.log no longer exists. To determine the status of your EL-16 device, you can view information in the /proc/dgrp/config and /proc/dgrp/nodeinfo files.
SGI suggests that you begin with a clean install of the Red Hat Linux ES 3.0 or WS 3.0 release.
| Note: If you are installing Red Hat Enterprise Linux ES 3.0 or WS 3.0 on an SGIconsole 1.1 platform make sure you have performed Procedure 3-3. |
Follow these instructions:
Back up your data (see “Backing up SGIconsole 1.1 or 2.0 Configuration Data”).
Insert Red Hat Enterprise Linux ES 3.0 or WS 3.0 CD number 1 and reboot the system from the CD. Follow the instructions to launch the Red Hat Enterprise Linux installer.
Note: Kickstart floppy images are provided to automate the installation. At the boot: prompt, after booting Red Hat Enterprise Linux ES 3.0 or WS 3.0 CD number 1, insert the appropriate kickstart floppy and enter linux ks=floppy then enter. The installer will start, select defaults, partition the system drive, start the installation, then prompt when necessary to insert the additional Red Hat Enterprise Linux CDs 2, 3, and 4. See “Creating a KickStart floppy” for instructions to create appropriate floppy from the SGIconsole-2.1 CD.
Red Hat Enterprise Linux ES 3.0 packages selected to install are, as follows:
engineering-and-scientific
legacy-software-development
editors
system-tools
base-x
web-server
development-tools
text-internet
legacy-network-server
server-cfg
dialup
admin-tools
ftp-server
network-server
kernel-development
graphical-internet
compat-arch-support
Red Hat Enterprise Linux WS 3.0 adds these additional packages, as follows:
gnome-desktop
sound-and-video
xemacs
graphics
office
mail-server
smb-server
printing
Additional RPMs to install are, (install after anaconda (1) has finished and you are logged in as root on a running system), as follows:
telnet-server-0.17-26
tftp-server-0.32-4
dhcp-3.0pl2-6.14
For convenience, a KickStart floppy image resides on the SGIconsole 2.1 CD under the images directory.
There are now two kickstart floppy images on the CD. One for the Red Hat Enterprise Linux ES 3.0 and one for the Red Hat Enterprise Linux WS 3.0, as follows:
SGIconsole2.1-RHES3.0.img
SGIconsole2.1-RHWS3.0.img
To create a KickStart floppy, copy the image to a blank DOS-formatted floppy disk:
Insert and mount the SGIconsole 2.1 CD, using the following command:
mount /dev/cdrom /mnt/cdrom
Insert the blank, formatted floppy.
Copy the image from the CD to the floppy, using the following commands:
For the Red Hat Enterprise Linux ES 3.0 release, perform the following:
dd if=/mnt/cdrom/images/SGIconsole2.1-RHES3.0.img of=/dev/fd0
For the Red Hat Enterprise Linux WS 3.0 release, perform the following:
dd if=/mnt/cdrom/images/SGIconsole2.1-RHWS3.0.img of=/dev/fd0
If, when you power up the system, it displays only a blank screen, you will need to install Red Hat Enterprise Linux ES 3.0 (refer to “Installing Red Hat Enterprise Linux ES 3.0 or WS 3.0 Release”). When the installation is complete, reboot the system and continue with configuring Red Hat Enterprise Linux ES 3.0 or WS 3.0 Linux.
The system will boot up running the Red Hat Enterprise Linux ES 3.0 or WS 3.0 Linux Server kernel to the init level 3 (text mode, multiuser). You will be automatically prompted for the following information to configure Red Hat Enterprise Linux ES 3.0 or WS 3.0 for use by SGIconsole. You will need to provide certain information such as host name, IP address, and so on. Have this information available before you start this procedure.
| Note: If you are interrupted midway through this procedure, or if
you want to rerun this configuration, enter the following command at the
Linux prompt (as root): touch /.unconfigured Then reboot the system and enter the configuration information at the prompts. If you are running Red Hat Enterprise Linux ES 3.0 on your system, run the configuration software by hand after initial login as root. Default root password is set to sgisgi. |
The first screen will display Changing password for user root after mounting local filesystems, then it will prompt you for a new UNIX password. Set the root password to improve the system's security behind your firewall.
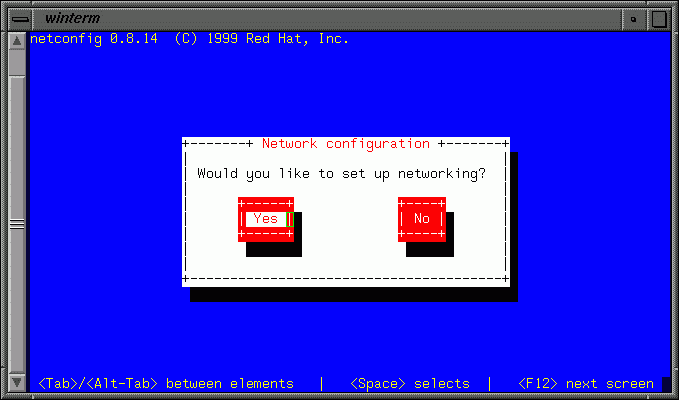
After the password is entered and verified, the first prompt will ask if you want to set up networking, as shown in Figure 3-1. To allow SGIconsole to access the systems it will be monitoring and managing, select Yes.
The Configure TCP/IP screen will prompt you to assign an Internet Protocol (IP) address to the SGIconsole system so it can participate in your network, as well as a netmask (for example, 255.255.255.0). If your network uses DNS, fill in the default gateway (IP) and primary nameserver.
After you have entered the information for each of these settings, click on OK.
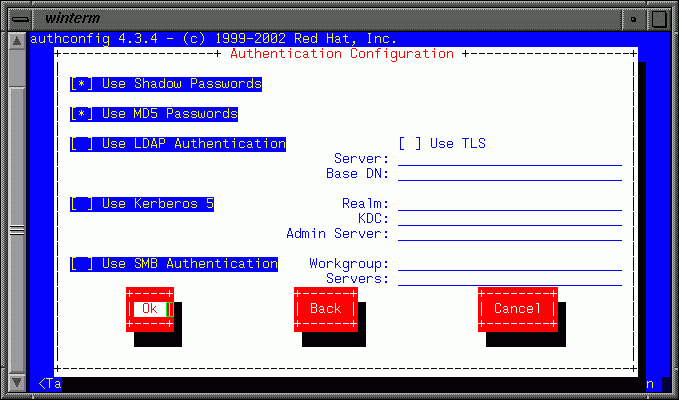
In the Authentication Configuration screens, set authentication to control other users' access to the SGIconsole. In the first screen, select Use NIS for NIS users.
In the second screen, select Use Shadow Passwords and Enable MD5 Passwords. After you have made your selections, click on OK.
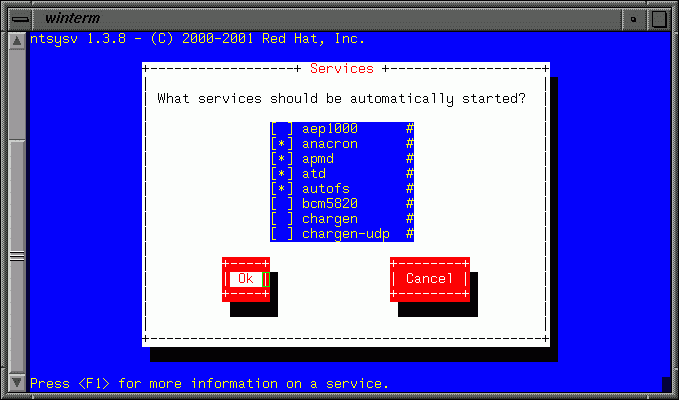
In the Services screen, use the default settings for services to be started automatically at SGIconsole boot-up. After you have reviewed the settings, click on OK .
At this point the display should show the standard login prompt. Log in as root with your new password. The configuration of Red Hat Enterprise Linux ES 3.0 or WS 3.0 for use with SGIconsole is complete.


This describes how to install the SGIconsole 2.1 release.
To install SGIconsole 2.1 software, follow these steps:
Log in as root.
Mount the SGIconsole 2.1 CD by executing the mount command as you have configured it. A common example is mount /dev/cdrom /mnt/cdrom.
Change directories to the root directory for the mounted CD. A common root directory is /mnt/cdrom.
Execute the command ./INSTALL.
Output similar to the following appears:
[root@linux3 image]# /install/INSTALL
Installed: /install/SGI/RPMS/pcp-RPMCollection.txt (collection)
Installed: /install/SGI/RPMS/sysadm_base-RPMCollection.txt (collection)
Installed: /install/SGI/RPMS/vacm-RPMCollection.txt (collection)
Installed: /install/SGI/RPMS/digiOthers-1.2-1.noarch.rpm
Installed: /install/SGI/RPMS/j2re-1.4.1_02-fcs-linux.i586.rpm
Installed: /install/SGI/RPMS/SGIconsole-2.1-1.noarch.rpm
Installed: /install/SGI/RPMS/SGIconsole-docs-2.1-0.noarch.rpm
Installed: /install/SGI/RPMS/SGIconsole-extra-2.1-1.noarch.rpm
Installed: /install/SGI/RPMS/snxsc_firmware-1.20.6-1.i386.rpm
Installed: /install/SGI/RPMS/snxsc_l3-1.20.1-1.i386.rpm
Installed: /install/SGI/RPMS/sysadm_console-client-2.1-1.i386.rpm
Installed: /install/SGI/RPMS/sysadm_console-server-2.1-1.i386.rpm
Installed: /install/SGI/RPMS/sysadm_console-web-2.1-1.i386.rpm
Installed: /install/SGI/RPMS/vacm-l1-1.3-1.i386.rpm
Installed: /install/SGI/RPMS/vacm-l2-1.6-1.i386.rpm
Installed: /install/SGI/RPMS/vacm-legacy-3.4-1.i386.rpm
Installed: /install/SGI/RPMS/vacm-sco-1.2-1.i386.rpm
Installation has been completed.  To check for errors, please examine
the log file:

    /root/log/INSTALL.log

Examine the installation log now?  [Y/n] n

Please run the script:

    /usr/share/SGIconsole/bin/SGIconsole_startup

to set up your system if installation has completed successfully.
If you choose to view the install log from the script or using the cat command, information similar to the following appears:
root@linux2 init.d]# cat /root/log/INSTALL.log
Jun 10 17:45:19:INSTALL[2320]: INSTALL (SGIconsole 2.1) started
Jun 10 17:45:54:INSTALL[2320]: Installing: /install/SGI/RPMS/pcp-2.3.0-17.i386.rpm
/install/SGI/RPMS/pcp-pro-2.3.0-17.i386.rpm
Jun 10 17:46:09:INSTALL[2320]: Installing: /install/SGI/RPMS/sysadm_base-client-3.0-4.i386.rpm
/install/SGI/RPMS/sysadm_base-dev-3.0-4.i386.rpm /install/SGI/RPMS/sysadm_base-lib-3.0-4.i386.rpm
/install/SGI/RPMS/sysadm_base-mkrhinoism-3.0-4.i386.rpm
/install/SGI/RPMS/sysadm_base-tcpmux-3.0-4.i386.rpm
/install/SGI/RPMS/sysadm_base-server-3.0-4.i386.rpm
... [2320]: Adding /usr/lib/sysadm/lib to ld.so.conf
... [2320]: Added the following lines to /etc/ld.so.conf:
... [2320]: /usr/lib/sysadm/lib
... [2320]: (end of lines added to /etc/ld.so.conf)
... [2320]: Running ldconfig
... [2320]: Adding tcpmux to inetd.conf
... [2320]: Couldn't find inetd.conf in /etc /usr/etc /usr/local/etc
... [2320]: Restarting inetd
... [2320]: inetd: no process killed
... [2320]: Restarting xinetd with -HUP
... [2320]: Adding sysadmd to tcpmux.conf
Jun 10 17:46:14:INSTALL[2320]: Installing: /install/SGI/RPMS/
vacm-2.1.5a-3.i386.rpm
/install/SGI/RPMS/vacm-clientlib-2.1.5a-3.i386.rpm
/install/SGI/RPMS/vacm-devel-2.1.5a-3.i386.rpm /install/SGI/RPMS/vacm-hoover-2.1.5a-3.i386.rpm
/install/SGI/RPMS/vacm-node-2.1.5a-3.i386.rpm
/install/SGI/RPMS/vacm-sercon-2.1.5a-3.i386.rpm /install/SGI/RPMS/vacm-vash-2.1.5a-3.i386.rpm
Jun 10 17:46:15:INSTALL[2320]: Installing: /install/SGI/RPMS/digiOthers-1.2-1.noarch.rpm
Jun 10 17:46:58:INSTALL[2320]: Installing: /install/SGI/RPMS/j2re-1.4.1_02-fcs-linux.i586.rpm
Jun 10 17:47:01:INSTALL[2320]: Installing: /install/SGI/RPMS/SGIconsole-2.1-1.noarch.rpm
Jun 10 17:47:14:INSTALL[2320]: Installing: /install/SGI/RPMS/SGIconsole-docs-2.1-0.noarch.rpm
Jun 10 17:47:15:INSTALL[2320]: Installing: /install/SGI/RPMS/SGIconsole-extra-2.1-1.noarch.rpm
Jun 10 17:47:32:INSTALL[2320]: Installing: /install/SGI/RPMS/snxsc_firmware-1.20.6-1.i386.rpm
Jun 10 17:47:35:INSTALL[2320]: Installing: /install/SGI/RPMS/snxsc_l3-1.20.1-1.i386.rpm
Jun 10 17:47:36:INSTALL[2320]: Installing: /install/SGI/RPMS/sysadm_console-client-2.1-1.i386.rpm
Jun 10 17:47:38:INSTALL[2320]: Installing: /install/SGI/RPMS/sysadm_console-server-2.1-1.i386.rpm
Jun 10 17:47:38:INSTALL[2320]: Installing: /install/SGI/RPMS/sysadm_console-web-2.1-1.i386.rpm
Jun 10 17:47:39:INSTALL[2320]: Installing: /install/SGI/RPMS/vacm-l1-1.3-1.i386.rpm
Jun 10 17:47:40:INSTALL[2320]: Installing: /install/SGI/RPMS/vacm-l2-1.6-1.i386.rpm
Jun 10 17:47:41:INSTALL[2320]: Installing: /install/SGI/RPMS/vacm-legacy-3.4-1.i386.rpm
Jun 10 17:47:42:INSTALL[2320]: Installing: /install/SGI/RPMS/vacm-sco-1.2-1.i386.rpm
Jun 10 17:47:42:INSTALL[2320]: INSTALL (SGIconsole 2.1) completed
[root@linux2 init.d]#
At this point you have completed installing SGIconsole 2.1 software. To verify your installation run the following command to verify the software.
rpm -qa | egrep "SGIconsole|pcp|vacm|sysadm" | sort |
If SGIconsole is correctly installed, the output from this command will list the SGIconsole, PCP, and SGIconsole software packages. Go to “Configuring SGIconsole 2.1”, for instructions on configuring SGIconsole software for use.
This section describes how to configure SGIconsole 2.1.
| Note: To configure
the SGIconsole 2.1 software, you will need to have the following information
for the L2 controller:
For example:
|
| Note: To configure the the EL-16 or EL-160 terminal server
(also know as serial port servers), you need the following information:
The SGI EL-16 version 1.1 terminal server is the Digi EL-160. The original SGI EL-16 terminal server is the Digi EL-16 . The Ethernet port on the v1.1 is labeled 100base-t while the original EL-16 was labeled 10base-T. |
To configure SGIconsole 2.1, begin by logging in as root and running the SGIconsole startup script:
/usr/share/SGIconsole/bin/SGIconsole_startup |
The sgiconsole_startup(8) man page provides more information on the startup script.
If you have not yet configured the Red Hat Enterprise Linux ES 3.0 or WS 3.0 release for use by SGIconsole, the following error message will be displayed on the system:
Error: You cannot run this startup script
because you have not
configured SGIconsole. To be guided through these steps, select
"y" which will reboot the system and run the configuration program.

Would you like to configure Linux for SGIconsole? [y/n]
Choose y to configure Linux immediately. (If you choose n the script will quit and you will not be able to configure SGIconsole software.) In this case, perform the following command as root
touch /.unconfigured
and then reboot the system.If you have already configured Red Hat Enterprise Linux ES 3.0 or Red Hat Enterprise Linux WS 3.0 for use with SGIconsole, then follow the startup script.
The SGIconsole startup script begins by displaying the following introduction, which lists the steps in configuring SGIconsole:
SGIconsole 2.1 Startup Process This script will guide you through the steps to configure SGIconsole 2.1 for use. This script should be run on a system that has Red Hat Linux Enterprise 3.0 WS or ES and SGIconsole software installed. This script will perform the following steps: 1) Define SGIconsole hostname. 2) Enable connection to serial port. 3) Configure eth1. 4) Start httpd. 5) Start VACM services. 6) Create console user 'root'. 7) Configure and upgrade EL-16 or EL-160 unit(s). 8) Configure DHCP services for L2 Controller(s). 9) Configure DHCP services for EL-16 or EL-160 unit(s). 10) Enable X11 Forwarding for ssh. 11) Improve system security. Continue with the startup process? [y/n] y |
Press Enter to be guided through the steps. The following list provides more information on the choices to be made.
Define SGIconsole hostname.
In order for SGIconsole software to communicate properly between the SGIconsole and the nodes you will be administering, you need to assign a hostname to the SGIconsole. For more information on hostnames, see the hostname(1) man page. This step places your input into the /etc/sysconfig/network file.
The startup script adds an entry to the /etc/inittab file to enable connection to a serial port on the SGIconsole server. The serial port speed default is 9600. The default terminal type for logging into SGI IRIX and Linux systems using SGIconsole is vt100.
Configure eth1.
SGIconsole comes with two Ethernet interfaces on the motherboard. The configuration steps assume eth0 will be used for the public network, so you can access the SGIconsole from a remote system inside your firewall, and eth1 will be used for the private network, to connect the SGIconsole to the machines it administers. This step places your input into the /etc/sysconfig/network-scripts/ifcfg-eth1 file.
You will be prompted to define the IP address for eth1 , as well as the netmask, broadcast address, and network address. In order to enable the included SGI system controller software, SGI recommends that you use IP Address 10.1.1.1, Netmask 255.0.0.0, Broadcast Address 10.255.255.255, and Network Address 10.0.0.0. These setting will enable the SGI system controller command /stand/sysco/bin/l2find to locate new L2 controllers as they are added to the eth1 network and enable the /stand/sysco/bin/l2term command to connect to new L2 controllers. For example, your entries might look like the following:
eth1 IP Address (e.g. 130.23.65.10): 10.1.1.1
eth1 Netmask (default 255.255.255.0): 255.0.0.0
eth1 Broadcast Address (default 10.1.1.255): 10.255.255.255
eth1 Network Address (default 10.1.1.0): 10.0.0.0
The information for the eth1 device is stored in the /etc/sysconfig/network-scripts/ifcfg-eth1 file, as follows:
DEVICE=eth1
BOOTPROTO=static
BROADCAST=10.255.255.255
IPADDR=10.1.1.1
NETMASK=255.0.0.0
NETWORK=10.0.0.0
ONBOOT=yes
The SGIconsole_startup script then brings up the eth1 interface.
After bringing up the eth1 device with these settings, you can use the System Controller command /stand/sysco/bin/l2find to find new L2 controllers when added to the eth1 subnet.
Because the SGIconsole main interface and PCP interface are web-based, the script enables the web server ( httpd) on the SGIconsole. (No input is needed.)
The startup script starts the vacm and vacm-mode services. (No input is needed.)
To enable SGIconsole software to function properly, the startup script creates a console user root password file. (No input is needed.)
Configure EL-16 or EL-160 units
Note: When looking at EL-16 hardware, if it says EL-16 ver 1.1, you need to configure it as a EL-160 unit, or you will not boot the RealPort software or communicate through it. You can verify hardware by using the rlogin command to the EL-16, as follows: [root@linux2 root]# rlogin el-16 EL-16 RealPort Server - US Patent No. 6,047,319 \__________________+note: RealPort
If the EL-16 reports back Realport software, you know your configuration is correct.
If you manage a server that requires serial console access using EtherLite serial port server devices, the firmware for these devices must be upgraded to RealPort for use with SGIconsole. In order to do this, DHCP and BOOTP are used to perform the upgrade.
Choose y if you have a server that you want to manage using Etherlite serial port server devices.
The SGIconsole_startup script builds and installs the Digi RealPort software.
Note: If the build/install operation fails, the system might not have been installed properly. Use the provided kickstart floppy image to clean install the system with required rpms as decribed in “Installing Red Hat Enterprise Linux ES 3.0 or WS 3.0 Release”.
This step is to set up the SGIconsole system to upgrade the firmware of the EtherLite units and to configure the upgraded EtherLite units for use with DHCP. If you skip this step, you will have to store an IP address in the unit, and it is assumed that the unit has already been upgraded to RealPort.
Chose y to configure and upgrade your EtherLite devices.
Choose y to add more units.
Note: The 2-character unit ID below is used by the Digi RealPort driver to identify the device in the /etc/dgrp.backing.store configuration files and the files in the/proc/dgrp dirctory. The TTY devices created for each Etherlite also contain the unit ID. For instance, entering a unit ID of "aa" will mean the Etherlite device identity will be "aa" and its TTY devices will be ttyaa00 through ttyaa15. For more information, see the dgrp_cfg_node(8) man page.
The 2-character unit ID field is case sensitive such that whatever you enter here will affect the tty that is used when configureing a node. This is because when you configure a node there is a default response of "/dev/ttyN001" provided in the definition window.
The following is an example of upgrading firmware and configuring two Digi EL-16 serial port servers as prompted by the SGIconsole_startup script:
Please enter: 2-character unit ID: N0
              IP address: 192.12.1.20
              EL-x unit type [16,160]: 16

Add another unit definition or press the Enter key to continue.

Please enter: 2-character unit ID: N1
              IP address: 192.12.1.21
              EL-x unit type [16,160]: 16

Add another unit definition or press the Enter key to continue.

Please enter: 2-character unit ID:

Using /usr/bin/dgrp/dgrp.o
Chkconfig dgrp_daemon on...

You will be prompted for information regarding the network in
which DHCP needs to provide services to.
Press the Enter key to use the default value.

Subnet Address (default 10.0.0.0):
Netmask (default 255.0.0.0):
Broadcast Address (default 10.255.255.255):

For the EtherLite unit with IP address 192.12.1.20, please specify:
Hostname: el-16
MAC Address (e.g. 00:a0:e7:aa:11:bb): 00:a0:e7:21:88:f9

Adding host to /etc/hosts file...

Adding 192.12.1.20 to routing table...

For the EtherLite unit with IP address 192.12.1.21, please specify:
Hostname: el-16-2
MAC Address (e.g. 00:a0:e7:aa:11:bb): 00:a0:e7:21:c7:e3

Adding host to /etc/hosts file...

Adding 192.12.1.21 to routing table...

The /etc/dhcpd.conf file is created.

Restarting xinetd and dhcpd...
Stopping xinetd: [  OK  ]
Starting xinetd: [  OK  ]
Chkconfig dhcpd on...

Starting dhcpd services on eth1...

Shutting down dhcpd: [FAILED]
Starting dhcpd: [  OK  ]
Upgrading firmware to any EtherLite units that are restarting...

IMPORTANT:
==========
If your EtherLite units do not have RealPort firmware installed,
now is the time to install it!  It is required that all EtherLite
Serial Port Server devices be upgraded to use RealPort firmware, since
SGIconsole uses RealPort drivers which are incompatible with older
EtherLite firmware.

To perform an upgrade to any EtherLite units you plan to use with
SGIconsole, you MUST connect them to a network via /dev/eth1 and
power cycle the units NOW to update their firmware.  Only EtherLite
units which are restarted will have their firmware overwritten.

It is suggested that you remove power from the EtherLite unit by
unplugging the power cord, waiting 10 seconds, and then re-applying
power to the unit.  The EtherLite unit will then reinitialize itself,
and the LEDs will flicker quickly while the firmware upgrade progresses.

*** DO NOT DISCONNECT POWER TO AN ETHERLITE UNIT WHILE A FIRMWARE
    UPGRADE IS IN PROGRESS OR THE UNIT WILL BE DAMAGED.

Wait a few seconds until the LEDs on the EtherLite unit stop flashing
(the LEDs should remain lit).  After you have power-cycled the
EtherLite devices you want upgraded, press the Enter key to continue...

Restarting xinetd again and shutting down dhcp...

Stopping xinetd: [  OK  ]
Starting xinetd: [  OK  ]
Starting dgrp_daemon...

Starting DGRP daemons:
        Daemon for id "N0" (192.12.1.20): started.
        Daemon for id "N1" (192.12.1.21): started.

----
Note: The tty devices for example unit with id "N0" are ttyN000 to ttyN015.
The tty devices for example unit with id "N1" are ttyN100 to ttyN115.
Configure DHCP service for L2.
If you have an SGI Origin 3000 series server, an SGI Altix 3000 server or supercluster, a larger SGI Altix 350 system, or an SGI Onyx 3000 graphics system, you will need an L2 system controller to administer it using SGIconsole. This step sets up one or more L2 system controllers for use with SGIconsole, placing your input into the /etc/dhcpd.conf and the /etc/hosts files, and into the routing table. For more information on dhcpd and route, see the dhcpd(8) and route (1M) man pages.
You will be prompted to enter for each L2 system controller a hostname, Ethernet (MAC) address, and fixed IP address. To determine the hardware address of the L2 system controller, see “Determining the Hardware Address of the L2 System Controller”.
Configure DHCP for EL-16 or EL-160 units.
If you have an SGI Origin 200 server, an SGI Origin 2000 series server, an SGI Origin 300 server, or SGI Altix 350 system, SGI Altix 3000 server or supercluster, or SGI Origin 3000 series server, or a Silicon Graphics Onyx 300 or Onyx 3000 graphics system, you will need a Silicon Graphics Ethernet serial port server (EL-16 or EL-160) to administer it using SGIconsole. This step sets up one or more Silicon Graphics Ethernet serial port servers for use with SGIconsole, placing your input into the /etc/dhcpd.conf and /etc/hosts files, and into the routing table. For more information on dhcpd and route, see the dhcpd(8) and route(1M) man pages.
You will be prompted to enter for each Silicon Graphics Ethernet serial port server a hostname, Ethernet (MAC) address, and fixed IP address.
Note: At this point, the script will start up DHCP services on the private network eth1. The following information describes the SGIconsole as a DHCP server with one or more L2 system controllers, SGIconsole as a DHCP server with a Silicon Graphics Ethernet serial port server (EL-16 or EL-160), or SGIconsole as a DHCP server with both L2 system controllers and a Silicon Graphics Ethernet serial port server.
Configure SGIconsole as a DHCP server.
This step places your input into the /etc/dhcpd.conf file, which the startup script will create for you, and creates the /var/state/dhcp/dhcpd.leases file. For more information on dhcpd, see the dhcpd(8) man page.
DHCP can enable SGIconsole to be more flexible in the event of a power cycle, because the Silicon Graphics Ethernet serial port server (EL-16) will be able to reacquire its IP address from the SGIconsole. Alternately, using a static IP can allow SGIconsole to be more secure for those environments concerned about security. The startup script assumes you want to use DHCP; if you prefer to use a static IP, please follow the instructions in the README.txt file.
You will be prompted to enter the SGIconsole subnet address, netmask, broadcast address, and default lease time.
See steps 7 and 8
Enable X11 Forwarding for ssh
The ssh (SSH client) is a program for logging into a remote machine and for executing commands on a remote machine. It replaces rlogin and rsh and provides secure encrypted communications between two untrusted hosts over an insecure network. X11 connections and arbitrary TCP/IP ports can also be forwarded over the secure channel.
Improve system security.
SGIconsole 2.1 startup script helps you improve security on your SGIconsole system. It disable services via chkconfig(8) command. These actions address common concerns but are not intended to eliminate all security risks. The SGIconsole system and the machine to which it displays windows, should be located behind a secure firewall.
Update SGIconsole group database (if it exists). (No input is needed.)
This step performs a maintenance upgrade on the groups database of older SGIconsole (1.x) installations.
Install periodic tasks. (No input is needed.)
This step installs cron(1) tasks for root in relation to console logging cleanup and rotation.
When the script has completed successfully, ensure that the host where applications will be displayed has access control disabled. You may have to modify the proxy settings of your Web browser to access the Internet. After running the SGIconsole 2.1 startup script, the only connection methods enabled are ssh(1) and telnet(1).
At this point SGIconsole software should be configured and ready to use (refer to “Using SGIconsole”).
At this point you should have used a kickstart image to install the Red Hat Enterprise Linux ES 3.0 or WS 3.0 release and configured the system using netconfig, authconfig, and so on as prompted. Run through SGIconsole_startup script making sure to setup the SGI 1100 server as the dhcp-server on the eth1 subnet, build and install the Digi realport driver, upgrade the Digi EL-16 devices to realport firmware, and configure and start the realport driver, dgrp_daemon for each Digi EL-16.
To restore the SGIconsole 1.1 or 2.0 data, perform the following steps:
Insert the floppy with the SGIconsole 1.1 backup data and issue the mount command, as follows:
[root@linux3 sysadm]# mount /dev/fd0
Add the console group to the /etc/group file and ensure that the group ID is 60000, as follows:
Note: The group ID changed from 31 in SGIconsole 1.1 to 60000 in SGIconsole 2.0 and 2.1. [root@linux3 sysadm]# cp /etc/group /etc/group.O [root@linux3 sysadm]# echo "console:x:60000:" >> /etc/group
Restore the sysadm privileged user file, as follows:
[root@linux3 sysadm]# cp /var/lib/sysadm/privilegedUsers /var/lib/sysadm/privilegedUsers.O
[root@linux3 sysadm]# cp /mnt/floppy/privilegedUsers /var/lib/sysadm/privilegedUsers
Restore VACM configuration file, as follows:
[root@linux3 sysadm]# cp /usr/lib/vacm/vacm_configuration /usr/lib/vacm/config.O

[root@linux3 sysadm]# cp /mnt/floppy/vacm_configuration /usr/lib/vacm/vacm_configuration
Restore the SGIconsole data directory, as follows:
[root@linux3 sysadm]# cp -R /var/lib/SGIconsole /var/lib/SGIconsole.O

[root@linux3 sysadm]# cp -R /mnt/floppy/SGIconsole/ /var/lib
If the /etc/sgiconsole.conf file exists and it contains the following line, comment out or remove the line and save the changes back to the sgiconsole.conf file:
nogroupdbfix
Restart the SGIconsole software by executing as root:
[root@linux3 sysadm]# /etc/init.d/sgiconsole restart
Note: Commenting out the nogroupdbfix directive in the /etc/sgiconsole.conf file enables SGIconsole to rescan the groups database at /var/lib/SGIconsole/groups and apply the necessary fixes to the database for SGIconsole 2.1 when SGIconsole is restarted, either by the method above or by using the Reset SGIconsole Software command in Console Manager.
The /etc/sgiconsole.conf file will be edited or recreated to restore the nogroupdbfix directive after the scan has been applied to the groups database.
Restore user data and create a user for each user that was local to the system (except root), as follows:
Compare the users listed in the restored SGIconsole directory with the contents of the saved passwd file from SGIconsole 1.1 or 2.0. Then add the information of local users to the system passwd file (with new console group ID 60000).
List the users, as follows:
[root@linux3 sysadm]# ls /var/lib/SGIconsole/users
nisuser  root  testuser
Save copy of the current system passwd file, as follows:
root@linux3 sysadm]# cp /etc/passwd /etc/passwd.O
Check for each user except root in the saved passwd file.
NIS users do not appear in the passwd file. If you check for a NIS user, as in the following example, nothing is returned:
[root@linux3 sysadm]# cat /mnt/floppy/passwd | grep nisuser
An example of local user in saved passwd file is, as follows:
[root@linux3 backup]# cat /mnt/floppy/passwd | grep testuser
testuser:x:54580:31::/home/testuser:/bin/bash
Add the local user to passwd file with new group ID 60000, as follows:
[root@linux3 backup]# echo "testuser:x:54580:60000::/home/testuser:
/bin/bash" >> /etc/passwd
Repeat the checks and add steps for remaining users.
If shadow password file was saved from SGIconsole 1.1 or 2.0, you must also check and add user information from the saved shadow password file. You can save a copy of current shadow password file, as follows:
[root@linux3 backup]# cp /etc/shadow /etc/shadow.O
Check for each user except root in the saved shadow password file, as follows:
[root@linux3 backup]# cat /mnt/floppy/shadow | grep testuser
testuser:xWMVKkegTeXxg:12209:0:99999:7:::
Add user data to the shadow password file of the current system, as follows:
[root@linux3 backup]# echo "testuser:xWMVKkegTeXxg:12209:0:99999:7:::"
 >> /etc/shadow
Create a home directory for each local user, as follows:
[root@linux3 backup]# mkdir /home/testuser
Copy default files, as follows:
[root@linux3 backup]# cp /etc/skel/.* /home/testuser
Create .telnetrc file in the home directory each user. Open file in an editor, as follows:
[root@linux3 backup]# vi /home/testuser/.telnetrc
Cut and paste the following contents into the file:# automatically generated by SGIconsole # do not edit localhost set crlf off mode character
Open the .bash_profile file of each user and add content to launch SGIconsole texted-based interface tscm on user login, as follows:
[root@linux3 backup]# vi /home/testuser/.bash_profile
Cut and paste the following contents to the end of the file:# Automatically run the text-based interface to SGIconsole if [ -x /usr/bin/tscm ] then echo "" echo "Automatically starting SGIconsole (to get to a shell," echo "enter 6 at the command line prompt)." sleep 5 clear /usr/bin/tscm exit fi # (... end support for text-based interface to SGIconsole)
Change ownership and mode of user files, as follows:
[root@linux3 backup]# chown -R testuser:console /home/testuser
[root@linux3 backup]# chmod 700 /home/testuser
Perform the following steps to map TTY device names from Digi Etherlite to RealPort driver:
SGIconsole 1.1 supported up to two Digi EL-16 or EL-160 Etherlite serial port servers. The TTY device names created and used by the Digi driver have changed. Node data for systems with serial port connections must be updated with the new TTY device names.
Note: The Digi RealPort driver should have been built and installed and the firmware of the Etherlite devices upgraded in step 7 of the SGIconsole_startup script described in Procedure 3-7. Further information on upgrading the firmware is available in “Replacing EtherLite Firmware with Realport Firmware” in Appendix A.
Use the cat(1) command to compare the saved Digi Etherlite driver configuration data with the Digi RealPort configuration data.
An example of saved Digi Etherlite driver configuration is, as follows:
[root@linux3 /root]# cat /mnt/floppy/els.conf
#elsnn  EL-type IP-address options( e.g. -t 600)
els0 EL-16 192.12.1.20 -t=120
els1 EL-16 192.12.1.21 -t=120
An example of Digi RealPort driver configuration data, is as follows:
[root@linux3 /root]# cat /etc/dgrp.backing.store
# Format:
#
#   ID  IP  PortCount  SpeedString  IPPort Mode Owner Group
#
# If any of the last five options should use the default, the
# string "default" appears instead.
#

N0 192.12.1.20 16 auto default default default default
N1 192.12.1.21 16 auto default default default default
The following table maps the TTY device names for the unit named els0 in the els.conf file and N0 in the dgrp.backing.store file with the common address 192.12.1.20.
Note: The RealPort TTY device names contain the unit ID. In this example, the RealPort unit ID is N0. The corresponding TTY device names are TTY N0 00 to TTY N0 15. The device names might be different for your configuration based on the unit IDs you see in your dgrp.backing.store file.)
Devices are /dev/tty****
els0:N000,N001,N002,N003,N004,N005,N006,N007,N008,N009,N00a,N00b,N00c,N00d,N00e,N00f
N0:  N000,N001,N002,N003,N004,N005,N006,N007,N008,N009,N010,N011,N012,N013,N014,N015
The following table maps the TTY device names for the unit named els1 in the els.conf file and N1 in the dgrp.backing.store file with the common address 192.12.1.21, as follows:
els1:N010,N011,N012,N013,N014,N015,N016,N017,N018,N019,N01a,N01b,N01c,N01d,N01e,N01f
N1:  N100,N101,N102,N103,N104,N105,N106,N107,N108,N109,N110,N111,N112,N113,N114,N115
Launch the Console Manager application and login as the root user.
Select each serial attached node in the Nodes View and launch the Modify a Node Configuration task from the Node Tasks pull-down menu.
Change the TTY device name(s) for the node from the Etherlite TTY device name to the RealPort TTY device name.
This section describes how the L2 system controllers come online after a system boots and how to set the eth1 port on the SGI 1100 server to match when a DHCPD server is running on a subnet.
SGI systems with L2 system controllers should be connected to the second Ethernet port (eth1) on the SGIconsole system. If connected directly it should be connected via a crossover cable. To ensure the L2 system controller is correctly installed, see the SGIconsole Hardware Connectivity Guide.
The SGIconsole system should be running the DHCP server for the eth1 subnet. A DHCPREQUEST message for the L2 with its current IP address and media access control (MAC) address should appear in the /var/log/messages system log on the SGIconsole system. However, SGIconsole will not serve an address to the request by default.

Warning: If the L2 controller fails to recieve an IP address from a DHCP request, it will start a dhcp server by default and give itself an address. This dhcp server will compete with the server running on the SGIconsole system and it can consequently serve an unknown address to other L2 controllers and Digi Etherlite units on the same subnet. A new L2 controller installed on the eth1 subnet should not be left unconfigured in /etc/dhcpd.conf file on the SGIconsole system.
The L2 system controller will broadcast a request for an IP address on power up.
Before connecting a new L2 controller to the private subnet off eth1 on the SGIconsole system open a shell and tail the system log, as follows:
tail -f /var/log/messages
Patch the L2 controller to the private subnet and power cycle it.
Create a host entry in the /etc/dhcpd.conf file for the L2 controller using the MAC address from the messages log. For example,
     # Device information
    host dino-l2 {
        hardware ethernet 08:00:69:11:81:18;
        fixed-address 192.12.1.10;
    }
Restart the dhcpd(8) daemon, as follows:
# /etc/rc.d/init.d/dhcpd stop

# /etc/rc.d/init.d/dhcpd start
Add an entry for the L2controller in the /etc/hosts file, as follows:
# echo "192.12.1.10 dino-l2" >> /etc/hosts
Add a route to the L2 controller, as follows:
# route add 192.12.1.10 eth1
Power cycle the L2 controller and watch the system log (/var/log/messages) for a dhcp message confirming the L2 controller has loaded the new address
Use the telnet command to connect to the L2 controller and disable the dhcpserver, as follows:
root@linux2 init.d]# telnet dino-l2
Trying 192.12.1.10...
Connected to dino-l2.
Escape character is '^]'.

Linux 2.4.7-sgil2 (192.12.1.10) (ttyp0)


SGI SN1 L2 Controller

INFO: connection established to localhost, to quit enter
dino-001-L2>dhcpserver disable
DHCP server startup DISABLED (this L2 will never start a DHCP server).
If more than one system with an L2 is on the same subnet, the L2 paramater multisys will need to be enabled. Use the telnet command to telnet to the the new L2 and, at the L2> prompt, enter the command msys on. Use help multisys at the L2> prompt for more information.
The SGI system controller l2find command can be used to find L2 controllers when troubleshooting your system. The eth1 interface on the SGIconsole system needs the following settings in /etc/sysconfig/network-scripts/ifcfg-eth1 file to enable it:
DEVICE=eth1
BOOTPROTO=static
BROADCAST=10.255.255.255
IPADDR=10.2.2.1
NETMASK=255.0.0.0
NETWORK=10.0.0.0
ONBOOT=yes
Reboot the SGI 1100 server or stop and start your network using the following commands:
[root@console-dino /root] # /etc/rc.d/init.d/network stop
and[root@console-dino /root] # /etc/rc.d/init.d/network start
To find the IP address of the L2 system controller, perform the following:
[root@console-dino /root]# /stand/sysco/bin/l2find eth1
Output similar to the following appears:1 L2's discovered: IP SSN NAME RACK FIRMWARE --------------- -------- ---------------- ---- ------------ 10.17.177.24 000 1.2.0
Use the l2term command to connect to the L2 controller and find the MAC address needed for dhcpd.conf file and the SGIconsole_startup script, as follows:
[root@console-dino /etc]# /stand/sysco/bin/l2term --l2 10.17.177.24
Output similar to the following appears:INFO: connection established to 10.17.177.24, to quit enter 10.17.177.24-L2> 10.17.177.24-L2>! ifconfig eth0 Link encap:Ethernet HWaddr 08:00:69:11:B1:18 <---needed by SGIconsole_startup for /etc/dhcpd.conf. inet addr:10.17.177.24 Bcast:10.255.255.255 Mask:255.0.0.0 UP BROADCAST RUNNING MULTICAST MTU:1500 Metric:1 RX packets:98 errors:0 dropped:0 overruns:0 frame:0 TX packets:56 errors:56 dropped:0 overruns:0 carrier:0 collisions:0 txqueuelen:100 Base address:0xe00 lo Link encap:Local Loopback inet addr:127.0.0.1 Mask:255.0.0.0 UP LOOPBACK RUNNING MTU:3924 Metric:1 RX packets:63 errors:0 dropped:0 overruns:0 frame:0 TX packets:63 errors:0 dropped:0 overruns:0 carrier:0 collisions:0 txqueuelen:0 10.17.177.24-L2>
Use the hardware address (HWaddr 08:00:69:11:B1:18 ) in the dhcpd.conf file and the SGIconsole_startup script.
Once DHCP is configured and restarted or after the SGIconsole_startup script has completed, the L2 system controllers need to be power cycled so they pick up their new addresses from the SGI 1100 server.
The main SGIconsole window provides access to the ConsoleManager and PCP tools, and to documentation about these and other SGIconsole components.
To start using SGIconsole, enter the following URL into a Web browser on a local or remote machine to bring up the SGIconsole main Web page. Replace SGIconsole-hostname with the name of your SGIconsole host:
http://SGIconsole-hostname |
The SGIconsole main window is shown in Figure 3-6.
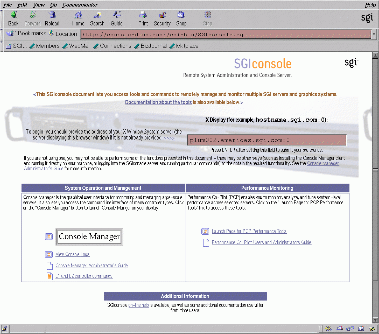
To activate a specific tool or command, click on the specific link or button. To access documentation, click on the specific title.
If there is no response to clicking on a link, check the following items:
The access control of the display host may be disallowing application windows to display on your machine. To allow any host to display windows on your machine, enter the following command:
xhost +
To allow only the host that you specify to display windows on your machine, enter the following command:
xhost + hostname
Your Web browser proxy setting may not be updated to access the Internet. Check your browser's proxy settings.
You may not have set the “Name of host where tools will display” entry field to your local host. Check the entry field and ensure that the host name is correct.
You may have iconified the browser or the application window from a previous access. Restore the browser or window to its normal size.
X terminal windows are provided for the system console. You can change the appearance as follows:
You can change it on the fly by <ctrl> <right mouse> to get the font-size menu.
You can change it globally with X resources. Add the following to the ~/.Xresources file:
XTerm*font:
-*-lucidatypewriter-medium-r-normal-*-10-*-100-100-*-*-*-*
In other applications, where you can invoke xterm with the -name name option, you can specify it as follows:
remxterm*font:
-*-lucidatypewriter-medium-r-normal-*-10-*-100-100-*-*-iso8859-1
and then start the Xterminal as xterm -name remxterm.
This section describes the procedures for installing software to allow you to use Console Manager directly on your client machine.
Check that you have Java2 installed on your machine.
For IRIX users, use the showprods(1) command to check that you have Java 2 installed as follows:
% showprods java2\*
Output similar to the following appears:I = Installed, R = Removed Name Date Description I java2_eoe 05/13/2003 Java2 v1.4.1 Execution Environment (Sun JRE v1.4.1) I java2_eoe.man 05/13/2003 Java Runtime System Documentation I java2_eoe.man.base 05/13/2003 Java Runtime System Man Pages I java2_eoe.man.relnotes 05/13/2003 Java Runtime System Release Notes I java2_eoe.man.webdocs 05/13/2003 Java Documentation (HTML) I java2_eoe.sw 05/13/2003 Java Runtime System Software I java2_eoe.sw.base 05/13/2003 Java Runtime System Software (Required) I java2_eoe.sw32 05/13/2003 Java n32 Runtime System Software I java2_eoe.sw32.binaries 05/13/2003 Java n32 Runtime Software (Required)
For Red Hat Enterprise Linux ES 3.0 or WS 3.0 users, check that you have Sun's Java2 runtime installed as follows:
[root@linux1 root]# rpm -qa | grep j2re
Output similar to the following appears:j2re-1.4.1_02-fcs
For Windows 98, NT 4.0, NT 2000, and XP users, open the Add/Remove Software control panel and check if Java 2 Runtime Environment, SE v1.4.1_02 appears in the list of programs installed.
If you have the JDK installed instead of the JRE, this is also suitable for running Console Manager.
The required Java2 runtime environments are included on the SGIconsole CD at the following locations:
IRIX images/ConsoleManager-Client/6.5_java2_eoe_1.4.1.tardist
Windows images/ConsoleManager-Client/j2re-1_4_1_02-windows-i586.exe
Linux SGI/RPMS/j2re-1.4.1_02-fcs-linux.i586.rpm
You can also make these Java2 runtime environment images available to users by creating a directory and copying them to that directory in the Apache webserver document root, as follows:
# mkdir /var/www/html/java2

# cp /mnt/cdrom/images/ConsoleManager-Client/6.5_java2_eoe_1.4.1.tardist /var/www/html/java2/

# cp /mnt/cdrom/images/ConsoleManager-Client/j2re-1_4_1_02-windows-i586.exe /var/www/html/java2/

# cp /mnt/cdrom/SGI/RPMS/j2re-1.4.1_02-fcs-linux.i586.rpm /var/www/html/java2
Users can then download and install these images from http:// hostname/java2
For information on installing software packages on your Linux or IRIX system, see rpm(1) or inst(1), respectively. For Windows users, all that is required is to run the executable file and follow the on-screen instructions.
SGIconsole 2.1 client software can be downloaded from the main SGIconsole webpage under System Operation and Management menu.
Download the software to a directory of your choice and uncompress the file using one of the following commands:
For IRIX, use /usr/freeware/bin/unzip from http://freeware.sgi.com
For Linux, use the unzip(1) command.
For Windows, Winzip is recommended from http://www.winzip.com
To run the client open the directory where the files were uncompressed to.
For IRIX and Linux systems, run the following command:
% ./cmgr
For Windows systems, run batch file CMGR.