This document is intended to help you get your new SGI server unpacked, connected, and powered on. Although there are a number of models in the SGI 1200-family of servers, this document will refer to the products generically as SGI 1200 servers. After completing the steps in this guide, you may wish to continue with additional configuration, or read more about your server's capabilities. Reference the SGI 1200-Family of Servers User's Guide for more detailed information on your system.
 | Warning: To avoid personal injury when unpacking the server, use two people and/or a mechanical assist unit to lift it out of the shipping carton. The server configuration weighs a maximum of 42.0 lbs (19.1 kg). The server, options, and packaging combination can weigh up to 70.0 lbs (31.8 kg). Use a hand-truck or other mechanical assist unit to move the server from one location to another. Before operating this server, read the additional cautions in “Product Warnings”. |
The SGI 1200 server can be mounted in most industry-standard racks. Contact your sales or service provider if you need to change the mounting configuration of your server after receiving the unit. Table 1 provides information on environmental requirements for the server. For instructions on mounting your server in a 19-inch equipment rack, see the SGI 1200-Family of Servers User's Guide.
Table 1. Cooling and Power Requirements
Use the information in this section to set up and turn on your SGI 1200 server.
Select a proper operational site for your server. Complete instructions for selecting a safe and appropriate site are provided in the SGI 1200-Family of Servers User's Guide.
Unpack the server from its shipping carton.
Remove the drive protection card (if present) from the diskette drive. Figure 1 shows the drive locations on the front of the server (plastic front cover removed).
If you plan to use any options (for example, PCI boards, additional memory, and so on), follow the instructions in the SGI 1200-Family of Servers User's Guide to install these items.

Caution: Electrostatic discharge (ESD) can damage disk drives, add-in boards, and other parts. This server can withstand normal levels of environmental ESD. However, SGI recommends doing all procedures in this guide only at an ESD–protected workstation. If one is not available, you can provide some ESD protection by wearing an antistatic wrist strap attached to chassis ground of the server—any unpainted metal surface—when handling components. As applicable, follow the detailed procedures in Chapter 3 of the User's Guide to install the unit into a rack.
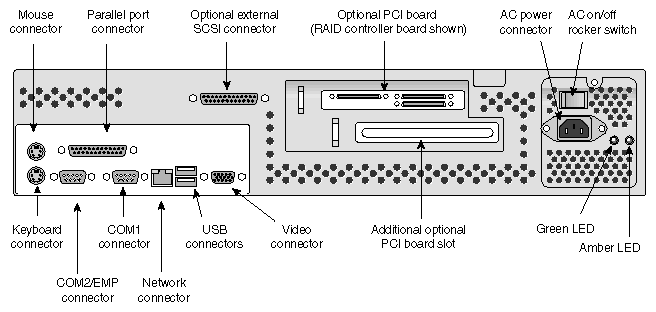
Attach any of the following common peripherals that you intend to use at the connectors shown in Figure 2:
Attach the power cord to the AC power plug at the back of the unit and plug the other end into a power source.
Caution: Make sure that the power service connection is through a properly grounded outlet. In geographic regions that are susceptible to electrical storms, using a surge suppressor is highly recommended. Turn on the rear rocker power switch (on the power supply).
Push the front on/off power switch.
Warning: The front on/off power switch does not turn off all internal power. To completely remove power from the server, you must turn off the rear rocker switch on the power supply and unplug the AC power cord from the supply or wall outlet. Verify that the power-on LED (illustrated in Figure 1 ) on the front panel is lit. A complete description of these LEDs is provided in the server's User's Guide.
After a few seconds, the power-on self-test (POST) begins. To view the POST results, the terminal must be connected to the rear of the server and turned on.
If the server's operating system (OS) is not pre installed, you should install it using the instructions in the documentation that shipped with the OS.
At power on the system displays a CPU description, runs a memory test, displays several additional screen messages, and then prompts you with the following:
Press <F2> to enter Setup
If you do not immediately press F2, the boot process continues. Then this message appears:
Press <Ctrl><A> for SCSI Utility
If you press Ctrl+A you enter the SCSI Utility screen. After you make any changes, press Esc to exit the utility. Note that if there are no SCSI devices connected to the system you cannot enter the SCSI Utility.
If you do not press Ctrl+A the system continues the boot process, offers you another chance to Press <F2> to enter Setup and then proceeds to the power-on self tests (POST). If the OS is not available you see the message:
Operating System not found
While the POST runs, you can press Esc to access a boot menu. From this menu, you can choose a new boot device or enter BIOS Setup.
After POST completes, the OS loads, then the login screen appears.

SGI provides manuals online and on CDs in various formats.
If you would like to access manuals on the SGI 1200 server using the World Wide Web, SGI makes its manuals available in a variety of formats via the Web. Using your Web browser, open the following URL:
http://techpubs.sgi.com/library |
Enter a keyword search, or search by title to find the information or manual you need.
SGI provides manuals on the CD that arrived with your SGI 1200 server. The manuals are in the following viewable and printable formats:
PDF files: read and print .pdf files using an Adobe Acrobat Reader; note that the reader is not pre installed with every operating system shipped. The Acrobat Reader application files are supplied on the documentation CD.
HTML files: view or print HTML files using your Web browser (English only).
Please be aware of these safety precautions and information when using SGI 1200 servers:
The power supply in this product contains no user-serviceable parts; refer servicing only to qualified personnel.
Do not attempt to modify the supplied AC power cord.
Do not use the supplied AC power cord if it is not the exact type required for your power source.
The SGI 1200 server's front on/off switch does not turn off all system power. To completely remove power from the system, you must turn the power supply switch to off and unplug the AC power cord from the wall outlet or power supply.